編輯:關於Android編程
最近寫博客的時間,都是在晚上圖書館學習回到宿捨後,大概是11點半開始寫,寫著寫著就1點多了,這還是我積累的比較充分了的情況下的,然後自己要看一遍再睡覺。第二天早上還要審稿後再發表。下星期開始調整寫作時間,早睡早起學習效率才高。
寫一篇文章真的不容易,我會陸續寫一個路線的博客,如事件分發機制,自定義View,View的繪制機制和加載過程,Activity的加載過程等等 。
進入正題。執行耗時的操作,比如網絡請求,IO操作等,需要在子線程中運行,不然會阻塞主線程。
而執行完網絡請求等耗時操作後通常需要更新UI,如果在子線程中更新UI,那麼程序會崩潰。因為Android的UI是線程不安全的。
解決的方案是只需把更新UI的操作切換到主線程即可,這時就輪到Handler出場了,相信大家都對Handler的用法很熟悉了。當我們在子線程向服務端拉取數據後,主線程是不知道的,這時handler在子線程發送一個消息到主線程告訴主線程:我已經請求數據完畢,現在你要更新UI了。然後handlerMessage方法接收到消息即可處理數據更新UI。
這一切都是那麼的自然。
Android中的消息機制,由四個角色承擔。分別是Handler,Looper(消息循環),MessageQueue(消息隊列),Thread。
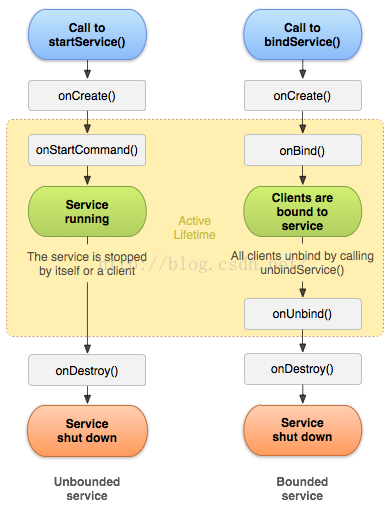
看到下圖這四個角色的關聯,先有一個大概的認識
 vce2yNK7xvDAtNGnz7DP+8+iu/rWxrDJPGJyIC8+DQrPyLTTaGFuZGxlcrbUz/O1xLS0vai/qsq8o6y909fF1Nm31s72aGFuZGxlctT1w7S3osvNz/vPoqGjPC9wPg0KPHA+ztLDx82os6PU2tb3z9+zzNbQtLS9qGhhbmRsZXKjrL+0v7TL+7XEubnU7Le9t6ihozwvcD4NCjxwcmUgY2xhc3M9"brush:java;">
public Handler() {
this(null, false);
}
vce2yNK7xvDAtNGnz7DP+8+iu/rWxrDJPGJyIC8+DQrPyLTTaGFuZGxlcrbUz/O1xLS0vai/qsq8o6y909fF1Nm31s72aGFuZGxlctT1w7S3osvNz/vPoqGjPC9wPg0KPHA+ztLDx82os6PU2tb3z9+zzNbQtLS9qGhhbmRsZXKjrL+0v7TL+7XEubnU7Le9t6ihozwvcD4NCjxwcmUgY2xhc3M9"brush:java;">
public Handler() {
this(null, false);
}
可以看到這個無參數的構造方法,內部使用this關鍵字調用含有兩個參數的構造方法。那就找到兩個參數的構造方法,源碼如下:
public Handler(Callback callback, boolean async) {
    if (FIND_POTENTIAL_LEAKS) {
        final Class klass = getClass();
        if ((klass.isAnonymousClass() || klass.isMemberClass() || klass.isLocalClass()) &&
                (klass.getModifiers() & Modifier.STATIC) == 0) {
            Log.w(TAG, "The following Handler class should be static or leaks might occur: " +
                klass.getCanonicalName());
        }
    }

    mLooper = Looper.myLooper();
    if (mLooper == null) {
        throw new RuntimeException(
            "Can't create handler inside thread that has not called Looper.prepare()");
    }
    mQueue = mLooper.mQueue;
    mCallback = callback;
    mAsynchronous = async;
}
可以看到Looper調用myLooper方法獲取到Looper對象, 如果mLooper == null的話,會拋出
Can't create handler inside thread that has not called Looper.prepare()
的異常。大概的意思就是無法在沒有調用Looper.prepare()的線程中創建handler。
我在剛開始學習Handler的時候經常會遇到這個錯誤。不急,等下在分析到底為什麼,現在我們只需要知道如果Looper.myLooper()沒有獲取到Looper對象的話就會報這個錯。
到了這裡,Handler和Looper就建立起了關聯。接著往下看完最後幾行代碼
mQueue = mLooper.mQueue;
從Looper對象中取出MessageQueue對象並賦值。MessageQueue就是消息隊列,那麼他裡面存儲著很多消息嗎?
到了這一步,Handler通過Looper與MessageQueue也建立起了關聯。
我們跟蹤Looper的myLooper方法進去,解決為什麼會拋出Can’t create handler inside thread that has not called Looper.prepare()異常。
myLooper方法源碼如下:
public static @Nullable Looper myLooper() {
    return sThreadLocal.get();
}
只有一行代碼,從線程中取出Looper對象,那麼我們有理由相信,這個ThreadLocal是通過set方法把Looper對象設置進去的。
想一想ThreadLocal在哪裡把Looper對象設置進去了呢。回到剛才想要解決的問題:Can’t create handler inside thread that has not called Looper.prepare() 。那會不會是Looper的prepare方法呢?
public static void prepare() {
    prepare(true);
}
prepare方法調用了它的一個參數的重載,那麼我們就看看那個重載的方法
private static void prepare(boolean quitAllowed) {
    if (sThreadLocal.get() != null) {
        throw new RuntimeException("Only one Looper may be created per thread");
    }
    sThreadLocal.set(new Looper(quitAllowed));
}
找到了線索,ThreadLocal確實是在Looper的prepare方法裡把Looper對象設置進去的,而且從第一行的判斷可以知道,一個線程只有一個Looper對象。
到了這裡,Looper與ThreadLocal建立起了關聯。可以看下Looper的構造方法
private Looper(boolean quitAllowed) {
    mQueue = new MessageQueue(quitAllowed);
    mThread = Thread.currentThread();
}
創建了一個MessageQueue對象。
好,結合我們的分析可以知道,如果Looper沒有調用prepare方法,ThreadLocal的get方法就會返回空,那麼Looper.myLooper()也會返回空,所以就拋出了Can't create handler inside thread that has not called Looper.prepare()的異常。
那麼問題又來了,我們寫程序時好像沒有手動調用Looper.prepare()吧,也不會拋出異常。前面提到,我們通常都是在主線程,也就是UI線程中創建handler的。而在主線程中,系統已經為我們創建了一個Looper對象,所以不會拋出異常了。。。而那些會拋出異常報錯的情況,是在子線程中創建的handler,但是又沒有調用Looper.prepare()去創建Looper對象。

繼續前進。那就來看看,主線程在什麼時候創建了Looper對象吧。
在ActivityThread的main方法,這個方法是應用程序的入口。

main方法的源碼如下:
public static void main(String[] args) {

    //代碼省略

    Looper.prepareMainLooper();

    ActivityThread thread = new ActivityThread();
    thread.attach(false);

    if (sMainThreadHandler == null) {
        sMainThreadHandler = thread.getHandler();
    }

    if (false) {
        Looper.myLooper().setMessageLogging(new
                LogPrinter(Log.DEBUG, "ActivityThread"));
    }

    // End of event ActivityThreadMain.
    Trace.traceEnd(Trace.TRACE_TAG_ACTIVITY_MANAGER);
    Looper.loop();

    throw new RuntimeException("Main thread loop unexpectedly exited");
}
找到了Looper.prepareMainLooper(),這和Looper.prepare()太像了吧,跟進去看看
public static void prepareMainLooper() {
    prepare(false);
    synchronized (Looper.class) {
        if (sMainLooper != null) {
            throw new IllegalStateException("The main Looper has already been prepared.");
        }
        sMainLooper = myLooper();
    }
}
又兜了回來,還是調用了prepare方法的。所以主線程是已經創建了一個Looper對象的。

Handler的創建過程分析完畢,現在總算搞明白了。
那先總結一下,Handler的創建是依賴於Looper的。而主線程是默認創建了一個Looper對象的。每一個Looper會關聯一個線程(ThreadLocal中封裝了Looper)。每一個Looper中又會封裝一個消息隊列。

這樣一來,handler,Looper,MessageQueue,Thread四個角色就關聯了起來,你中有我,我中有你。

handler在主線程中創建,是因為要和主線程的消息隊列關聯起來,那樣handler的handleMessage方法才會在主線程中執行,那麼這樣在更新UI就是線程安全的了。
接著繼續吧,還很多問題沒有解決

相信你更想了解Handler是怎麼發送消息的。通常我們是創建一個Message對象,並將一些從服務端拉取的數據,標記,參數等賦值到Message的一些字段what,arg1,obj等,handler調用sendMessage方法發送,就能將這個數據發送到主線程,然後在handlerMessage方法處理更新UI即可。
那我們就從handler的sendMessage方法開始尋找信息
public final boolean sendMessage(Message msg)
{
    return sendMessageDelayed(msg, 0);
}
sendMessage會調用sendMessageDelayed方法並將message對象傳進去,第二個參數是延時時間,使用sendMessage方法時默認為0的。

那麼來到sendMessageDelayed方法
public final boolean sendMessageDelayed(Message msg, long delayMillis)
{
    if (delayMillis < 0) {
        delayMillis = 0;
    }
    return sendMessageAtTime(msg, SystemClock.uptimeMillis() + delayMillis);
}
兜兜轉轉,最終會調用sendMessageAtTime方法,並將message對象傳進。

繼續跟進sendMessageAtTime方法,
public boolean sendMessageAtTime(Message msg, long uptimeMillis) {
    MessageQueue queue = mQueue;
    if (queue == null) {
        RuntimeException e = new RuntimeException(
                this + " sendMessageAtTime() called with no mQueue");
        Log.w("Looper", e.getMessage(), e);
        return false;
    }
    return enqueueMessage(queue, msg, uptimeMillis);
}
上面分析了,在創建Looper對象的時候,會創建一個MessageQueue,所以只要Looper是正常創建的話,消息隊列是不為空的。

那麼到最後一行的enqueueMessage方法,源碼如下:
private boolean enqueueMessage(MessageQueue queue, Message msg, long uptimeMillis) {
    msg.target = this;
    if (mAsynchronous) {
        msg.setAsynchronous(true);
    }
    return queue.enqueueMessage(msg, uptimeMillis);
}
可以看到最後一行調用了MessageQueue的enqueueMessage方法。

注意: 上面貼出的enqueueMessage是Handler的方法,不是MessageQueue的,只是做了一層包裝而已,真正的入隊消息隊列的操作當然是在MessageQueue中。而且從第一行的msg.target = this中可以知道,msg的target字段,其實就是handler。
MessageQueue的enqueueMessage方法源碼如下:
boolean enqueueMessage(Message msg, long when) {
    if (msg.target == null) {
        throw new IllegalArgumentException("Message must have a target.");
    }
    if (msg.isInUse()) {
        throw new IllegalStateException(msg + " This message is already in use.");
    }

    synchronized (this) {
        if (mQuitting) {
            IllegalStateException e = new IllegalStateException(
                    msg.target + " sending message to a Handler on a dead thread");
            Log.w(TAG, e.getMessage(), e);
            msg.recycle();
            return false;
        }

        msg.markInUse();
        msg.when = when;
        Message p = mMessages;
        boolean needWake;
        if (p == null || when == 0 || when < p.when) {
            // New head, wake up the event queue if blocked.
            msg.next = p;
            mMessages = msg;
            needWake = mBlocked;
        } else {
            // Inserted within the middle of the queue.  Usually we don't have to wake
            // up the event queue unless there is a barrier at the head of the queue
            // and the message is the earliest asynchronous message in the queue.
            needWake = mBlocked && p.target == null && msg.isAsynchronous();
            Message prev;
            for (;;) {
                prev = p;
                p = p.next;
                if (p == null || when < p.when) {
                    break;
                }
                if (needWake && p.isAsynchronous()) {
                    needWake = false;
                }
            }
            msg.next = p; // invariant: p == prev.next
            prev.next = msg;
        }

        // We can assume mPtr != 0 because mQuitting is false.
        if (needWake) {
            nativeWake(mPtr);
        }
    }
    return true;
}
Messagequeue中有一個對象mMessage用於指向當前傳進的msg,即最新的消息。而剛才的sendMessageAtTime(Message msg, long uptimeMillis)方法,第二個參數指定了時間,然後在這裡按照這個uptimeMillis來進行消息的排序,而我分析的結果msg.next是指向下一個消息,這樣每一個消息都是按照時間的排序關聯了起來,排在前面的消息指向了排在後面的消息。
以上是進入消息隊列的分析,handler調用sendMessage方法的最終將message對象傳進messagequeue。
完畢,那麼消息是怎麼從消息隊列出來的呢?

這時我們要回看ActiviryThread的main方法,去尋找點線索。源碼在上面已貼出。

發現了倒數第二行的Looper.loop(),簡單理解就是消息循環執行循環操作。
這裡一定能滿足我們的好奇心。那麼跟進。loop方法的源碼如下:
public static void loop() {
    final Looper me = myLooper();
    if (me == null) {
        throw new RuntimeException("No Looper; Looper.prepare() wasn't called on this thread.");
    }
    final MessageQueue queue = me.mQueue;

    // Make sure the identity of this thread is that of the local process,
    // and keep track of what that identity token actually is.
    Binder.clearCallingIdentity();
    final long ident = Binder.clearCallingIdentity();

    for (;;) {
        Message msg = queue.next(); // might block
        if (msg == null) {
            // No message indicates that the message queue is quitting.
            return;
        }

        // This must be in a local variable, in case a UI event sets the logger
        Printer logging = me.mLogging;
        if (logging != null) {
            logging.println(">>>>> Dispatching to " + msg.target + " " +
                    msg.callback + ": " + msg.what);
        }

        msg.target.dispatchMessage(msg);

        if (logging != null) {
            logging.println("<<<<< Finished to " + msg.target + " " + msg.callback);
        }

        // Make sure that during the course of dispatching the
        // identity of the thread wasn't corrupted.
        final long newIdent = Binder.clearCallingIdentity();
        if (ident != newIdent) {
            Log.wtf(TAG, "Thread identity changed from 0x"
                    + Long.toHexString(ident) + " to 0x"
                    + Long.toHexString(newIdent) + " while dispatching to "
                    + msg.target.getClass().getName() + " "
                    + msg.callback + " what=" + msg.what);
        }

        msg.recycleUnchecked();
    }
}
抓重點看就好。首先是調用myLooper方法獲取到Looper對象,這裡是沒問題的,那就繼續
MessageQueue queue = me.mQueue
然後從Looper對象中取出關聯的消息隊列,

接著進入了一個死循環,調用messagequeue的next方法取出message對象。這個next方法我沒看懂,所以不貼源碼出來分析了,反正next方法的作用就是取出message對象的。有興趣的同學自己去研究研究吧。

到這裡可以總結一下:通過Looper.prepare()來創建Looper(消息循環)對象,然後通過Looper.loop()來執行消息循環,Looper.prepare()和Looper.loop()通常是成對出現的。

好,回來繼續

經過一系列的判斷後會來到這裡,很重點
msg.target.dispatchMessage(msg);
上面已經分析,msg.target就是handler,那麼這行代碼的意義就是調用handler的dispatchMessgage的方法去分發消息,

那麼看到dispatchMessage的方法源碼,相信謎底就要揭開了
public void dispatchMessage(Message msg) {
    if (msg.callback != null) {
        handleCallback(msg);
    } else {
        if (mCallback != null) {
            if (mCallback.handleMessage(msg)) {
                return;
            }
        }
        handleMessage(msg);
    }
}
從上述的代碼跟蹤中,都沒有發現給message的callback字段賦值,那麼我們就先不搭理,默認callback為空,那麼就一定會來到handleMessage方法。
message對象傳遞到了handleMessage方法。
/**
 * Subclasses must implement this to receive messages.
 */
public void handleMessage(Message msg) {
}
handleMessage是一個空方法,需要我們去重寫。
至此,海闊天空。完美的從子線程切換到主線程,我不得不說Android的源碼設計是多麼精彩。

以上就是handler使用sendMessage方法發送消息的源碼分析。
為什麼我會這麼說呢?因為handler還有一種方法可以發送消息,是post方法,理解這個方法。可以解決剛才沒搭理的那個message的callback字段的問題。看到post方法源碼
public final boolean post(Runnable r)
{
   return  sendMessageDelayed(getPostMessage(r), 0);
}
接收一個實現了Runable接口的對象,然後將其傳進getPostMessage()方法。跟進getPostMessage()方法看看
private static Message getPostMessage(Runnable r) {
    Message m = Message.obtain();
    m.callback = r;
    return m;
}
其實就是將Runable包裝成message的callback嘛。

所以,如果我們使用post方法發送消息,callback字段是不為空的,那麼就會執行handleCallback()方法,而不是執行handleMessage方法了。
handleCallback方法源碼如下:
private static void handleCallback(Message message) {
    message.callback.run();
}
直接是調用run方法,表明我們直接在run方法裡進行UI操作就行了。
我們發現不管是使用post方法還是sendMessage方法來發送消息,最終都會調用sendMessageDelayed方法。handler將消息追加到消息隊列中的過程都是一樣的,然後Looper不斷的從MessageQueue中取出消息,並由handler去分發消息,處理消息,這樣就構成了完善的Android消息機制體系。
呼,終於結束了,搞定了Android的消息機制,才能更深刻的理解Android中的多線程。以後的時間裡一起打怪升級。
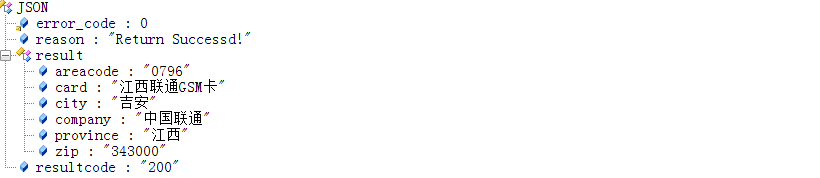 Android JSON原生解析的幾種思路,以號碼歸屬地,笑話大全,天氣預報為例演示
今天項目中要實現一個天氣的預覽,加載的信息很多,字段也很多,所以理清了一下思路,准備獨立出來寫一個總結,這樣對大家還是很有幫助的,老司機要開車了 涉及到網絡
 Android自定義View------柱狀統計圖
關於自定義View,相信多數開發者都已經非常熟悉了,網絡上的例子也非常多,各種炫酷吊炸天的自定義View也層出不窮。本文只是一個初級學習教程,對於初學者有參考價值。下面正
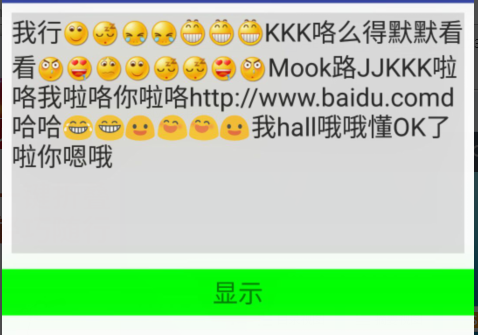 匹配表情、關鍵字、Url的Textview
注:在Edittext和Textview中,不要加下面2個屬性中的任何一種。否則,當行數大於1行以後會發生表情、圖片對不齊的情況android:lineSpacingEx
 Android RecylerView入門教程
今年Google I/0大會,Google開放了兩個全新的視圖:RecyclerView和CardView。這篇文章會提供關於RecylerView的簡介。Recyler