編輯:關於Android編程
A service is an application component that can perform long-running operations in the background and does not provide a user interface。
通常service用來執行一些耗時操作,或者後台執行不提供用戶交互界面的操作。其他的應用組件可以啟動Service,即便用戶切換了其他應用,啟動的Service仍可在後台運行。一個組件可以與Service綁定並與之交互,甚至是跨進程通信(IPC)。例如,一個Service可以在後台執行網絡請求、播放音樂、執行文件讀寫操作或者與 content provider交互等。
為了創建Service,需要繼承Service類。並重寫它的回調方法,這些回調方法反應了Service的生命周期,並提供了綁定Service的機制。最重要的Service的生命周期回調方法如下所示:
onStartCommand()如果某個組件通過調用startService()啟動了Service(系統會回調onStartCommand()方法),那麼直到在Service中手動調用stopSelf()方法、或在其他組件中手動調用stopService()方法,該Service才會停止。
如果某個組件通過調用bindService()綁定了Service(系統不會回調onStartCommand()方法),只要該組件與Service處於綁定狀態,Service就會一直運行,當Service不再與組件綁定時,該Service將被destroy。
當系統內存低時,系統將強制停止Service的運行;若Service綁定了正在與用戶交互的activity,那麼該Service將不大可能被系統kill。如果創建的是前台Service,那麼該Service幾乎不會被kill。否則,當創建了一個長時間在後台運行的Service後,系統會降低該Service在後台任務棧中的級別——這意味著它容易被kill,所以在開發Service時,需要使Service變得容易被restart,因為一旦Service被kill,再restart它需要其資源可用時才行,當然這也取決於onStartCommand()方法返回的值。
onStartCommand()方法必須返回一個整數,這個整數是一個描述了在系統的kill事件中,系統應該如何繼續這個服務的值。onStartCommand()有4種返回值:
在manifest文件中注冊service的方式如下:
除此之外,在<\service>標簽中還可以配置其他屬性:
android:name —>服務全限定類名(唯一不可缺省的) android:label —>服務的名字,如果此項不設置,那麼默認顯示的服務名則為類名 android:icon —>服務的圖標 android:permission —>申明此服務的權限,這意味著只有提供了該權限的應用才能控制或連接此服務 android:process若不確定該啟動哪個Service,那麼可以在<\service>中配置intent-filter,並在Intent中排除該Service,但必須調用Intent的setPackage()方法,來為啟動的service消除歧義。
注:setPackage()方法傳入一個String參數,代表一個包名。該方法表示該Intent對象只能在傳入的這個包名下尋找符合條件的組件,若傳入null,則表示可以在任意包下尋找。
有了 Service 類我們如何啟動他呢,有兩種方法:
Context.startService() Context.bindService()當然,service也可以同時在上述兩種方式下運行。這涉及到Service中兩個回調方法的執行:onStartCommand()(通過start方式啟動一個service時回調的方法)、onBind()(通過bind方式啟動一個service回調的方法)。
無論通過那種方式啟動service(start、bind、start&bind),任何組件(甚至其他應用的組件)都可以使用service。並通過Intent傳遞參數。當然,您也可以將Service在manifest文件中配置成私有的,不允許其他應用訪問。
其他組件調用startService()方法啟動一個Service。一旦啟動,Service將一直運行在後台即便啟動Service的組件已被destroy。通常,一個被start的Service會在後台執行單獨的操作,也並不給啟動它的組件返回結果。比如說,一個start的Service執行在後台下載或上傳一個文件的操作,完成之後,Service應自己停止。
一般使用如下兩種方式創建一個start Service:
繼承Service類(1)繼承Service類
如果你需要在Service中執行多線程而不是處理一個請求隊列,那麼需要繼承Service類,分別處理每個Intent。在Service中執行操作時,處理每個請求都需要開啟一個線程,並且同一時刻一個線程只能處理一個請求。
public class MyService extends Service {
    private HandlerThread mThread;
    private Handler mHandler;

    @Override
    public void onCreate() {
        super.onCreate();
        MainActivity.showlog("onCreate()");
        initBackThread();
    }

    private void initBackThread() {
        mThread = new HandlerThread("ServiceStartArguments");
        mThread.start();
        mHandler = new Handler(mThread.getLooper()) {
            @Override
            public void handleMessage(Message msg) {
                //模擬耗時線程操作
                MainActivity.showlog("processing...msg.arg1="+msg.arg1);
                try {
                    Thread.sleep(5000);
                } catch (Exception e) {
                    Thread.currentThread().interrupt();
                }
                MainActivity.showlog("stopSelf...msg.arg1="+msg.arg1);
                //當所有操作完成後,服務自己停止
                stopSelf(msg.arg1);
            }
        };
    }

    @Override
    public int onStartCommand(Intent intent, int flags, int startId) {
        MainActivity.showlog("onStartCommand()");

        Message msg = mHandler.obtainMessage();
        msg.arg1 = startId;
        mHandler.sendMessage(msg);

        return START_STICKY;
    }

    @Override
    public void onDestroy() {
        super.onDestroy();
        MainActivity.showlog("onDestroy()");
    }

    @Override
    public IBinder onBind(Intent intent) {
        MainActivity.showlog("onBind()");
        return null;
    }
}
添加Button點擊事件:
    @Override
    public void onClick(View v) {
        switch (v.getId()) {
        case R.id.start_service:
            showlog("click Start Service button");
            Intent it1 = new Intent(this, MyService.class);
            startService(it1);
            break;
        case R.id.stop_service:
            showlog("click Stop Service button");
            Intent it2 = new Intent(this, MyService.class);
            stopService(it2);
            break;
        default:
            break;
        }
    }
這樣的話,一個簡單的帶有Service功能的程序就寫好了,現在我們將程序運行起來,並點擊一下Start Service按鈕,可以看到LogCat的打印日志如下:

流程:點擊->onCreate->onStartCommand->耗時事件處理(5S)->onDestroy
那麼如果我連續兩次點擊Start Service按鈕呢?這個時候的打印日志如下:

流程:第一次點擊->onCreate->onStartCommand->耗時事件處理(5S)
第二次點擊->onStartCommand->耗時事件處理(5S)->onDestroy
這裡的耗時處理在同一個線程,第一個事件處理完成後再進行第二個事件處理。
點擊Start Service然後再點擊Stop Service按鈕就可以將MyService立即停止掉了,Log如下:

注:多個啟動Service的請求可能導致onStartCommand()多次調用,但只需調用stopSelf() 、 stZ喎?/kf/ware/vc/" target="_blank" class="keylink">vcFNlcnZpY2UoKdXiwb249re9t6jWrtK7o6y+zb/JwaK8tM2j1rm4w7f+zvGhozwvcD4NCjxwPsnPw+bI57n7ztLDx7XEusTKscjOzvHKsbzkubuzpKOs1NpNeVNlcnZpY2XNo9a51q7HsLXju/cmcmRxdW87t7W72CZyZHF1bzujrEFjdGl2aXR5sbu4ybX0wcujrLWrysfO0sPHtcS3/s7xyNTIu9Ta1MvQ0KOsv8nS1LLpv7QgyejWwyZuZGFzaDsmZ3Q706bTwyZuZGFzaDsmZ3Q71f3U2tTL0NCjrL3YzbzI58/Co7o8YnIgLz4NCjxpbWcgYWx0PQ=="這裡寫圖片描述" src="/uploadfile/Collfiles/20161015/201610150952202507.jpg" title="\" />
(2)繼承IntentService類
在大多數情況下,start Service並不會同時處理多個請求,因為處理多線程較為危險,所以繼承IntentService類帶創建Service是個不錯選擇。
使用IntentService的要點如下:
綜上所述,您只需重寫onHandleIntent()方法即可,當然,還需要創建一個構造方法,示例如下:
public class MyIntentService extends IntentService {

    public MyIntentService() {
        super("MyIntentService");
    }

    @Override
    public void onHandleIntent(Intent intent) {
        //模擬耗時線程操作
        MainActivity.showlog("processing...");
        try {
            Thread.sleep(5000);
        } catch (Exception e) {
            Thread.currentThread().interrupt();
        }
    }
}
如果您還希望在IntentService的繼承類中重寫其他生命周期方法,如onCreate()、onStartCommand() 或 onDestroy(),那麼請先調用各自的父類方法以保證子線程能夠正常啟動。
比如,要實現onStartCommand()方法,需返回其父類方法:
    @Override
    public int onStartCommand(Intent intent, int flags, int startId) {
        MainActivity.showlog("onStartCommand()");
        return super.onStartCommand(intent, flags, startId);
    }
注:除onHandleIntent()外,onBind()方法也無需調用其父類方法。
上面學習了startService()啟動 Service,不過這樣的話Service和Activity的關系並不大,只是Activity通知了Service一下:“你可以啟動了。”然後Service就去忙自己的事情了。那麼有沒有什麼辦法能讓它們倆的關聯更多一些呢?比如說在Activity中可以指定讓Service去執行什麼任務,當然可以,只需要讓Activity和Service建立關聯就好了。
bindService()方法的意思是,把這個 Service 和調用 Service 的客戶類綁起來,如果這個客戶類被銷毀,Service 也會被銷毀。用這個方法的一個好處是,bindService() 方法執行後 Service 會回調 onBind() 方法,你可以從這裡返回一個實現了 IBind 接口的類,在客戶端操作這個類就能和這個服務通信了,比如得到 Service 運行的狀態或其他操作。如果 Service 還沒有運行,使用這個方法啟動 Service 就會 onCreate() 方法而不會調用 onStartCommand()。
觀察MyService中的代碼,你會發現有一個onBind()方法我們都沒有使用到,這個方法其實就是用於和Activity建立關聯的,重新寫一個MyBindService,如下所示:
public class MyBindService extends Service {
    private MyBinder mBinder = new MyBinder();

    @Override
    public void onCreate() {
        super.onCreate();
        MainActivity.showlog("onCreate()");
    }

    @Override
    public int onStartCommand(Intent intent, int flags, int startId) {
        MainActivity.showlog("onStartCommand()");
        return super.onStartCommand(intent, flags, startId);
    }

    @Override
    public void onDestroy() {
        super.onDestroy();
        MainActivity.showlog("onDestroy()");
    }

    //Service自定義方法
    public void doSomethingInService(){
        MainActivity.showlog("doSomethingInService()");
    }

    //復寫onBind方法,並且返回IBinder的實現類
    @Override
    public IBinder onBind(Intent intent) {
        MainActivity.showlog("onBind()");
        return mBinder;
    }

    @Override
    public boolean onUnbind(Intent intent) {
        MainActivity.showlog("onUnbind()");
        return super.onUnbind(intent);
    }

    //內部類,擴展自Binder類
    class MyBinder extends Binder {
        //MyBinder自定義方法
        public void doSomethingInBinder() {
            MainActivity.showlog("doSomethingInBinder()");
        }
        public MyBindService getService(){
            return MyBindService.this;
        }
    }
}
這裡我們新增了一個MyBinder類繼承自Binder類,然後在MyBinder中添加了一個doSomethingInBinder()方法用於在後台執行任務,而且在Service中還寫了一個doSomethingInService()方法,同樣可以執行後台任務,其實這裡只是打印了一行日志。
接下來再修改MainActivity中的代碼,讓MainActivity和MyBindService之間建立關聯,代碼如下所示:
public class MainActivity extends Activity implements OnClickListener {
    private Button startService;
    private Button stopService;
    private Button startIntentService;
    private Button stopIntentService;
    private Button bindService;
    private Button unbindService;
    private MyBindService.MyBinder myBinder;
    private boolean isConnected = false;

    private ServiceConnection connection = new ServiceConnection() {
        @Override
        public void onServiceDisconnected(ComponentName name) {
            showlog("onServiceDisconnected");
            isConnected = false;
        }

        @Override
        public void onServiceConnected(ComponentName name, IBinder iBinder) {
            showlog("onServiceConnected");
            myBinder = (MyBindService.MyBinder) iBinder;
            myBinder.doSomethingInBinder();
            MyBindService service = myBinder.getService();
            service.doSomethingInService();
            isConnected = true;
        }
    };

    @Override
    protected void onCreate(Bundle savedInstanceState) {
        super.onCreate(savedInstanceState);
        setContentView(R.layout.activity_main);
        startService = (Button) findViewById(R.id.start_service);
        stopService = (Button) findViewById(R.id.stop_service);
        startIntentService = (Button) findViewById(R.id.start_intent_service);
        stopIntentService = (Button) findViewById(R.id.stop_intent_service);
        bindService = (Button) findViewById(R.id.bind_service);
        unbindService = (Button) findViewById(R.id.unbind_service);
        startService.setOnClickListener(this);
        stopService.setOnClickListener(this);
        startIntentService.setOnClickListener(this);
        stopIntentService.setOnClickListener(this);
        bindService.setOnClickListener(this);
        unbindService.setOnClickListener(this);
    }

    @Override
    public void onClick(View v) {
        switch (v.getId()) {
        case R.id.start_service:
            showlog("click Start Service button");
            Intent it1 = new Intent(this, MyService.class);
            startService(it1);
            break;
        case R.id.stop_service:
            showlog("click Stop Service button");
            Intent it2 = new Intent(this, MyService.class);
            stopService(it2);
            break;
        case R.id.start_intent_service:
            showlog("click Start IntentService button");
            Intent it3 = new Intent(this, MyIntentService.class);
            startService(it3);
            break;
        case R.id.stop_intent_service:
            showlog("click Stop IntentService button");
            Intent it4 = new Intent(this, MyIntentService.class);
            stopService(it4);
            break;
        case R.id.bind_service:
            showlog("click Bind Service button");
            Intent it5 = new Intent(this, MyBindService.class);
            bindService(it5, connection, BIND_AUTO_CREATE);
            break;
        case R.id.unbind_service:
            showlog("click Unbind Service button");
            if(isConnected == true){
                unbindService(connection);
            }
            break;
        default:
            break;
        }
    }

    public static void showlog(String info) {
        System.out.print("Watson "+info+"\n");
    }

}
可以看到,這裡我們首先創建了一個ServiceConnection的匿名類,在裡面重寫了onServiceConnected()方法和onServiceDisconnected()方法,這兩個方法分別會在Activity與Service建立關聯和解除關聯的時候調用。在onServiceConnected()方法中,我們又通過向下轉型得到了MyBinder的實例,有了這個實例,Activity和Service之間的關系就變得非常緊密了。現在我們可以在Activity中根據具體的場景來調用MyBinder中的任何public方法,即實現了Activity指揮Service干什麼Service就去干什麼的功能。
當然,現在Activity和Service其實還沒關聯起來了呢,這個功能是在Bind Service按鈕的點擊事件裡完成的。可以看到,這裡我們仍然是構建出了一個Intent對象,然後調用bindService()方法將Activity和Service進行綁定。bindService()方法接收三個參數,第一個參數就是剛剛構建出的Intent對象,第二個參數是前面創建出的ServiceConnection的實例,第三個參數是一個標志位,有兩個flag, BIND_DEBUG_UNBIND 與 BIND_AUTO_CREATE,前者用於調試,後者默認使用,這裡傳入BIND_AUTO_CREATE表示在Activity和Service建立關聯後自動創建Service,這會使得MyService中的onCreate()方法得到執行,但onStartCommand()方法不會執行。
現在讓我們重新運行一下程序吧,在MainActivity中點擊一下Bind Service按鈕,LogCat裡的打印日志如下圖所示:

由於在綁定Service的時候指定的標志位是BIND_AUTO_CREATE,說明點擊Bind Service按鈕的時候Service也會被創建,這時應該怎麼銷毀Service呢?其實也很簡單,點擊一下Unbind Service按鈕,將Activity和Service的關聯解除就可以了。Log如下:

另外需要注意,任何一個Service在整個應用程序范圍內都是通用的,即MyService不僅可以和MainActivity建立關聯,還可以和任何一個Activity建立關聯,而且在建立關聯時它們都可以獲取到相同的MyBinder實例。
在Service的啟動這一部分,我們已經簡單介紹了銷毀Service的方法。
startService—>stopService bindService—>unbindService以上這兩種銷毀的方式都很好理解。
但有幾點需要注意一下:
(1)你應當知道在調用 bindService 綁定到Service的時候,你就應當保證在某處調用 unbindService 解除綁定(盡管 Activity 被 finish 的時候綁定會自動解除,並且Service會自動停止);
(2)你應當注意使用 startService 啟動服務之後,一定要使用 stopService停止服務,不管你是否使用bindService;
(3)同時使用 startService 與 bindService 要注意到,Service 的終止,需要unbindService與stopService同時調用,才能終止 Service,不管 startService 與 bindService 的調用順序,如果先調用 unbindService 此時服務不會自動終止,再調用 stopService 之後服務才會停止,如果先調用 stopService 此時服務也不會終止,而再調用 unbindService 或者之前調用 bindService 的 Context 不存在了(如Activity 被 finish 的時候)之後服務才會自動停止;
(4)當在旋轉手機屏幕的時候,當手機屏幕在“橫”“豎”變換時,此時如果你的 Activity 如果會自動旋轉的話,旋轉其實是 Activity 的重新創建,因此旋轉之前的使用 bindService 建立的連接便會斷開(Context 不存在了),對應服務的生命周期與上述相同。
(5)unbindService 解除綁定,參數為之前創建的 ServiceConnection 接口對象。另外,多次調用 unbindService 來釋放相同的連接會拋出異常,因此我創建了一個 boolean 變量來判斷是否 unbindService 已經被調用過。
對於StartService啟動的服務,Service本身還提供了另外一個方法讓自己停止—>stopSelf。
若系統正在處理多個調用onStartCommand()請求,那麼在啟動一個請求時,你不應當在此時停止該Service。為了避免這個問題,您可以調用stopSelf(int)方法,以確保請求停止的Service是最新的啟動請求。這就是說,當調用stopSelf(int)方法時,傳入的ID代表啟動請求(該ID會傳遞至onStartCommand()),該ID與請求停止的ID一致。則如果在調用stopSelf(int)之前,Service收到一個新的Start請求,ID將無法匹配,Service並不會停止。具體的例子參見上面Service啟動一節。
    ...
    private void initBackThread() {
        mThread = new HandlerThread("ServiceStartArguments");
        mThread.start();
        mHandler = new Handler(mThread.getLooper()) {
            @Override
            public void handleMessage(Message msg) {
                //線程操作
                MainActivity.showlog("processing...msg.arg1="+msg.arg1);
                try {
                    Thread.sleep(5000);
                } catch (Exception e) {
                    Thread.currentThread().interrupt();
                }
                MainActivity.showlog("stopSelf...msg.arg1="+msg.arg1);
                stopSelf(msg.arg1);
            }
        };
    }

    @Override
    public int onStartCommand(Intent intent, int flags, int startId) {
        MainActivity.showlog("onStartCommand()");

        Message msg = mHandler.obtainMessage();
        msg.arg1 = startId;
        mHandler.sendMessage(msg);

        return START_STICKY;
    }
    ...
Thread我們大家都知道,是用於開啟一個子線程,在這裡去執行一些耗時操作就不會阻塞主線程的運行。而Service我們最初理解的時候,總會覺得它是用來處理一些後台任務的,一些比較耗時的操作也可以放在這裡運行,這就會讓人產生混淆了。但是,如果我告訴你Service其實是運行在主線程裡的,你還會覺得它和Thread有什麼關系嗎?
在MainActivity的onCreate()方法裡加入一行打印當前線程id的Log:
showlog("MainActivity thread id is " + Thread.currentThread().getId());
同時在MyService的onCreate()方法裡加入打印當前線程id的Log:
MainActivity.showlog("MyService thread id is " + Thread.currentThread().getId());
現在重新運行一下程序,並點擊Start Service按鈕,會看到如下Log信息:
可以看到,它們的線程id完全是一樣的,由此證實了Service確實是運行在主線程裡的,也就是說如果你在Service裡編寫了非常耗時的代碼,程序也會出現ANR的。
下面我詳細的來解釋一下:
Thread:Thread 是程序執行的最小單元,它是分配CPU的基本單位。可以用 Thread 來執行一些異步的操作。 Service:Service 是android的一種機制,當它運行的時候如果是Local Service,那麼對應的 Service 是運行在主進程的 main 線程上的。如:onCreate,onStart 這些函數在被系統調用的時候都是在主進程的 main 線程上運行的。如果是Remote Service,那麼對應的 Service 則是運行在獨立進程的 main 線程上。 因此請不要把 Service 理解成線程,它跟線程半毛錢的關系都沒有!Android的後台就是指,它的運行是完全不依賴UI的。即使Activity被銷毀,或者程序被關閉,只要進程還在,Service就可以繼續運行。比如說一些應用程序,始終需要與服務器之間始終保持著心跳連接,就可以使用Service來實現。你可能又會問,前面不是剛剛驗證過Service是運行在主線程裡的麼?在這裡一直執行著心跳連接,難道就不會阻塞主線程的運行嗎?當然會,但是我們可以在Service中再創建一個子線程,然後在這裡去處理耗時邏輯就沒問題了。
既然在Service裡也要創建一個子線程,那為什麼不直接在Activity裡創建呢?這是因為Activity很難對Thread進行控制,當Activity被銷毀之後,就沒有任何其它的辦法可以再重新獲取到之前創建的子線程的實例。而且在一個Activity中創建的子線程,另一個Activity無法對其進行操作。但是Service就不同了,所有的Activity都可以與Service進行關聯,然後可以很方便地操作其中的方法,即使Activity被銷毀了,之後只要重新與Service建立關聯,就又能夠獲取到原有的Service中Binder的實例。因此,使用Service來處理後台任務,Activity就可以放心地finish,完全不需要擔心無法對後台任務進行控制的情況。你也可以在 Service 裡注冊 BroadcastReceiver,在其他地方通過發送 broadcast 來控制它,當然這些都是 Thread 做不到的。
一個比較標准的Service就可以寫成:
@Override
public int onStartCommand(Intent intent, int flags, int startId) {
    new Thread(new Runnable() {
        @Override
        public void run() {
            // 開始執行後台任務
        }
    }).start();
    return super.onStartCommand(intent, flags, startId);
}

class MyBinder extends Binder {

    public void startDownload() {
        new Thread(new Runnable() {
            @Override
            public void run() {
                // 執行具體的下載任務
            }
        }).start();
    }
}
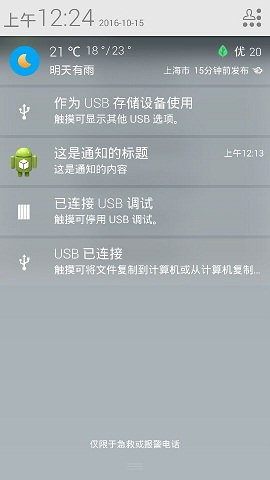
Service幾乎都是在後台運行的,一直以來它都是默默地做著辛苦的工作。但是Service的系統優先級還是比較低的,當系統出現內存不足情況時,就有可能會回收掉正在後台運行的Service。如果你希望Service可以一直保持運行狀態,而不會由於系統內存不足的原因導致被回收,就可以考慮使用前台Service。前台Service和普通Service最大的區別就在於,它會一直有一個正在運行的圖標在系統的狀態欄顯示,下拉狀態欄後可以看到更加詳細的信息,非常類似於通知的效果,只有前台Service被destroy後,狀態欄顯示才能消失。當然有時候你也可能不僅僅是為了防止Service被回收才使用前台Service,有些項目由於特殊的需求會要求必須使用前台Service,比如說墨跡天氣,它的Service在後台更新天氣數據的同時,還會在系統狀態欄一直顯示當前天氣的信息,如下圖所示:

來看一下如何才能創建一個前台Service吧,其實並不復雜,修改MyService中的代碼,如下所示:
    @Override
    public void onCreate() {
        super.onCreate();
        MainActivity.showlog("onCreate()");
        initBackThread();

        Intent notificationIntent = new Intent(this, MainActivity.class);
      /*第二個參數現在不再使用了
        第四個參數描述:
        FLAG_CANCEL_CURRENT:如果當前系統中已經存在一個相同的PendingIntent對象,那麼就將先將已有的PendingIntent取消,然後重新生成一個PendingIntent對象。
        FLAG_NO_CREATE:如果當前系統中存在相同的PendingIntent對象,系統將不會創建該PendingIntent對象而是直接返回null。
        FLAG_ONE_SHOT:該PendingIntent只作用一次。在該PendingIntent對象通過send()方法觸發過後,PendingIntent將自動調用cancel()進行銷毀,那麼如果你再調用send()方法的話,系統將會返回一個SendIntentException。
        FLAG_UPDATE_CURRENT:如果系統中有一個和你描述的PendingIntent對等的PendingInent,那麼系統將使用該PendingIntent對象,但是會使用新的Intent來更新之前PendingIntent中的Intent對象數據,例如更新Intent中的Extras*/
        PendingIntent pendingIntent = PendingIntent.getActivity(this, 0, notificationIntent, PendingIntent.FLAG_UPDATE_CURRENT);
        Notification notification = new Notification.Builder(this)
            .setSmallIcon(R.drawable.ic_launcher)
            .setWhen(System.currentTimeMillis())
            .setTicker("有通知到來")
            .setContentTitle("這是通知的標題")
            .setContentText("這是通知的內容")
            .setOngoing(true)
            .setContentIntent(pendingIntent)
            .build();
        /*使用startForeground,如果id為0,那麼notification將不會顯示*/
        startForeground(1, notification);
    }
這裡只是修改了MyService中onCreate()方法的代碼。可以看到,我們創建了一個Notification對象,然後設置了它的布局和數據,並在這裡設置了點擊通知後就打開MainActivity。然後調用startForeground()方法就可以讓MyService變成一個前台Service,並會將通知的圖片顯示出來。
現在重新運行一下程序,並點擊Start Service或Bind Service按鈕,MyService就會以前台Service的模式啟動了,並且在系統狀態欄會彈出一個通欄圖標,下拉狀態欄後可以看到通知的詳細內容,如下圖所示。
可以調用stopForeground(Boolean bool)來移除前台Service。該方法需傳入一個boolean型變量,表示是否也一並清除狀態欄上的notification。該方法並不停止Service,如果停止正在前台運行的Service,那麼notification 也會一並被清除。
最後我們看一下進程的分類:
前台進程 Foreground process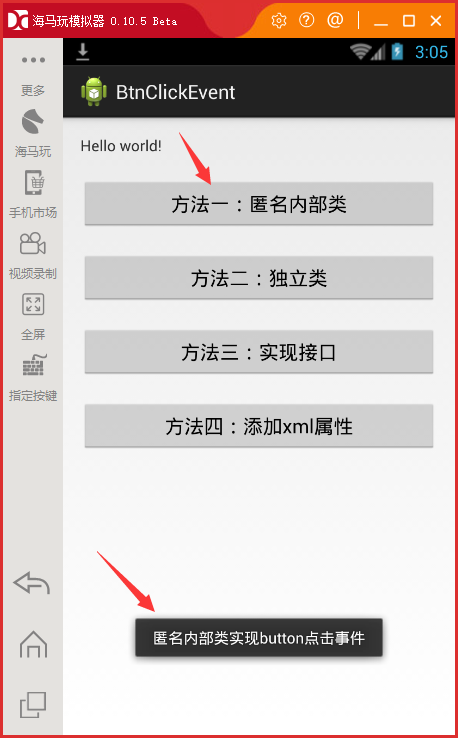 Android開發-之監聽button點擊事件的多種方法
在Android下,事件的發生是在監聽器下進行,android系統可以響應按鍵事件和觸摸屏事件,本文主要介紹了button點擊事件的方法一、實現button點
 Android開發筆記(一百)折疊式列表
更多動態視圖MoreNewsView經常看朋友圈的動態,有的動態內容較多就只展示前面一段,如果用戶想看完整的再點擊展開,這樣整個頁面的動態列表比較均衡,不會出現個別動態占
 基於Android實現個性彩色好看的二維碼
我編碼的風格,先給大家展示下效果圖,親們感覺效果還不錯,很滿意的話,請繼續往下閱讀。 之前呢,也寫過用安卓實現二維碼生成彩色的二維碼和帶logo的二維碼,也知道可以使用Q
 LayoutInflater——80%的Android程序員對它並不了解甚至錯誤使用
這個標題起的有點誇張哈,但是LayoutInflater這個類的一些用法,在Android開發者使用的過程中,確實存在著一些很普遍的誤區,最起碼我研究的這麼多小項目的源代