編輯:關於Android編程
屬性動畫,這個是在Android 3.0中才引進的,以前學WPF時裡面的動畫機制好像就是這個,它更改的是對象的實際屬性,在View Animation(Tween Animation)中,其改變的是View的繪制效果,真正的View的屬性保持不變,比如無論你在對話中如何縮放Button的大小,Button的有效點擊區域還是沒有應用動畫時的區域,其位置與大小都不變。而在Property Animation中,改變的是對象的實際屬性,如Button的縮放,Button的位置與大小屬性值都改變了。而且Property Animation不止可以應用於View,還可以應用於任何對象。Property Animation只是表示一個值在一段時間內的改變,當值改變時要做什麼事情完全是你自己決定的。在Property Animation中,可以對動畫應用以下屬性:
一、舉個例子
1、某個對象的X坐標在40ms內從0移動到40 pixel.按默認的10ms刷新一次,這個對象會移動4次,每次移動40/4=10pixel。

2、改變插值方式後,該對象的運動形式也隨之改變
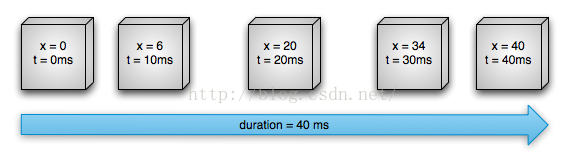
上述例子的實現可以通關ValueAnimator來實現,現在有個印象即可
二、ValueAnimator工作流程圖
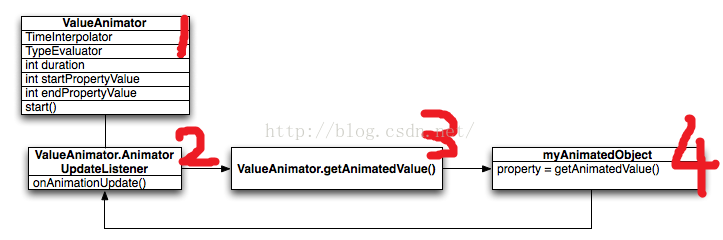
此圖是理解ValueAnimator的關鍵,現在不理解沒關系,還是大致看一下,按順序浏覽,有個印象即可,不過浏覽後續部分時需回來對照參考
三、ValueAnimator介紹ValueAnimator是Property Animation的執行類,ValueAnimator包含Property Animation動畫的所有核心功能,如動畫時間,開始、結束屬性值,相應時間屬性值計算方法等。上圖大致描述了ValueAnimator的工作流程,理解了就差不多對ValueAnimator了解了,當然後面會有具體介紹。
ValueAnimator的屬性介紹:
TimeIntepolator:時間插值
TypeEvaluator:綜合了時間插值、屬性開始值、屬性結束值計算出的屬性當前值
duration:動畫持續時間
startPropertyValue:屬性開始值
endPropertyValue:屬性結束值
start():動畫啟動方法
四、ValueAnimator實現步驟
一、計算當前的屬性值,ex.t = 5 ms時,x的值:
1、ValueAnimator根據動畫已進行的時間跟動畫總時間(duration)的比計算出一個時間因子(0~1),如上例中10ms時,計算時間因子t:即經過的時間百分比:t=10ms/40ms=0.25
2、然後根據TimeInterpolator計算出插值因子,上述例子中用了AccelerateDecelerateInterpolator,計算公式為(input即為時間因子):(Math.cos((input + 1) * Math.PI) / 2.0f) + 0.5f; 經插值計算(inteplator)後的插值因子:大約為0.15
3、最後TypeEvaluator通過這個因子計算出屬性值,計算方法為 :
1 2 3 4 publicFloatevaluate(floatfraction,NumberstartValue,NumberendValue){ floatstartFloat=startValue.floatValue(); returnstartFloat+fraction*(endValue.floatValue()-startFloat); }參數分別為上一步的插值因子,開始值與結束值。最後根據TypeEvaluator計算出在10ms時的屬性值:0.15*(40-0)=6pixel。
二、根據屬性值執行相應的動作,如改變對象的某一屬性。(參照上圖理解) 1.通過注冊監聽器AnimatorUpdateListener,在onAnimationUpdate()回調方法中通過ValueAnimator.getAnimatedValue()方法獲取步驟一中的當前屬性值 2.將屬性值賦值給動畫對象 五、ValueAnimator代碼實現 1 2 3 4 5 6 7 8 9 10 11 12 13 14 15 16 17 18 19 20 21 22 23 24 25 26 27 28 29 30 31 32 ValueAnimatorvalueAnimator=newValueAnimator(); valueAnimator.setDuration(3000); //設置動畫時間 valueAnimator.setObjectValues(newPointF(0,0)); //設置目標值 valueAnimator.setInterpolator(newLinearInterpolator()); //設置插值方式 valueAnimator.setEvaluator(newTypeEvaluator如果理解了Value Animator後,Object Animator理解起來也不是太難。因為他們很相似,Value Animator分兩步執行,而Object Animator合二為一了,主要是省去了第二步,因為Object Animator已經在初始化時就指定了要改變的屬性值了,不多說,上代碼:
1 2 3 4 ObjectAnimator .ofFloat(view,"rotationX",0.0F,360.0F) .setDuration(500) .start();對於Object Animator,有如下注意點:
1、提供了ofInt、ofFloat、ofObject,這幾個方法都是設置動畫作用的元素屬性。
2、動畫更新的過程中,會不斷調用setPropName更新元素的屬性,所有使用Object Animator更新某個屬性,必須得有getter(設置一個屬性值的時候)和setter方法~如果你操作對象的該屬性方法裡面,比如上例的setRotationX如果內部沒有調用view的重繪,則你需要自己按照下面方式手動調用。
1 2 3 4 5 6 7 8 9 anim.addUpdateListener(newAnimatorUpdateListener() { @Override publicvoidonAnimationUpdate(ValueAnimatoranimation) { view.postInvalidate(); view.invalidate(); } });
       imageView.animate()
          .setDuration(4000)
          .rotationY(45f)
          .translationX(imageView.getWidth())
          .alpha(0f);
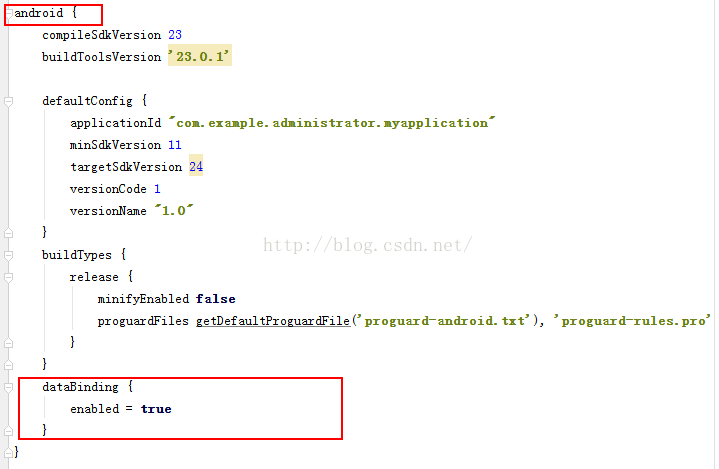 Android數據綁定框架DataBinding用法
一、數據綁定框架DataBinding介紹:Android的新框架DataBinding給我們帶來了很大的方便,以前可能需要在每個Activity裡寫很多的findVie
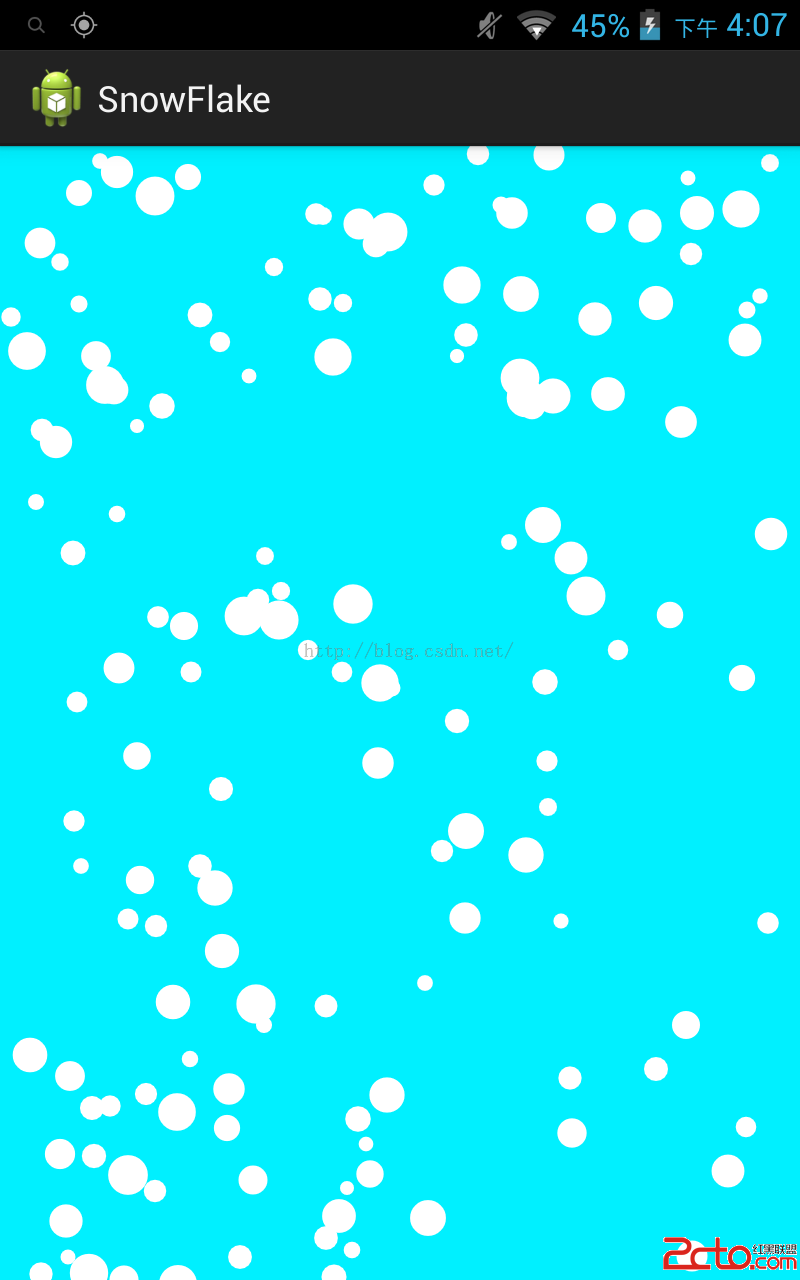 android 實現漫天飛舞雪花以及下雨天的效果
前言:這個效果實現的原作者是國外一位大神。我在其基礎上測試,以及在代碼上加了不少注釋,以及局部修改。後面我有根據漫天飛舞雪花,實現下雨天場景的效果。原作者項目還是andr
 Android ViewPager導航------平凡中有奇跡
ViewPager做導航想不想有這樣的效果: 比如說有四張圖片,下面有四個圓點,當頁面滑動的時候一個點變大一個點變小(或者是一個點變小一個點變大),等於說同時在執行兩個動
 Android 微信搖骰子和猜拳作弊器原理解析
一、前言在之前的一篇文章中我們已經詳細介紹了Android中Hook工作的一款神器Xposed工具:Xposed框架原理解析和使用案例分析 在那一篇文章中我們介紹了如何安