編輯:關於Android編程
好久沒更新博客了,最近在做公司的項目,這也算是我接觸的第一個正式項目。通過項目的檢驗,發現自己積累了一年的知識還是遠遠不夠,想要提高,好的方法是 :項目+書+視頻+博客。最重要一點:勤動手。最近發現了慕課網的視頻,居然都是高清無碼免費的!而且滿滿的干貨!我用業余時間跟著視頻中大神的講解學習了不少知識,下面就將這些小demo與大家分享,當然,我做了一些優化,代碼與視頻中有些出入,但功能可以完全實現。
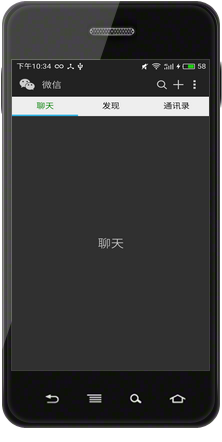
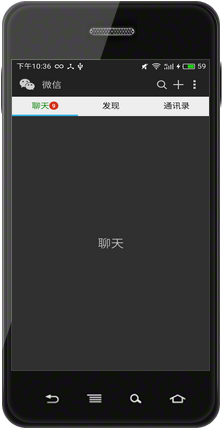
這是一個模仿5.2.1版本的顯示界面,如下圖所示:
功能及實現思路簡介
主要功能很簡單:
1、上面有一個自定義的標題欄;
2、往下是聊天、發現、通訊錄選項卡;
3、手指滑動時,文字下方藍色的indicator可以跟隨滑動;
4、在聊天的右側,有一個未讀消息的紅色提醒圓點。
自定義的標題欄就是一個LinearLayout,同時將系統自帶的TitleBar(或是ActionBar)隱藏;
由於是選項卡,自然想到了Fragment;
手指可以滑動,顯然,黑色的區域是一個ViewPager,數據源就是Fragment組成的集合,並通過FragmentPagerAdapter進行管理;
要實現藍色的indicator隨選項卡的滑動而滑動,可以為ViewPager設置監聽,並根據回調方法的回傳值控制該Indicator的marginLeft屬性值可以實現該效果。
最後消息提醒的小圓點是一個BadgeView ,它是一個第三方開源控件。
主布局
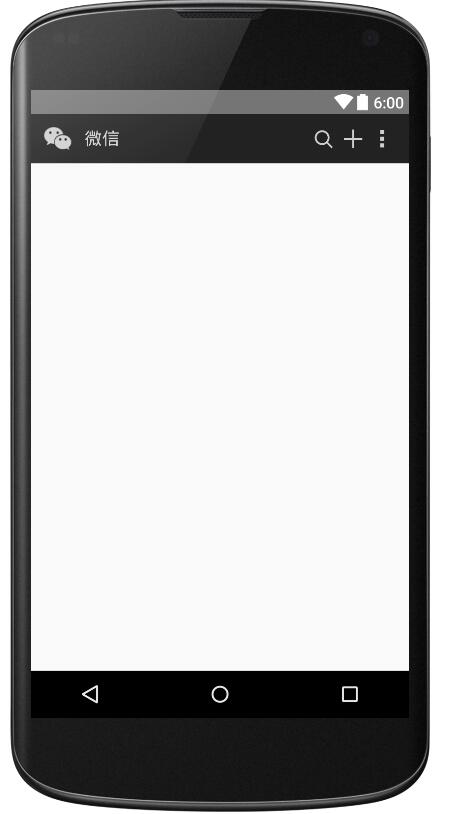
MainActivity布局如下,首先是自定義的TitleBar:
<!-- top1.xml -->

<?xml version="1.0" encoding="utf-8"?>
<RelativeLayout xmlns:android="http://schemas.android.com/apk/res/android"

 android:layout_width="match_parent"
 android:layout_height="50dp"
 android:background="@drawable/topone_bg"
 android:paddingLeft="12dp"
 android:paddingRight="12dp">

 <LinearLayout
  android:layout_width="wrap_content"
  android:layout_height="wrap_content"
  android:layout_centerVertical="true"
  android:gravity="center"
  android:orientation="horizontal">

  <ImageView
   android:layout_width="30dp"
   android:layout_height="30dp"
   android:background="@drawable/actionbar_icon" />

  <TextView
   android:layout_width="wrap_content"
   android:layout_height="wrap_content"
   android:layout_marginLeft="12dp"
   android:text="微信"
   android:textColor="#D3D3D3"
   android:textSize="18sp" />
 </LinearLayout>

 <LinearLayout
  android:layout_width="wrap_content"
  android:layout_height="wrap_content"
  android:layout_alignParentRight="true"
  android:layout_centerVertical="true"
  android:orientation="horizontal">


  <ImageView
   android:layout_width="30dp"
   android:layout_height="30dp"
   android:background="@drawable/actionbar_search_icon" />

  <ImageView
   android:layout_width="30dp"
   android:layout_height="30dp"
   android:background="@drawable/actionbar_add_icon" />

  <ImageView
   android:layout_width="30dp"
   android:layout_height="30dp"
   android:background="@drawable/actionbar_more_icon" />


 </LinearLayout>


</RelativeLayout>
效果如下所示:
接著是三個選項卡的布局:
<!-- top2.xml -->
<?xml version="1.0" encoding="utf-8"?>
<LinearLayout xmlns:android="http://schemas.android.com/apk/res/android"
 android:layout_width="match_parent"
 android:layout_height="40dp"
 android:background="#EEEEEE"
 android:orientation="vertical">

 <LinearLayout
  android:layout_width="match_parent"
  android:layout_height="37dp"
  android:orientation="horizontal">

  <LinearLayout
   android:id="@+id/ll_chat"
   android:layout_width="0dp"
   android:layout_height="match_parent"
   android:layout_weight="1"
   android:gravity="center"
   android:orientation="horizontal">

   <TextView
    android:id="@+id/tv_tab_chat"
    android:layout_width="wrap_content"
    android:layout_height="wrap_content"

    android:layout_gravity="center"
    android:text="聊天"
    android:textColor="#008000"
    android:textSize="16sp" />


  </LinearLayout>

  <LinearLayout
   android:layout_width="0dp"
   android:layout_height="match_parent"
   android:layout_weight="1"
   android:gravity="center">

   <TextView
    android:id="@+id/tv_tab_discover"
    android:layout_width="wrap_content"

    android:layout_height="wrap_content"
    android:text="發現"
    android:textColor="@android:color/black"
    android:textSize="16sp" />


  </LinearLayout>

  <LinearLayout
   android:layout_width="0dp"
   android:layout_height="match_parent"
   android:layout_weight="1"
   android:gravity="center">

   <TextView
    android:id="@+id/tv_tab_contacts"

    android:layout_width="wrap_content"
    android:layout_height="wrap_content"
    android:text="通訊錄"
    android:textColor="@android:color/black"
    android:textSize="16sp" />


  </LinearLayout>

 </LinearLayout>

 <ImageView
  android:id="@+id/iv_tab_line"
  android:layout_width="100dp"
  android:layout_height="3dp"
  android:background="@drawable/tabline" />

</LinearLayout>
效果如下:
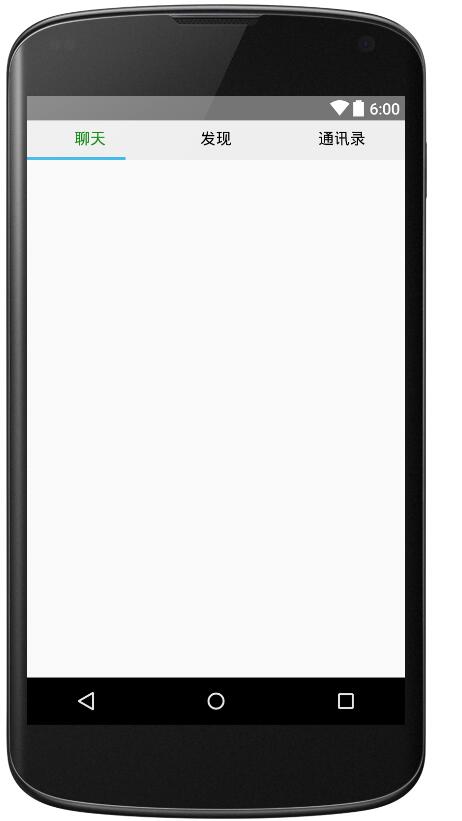
由於Indicator還需要在代碼中動態設置其長度,故在xml中可以附一個任意值。
最後將top1.xml、top2.xml加入至主布局中,並在主布局中引入ViewPager:
<!-- activity_main.xml -->
<?xml version="1.0" encoding="utf-8"?>
<LinearLayout xmlns:android="http://schemas.android.com/apk/res/android"
 xmlns:tools="http://schemas.android.com/tools"
 android:layout_width="match_parent"
 android:layout_height="match_parent"
 android:orientation="vertical"
 tools:context="com.demo.lenovo.myapplication.MainActivity">

 <include layout="@layout/top1" />

 <include layout="@layout/top2" />

 <android.support.v4.view.ViewPager
  android:id="@+id/vp_content"
  android:layout_width="match_parent"
  android:layout_height="0dp"
  android:layout_weight="1" />
</LinearLayout>
效果如下:
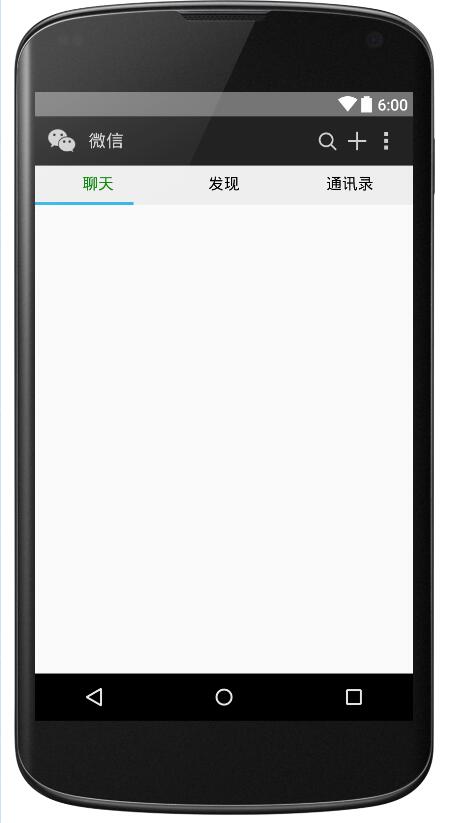
注:如您的Activity繼承於ActionBarActivity,可以在setContentView()方法之前調用requestWindowFeature(Window.FEATURE_NO_TITLE);隱藏標題欄;如繼承於AppCompactActivity,可以在AndroidMainfest
中的Application標簽中設置主題為:android:theme="@style/Theme.AppCompat.NoActionBar",也可以實現隱藏標題欄的目的。
使用FragmentPagerAdapter為ViewPager適配數據
在MainActivity.java 中,加入FragmentPagerAdapter邏輯:(在此略去三個Fragment的布局及代碼)
 private FragmentPagerAdapter adapter;
 private List<Fragment> mData;

@Override
  protected void onCreate(Bundle savedInstanceState) {
    super.onCreate(savedInstanceState);
    requestWindowFeature(Window.FEATURE_NO_TITLE);
    setContentView(R.layout.activity_main);
    initView();
在initView()中,初始化Fragment,並將Fragment實例一次裝入List中,接著,在初始化FragmentPagerAdapter時管理List的數據。最後調用ViewPager的setAdapter方法將FragmentPagerAdapter實例傳入。
 mData = new ArrayList<>();
    mData.add(new ChatFragment());
    mData.add(new DiscoverFragment());
    mData.add(new ContactsFragment());
    adapter = new FragmentPagerAdapter(getSupportFragmentManager()) {
      @Override
      public Fragment getItem(int position) {
        return mData.get(position);
      }

      @Override
      public int getCount() {
        return mData.size();
      }
    };
    vp_content.setAdapter(adapter);
設置滑動時字體顏色的變化
為實現該功能,需要為ViewPager設置setOnPageChangeListener監聽,並通過OnPageChangeListener接口的回調方法onPagerSelected(int position),監聽當前滑動到了第幾頁:
@Override
      public void onPageSelected(int position) {
        Log.e(TAG, "onPageSelected: " + position);
        resetTextViewColor();
        switch (position) {
          case 0:
          addBadgeView();  tv_tab_chat.setTextColor(Color.parseColor("#008000"));
            break;

          case 1:
            tv_tab_discover.setTextColor(Color.parseColor("#008000"));
            break;

          case 2:
            tv_tab_contacts.setTextColor(Color.parseColor("#008000"));
            break;
        }

      }

//首先將每個選項卡的文字顏色置為黑色
 private void resetTextViewColor() {
    tv_tab_contacts.setTextColor(Color.BLACK);
    tv_tab_chat.setTextColor(Color.BLACK);
    tv_tab_discover.setTextColor(Color.BLACK);
添加BadgeView
在addBadgeView();方法中首先判斷BadgeView是否為空,若不為空,首先將其移除,再添加新的BadgeView,代碼如下:
 private void addBadgeView()
 {
 if (mBadgeView != null) {
              ll_chat.removeView(mBadgeView);
            }
            mBadgeView = new BadgeView(MainActivity.this);
            ll_chat.addView(mBadgeView);
            mBadgeView.setBadgeCount(9);


}
indicator的滑動
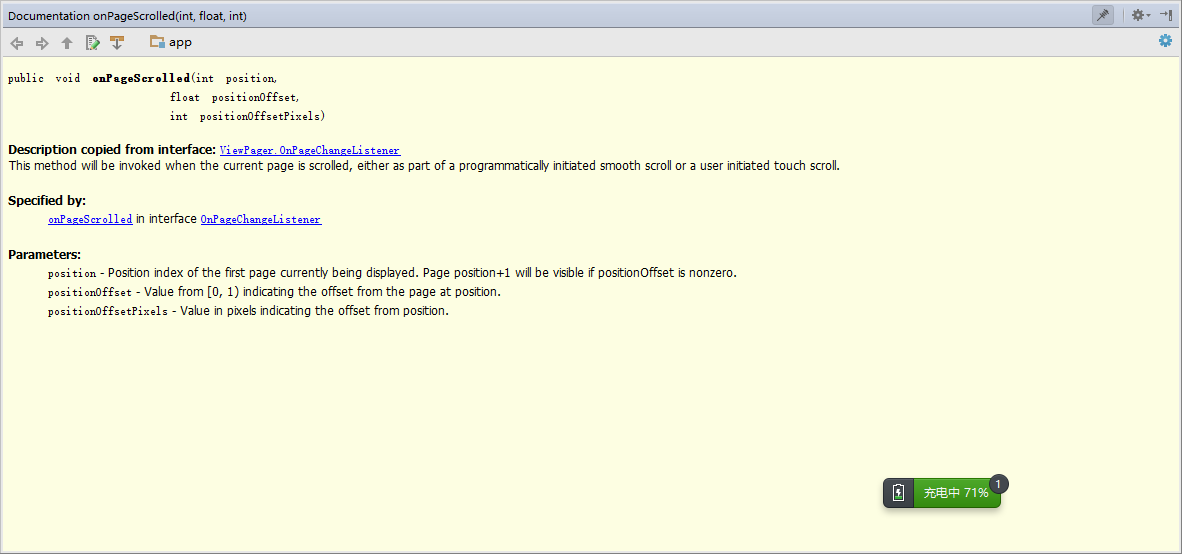
為了實現該Indicator隨手指的滑動而跟隨的效果,需要在OnPageChangeListener接口中的onPageScrolled()方法中編寫邏輯,該方法的文檔如下:
 ,
,
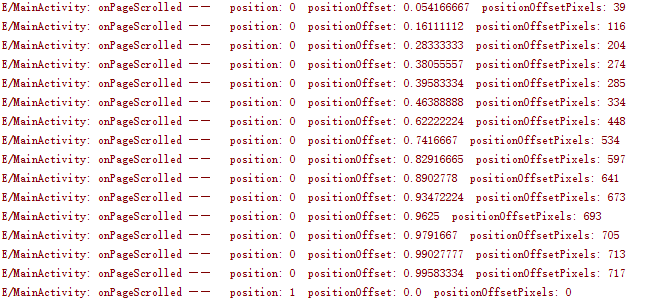
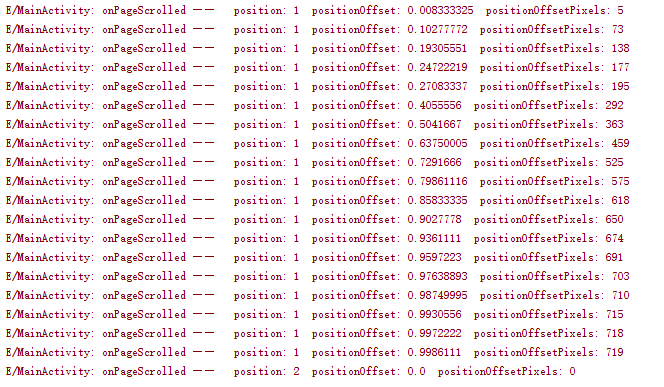
其中,第一個參數position表示滑動到了第幾頁,比如說,若從第0頁滑動至第一頁,那麼position將一直為0,直到松手以後,滑動至第一頁,position將變為1,第二個參數positionOffset表示滑動的百分比,取值范圍是0-1,最後一個參數positionOffsetPixels表示滑動的像素數。
下面是從0—>1頁面時打印的log,如下所示:
從1—->2頁面時打印的log:
從2—->1頁面時打印的log:
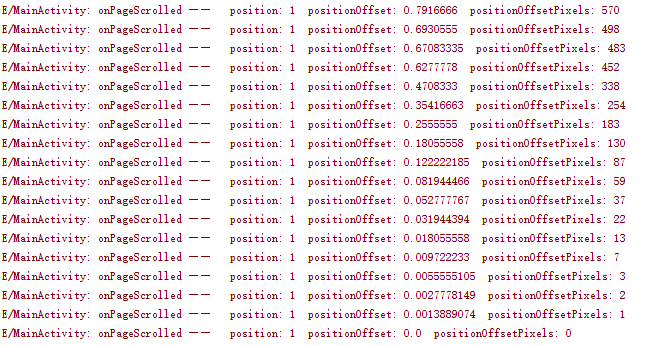
最後,可以根據(position+positionOffset)*1/3,來設置該Indicator的marginLeft。
首先,應為Indicator設置寬度,其寬度應為屏幕寬度的1/3:
 WindowManager manager = getWindow().getWindowManager();
    Display display = manager.getDefaultDisplay();
    DisplayMetrics outMetrics = new DisplayMetrics();
    display.getMetrics(outMetrics);
    mScreenOneThird = outMetrics.widthPixels / 3;
其中int型參數mScreenOneThird 的單位是像素px。
設置到Indicator上:
LinearLayout.LayoutParams lp = (LinearLayout.LayoutParams) iv_tab_line.getLayoutParams();
    lp.width = mScreenOneThird;
    iv_tab_line.setLayoutParams(lp);
最終在onPageScrolled方法中動態改變Indicator的marginLeft屬性:
@Override
      public void onPageScrolled(int position, float positionOffset, int positionOffsetPixels) {
        LinearLayout.LayoutParams lp = (LinearLayout.LayoutParams) iv_tab_line.getLayoutParams();
        lp.leftMargin = (int) ((positionOffset * mScreenOneThird) + (mScreenOneThird * position));
        iv_tab_line.setLayoutParams(lp);
可實現最終效果。
以上就是本文的全部內容,希望對大家的學習有所幫助,也希望大家多多支持本站。
 Android編程實現向桌面添加快捷方式的方法
本文實例講述了Android編程實現向桌面添加快捷方式的方法。分享給大家供大家參考,具體如下:有時候為了使用方便,需要在桌面上添加快捷方式,下面是兩種添加快捷方式的方法:
 android下NDK開發環境搭建及TestJNI入門實例完整過程
1.先搭建好基本的ndk的開發環境在windows下安裝下面兩個軟件1、 Android NDK 安裝2、 安裝Cygwin與使用NDK編譯本文建立在已經完成Androi
 Android自定義UI手勢密碼終結版
之前寫過3篇手勢密碼的demo,不過沒有集成到真實的企業項目中,這幾天正好領到一個手勢密碼項目,昨天剛好弄完,今天抽空整理下,目前還沒有完善,有一些地方需要更改,不過基本
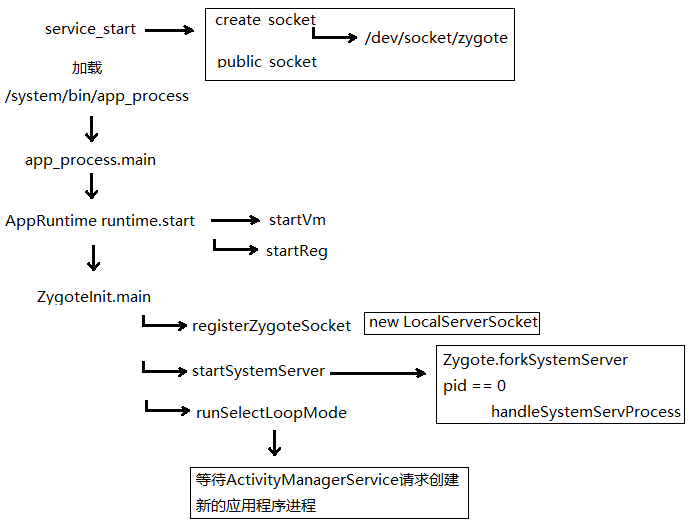 Dalvik學習筆記——Zygote啟動
這張圖簡單說明了Zygote的啟動過程下面重點解析這些函數,從app_process.main開始 int main(int argc, char* const