編輯:關於Android編程
1、概述
Android提供了幾種動畫類型:View Animation 、Drawable Animation 、Property Animation 。View Animation相當簡單,不過只能支持簡單的縮放、平移、旋轉、透明度基本的動畫,且有一定的局限性。比如:你希望View有一個顏色的切換動畫;你希望可以使用3D旋轉動畫;你希望當動畫停止時,View的位置就是當前的位置;這些View Animation都無法做到。這就是Property Animation產生的原因,本篇則來詳細介紹Property Animation的用法。
property 動畫系統是相當健壯的框架,它幾乎可以動畫顯示任何對象。 你可以定義一個動畫來定時改變任何對象的屬性值,不論該對象是否在屏幕上顯示。 property 動畫將以一定的時間間隔修改屬性值(對象中的字段值)。 要實現動畫顯示,你須指定對象的相應屬性(比如對象的屏幕位置),以及動畫時長、動畫時間間隔。
property 動畫系統能讓你設定以下動畫要素:
(1)持續時間:指定動畫的持續顯示時間。默認的時長是300毫秒。
(2)圖像插值方式:指定屬性值的變化方式,表示為關於動畫已顯示時間的函數。
(3)重復次數和方式:指定動畫是否循環播放,以及重復的次數。還可以指定動畫是否反向播放。可以設為先正向播放再反向回放,如此往復直至達到設定的重復次數。
(4)動畫集合:你可以把動畫分為多個邏輯組,以便實現同時播放、順序播放或間隔一段時間再播放。
(5)幀刷新間隔:指定動畫幀的刷新頻率。默認是每 10 ms刷新一次,但應用程序實際可執行的刷新頻率取決於系統整體的繁忙程度,以及系統對定時器的支持程度。
2、相關API
Property Animation故名思議就是通過動畫的方式改變對象的屬性了,我們首先需要了解幾個屬性:
(1)Duration動畫的持續時間,默認300ms。
(2)Time interpolation:時間差值,乍一看不知道是什麼,但是我說LinearInterpolator、AccelerateDecelerateInterpolator,大家一定知道是干嘛的了,定義動畫的變化率。
(3)Repeat count and behavior:重復次數、以及重復模式;可以定義重復多少次;重復時從頭開始,還是反向。
(4)Animator sets: 動畫集合,你可以定義一組動畫,一起執行或者順序執行。
(5)Frame refresh delay:幀刷新延遲,對於你的動畫,多久刷新一次幀;默認為10ms,但最終依賴系統的當前狀態;基本不用管。
相關的類:
(1)ObjectAnimator 動畫的執行類,後面詳細介紹
(2)ValueAnimator 動畫的執行類,後面詳細介紹
(3)AnimatorSet 用於控制一組動畫的執行:線性,一起,每個動畫的先後執行等。
(4)AnimatorInflater 用戶加載屬性動畫的xml文件
(5)TypeEvaluator 類型估值,主要用於設置動畫操作屬性的值。
(6)TimeInterpolator 時間插值,上面已經介紹。
總的來說,屬性動畫就是,動畫的執行類來設置動畫操作的對象的屬性、持續時間,開始和結束的屬性值,時間差值等,然後系統會根據設置的參數動態的變化對象的屬性。
3、ObjectAnimator實現動畫
之所以選擇ObjectAnimator為第一個~~是因為,這個實現最簡單~~一行代碼,秒秒鐘實現動畫,下面看個例子:
布局文件:
<RelativeLayout xmlns:android="http://schemas.android.com/apk/res/android"
  xmlns:tools="http://schemas.android.com/tools"
  android:layout_width="match_parent"
  android:layout_height="match_parent"
  android:id="@+id/id_container" >

  <ImageView
    android:id="@+id/id_ball"
    android:layout_width="wrap_content"
    android:layout_height="wrap_content"
    android:layout_centerInParent="true"
    android:src="@drawable/mv"
    android:scaleType="centerCrop"
    android:onClick="rotateyAnimRun"
    />

</RelativeLayout>
很簡單,就一張妹子圖片~
Activity代碼:
package com.example.zhy_property_animation;

import android.animation.ObjectAnimator;
import android.app.Activity;
import android.os.Bundle;
import android.view.View;

public class ObjectAnimActivity extends Activity
{
  @Override
  protected void onCreate(Bundle savedInstanceState)
  {
    super.onCreate(savedInstanceState);
    setContentView(R.layout.xml_for_anim);
  }

  public void rotateyAnimRun(View view)
  {
     ObjectAnimator//
     .ofFloat(view, "rotationX", 0.0F, 360.0F)//
     .setDuration(500)//
     .start();
  }

}
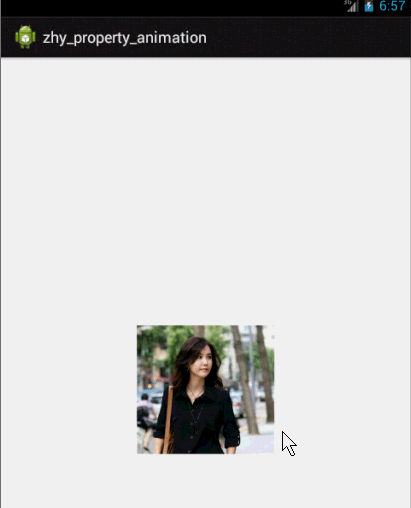
效果:
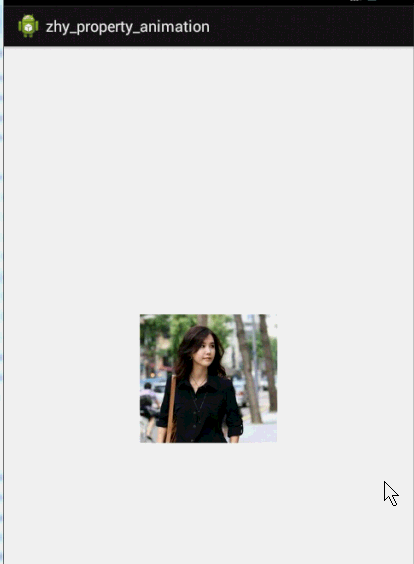
是不是一行代碼就能實現簡單的動畫~~
對於ObjectAnimator:
(1)提供了ofInt、ofFloat、ofObject,這幾個方法都是設置動畫作用的元素、作用的屬性、動畫開始、結束、以及中間的任意個屬性值。
當對於屬性值,只設置一個的時候,會認為當然對象該屬性的值為開始(getPropName反射獲取),然後設置的值為終點。如果設置兩個,則一個為開始、一個為結束~~~
動畫更新的過程中,會不斷調用setPropName更新元素的屬性,所有使用ObjectAnimator更新某個屬性,必須得有getter(設置一個屬性值的時候)和setter方法~
(2)如果你操作對象的該屬性方法裡面,比如上例的setRotationX如果內部沒有調用view的重繪,則你需要自己按照下面方式手動調用。
anim.addUpdateListener(new AnimatorUpdateListener()
    {
      @Override
      public void onAnimationUpdate(ValueAnimator animation)
      {
//       view.postInvalidate();
//       view.invalidate();
      }
    });
(3)看了上面的例子,因為設置的操作的屬性只有一個,那麼如果我希望一個動畫能夠讓View既可以縮小、又能夠淡出(3個屬性scaleX,scaleY,alpha),只使用ObjectAnimator咋弄?
想法是不是很不錯,可能會說使用AnimatorSet啊,這一看就是一堆動畫塞一起執行,但是我偏偏要用一個ObjectAnimator實例實現呢~下面看代碼:
public void rotateyAnimRun(final View view)
{
  ObjectAnimator anim = ObjectAnimator//
      .ofFloat(view, "zhy", 1.0F, 0.0F)//
      .setDuration(500);//
  anim.start();
  anim.addUpdateListener(new AnimatorUpdateListener()
  {
    @Override
    public void onAnimationUpdate(ValueAnimator animation)
    {
      float cVal = (Float) animation.getAnimatedValue();
      view.setAlpha(cVal);
      view.setScaleX(cVal);
      view.setScaleY(cVal);
    }
  });
}
把設置屬性的那個字符串,隨便寫一個該對象沒有的屬性,就是不管~~咱們只需要它按照時間插值和持續時間計算的那個值,我們自己手動調用~
效果:
這個例子就是想說明一下,有時候換個思路不要被API所約束,利用部分API提供的功能也能實現好玩的效果~~~
比如:你想實現拋物線的效果,水平方向100px/s,垂直方向加速度200px/s*s ,咋實現呢~~可以自己用ObjectAnimator試試~
(4)其實還有更簡單的方式,實現一個動畫更改多個效果:使用propertyValuesHolder
public void propertyValuesHolder(View view)
  {
    PropertyValuesHolder pvhX = PropertyValuesHolder.ofFloat("alpha", 1f,
        0f, 1f);
    PropertyValuesHolder pvhY = PropertyValuesHolder.ofFloat("scaleX", 1f,
        0, 1f);
    PropertyValuesHolder pvhZ = PropertyValuesHolder.ofFloat("scaleY", 1f,
        0, 1f);
    ObjectAnimator.ofPropertyValuesHolder(view, pvhX, pvhY,pvhZ).setDuration(1000).start();
  }
4、ValueAnimator實現動畫
和ObjectAnimator用法很類似,簡單看一下用view垂直移動的動畫代碼:
public void verticalRun(View view)
  {
    ValueAnimator animator = ValueAnimator.ofFloat(0, mScreenHeight
        - mBlueBall.getHeight());
    animator.setTarget(mBlueBall);
    animator.setDuration(1000).start();
  }
給你的感覺是不是,坑爹啊,這和ValueAnimator有毛線區別~但是仔細看,你看會發現,沒有設置操作的屬性~~也就是說,上述代碼是沒有任何效果的,沒有指定屬性~
這就是和ValueAnimator的區別之處:ValueAnimator並沒有在屬性上做操作,你可能會問這樣有啥好處?我豈不是還得手動設置?
好處:不需要操作的對象的屬性一定要有getter和setter方法,你可以自己根據當前動畫的計算值,來操作任何屬性,記得上例的那個【我希望一個動畫能夠讓View既可以縮小、又能夠淡出(3個屬性scaleX,scaleY,alpha)】嗎?其實就是這麼個用法~
實例:
布局文件:
<RelativeLayout xmlns:android="http://schemas.android.com/apk/res/android"
  xmlns:tools="http://schemas.android.com/tools"
  android:layout_width="match_parent"
  android:layout_height="match_parent"
  android:id="@+id/id_container"

  >

  <ImageView
    android:id="@+id/id_ball"
    android:layout_width="wrap_content"
    android:layout_height="wrap_content"
    android:src="@drawable/bol_blue" />

  <LinearLayout
    android:layout_width="fill_parent"
    android:layout_height="wrap_content"
    android:layout_alignParentBottom="true"
    android:orientation="horizontal" >

    <Button
      android:layout_width="wrap_content"
      android:layout_height="wrap_content"
      android:onClick="verticalRun"
      android:text="垂直" />

    <Button
      android:layout_width="wrap_content"
      android:layout_height="wrap_content"
      android:onClick="paowuxian"
      android:text="拋物線" />

  </LinearLayout>

</RelativeLayout>
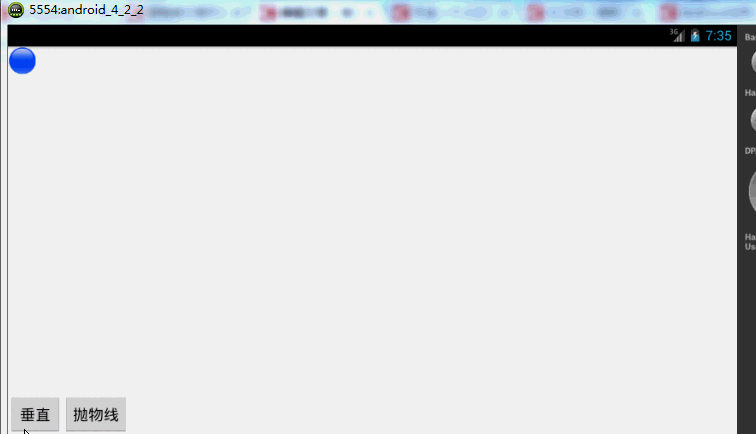
左上角一個小球,底部兩個按鈕~我們先看一個自由落體的代碼:
/**
   * 自由落體
   * @param view
   */
  public void verticalRun( View view)
  {
    ValueAnimator animator = ValueAnimator.ofFloat(0, mScreenHeight
        - mBlueBall.getHeight());
    animator.setTarget(mBlueBall);
    animator.setDuration(1000).start();
//   animator.setInterpolator(value)
    animator.addUpdateListener(new AnimatorUpdateListener()
    {
      @Override
      public void onAnimationUpdate(ValueAnimator animation)
      {
        mBlueBall.setTranslationY((Float) animation.getAnimatedValue());
      }
    });
  }
與ObjectAnimator不同的就是我們自己設置元素屬性的更新~雖然多了幾行代碼,但是貌似提高靈活性~
下面再來一個例子,如果我希望小球拋物線運動【實現拋物線的效果,水平方向100px/s,垂直方向加速度200px/s*s 】,分析一下,貌似只和時間有關系,但是根據時間的變化,橫向和縱向的移動速率是不同的,我們該咋實現呢?此時就要重寫TypeValue的時候了,因為我們在時間變化的同時,需要返回給對象兩個值,x當前位置,y當前位置:
代碼:
/**
   * 拋物線
   * @param view
   */
  public void paowuxian(View view)
  {

    ValueAnimator valueAnimator = new ValueAnimator();
    valueAnimator.setDuration(3000);
    valueAnimator.setObjectValues(new PointF(0, 0));
    valueAnimator.setInterpolator(new LinearInterpolator());
    valueAnimator.setEvaluator(new TypeEvaluator<PointF>()
    {
      // fraction = t / duration
      @Override
      public PointF evaluate(float fraction, PointF startValue,
          PointF endValue)
      {
        Log.e(TAG, fraction * 3 + "");
        // x方向200px/s ,則y方向0.5 * 10 * t
        PointF point = new PointF();
        point.x = 200 * fraction * 3;
        point.y = 0.5f * 200 * (fraction * 3) * (fraction * 3);
        return point;
      }
    });

    valueAnimator.start();
    valueAnimator.addUpdateListener(new AnimatorUpdateListener()
    {
      @Override
      public void onAnimationUpdate(ValueAnimator animation)
      {
        PointF point = (PointF) animation.getAnimatedValue();
        mBlueBall.setX(point.x);
        mBlueBall.setY(point.y);

      }
    });
  }
可以看到,因為ofInt,ofFloat等無法使用,我們自定義了一個TypeValue,每次根據當前時間返回一個PointF對象,(PointF和Point的區別就是x,y的單位一個是float,一個是int;RectF,Rect也是)PointF中包含了x,y的當前位置~然後我們在監聽器中獲取,動態設置屬性:
效果圖:
有木有兩個鐵球同時落地的感覺~~對,我應該搞兩個球~~ps:物理公式要是錯了,就當沒看見哈
自定義TypeEvaluator傳入的泛型可以根據自己的需求,自己設計個Bean。
好了,我們已經分別講解了ValueAnimator和ObjectAnimator實現動畫;二者區別;如何利用部分API,自己更新屬性實現效果;自定義TypeEvaluator實現我們的需求;但是我們並沒有講如何設計插值,其實我覺得把,這個插值默認的那一串實現類夠用了~~很少,會自己去設計個超級變態的~嗯~所以:略。
5、監聽動畫的事件
對於動畫,一般都是一些輔助效果,比如我要刪除個元素,我可能希望是個淡出的效果,但是最終還是要刪掉,並不是你透明度沒有了,還占著位置,所以我們需要知道動畫如何結束。
所以我們可以添加一個動畫的監聽:
public void fadeOut(View view)
  {
    ObjectAnimator anim = ObjectAnimator.ofFloat(mBlueBall, "alpha", 0.5f);

    anim.addListener(new AnimatorListener()
    {

      @Override
      public void onAnimationStart(Animator animation)
      {
        Log.e(TAG, "onAnimationStart");
      }

      @Override
      public void onAnimationRepeat(Animator animation)
      {
        // TODO Auto-generated method stub
        Log.e(TAG, "onAnimationRepeat");
      }

      @Override
      public void onAnimationEnd(Animator animation)
      {
        Log.e(TAG, "onAnimationEnd");
        ViewGroup parent = (ViewGroup) mBlueBall.getParent();
        if (parent != null)
          parent.removeView(mBlueBall);
      }

      @Override
      public void onAnimationCancel(Animator animation)
      {
        // TODO Auto-generated method stub
        Log.e(TAG, "onAnimationCancel");
      }
    });
    anim.start();
  }
這樣就可以監聽動畫的開始、結束、被取消、重復等事件~但是有時候會覺得,我只要知道結束就行了,這麼長的代碼我不能接收,那你可以使用AnimatorListenerAdapter
anim.addListener(new AnimatorListenerAdapter()
{
  @Override
  public void onAnimationEnd(Animator animation)
  {
    Log.e(TAG, "onAnimationEnd");
    ViewGroup parent = (ViewGroup) mBlueBall.getParent();
    if (parent != null)
      parent.removeView(mBlueBall);
  }
});
AnimatorListenerAdapter繼承了AnimatorListener接口,然後空實現了所有的方法~
效果圖:
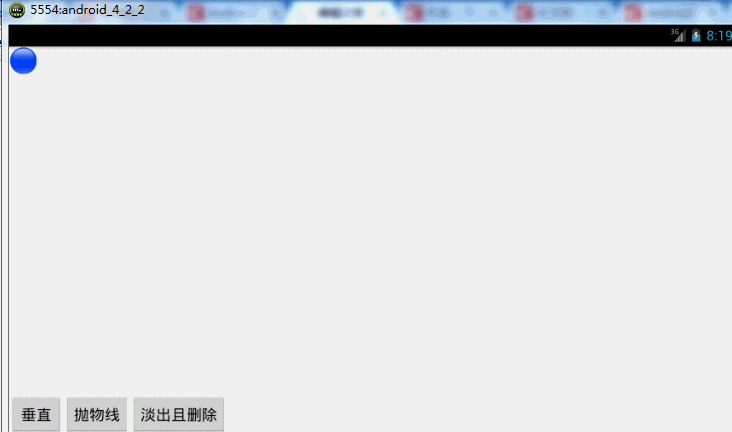
animator還有cancel()和end()方法:cancel動畫立即停止,停在當前的位置;end動畫直接到最終狀態。
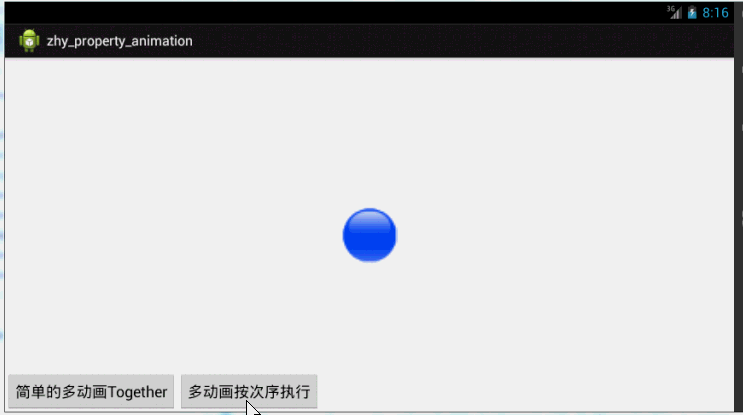
6、AnimatorSet的使用
實例:
布局文件:
<RelativeLayout xmlns:android="http://schemas.android.com/apk/res/android"
  xmlns:tools="http://schemas.android.com/tools"
  android:layout_width="match_parent"
  android:layout_height="match_parent"
  android:id="@+id/id_container"

  >

  <ImageView
    android:id="@+id/id_ball"
    android:layout_width="wrap_content"
    android:layout_height="wrap_content"
    android:layout_centerInParent="true"
    android:src="@drawable/bol_blue" />

  <LinearLayout
    android:layout_width="fill_parent"
    android:layout_height="wrap_content"
    android:layout_alignParentBottom="true"
    android:orientation="horizontal" >

    <Button
      android:layout_width="wrap_content"
      android:layout_height="wrap_content"
      android:onClick="togetherRun"
      android:text="簡單的多動畫Together" />

    <Button
      android:layout_width="wrap_content"
      android:layout_height="wrap_content"
      android:onClick="playWithAfter"
      android:text="多動畫按次序執行" />


  </LinearLayout>

</RelativeLayout>
繼續玩球~
代碼:
package com.example.zhy_property_animation;

import android.animation.AnimatorSet;
import android.animation.ObjectAnimator;
import android.app.Activity;
import android.os.Bundle;
import android.view.View;
import android.view.animation.LinearInterpolator;
import android.widget.ImageView;

public class AnimatorSetActivity extends Activity
{
  private ImageView mBlueBall;

  @Override
  protected void onCreate(Bundle savedInstanceState)
  {
    super.onCreate(savedInstanceState);
    setContentView(R.layout.anim_set);

    mBlueBall = (ImageView) findViewById(R.id.id_ball);

  }

  public void togetherRun(View view)
  {
    ObjectAnimator anim1 = ObjectAnimator.ofFloat(mBlueBall, "scaleX",
        1.0f, 2f);
    ObjectAnimator anim2 = ObjectAnimator.ofFloat(mBlueBall, "scaleY",
        1.0f, 2f);
    AnimatorSet animSet = new AnimatorSet();
    animSet.setDuration(2000);
    animSet.setInterpolator(new LinearInterpolator());
    //兩個動畫同時執行
    animSet.playTogether(anim1, anim2);
    animSet.start();
  }

  public void playWithAfter(View view)
  {
    float cx = mBlueBall.getX();

    ObjectAnimator anim1 = ObjectAnimator.ofFloat(mBlueBall, "scaleX",
        1.0f, 2f);
    ObjectAnimator anim2 = ObjectAnimator.ofFloat(mBlueBall, "scaleY",
        1.0f, 2f);
    ObjectAnimator anim3 = ObjectAnimator.ofFloat(mBlueBall,
        "x", cx , 0f);
    ObjectAnimator anim4 = ObjectAnimator.ofFloat(mBlueBall,
        "x", cx);

    /**
     * anim1,anim2,anim3同時執行
     * anim4接著執行
     */
    AnimatorSet animSet = new AnimatorSet();
    animSet.play(anim1).with(anim2);
    animSet.play(anim2).with(anim3);
    animSet.play(anim4).after(anim3);
    animSet.setDuration(1000);
    animSet.start();
  }
}
這裡寫了兩個效果:
第一:使用playTogether兩個動畫同時執行,當然還有playSequentially依次執行~~
第二:如果我們有一堆動畫,如何使用代碼控制順序,比如1,2同時;3在2後面;4在1之前等~就是效果2了
有一點注意:animSet.play().with();也是支持鏈式編程的,但是不要想著狂點,比如 animSet.play(anim1).with(anim2).before(anim3).before(anim5); 這樣是不行的,系統不會根據你寫的這一長串來決定先後的順序,所以麻煩你按照上面例子的寫法,多寫幾行:
效果圖:
 Android進程間通信與數據共享(ppt)
 android TabHost(選項卡)的使用方法
首先,定義TabHost的布局文件:復制代碼 代碼如下:<?xml version=1.0 encoding=utf-8?><TabHost xmlns
 Android 懸浮窗各機型各系統適配大全
這篇博客主要介紹的是 Android 主流各種機型和各種版本的懸浮窗權限適配,但是由於碎片化的問題,所以在適配方面也無法做到完全的主流機型適配懸浮窗適配懸浮窗適配有兩種方
 Android - 交換控件位置:基於LayoutParams的瞬間交換與基於ObjectAnimator動畫效果交換
現需要交換兩個控件(本文中是兩個RelativeLayout),找到了兩個方法:1、使用LayoutParams改變兩個layout的屬性,即其相對關系(below等),