編輯:關於Android編程
Android為我們提供了兩種HTTP交互的方式:HttpURLConnection 和 Apache HTTP Client,雖然兩者都支持HTTPS,流的上傳和下載,配置超時,IPv6和連接池,已足夠滿足我們各種HTTP請求的需求。但更高效的使用HTTP可以讓您的應用運行更快、更節省流量。而OkHttp庫就是為此而生。
OkHttp是一個高效的HTTP庫:
支持 SPDY ,共享同一個Socket來處理同一個服務器的所有請求
如果SPDY不可用,則通過連接池來減少請求延時
無縫的支持GZIP來減少數據流量
緩存響應數據來減少重復的網絡請求
會從很多常用的連接問題中自動恢復。如果您的服務器配置了多個IP地址,當第一個IP連接失敗的時候,OkHttp會自動嘗試下一個IP。OkHttp還處理了代理服務器問題和SSL握手失敗問題。
使用 OkHttp 無需重寫您程序中的網絡代碼。OkHttp實現了幾乎和java.net.HttpURLConnection一樣的API。如果您用了 Apache HttpClient,則OkHttp也提供了一個對應的okhttp-apache 模塊。
OKHttp源碼位置https://github.com/square/okhttp
簡單使用代碼

上面是OKHttp總體設計圖,主要是通過Diapatcher不斷從RequestQueue中取出請求(Call),根據是否已緩存調用Cache或Network這兩類數據獲取接口之一,從內存緩存或是服務器取得請求的數據。該引擎有同步和異步請求,同步請求通過Call.execute()直接返回當前的Response,而異步請求會把當前的請求Call.enqueue添加(AsyncCall)到請求隊列中,並通過回調(Callback)的方式來獲取最後結果。
接下來會介紹一些比較重要的類,另外一些基礎IO方面的內容主要來之iohttp這個包。這些類的解釋大部分來至文檔介紹本身,所以在此不會翻譯成中文,本人覺得英語原文更能准確表達它自身的作用。
1.Route.java
The concrete route used by a connection to reach an abstract origin server.
When creating a connection the client has many options:
HTTP proxy: a proxy server may be explicitly configured for the client. Otherwise the {@linkplain java.net.ProxySelector proxy selector} is used. It may return multiple proxies to attempt.
IP address: whether connecting directly to an origin server or a proxy, opening a socket requires an IP address. The DNS server may return multiple IP addresses to attempt.
TLS configuration: which cipher suites and TLS versions to attempt with the HTTPS connection.
Each route is a specific selection of these options.
其實就是對地址的一個封裝類,但是很重要。
2.Platform.java
Access to platform-specific features.
Server name indication (SNI): Supported on Android 2.3+.
Session Tickets: Supported on Android 2.3+.
Android Traffic Stats (Socket Tagging): Supported on Android 4.0+.
ALPN (Application Layer Protocol Negotiation): Supported on Android 5.0+. The APIs were present in Android 4.4, but that implementation was unstable.
Supported on OpenJDK 7 and 8 (via the JettyALPN-boot library).
這個類主要是做平台適應性,針對Android2.3到5.0後的網絡請求的適配支持。同時,在這個類中能看到針對不同平台,通過java反射不同的class是不一樣的。
3.Connnection.java
The sockets and streams of an HTTP, HTTPS, or HTTPS+SPDY connection. May be used for multiple HTTP request/response exchanges. Connections may be direct to the origin server or via a proxy.
Typically instances of this class are created, connected and exercised automatically by the HTTP client. Applications may use this class to monitor HTTP connections as members of a ConnectionPool.
Do not confuse this class with the misnamed HttpURLConnection, which isn’t so much a connection as a single request/response exchange.
Modern TLS
There are tradeoffs when selecting which options to include when negotiating a secure connection to a remote host. Newer TLS options are quite useful:
Server Name Indication (SNI) enables one IP address to negotiate secure connections for multiple domain names.
Application Layer Protocol Negotiation (ALPN) enables the HTTPS port (443) to be used for different HTTP and SPDY protocols.
Unfortunately, older HTTPS servers refuse to connect when such options are presented. Rather than avoiding these options entirely, this class allows a connection to be attempted with modern options and then retried without them should the attempt fail.
4.ConnnectionPool.java
Manages reuse of HTTP and SPDY connections for reduced network latency. HTTP requests that share the same Address may share a Connection. This class implements the policy of which connections to keep open for future use.
The system-wide default uses system properties for tuning parameters:
http.keepAlive true if HTTP and SPDY connections should be pooled at all. Default is true.
http.maxConnections maximum number of idle connections to each to keep in the pool. Default is 5.
http.keepAliveDuration Time in milliseconds to keep the connection alive in the pool before closing it. Default is 5 minutes. This property isn’t used by HttpURLConnection.
The default instance doesn’t adjust its configuration as system properties are changed. This assumes that the applications that set these parameters do so before making HTTP connections, and that this class is initialized lazily.
5.Request.java
An HTTP request. Instances of this class are immutable if their body is null or itself immutable.(Builder模式)
6.Response.java
An HTTP response. Instances of this class are not immutable: the response body is a one-shot value that may be consumed only once. All other properties are immutable.
7.Call.java
A call is a request that has been prepared for execution. A call can be canceled. As this object represents a single request/response pair (stream), it cannot be executed twice.
8.Dispatcher.java
Policy on when async requests are executed.
Each dispatcher uses an ExecutorService to run calls internally. If you supply your own executor, it should be able to run configured maximum number of calls concurrently.
9.HttpEngine.java
Handles a single HTTP request/response pair. Each HTTP engine follows this
lifecycle:
It is created.
The HTTP request message is sent with sendRequest(). Once the request is sent it is an error to modify the request headers. After sendRequest() has been called the request body can be written to if it exists.
The HTTP response message is read with readResponse(). After the response has been read the response headers and body can be read. All responses have a response body input stream, though in some instances this stream is empty.
The request and response may be served by the HTTP response cache, by the network, or by both in the event of a conditional GET.
10.Internal.java
Escalate internal APIs in {@code com.squareup.okhttp} so they can be used from OkHttp’s implementation packages. The only implementation of this interface is in {@link com.squareup.okhttp.OkHttpClient}.
11.Cache.java
Caches HTTP and HTTPS responses to the filesystem so they may be reused, saving time and bandwidth.
Cache Optimization
To measure cache effectiveness, this class tracks three statistics:
Request Count: the number of HTTP requests issued since this cache was created.
Network Count: the number of those requests that required network use.
Hit Count: the number of those requests whose responses were served by the cache.
Sometimes a request will result in a conditional cache hit. If the cache contains a stale copy of the response, the client will issue a conditional GET. The server will then send either the updated response if it has changed, or a short ‘not modified’ response if the client’s copy is still valid. Such responses increment both the network count and hit count.
The best way to improve the cache hit rate is by configuring the web server to return cacheable responses. Although this client honors all HTTP/1.1 (RFC 2068) cache headers, it doesn’t cache partial responses.
Force a Network Response
In some situations, such as after a user clicks a ‘refresh’ button, it may be necessary to skip the cache, and fetch data directly from the server. To force a full refresh, add the {@code no-cache} directive:
If it is only necessary to force a cached response to be validated by the server, use the more efficient {@code max-age=0} instead:
Force a Cache Response
Sometimes you’ll want to show resources if they are available immediately, but not otherwise. This can be used so your application can show something while waiting for the latest data to be downloaded. To restrict a request to locally-cached resources, add the {@code only-if-cached} directive:
This technique works even better in situations where a stale response is better than no response. To permit stale cached responses, use the {@code max-stale} directive with the maximum staleness in seconds:
12.OkHttpClient.java
Configures and creates HTTP connections. Most applications can use a single OkHttpClient for all of their HTTP requests - benefiting from a shared response cache, thread pool, connection re-use, etc.
Instances of OkHttpClient are intended to be fully configured before they’re shared - once shared they should be treated as immutable and can safely be used to concurrently open new connections. If required, threads can call clone to make a shallow copy of the OkHttpClient that can be safely modified with further configuration changes.
下面是關於OKHttp的請求流程圖

由於整個設計類圖比較大,所以本人將從核心入口client、cache、interceptor、網絡配置、連接池、平台適配性…這些方面來逐一進行分析源代碼的設計。
下面是核心入口OkHttpClient的類設計圖

從OkHttpClient類的整體設計來看,它采用門面模式來。client知曉子模塊的所有配置以及提供需要的參數。client會將所有從客戶端發來的請求委派到相應的子系統去。
在該系統中,有多個子系統、類或者類的集合。例如上面的cache、連接以及連接池相關類的集合、網絡配置相關類集合等等。每個子系統都可以被客戶端直接調用,或者被門面角色調用。子系統並不知道門面的存在,對於子系統而言,門面僅僅是另外一個客戶端而已。同時,OkHttpClient可以看作是整個框架的上下文。
通過類圖,其實很明顯反應了該框架的幾大核心子系統;路由、連接協議、攔截器、代理、安全性認證、連接池以及網絡適配。從client大大降低了開發者使用難度。同時非常明了的展示了該框架在所有需要的配置以及獲取結果的方式。
在接下來的幾個Section中將會結合子模塊核心類的設計,從該框架的整體特性上來分析這些模塊是如何實現各自功能。以及各個模塊之間是如何相互配合來完成客戶端各種復雜請求。
在發起請求時,整個框架主要通過Call來封裝每一次的請求。同時Call持有OkHttpClient和一份HttpEngine。而每一次的同步或者異步請求都會有Dispatcher的參與,不同的是:
同步
Dispatcher會在同步執行任務隊列中記錄當前被執行過得任務Call,同時在當前線程中去執行Call的getResponseWithInterceptorChain()方法,直接獲取當前的返回數據Response;異步
首先來說一下Dispatcher,Dispatcher內部實現了懶加載無邊界限制的線程池方式,同時該線程池采用了SynchronousQueue這種阻塞隊列。SynchronousQueue每個插入操作必須等待另一個線程的移除操作,同樣任何一個移除操作都等待另一個線程的插入操作。因此此隊列內部其 實沒有任何一個元素,或者說容量是0,嚴格說並不是一種容器。由於隊列沒有容量,因此不能調用peek操作,因為只有移除元素時才有元素。顯然這是一種快速傳遞元素的方式,也就是說在這種情況下元素總是以最快的方式從插入者(生產者)傳遞給移除者(消費者),這在多任務隊列中是最快處理任務的方式。對於高頻繁請求的場景,無疑是最適合的。
異步執行是通過Call.enqueue(Callback responseCallback)來執行,在Dispatcher中添加一個封裝了Callback的Call的匿名內部類Runnable來執行當前的Call。這裡一定要注意的地方這個AsyncCall是Call的匿名內部類。AsyncCall的execute方法仍然會回調到Call的getResponseWithInterceptorChain方法來完成請求,同時將返回數據或者狀態通過Callback來完成。
接下來繼續講講Call的getResponseWithInterceptorChain()方法,這裡邊重點說一下攔截器鏈條的實現以及作用。
先來看看Interceptor本身的文檔解釋:觀察,修改以及可能短路的請求輸出和響應請求的回來。通常情況下攔截器用來添加,移除或者轉換請求或者回應的頭部信息。
攔截器接口中有intercept(Chain chain)方法,同時返回Response。所謂攔截器更像是AOP設計的一種實現。下面來看一個okhttp源碼中的一個引導例子來說明攔截器的作用。
返回信息
從這裡的執行來看,攔截器主要是針對Request和Response的切面處理。
那再來看看源碼到底在什麼位置做的這個處理呢?為了更加直觀的反應執行流程,本人截圖了一下執行堆棧

另外如果還有同學對Interceptor比較敢興趣的可以去源碼的simples模塊看看GzipRequestInterceptor.java針對HTTP request body的一個zip壓縮。
在這裡再多說一下關於Call這個類的作用,在Call中持有一個HttpEngine。每一個不同的Call都有自己獨立的HttpEngine。在HttpEngine中主要是各種鏈路和地址的選擇,還有一個Transport比較重要
在OkHttpClient內部暴露了有Cache和InternalCache。而InternalCache不應該手動去創建,所以作為開發使用者來說,一般用法如下:
返回信息
上邊這一段代碼同樣來之於simple代碼CacheResponse.java,反饋回來的數據重點看一下緩存日志。第一次是來至網絡數據,第二次來至緩存。
那在這一節重點說一下整個框架的緩存策略如何實現的。
在這裡繼續使用上一節中講到的運行堆棧圖。從Call.getResponse(Request request, boolean forWebSocket)執行Engine.sendRequest()和Engine.readResponse()來詳細說明一下。
sendRequest()
此方法是對可能的Response資源進行一個預判,如果需要就會開啟一個socket來獲取資源。如果請求存在那麼就會為當前request添加請求頭部並且准備開始寫入request body。
readResponse()
此方法發起刷新請求頭部和請求體,解析HTTP回應頭部,並且如果HTTP回應體存在的話就開始讀取當前回應頭。在這裡有發起返回存入緩存系統,也有返回和緩存系統進行一個對比的過程。
外部網絡請求的入口都是通過Transport接口來完成。該類采用了橋接模式將HttpEngine和HttpConnection來連接起來。因為HttpEngine只是一個邏輯處理器,同時它也充當了請求配置的提供引擎,而HttpConnection是對底層處理Connection的封裝。
OK現在重點轉移到HttpConnection(一個用於發送HTTP/1.1信息的socket連接)這裡。主要有如下的生命周期:
1、發送請求頭;
2、打開一個sink(io中有固定長度的或者塊結構chunked方式的)去寫入請求body;
3、寫入並且關閉sink;
4、讀取Response頭部;
5、打開一個source(對應到第2步的sink方式)去讀取Response的body;
6、讀取並關閉source;
下邊看一張關於連接執行的時序圖:

這張圖畫得比較簡單,詳細的過程以及連接池的使用下面大致說明一下:
1、連接池是暴露在client下的,它貫穿了Transport、HttpEngine、Connection、HttpConnection和SpdyConnection;在這裡目前默認討論HttpConnection;
2、ConnectionPool有兩個構建參數是maxIdleConnections(最大空閒連接數)和keepAliveDurationNs(存活時間),另外連接池默認的線程池采用了Single的模式(源碼解釋是:一個用於清理過期的多個連接的後台線程,最多一個單線程去運行每一個連接池);
3、發起請求是在Connection.connect()這裡,實際執行是在HttpConnection.flush()這裡進行一個刷入。這裡重點應該關注一下sink和source,他們創建的默認方式都是依托於同一個socket:
this.source = Okio.buffer(Okio.source(socket));
this.sink = Okio.buffer(Okio.sink(socket));
如果再進一步看一下io的源碼就能看到:
Source source = source((InputStream)socket.getInputStream(), (Timeout)timeout);
Sink sink = sink((OutputStream)socket.getOutputStream(), (Timeout)timeout);
這下我想大家都應該明白這裡到底是真麼回事兒了吧?
相關的sink和source還有相應的細分,如果有興趣的朋友可以繼續深入看一下,這裡就不再深入了。不然真的說不完了。。。
其實連接池這裡還是有很多值得細看的地方,由於時間有限,到這裡已經花了很多時間搞這事兒了。。。
這裡重點說說連接鏈路的相關事情。說說自動重連到底是如何實現的。
照樣先來看看下面的這個自動重連機制的實現方式時序圖

同時回到Call.getResponse()方法說起
相信這一段代碼能讓同學們清晰的看到自動重連機制的實現方式,那麼我們來看看詳細的步驟:
1、HttpEngine.recover()的實現方式是通過檢測RouteSelector是否還有更多的routes可以嘗試連接,同時會去檢查是否可以恢復等等的一系列判斷。如果可以會為重新連接重新創建一份新的HttpEngine,同時把相應的鏈路信息傳遞過去;
2、當恢復後的HttpEngine不為空,那麼替換當前Call中的當前HttpEngine,執行while的continue,發起下一次的請求;
3、再重點強調一點HttpEngine.sendRequest()。這裡之前分析過會觸發connect()方法,在該方法中會通過RouteSelector.next()再去找當前適合的Route。多說一點,next()方法會傳遞到nextInetSocketAddress()方法,而此處一段重要的執行代碼就是network.resolveInetAddresses(socketHost)。這個地方最重要的是在Network這個接口中有一個對該接口的DEFAULT的實現域,而該方法通過工具類InetAddress.getAllByName(host)來完成對數組類的地址解析。
所以,多地址可以采用[“http://aaaaa","https://bbbbbb"]的方式來配置。
在源碼引導RequestBodyCompression.java中我們可以看到gzip的使用身影。通過攔截器對Request 的body進行gzip的壓縮,來減少流量的傳輸。
Gzip實現的方式主要是通過GzipSink對普通sink的封裝壓縮。在這個地方就不再貼相關代碼的實現。有興趣同學對照源碼看一下就ok。
強大的Interceptor設計應該也算是這個框架的一個亮點。
連接安全性主要是在HttpEngine.connect()方法。上一節油講到地址相關的選擇,在HttpEngine中有一個靜態方法createAddress(client, networkRequest),在這裡通過獲取到OkHttpClient中關於SSLSocketFactory、HostnameVerifier和CertificatePinner的配置信息。而這些信息大部分采用默認情況。這些信息都會在後面的重連中作為對比參考項。
同時在Connection.upgradeToTls()方法中,有對SSLSocket、SSLSocketFactory的創建活動。這些創建都會被記錄到ConnectionSpec中,當發起ConnectionSpec.apply()會發起一些列的配置以及驗證。
建議有興趣的同學先了解java的SSLSocket相關的開發再來了解本框架中的安全性,會更能理解一些。
講了很多,終於來到了平台適應性了。Platform是整個平台適應的核心類。同時它封裝了針對不同平台的三個平台類Android和JdkWithJettyBootPlatform。
代碼實現在Platform.findPlatform中
這裡采用了JAVA的反射原理調用到class的method。最後在各自的平台調用下發起invoke來執行相應方法。詳情請參看繼承了Platform的Android類。
當然要做這兩種的平台適應,必須要知道當前平台在內存中相關的class地址以及相關方法。
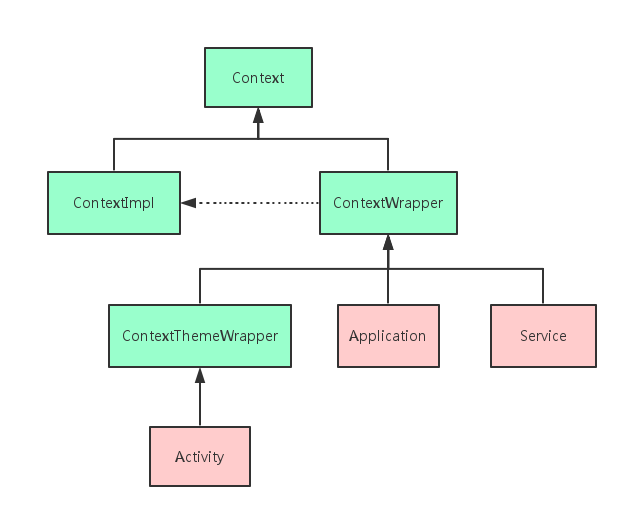
1、從整體結構和類內部域中都可以看到OkHttpClient,有點類似與安卓的ApplicationContext。看起來更像一個單例的類,這樣使用好處是統一。但是如果你不是高手,建議別這麼用,原因很簡單:邏輯牽連太深,如果出現問題要去追蹤你會有深深地罪惡感的;
2、框架中的一些動態方法、靜態方法、匿名內部類以及Internal的這些代碼相當規整,每個不同類的不同功能能劃分在不同的地方。很值得開發者學習的地方;
3、從平台的兼容性來講,也是很不錯的典范(如果你以後要從事API相關編碼,那更得好好注意對兼容性的處理);
4、由於時間不是很富裕,所以本人對細節的把我還是不夠,這方面還得多多努力;
5、對於初學網絡編程的同學來說,可能一開始學習都是從簡單的socket的發起然後獲取響應開始的。因為沒有很好的場景能讓自己知道網絡編程到底有多麼的重要,當然估計也沒感受到網絡編程有多麼的難受。我想這是很多剛入行的同學們的一種內心痛苦之處;
6、不足的地方是沒有對SPDY的方式最詳細跟進剖析(手頭還有工作的事情,後面如果有時間再補起來吧)。
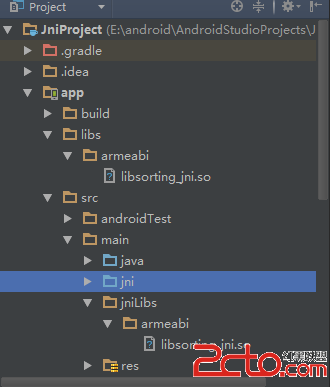 Android使用JNI(從java調用本地函數)
當編寫一個混合有本地C代碼和Java的應用程序時,需要使用Java本地接口(JNI)作為連接橋梁。JNI作為一個軟件層和API,允許使用本地代碼調用Java對象的方法,同
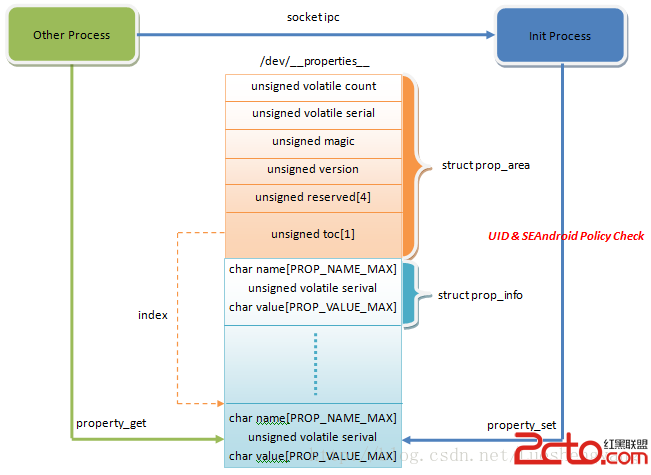 SEAndroid安全機制對Android屬性訪問的保護分析
Android系統通過屬性暴露設備和運行時信息,並且可以通過設置屬性來控制系統行為。因此,屬性也像文件一樣,是一種需要保護的資源。在啟用SEAndroid之前,敏感屬性只
 Android 自定義一款炫酷的加載控件
概述在設計應用的時候,我們應該熱愛極簡主義,簡單就是好的,對於很多用戶來說,復雜的東西並不受歡迎。我要實現的是根據不同的情況去顯示不同的加載效果,隨用隨調,效果是借鑒於某
 Android多媒體之錄音
錄制音頻的步驟: 1、創建錄音對象 2、指定錄音設備(初始化狀態) 3、設置錄制音頻的碼率 4、設置錄制音頻的編碼格式 5、設置錄制音頻存放的位置 6、准備錄音(准備狀態