編輯:關於Android編程
在開發中往往有要獲取聯系人列表的功能,但是這次卻不是獲取聯系人列表,而是在聯系人列表點擊單個聯系人,獲取單個聯系人的姓名和電話,並設置在指定的輸入框內,方便用戶的使用;以下是實現的代碼:
<?xml version="1.0" encoding="utf-8"?>
<LinearLayout xmlns:android="http://schemas.android.com/apk/res/android"
 android:layout_width="match_parent"
 android:layout_height="match_parent"
 android:orientation="vertical" >

 <LinearLayout
  android:layout_width="fill_parent"
  android:layout_height="40dp"
  android:orientation="horizontal" >

  <TextView
   android:layout_width="wrap_content"
   android:layout_height="wrap_content"
   android:layout_gravity="bottom"
   android:paddingLeft="10dp"
   android:text="姓名:"
   android:textColor="@android:color/black"
   android:textSize="13sp" />

  <EditText
   android:id="@+id/et_name"
   android:layout_width="200dp"
   android:layout_height="fill_parent"
   android:layout_marginLeft="10dp" />

  <Button
   android:id="@+id/btn1"
   android:layout_width="wrap_content"
   android:layout_height="40dp"
   android:text="點擊" />
 </LinearLayout>

 <LinearLayout
  android:layout_width="fill_parent"
  android:layout_height="40dp"
  android:orientation="horizontal" >

  <TextView
   android:layout_width="wrap_content"
   android:layout_height="wrap_content"
   android:layout_gravity="bottom"
   android:paddingLeft="10dp"
   android:text="電話:"
   android:textColor="@android:color/black"
   android:textSize="13sp" />

  <EditText
   android:id="@+id/et_phone"
   android:layout_width="200dp"
   android:layout_height="fill_parent"
   android:layout_marginLeft="10dp"
   android:inputType="phone" />
 </LinearLayout>

</LinearLayout>
這個就是一個普通的布局文件代碼;
/**
  * 獲取聯系人電話
  *
  * @param cursor
  * @param context
  * @return
  */
 private ContactBen getContactPhone(Cursor cursor, Context context) {
  ContactBen vo = new ContactBen();
  int phoneColumn = cursor.getColumnIndex(ContactsContract.Contacts.HAS_PHONE_NUMBER);
  int phoneNum = 0;
  try {
   phoneNum = cursor.getInt(phoneColumn);
  } catch (Exception e) {
   return null;
  }

  // String phoneResult = "";
  if (phoneNum > 0) {
   // 獲得聯系人的ID號
   int idColumn = cursor.getColumnIndex(ContactsContract.Contacts._ID);
   String contactId = cursor.getString(idColumn);

   vo.name = cursor.getString(cursor.getColumnIndex(ContactsContract.Contacts.DISPLAY_NAME));

   // 獲得聯系人的電話號碼的cursor;
   Cursor phones = context.getContentResolver().query(ContactsContract.CommonDataKinds.Phone.CONTENT_URI, null,
     ContactsContract.CommonDataKinds.Phone.CONTACT_ID + " = " + contactId, null, null);

   if (phones.moveToFirst()) {
    // 遍歷所有的電話號碼
    for (; !phones.isAfterLast(); phones.moveToNext()) {
     int index = phones.getColumnIndex(ContactsContract.CommonDataKinds.Phone.NUMBER);
     int typeindex = phones.getColumnIndex(ContactsContract.CommonDataKinds.Phone.TYPE);
     int phone_type = phones.getInt(typeindex);
     String phoneNumber = phones.getString(index);
     switch (phone_type) {
     case 2:
      vo.phone = phoneNumber;
      break;
     }
    }
    if (!phones.isClosed()) {
     phones.close();
    }
   }
  }
  return vo;
 }
這裡是主要功能的代碼,在這裡要做一個try catch的動作,因為Android手機的話會將微信還有qq的聯系方式也添加到列表中,但是其實是沒有電話號碼,點擊返回的時候,就會獲取不到,如果沒有try catch的就會報異常;
@Override
 protected void onActivityResult(int requestCode, int resultCode, Intent data) {
  super.onActivityResult(requestCode, resultCode, data);
  switch (requestCode) {
  case (1): {
   if (resultCode == Activity.RESULT_OK) {
    if (data != null) {
     Uri contactData = data.getData();
     @SuppressWarnings("deprecation")
     Cursor c = MainActivity.this.managedQuery(contactData, null, null, null, null);
     c.moveToFirst();
     ContactBen contactPhone = getContactPhone(c, MainActivity.this);
     if (contactPhone == null) {
      contactPhone = new ContactBen();
     }
     et_name.setText("" + contactPhone.name);
     et_phone.setText("" + contactPhone.phone);
    }
   }
   break;
  }
  }
 }
這裡是獲取值的一個回調,在這個回調中可以獲取到你想要的數據;
findViewById(R.id.btn1).setOnClickListener(new OnClickListener() {
   @Override
   public void onClick(View v) {
    requestPermission(new String[] { Manifest.permission.READ_CONTACTS }, new PermissionHandler() {

     @Override
     public void onGranted() {
      Intent intent = new Intent(Intent.ACTION_PICK, ContactsContract.Contacts.CONTENT_URI);
      startActivityForResult(intent, 1);
     }

     @Override
     public void onDenied() {
      super.onDenied();

     }
    });
   }
  });
這裡是點擊事件的處理,已經做了android6.0及6.0以上系統權限的適配了;最後記得在清單文件中添加相應的權限:
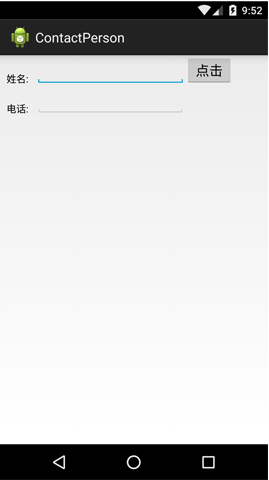
最終效果如下:
源碼地址:contactperson
以上就是本文的全部內容,希望對大家的學習有所幫助,也希望大家多多支持本站。
 Android實現平鋪圖片效果
最近開發App,美工設計了一個有鋸齒邊沿效果的背景圖,只給了我一個鋸齒,然後需要平鋪展示鋸齒效果: android中實現平鋪圖片有兩種方式:(1)在drawable中的d
 Android的PopupWindow彈窗(以常見的分享界面為例)
1.主要代碼: 聲明: private View shareView; private PopupWindow pop; 在onCreate方法裡: // 引入
 簡單自定義安全鍵盤(只能輸入字母,數字,部分符號)
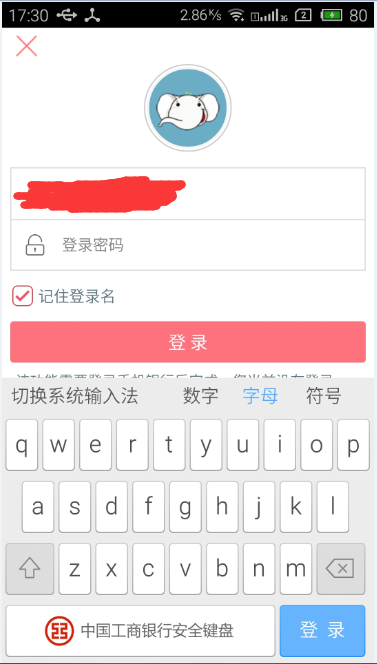
以前知道有個KeyboardView這個東西可以自定義鍵盤,但因為一直沒涉及到,所以沒研究過,今天看到工商銀行密碼輸入的鍵盤覺得挺好看,就來研究一下。先看一下工商銀行的圖
 Android開發四大組件之實現電話攔截和電話錄音
一、問題描述 使用BordercastReceiver和Service組件實現下述功能:1.當手機處於來電狀態,啟動監聽服務,對來電進行監聽錄音。2.設置電話黑名單,當