編輯:關於Android編程
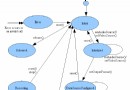
即Handler的運行機制,配合底層的Looper和MessageQueue,完成消息的發送與接收工作過程。handler發送Message給Looper輪循器,Looper輪循器被喚醒並開始遍歷MessageQueue,輪詢取出消息並讓handler來分發消息,最終完成消息的傳遞與處理。
Looper 消息輪循
MessageQueue 消息隊列,底層由鏈表實現
Message 消息對象
Handler 消息發送、接收、處理
1、handler.sendMessage(msg);
2、msg.setTarget(target); //設置發送給哪個Handler
msg.sendToTarget();
1、handler.obtainMessage();
obtainMessage()方法實際調用了Message.obtain方法
2、Message msg = Message.obtain(handler);// obtain(handler)調用了Message.obtain()方法

	或

	Message msg = Message.obtain();

	msg.setTarget(target)
3、Message message=new Message();
Message.obtain()方法如下
 /**
 * Return a new Message instance from the global pool. Allows us to
 * avoid allocating new objects in many cases.
 * 消息池有消息則直接返回消息
 * 否則直接新建一個消息返回
 */
public static Message obtain() {
    synchronized (sPoolSync) {
        if (sPool != null) {
            Message m = sPool;
            sPool = m.next;
            m.next = null;
            sPoolSize--;
            return m;
        }
    }
    return new Message();
}
二、 Handler消息機制運行流程1 Looper初始化與開啟輪循
ActivityThread(UI線程)的main方法中初始化Looper
public static void main(String[] args) {
    SamplingProfilerIntegration.start();


...
// 初始化Looper
    Looper.prepareMainLooper();

    ActivityThread thread = new ActivityThread();
    thread.attach(false);

    if (sMainThreadHandler == null) {
        sMainThreadHandler = thread.getHandler();
    }

 ...
// 開啟輪循
    Looper.loop();

    throw new RuntimeException("Main thread loop unexpectedly exited");
}
Looper初始化
prepareMainLooper方法
 public static void prepareMainLooper() {
    prepare(false);
    synchronized (Looper.class) {
        if (sMainLooper != null) {
            throw new IllegalStateException("The main Looper has already been prepared.");
        }
        sMainLooper = myLooper();
    }
}
prepare(boolean quitAllowed)
private static void prepare(boolean quitAllowed) {
    if (sThreadLocal.get() != null) {
        throw new RuntimeException("Only one Looper may be created per thread");
    }
    sThreadLocal.set(new Looper(quitAllowed));
}
myLooper() , 從sThreadLocal中獲取Looper對象
 public static Looper myLooper() {
    return sThreadLocal.get();
}
Looper開啟輪循
loop() 方法開啟輪循,等待處理消息

	1、通過queue.next()取出消息

	2、通過queue.enqueueMessage向消息隊列插入一條消息
/**
 * Run the message queue in this thread. Be sure to call
 * {@link #quit()} to end the loop.
 */
public static void loop() {
    final Looper me = myLooper();
    if (me == null) {
        throw new RuntimeException("No Looper; Looper.prepare() wasn't called on this thread.");
    }
    final MessageQueue queue = me.mQueue;

    // Make sure the identity of this thread is that of the local process,
    // and keep track of what that identity token actually is.
    Binder.clearCallingIdentity();
    final long ident = Binder.clearCallingIdentity();
// 取出消息,若無消息則阻塞
    for (;;) {
        Message msg = queue.next(); // might block
        if (msg == null) {
            // No message indicates that the message queue is quitting.
            return;
        }

        // This must be in a local variable, in case a UI event sets the logger
        Printer logging = me.mLogging;
        if (logging != null) {
            logging.println(">>>>> Dispatching to " + msg.target + " " +
                    msg.callback + ": " + msg.what);
        }

// 分發消息
        msg.target.dispatchMessage(msg);

        if (logging != null) {
            logging.println("<<<<< Finished to " + msg.target + " " + msg.callback);
        }

        // Make sure that during the course of dispatching the
        // identity of the thread wasn't corrupted.
        final long newIdent = Binder.clearCallingIdentity();
        if (ident != newIdent) {
            Log.wtf(TAG, "Thread identity changed from 0x"
                    + Long.toHexString(ident) + " to 0x"
                    + Long.toHexString(newIdent) + " while dispatching to "
                    + msg.target.getClass().getName() + " "
                    + msg.callback + " what=" + msg.what);
        }
// 回收消息
        msg.recycle();
    }
}
2 Handler的構造方法
/**
 * @param callback The callback interface in which to handle messages, or null.
 * @param async If true, the handler calls {@link Message#setAsynchronous(boolean)} for
 * each {@link Message} that is sent to it or {@link Runnable} that is posted to it.
 *
 * @hide
 */
public Handler(Callback callback, boolean async) {
   ...
// 獲取Looper對象
    mLooper = Looper.myLooper();
    if (mLooper == null) {
        throw new RuntimeException(
            "Can't create handler inside thread that has not called Looper.prepare()");
    }
// 獲得消息隊列
    mQueue = mLooper.mQueue;
    mCallback = callback;
    mAsynchronous = async;
}
3 消息的發送與插入消息隊列
發送消息的幾種方法最終都會調用sendMessageDelayed方法
public final boolean sendMessageDelayed(Message msg, long delayMillis)
{
    if (delayMillis < 0) {
        delayMillis = 0;
    }
    return sendMessageAtTime(msg, SystemClock.uptimeMillis() + delayMillis);
}
sendMessageDelayed方法又調用了sendMessageAtTime方法
public boolean sendMessageAtTime(Message msg, long uptimeMillis) {
    MessageQueue queue = mQueue;
    if (queue == null) {
        RuntimeException e = new RuntimeException(
                this + " sendMessageAtTime() called with no mQueue");
        Log.w("Looper", e.getMessage(), e);
        return false;
    }
    return enqueueMessage(queue, msg, uptimeMillis);
}
在sendMessageAtTime中調用enqueueMessage方法插入消息
private boolean enqueueMessage(MessageQueue queue, Message msg, long uptimeMillis) {
    // 設置要發送給那個handler對象
    msg.target = this;
    if (mAsynchronous) {
        msg.setAsynchronous(true);
    }
    // 插入消息
    return queue.enqueueMessage(msg, uptimeMillis);
}
在enqueueMessage方法中通過queue.enqueueMessage向消息隊列插入消息
boolean enqueueMessage(Message msg, long when) {
    if (msg.isInUse()) {
        throw new AndroidRuntimeException(msg + " This message is already in use.");
    }
    if (msg.target == null) {
        throw new AndroidRuntimeException("Message must have a target.");
    }

    synchronized (this) {
        if (mQuitting) {
            RuntimeException e = new RuntimeException(
                    msg.target + " sending message to a Handler on a dead thread");
            Log.w("MessageQueue", e.getMessage(), e);
            return false;
        }

        msg.when = when;
        Message p = mMessages;
        boolean needWake;
        if (p == null || when == 0 || when < p.when) {
            // New head, wake up the event queue if blocked.
            msg.next = p;
            mMessages = msg;
            needWake = mBlocked;
        } else {
            // Inserted within the middle of the queue.  Usually we don't have to wake
            // up the event queue unless there is a barrier at the head of the queue
            // and the message is the earliest asynchronous message in the queue.
            needWake = mBlocked && p.target == null && msg.isAsynchronous();
            Message prev;
            for (;;) {
                prev = p;
                p = p.next;
                if (p == null || when < p.when) {  // 遍歷到最後一個元素
                    break;
                }
                if (needWake && p.isAsynchronous()) {
                    needWake = false;
                }
            }
            msg.next = p; // invariant: p == prev.next  插入新消息
            prev.next = msg;
        }

        // We can assume mPtr != 0 because mQuitting is false.
        if (needWake) {
            nativeWake(mPtr);
        }
    }
    return true;
}
4 消息取出與分發Looper的loop方法取出消息,並讓Handler來分發消息,即msg.target.dispatchMessage(msg);其中msg.target即Handler對象
/**
 * Handle system messages here.
 */
public void dispatchMessage(Message msg) {
    if (msg.callback != null) {
        handleCallback(msg);
    } else {
        if (mCallback != null) {
            if (mCallback.handleMessage(msg)) {
                return;
            }
        }
        handleMessage(msg);
    }
}
1、首先會判斷msg.callback是否為空,msg.callback即是handler.post的那個Runnable對象,不為空則調用 handleCallback(msg);
注意:handler.post()並沒有開啟一個新線程,Runnable的run方法運行於Handler所在線程
private static void handleCallback(Message message) {
    message.callback.run();
}
當msg.callback為空時,要判斷mCallback是否為空,mCallback是一個回調接口
 public interface Callback {
    public boolean handleMessage(Message msg);
}
Handler有如下構造
     public Handler(Callback callback) {
        this(callback, false);
    }
可以用來構造Handler,如下
Handler h=new Handler(new Handler.Callback() {

        @Override
        public boolean handleMessage(Message msg) {
            // TODO Auto-generated method stub
            return false;
        }
    });
2、mCallback不為空時,則調用mCallback.handleMessage(msg),即調用了Callback中的handleMessage方法,如下handleMessage1方法
3、mCallback為空時,則調用了handler的handleMessage方法,即調用了handleMessage2方法
    Handler h = new Handler(new Handler.Callback() {

    // handleMessage1
        @Override
        public boolean handleMessage(Message msg) {
            // TODO Auto-generated method stub
            return false;
        }
    }) {

    // handleMessage2
        @Override
        public void handleMessage(Message msg) {
            // TODO Auto-generated method stub
            super.handleMessage(msg);
        }

    };
三、分析 runOnUiThread原理
public final void runOnUiThread(Runnable action) {
    if (Thread.currentThread() != mUiThread) {
        mHandler.post(action);
    } else {
        action.run();
    }
}
1 通過 mHandler.post方法發送一個消息
public final boolean post(Runnable r)
{
   return  sendMessageDelayed(getPostMessage(r), 0);
}
2 通過getPostMessage方法初始化一個消息對象,並給它的callback賦值
private static Message getPostMessage(Runnable r) {
    Message m = Message.obtain();
    m.callback = r;
    return m;
}
3 Handler在dispatchMessage中處理消息,此時msg.callback不為空,msg.callback即是handler.post的那個Runnable對象,此時handleCallback(msg);會被調用
View的post方法原理類似。
四、幾個思考1、handler.post(Runnable r)有開啟一個新線程嗎?
追蹤源碼發現,最終是通過 message.callback.run();來開啟任務的,並沒有開啟一個新線程,Runnable的run方法運行於Handler所在線程
2、子線程是如何切換到主線程的?
通過Handler來切換線程。在子線程中將消息發送到MessageQueue,在Looper輪循消息時,調用了msg.target.dispatchMessage(msg);讓Handler來分發處理消息,此時已從子線程切換到主線程了。
3、Looper的loop方法為什麼不會卡死主線程?

loop方法會阻塞主線程但不會卡死主線程。在源碼中我們知道,在 Looper.loop();之後又這麼一句
throw new RuntimeException("Main thread loop unexpectedly exited");
我們可以知道如果loop結束運行則會拋出此異常。因此loop方法正常是不會結束的。它配合ActivityThread內部Handler(即mH),通過不停的消息輪循與事件處理來完成與用戶的交互。
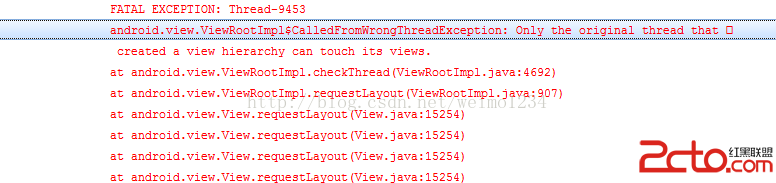
4、為什麼在子線程中創建Handler時會出錯?
由上面我們分析源碼可知,在構造Handler時會初始化Looper對象,而子線程通常是沒有Looper對象的(如果我們並沒有自己創建Looper對象的話),會拋出如下異常
09-07 19:55:44.050: E/AndroidRuntime(1870): java.lang.RuntimeException: Can't create handler inside thread that has not called Looper.prepare()
為了解決這個錯誤,我們可以手動創建Looper對象,並開啟消息輪循
new Thread(){
    public void run() {
        Looper.prepare();
        Handler h=new Handler(){
            public void handleMessage(android.os.Message msg) {};
        };
        Looper.loop();
    };
}.start();
這樣就解決了問題了,但同時要注意,當我們不需要使用此子線程的Handler時,我們應該手動停止Looper以回收資源,通過Looper的quit(立即停止)或quitSafely(當消息輪循完時)即可停止消息輪循。
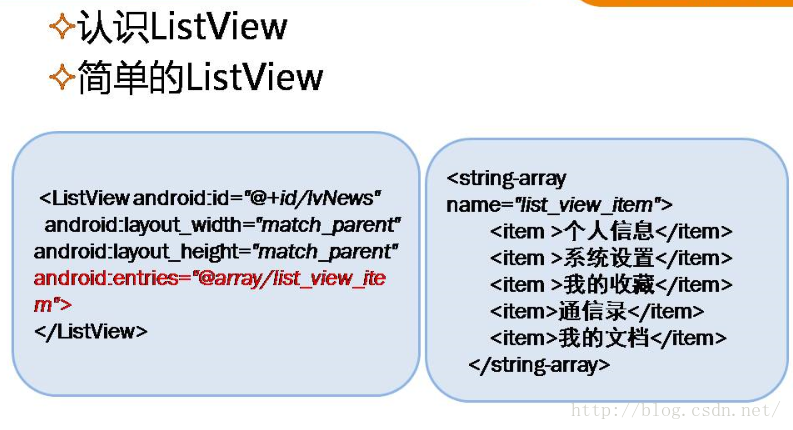 Android——ListView與適配器
1.抽屜布局 Drawer 2.
 Android 開發基於百度語音識別技術的小程序
Android 開發基於百度語音識別技術的小程序百度開發者平台為開發者提供了很多工具,雖然我對百度無感,但是因為有了這些工具,使我們開發程序更加快捷、便利。本文將會簡單介
 Android之Handler詳解
handler是什麼? handler是android給我們提供用來更新UI的一套機制,也是一套消息處理的機制,我們可以發送消息,也可以通過他處理消息。 為什麼要用han
 android開發筆記之高級主題—傳感器的簡單應用
上篇文章我們簡單的了解了下傳感器,這次我們來簡單運用下——搖一搖聽音樂效果:初始界面:步驟:①獲得傳感器服務SensorManager sm =