編輯:關於Android編程
 LauncherAppState.setApplicationContext(getApplicationContext());
        LauncherAppState app = LauncherAppState.getInstance();
    在oncreate中會調用這個方法,LauncherAppState 保存著初始化的信息,並且Launcher實現了LauncherProviderChangeListener這個接口,然後兩者產生聯系,當應用的快捷方式,文件夾發生了變換,數據庫也就發生了變換,進而通知LauncherAppState 。
    ## Launcher與launchermode的連接 ##
mModel = app.setLauncher(this);
launcher實現了launchermodel的callbacks接口。通過這樣的調用,launchermodel’生成的數據就可以傳遞給launcher了。
launcher oncreate方法
  super.onCreate(savedInstanceState);

        LauncherAppState.setApplicationContext(getApplicationContext());
        LauncherAppState app = LauncherAppState.getInstance();

        // Load configuration-specific DeviceProfile
        mDeviceProfile = getResources().getConfiguration().orientation
                == Configuration.ORIENTATION_LANDSCAPE ?
                        app.getInvariantDeviceProfile().landscapeProfile
                            : app.getInvariantDeviceProfile().portraitProfile;
//設置有多少個格子
        mSharedPrefs = getSharedPreferences(LauncherAppState.getSharedPreferencesKey(),
                Context.MODE_PRIVATE);
        mIsSafeModeEnabled = getPackageManager().isSafeMode();
        mModel = app.setLauncher(this);
        mIconCache = app.getIconCache();
//圖標緩沖區
        mDragController = new DragController(this);
//初始化拖拽器,這個可能是我們最經常的操作了

        mInflater = getLayoutInflater();
        mStateTransitionAnimation = new LauncherStateTransitionAnimation(this);

        mStats = new Stats(this);
//launcher中有一個stats.log文件,保存著應用的啟動信息。在stats類實例化的時候,會讀取文件的信息,並進行保存
        /*
        * 桌面小部件
        * 通過LauncherAppWidgetHost加載小部件,並啟動監聽
        * */
        mAppWidgetManager = AppWidgetManagerCompat.getInstance(this);

        mAppWidgetHost = new LauncherAppWidgetHost(this, APPWIDGET_HOST_ID);
        mAppWidgetHost.startListening();

        // If we are getting an onCreate, we can actually preempt onResume and unset mPaused here,
        // this also ensures that any synchronous binding below doesn't re-trigger another
        // LauncherModel load.
        mPaused = false;

        if (PROFILE_STARTUP) {
            android.os.Debug.startMethodTracing(
                    Environment.getExternalStorageDirectory() + "/launcher");
        }

        setContentView(R.layout.launcher);
//設置布局文件,由此可見,launcher其實也是一個activity

        setupViews();
//        對控件初始化
    mDeviceProfile.layout(this);
    /*
* 上一個我們討論了activity的狀態恢復
* 這裡進行的是laucher的狀態恢復
* */
        mSavedState = savedInstanceState;
        restoreState(mSavedState);
控件初始化
  private void setupViews() {
        final DragController dragController = mDragController;

        mLauncherView = findViewById(R.id.launcher);
        mFocusHandler = (FocusIndicatorView) findViewById(R.id.focus_indicator);
        mDragLayer = (DragLayer) findViewById(R.id.drag_layer);
        mWorkspace = (Workspace) mDragLayer.findViewById(R.id.workspace);
        mWorkspace.setPageSwitchListener(this);
//        設置workspace切換監聽器
        mPageIndicators = mDragLayer.findViewById(R.id.page_indicator);
//這個是指示器
        mLauncherView.setSystemUiVisibility(
                View.SYSTEM_UI_FLAG_LAYOUT_FULLSCREEN | View.SYSTEM_UI_FLAG_LAYOUT_HIDE_NAVIGATION);
        mWorkspaceBackgroundDrawable = getResources().getDrawable(R.drawable.workspace_bg);
/*
* 設置launcher為全屏
*  獲得背景圖p
* */
        // Setup the drag layer
        mDragLayer.setup(this, dragController);
//設置拖拽曾
        // Setup the hotseat
        mHotseat = (Hotseat) findViewById(R.id.hotseat);
//        快捷啟動欄

        if (mHotseat != null) {
            mHotseat.setOnLongClickListener(this);
        }

        mOverviewPanel = (ViewGroup) findViewById(R.id.overview_panel);
        mWidgetsButton = findViewById(R.id.widget_button);
        mWidgetsButton.setOnClickListener(new OnClickListener() {
            @Override
            public void onClick(View arg0) {
                if (!mWorkspace.isSwitchingState()) {
                    onClickAddWidgetButton(arg0);
                }
            }
        });
        mWidgetsButton.setOnTouchListener(getHapticFeedbackTouchListener());

        View wallpaperButton = findViewById(R.id.wallpaper_button);
        wallpaperButton.setOnClickListener(new OnClickListener() {
            @Override
            public void onClick(View arg0) {
                if (!mWorkspace.isSwitchingState()) {
                    onClickWallpaperPicker(arg0);
                }
            }
        });
        wallpaperButton.setOnTouchListener(getHapticFeedbackTouchListener());

        View settingsButton = findViewById(R.id.settings_button);
        if (hasSettings()) {
            settingsButton.setOnClickListener(new OnClickListener() {
                @Override
                public void onClick(View arg0) {
                    if (!mWorkspace.isSwitchingState()) {
                        onClickSettingsButton(arg0);
                    }
                }
            });
            settingsButton.setOnTouchListener(getHapticFeedbackTouchListener());
        } else {
            settingsButton.setVisibility(View.GONE);
        }

        mOverviewPanel.setAlpha(0f);
        /*
        * 這一塊是對預覽模式下的設置,長按屏幕會進入預覽模式
        * 下面會有三個按鈕,壁紙,小部件,設置
        *
        * */

        // Setup the workspace應用菜單誤操作反饋
        mWorkspace.setHapticFeedbackEnabled(false);
        mWorkspace.setOnLongClickListener(this);//設置長按
//        接收控制器的控制
        mWorkspace.setup(dragController);
        dragController.addDragListener(mWorkspace);

        // Get the search/delete bar。獲取搜索框實例
        mSearchDropTargetBar = (SearchDropTargetBar)
                mDragLayer.findViewById(R.id.search_drop_target_bar);

        // Setup Apps and Widgets,初始化小部件,常用app
        mAppsView = (AllAppsContainerView) findViewById(R.id.apps_view);
        mWidgetsView = (WidgetsContainerView) findViewById(R.id.widgets_view);
        if (mLauncherCallbacks != null && mLauncherCallbacks.getAllAppsSearchBarController() != null) {
            mAppsView.setSearchBarController(mLauncherCallbacks.getAllAppsSearchBarController());
        } else {
            mAppsView.setSearchBarController(mAppsView.newDefaultAppSearchController());
        }

        // Setup the drag controller (drop targets have to be added in reverse order in priority)
        dragController.setDragScoller(mWorkspace);
        dragController.setScrollView(mDragLayer);
        dragController.setMoveTarget(mWorkspace);
        dragController.addDropTarget(mWorkspace);
        if (mSearchDropTargetBar != null) {
            mSearchDropTargetBar.setup(this, dragController);
            mSearchDropTargetBar.setQsbSearchBar(getOrCreateQsbBar());
        }
//初始化小部件  ,讀取文件數據,如果為true,則進行加載
        if (getResources().getBoolean(R.bool.debug_memory_enabled)) {
            Log.v(TAG, "adding WeightWatcher");
//            鐘表組件
            mWeightWatcher = new WeightWatcher(this);
            mWeightWatcher.setAlpha(0.5f);
            ((FrameLayout) mLauncherView).addView(mWeightWatcher,
                    new FrameLayout.LayoutParams(
                            FrameLayout.LayoutParams.MATCH_PARENT,
                            FrameLayout.LayoutParams.WRAP_CONTENT,
                            Gravity.BOTTOM)
            );

            boolean show = shouldShowWeightWatcher();
            mWeightWatcher.setVisibility(show ? View.VISIBLE : View.GONE);
        }
    }
mDeviceProfile.layout(this);
/*
* 控件已經進行了初始化,那麼怎麼擺放呢
* launcher中含有搜索框,hotseat快捷啟動欄,頁面指示器,那麼我們就必須調用DeviceProfile的layout方法設置其位置,內容比較繁雜,但都是一個道理,根據橫屏豎屏,以及參數改變其位置
* */
    public void layout(Launcher launcher) {
        FrameLayout.LayoutParams lp;
        /*
        * 布局參數ip
        * 判斷是否是豎屏
        * */
        boolean hasVerticalBarLayout = isVerticalBarLayout();
        final boolean isLayoutRtl = Utilities.isRtl(launcher.getResources());

        // Layout the search bar space
        View searchBar = launcher.getSearchDropTargetBar();
        lp = (FrameLayout.LayoutParams) searchBar.getLayoutParams();
        if (hasVerticalBarLayout) {
            // Vertical search bar space -- The search bar is fixed in the layout to be on the left
            //                              of the screen regardless of RTL
            lp.gravity = Gravity.LEFT;
            lp.width = searchBarSpaceHeightPx;

            LinearLayout targets = (LinearLayout) searchBar.findViewById(R.id.drag_target_bar);
            targets.setOrientation(LinearLayout.VERTICAL);
            FrameLayout.LayoutParams targetsLp = (FrameLayout.LayoutParams) targets.getLayoutParams();
            targetsLp.gravity = Gravity.TOP;
            targetsLp.height = LayoutParams.WRAP_CONTENT;

        } else {
            // Horizontal search bar space
            lp.gravity = Gravity.TOP;
            lp.height = searchBarSpaceHeightPx;

            LinearLayout targets = (LinearLayout) searchBar.findViewById(R.id.drag_target_bar);
            targets.getLayoutParams().width = searchBarSpaceWidthPx;
        }
        searchBar.setLayoutParams(lp);

        // Layout the workspace
        PagedView workspace = (PagedView) launcher.findViewById(R.id.workspace);
        lp = (FrameLayout.LayoutParams) workspace.getLayoutParams();
        lp.gravity = Gravity.CENTER;
        Rect padding = getWorkspacePadding(isLayoutRtl);
        workspace.setLayoutParams(lp);
        workspace.setPadding(padding.left, padding.top, padding.right, padding.bottom);
        workspace.setPageSpacing(getWorkspacePageSpacing(isLayoutRtl));

        // Layout the hotseat
//        獲取hotseat實例
        View hotseat = launcher.findViewById(R.id.hotseat);
//        獲得LayoutParams
        lp = (FrameLayout.LayoutParams) hotseat.getLayoutParams();
        if (hasVerticalBarLayout) {
            // Vertical hotseat -- The hotseat is fixed in the layout to be on the right of the
            //                     screen regardless of RTL
            lp.gravity = Gravity.RIGHT;
            lp.width = hotseatBarHeightPx;
            lp.height = LayoutParams.MATCH_PARENT;
            hotseat.findViewById(R.id.layout).setPadding(0, 2 * edgeMarginPx, 0, 2 * edgeMarginPx);
        } else if (isTablet) {
            // Pad the hotseat with the workspace padding calculated above
            lp.gravity = Gravity.BOTTOM;
            lp.width = LayoutParams.MATCH_PARENT;
            lp.height = hotseatBarHeightPx;
            hotseat.setPadding(edgeMarginPx + padding.left, 0,
                    edgeMarginPx + padding.right,
                    2 * edgeMarginPx);
        } else {
            /*
            * 設置快鍵攔的位置為底部,設置padding距離
            * */
            // For phones, layout the hotseat without any bottom margin
            // to ensure that we have space for the folders
            lp.gravity = Gravity.BOTTOM;
            lp.width = LayoutParams.MATCH_PARENT;
            lp.height = hotseatBarHeightPx;
            hotseat.findViewById(R.id.layout).setPadding(2 * edgeMarginPx, 0,
                    2 * edgeMarginPx, 0);
        }
        hotseat.setLayoutParams(lp);
launcher狀態恢復
  private void restoreState(Bundle savedState) {
//        判斷savestate數據是否為空
        if (savedState == null) {
            return;
        }

        State state = intToState(savedState.getInt(RUNTIME_STATE, State.WORKSPACE.ordinal()));
        if (state == State.APPS || state == State.WIDGETS) {
            mOnResumeState = state;
        }
//這個跟我們上次所講的保存狀態發生關聯
        int currentScreen = savedState.getInt(RUNTIME_STATE_CURRENT_SCREEN,
                PagedView.INVALID_RESTORE_PAGE);
//        獲得應用程序菜單在第幾頁,然後進行恢復
        if (currentScreen != PagedView.INVALID_RESTORE_PAGE) {
            mWorkspace.setRestorePage(currentScreen);
        }
//恢復要添加的組件
        final long pendingAddContainer = savedState.getLong(RUNTIME_STATE_PENDING_ADD_CONTAINER, -1);
        final long pendingAddScreen = savedState.getLong(RUNTIME_STATE_PENDING_ADD_SCREEN, -1);

        if (pendingAddContainer != ItemInfo.NO_ID && pendingAddScreen > -1) {
            mPendingAddInfo.container = pendingAddContainer;
            mPendingAddInfo.screenId = pendingAddScreen;
            mPendingAddInfo.cellX = savedState.getInt(RUNTIME_STATE_PENDING_ADD_CELL_X);
            mPendingAddInfo.cellY = savedState.getInt(RUNTIME_STATE_PENDING_ADD_CELL_Y);
            mPendingAddInfo.spanX = savedState.getInt(RUNTIME_STATE_PENDING_ADD_SPAN_X);
            mPendingAddInfo.spanY = savedState.getInt(RUNTIME_STATE_PENDING_ADD_SPAN_Y);
            AppWidgetProviderInfo info = savedState.getParcelable(
                    RUNTIME_STATE_PENDING_ADD_WIDGET_INFO);
            mPendingAddWidgetInfo = info == null ?
                    null : LauncherAppWidgetProviderInfo.fromProviderInfo(this, info);

            mPendingAddWidgetId = savedState.getInt(RUNTIME_STATE_PENDING_ADD_WIDGET_ID);
//            根據 保存的信息進行恢復,使launcher處於等待狀態,下面貼出列這個方法的實現,似乎只是把value的值付給了mwaitingforresult,然後進行了判斷,兩者不可能不一樣,那麼調用 onWorkspaceLockedChanged();
            setWaitingForResult(true);
//            這個應該表示恢復成功,進行標識,以便後續使用
            mRestoring = true;
        }

        mItemIdToViewId = (HashMap)
                savedState.getSerializable(RUNTIME_STATE_VIEW_IDS);
    }
    private void setWaitingForResult(boolean value) {
        boolean isLocked = isWorkspaceLocked();
        mWaitingForResult = value;
        if (isLocked != isWorkspaceLocked()) {
            onWorkspaceLockedChanged();
        }
    }
 Android動態改變布局
遇到這麼個需求,先看圖: 其實是一個軟件的登錄界面,初始是第一個圖的樣子,當軟鍵盤彈出後變為第二個圖的樣子,因為登錄界面有用戶名、密碼、登錄按鈕,不這樣的
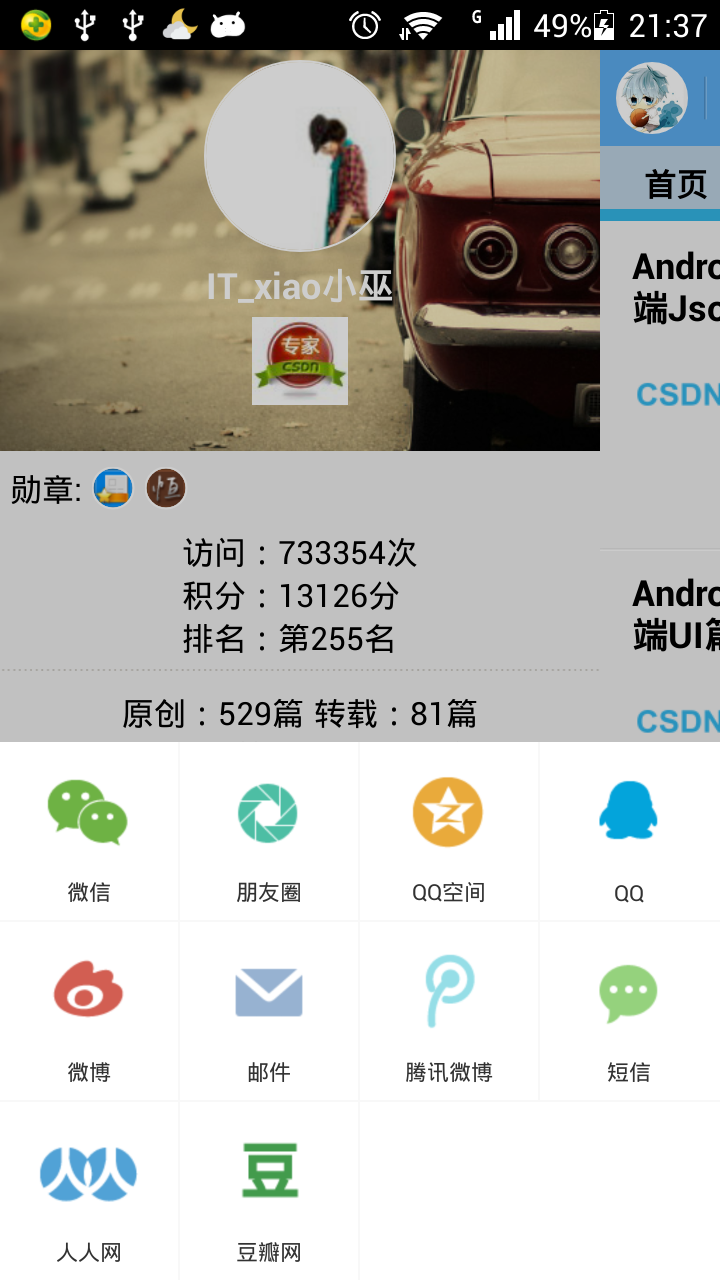 Android應用開發-小巫CSDN博客客戶端之集成友盟社會化分享組件
Android應用開發-小巫CSDN博客客戶端之集成友盟社會化分享組件 上一篇博客給大家介紹了如何分析網頁並且使用jsoup這個庫對html代碼進行解析,本篇博客繼續給大
 ViewPageerTransform深入理解,給viewpager切換加動畫
每當viewpager上一個可見或依附的頁面發生了滾動事件就會調用PageTransformer,這讓應用可以使用自定義transformation讓viewpager某
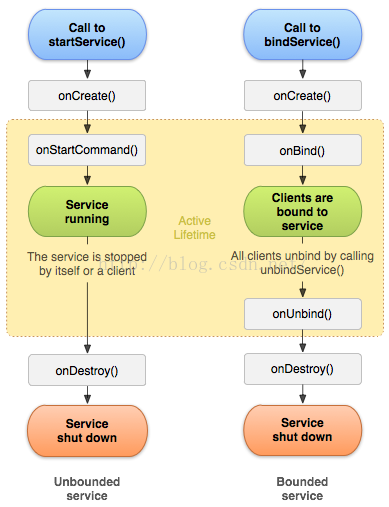 Android Service詳解
來自:https://developer.android.com/guide/components/services.htmlService是一個可以在後台執行長時間運行