編輯:關於Android編程
Respond to the Send Button
To respond to the button's on-click event, open the main.xml layout file and add the android:onClick attribute to the <Button> element:
<Button
android:layout_width="wrap_content"
android:layout_height="wrap_content"
android:text="@string/button_send"
android:onClick="sendMessage" />
The android:onClick attribute’s value, "sendMessage", is the name of a method in your activity that the system calls when the user clicks the button.
Open the MainActivity class and add the corresponding method:
/** Called when the user clicks the Send button */
public void sendMessage(View view) {
// Do something in response to button
}
Tip: In Eclipse, press Ctrl + Shift + O to import missing classes (Cmd + Shift + O on Mac).
In order for the system to match this method to the method name given to android:onClick, the signature must be exactly as shown. Specifically, the method must:
Be public
Have a void return value
Have a View as the only parameter (this will be the View that was clicked)
Next, you’ll fill in this method to read the contents of the text field and deliver that text to another activity.
Build an Intent
An Intent is an object that provides runtime binding between separate components (such as two activities). The Intent represents an app’s "intent to do something." You can use intents for a wide variety of tasks, but most often they’re used to start another activity.
Inside the sendMessage() method, create an Intent to start an activity called DisplayMessageActivity:
Intent intent = new Intent(this, DisplayMessageActivity.class);
The constructor used here takes two parameters:
A Context as its first parameter (this is used because the Activity class is a subclass of Context)
The Class of the app component to which the system should deliver the Intent (in this case, the activity that should be started)
Sending an intent to other apps
The intent created in this lesson is what's considered an explicit intent, because the Intent specifies the exact app component to which the intent should be given. However, intents can also be implicit, in which case the Intent does not specify the desired component, but allows any app installed on the device to respond to the intent as long as it satisfies the meta-data specifications for the action that's specified in various Intent parameters. For more information, see the class about Interacting with Other Apps.
Note: The reference to DisplayMessageActivity will raise an error if you’re using an IDE such as Eclipse because the class doesn’t exist yet. Ignore the error for now; you’ll create the class soon.
An intent not only allows you to start another activity, but it can carry a bundle of data to the activity as well. So, use findViewById() to get the EditText element and add its text value to the intent:
Intent intent = new Intent(this, DisplayMessageActivity.class);
EditText editText = (EditText) findViewById(R.id.edit_message);
String message = editText.getText().toString();
intent.putExtra(EXTRA_MESSAGE, message);
An Intent can carry a collection of various data types as key-value pairs called extras. The putExtra() method takes the key name in the first parameter and the value in the second parameter.
In order for the next activity to query the extra data, you should define your key using a public constant. So add the EXTRA_MESSAGE definition to the top of the MainActivity class:
public class MainActivity extends Activity {
public final static String EXTRA_MESSAGE = "com.example.myfirstapp.MESSAGE";
...
}
It's generally a good practice to define keys for intent extras using your app's package name as a prefix. This ensures they are unique, in case your app interacts with other apps.
Start the Second Activity
To start an activity, you simply need to call startActivity() and pass it your Intent. The system receives this call and starts an instance of the Activity specified by the Intent.
With this new code, the complete sendMessage() method that's invoked by the Send button now looks like this:
/** Called when the user clicks the Send button */
public void sendMessage(View view) {
Intent intent = new Intent(this, DisplayMessageActivity.class);
EditText editText = (EditText) findViewById(R.id.edit_message);
String message = editText.getText().toString();
intent.putExtra(EXTRA_MESSAGE, message);
startActivity(intent);
}
Now you need to create the DisplayMessageActivity class in order for this to work.
Create the Second Activity
Figure 1. The new activity wizard in Eclipse.
To create a new activity using Eclipse:
Click New in the toolbar.
In the window that appears, open the Android folder and select Android Activity. Click Next.
Select BlankActivity and click Next.
Fill in the activity details:
Project: MyFirstApp
Activity Name: DisplayMessageActivity
Layout Name: activity_display_message
Navigation Type: None
Hierarchial Parent: com.example.myfirstapp.MainActivity
Title: My Message
Click Finish.
If you're using a different IDE or the command line tools, create a new file named DisplayMessageActivity.java in the project's src/ directory, next to the original MainActivity.java file.
Open the DisplayMessageActivity.java file. If you used Eclipse to create it, the class already includes an implementation of the required onCreate() method. There's also an implementation of the onCreateOptionsMenu() method, but you won't need it for this app so you can remove it. The class should look like this:
public class DisplayMessageActivity extends Activity {
@Override
public void onCreate(Bundle savedInstanceState) {
super.onCreate(savedInstanceState);
setContentView(R.layout.activity_display_message);
}
}
All subclasses of Activity must implement the onCreate() method. The system calls this when creating a new instance of the activity. It is where you must define the activity layout and where you should perform initial setup for the activity components.
Add it to the manifest
You must declare all activities in your manifest file, AndroidManifest.xml, using an <activity> element.
When you use the Eclipse tools to create the activity, it creates a default entry. It should look like this:
<application ... >
...
<activity
android:name=".DisplayMessageActivity"
android:label="@string/title_activity_display_message" >
<meta-data
android:name="android.support.PARENT_ACTIVITY"
android:value="com.example.myfirstapp.MainActivity" />
</activity>
</application>
The <meta-data> element declares the name of this activity's parent activity within the app's logical hierarchy. The Android Support Library uses this information to implement default navigation behaviors, such as Up navigation.
Note: During installation, you should have downloaded the latest Support Library. Eclipse automatically includes this library in your app project (you can see the library's JAR file listed under Android Dependencies). If you're not using Eclipse, you may need to manually add the library to your project—follow this guide for setting up the Support Library.
The app is now runnable because the Intent in the first activity now resolves to the DisplayMessageActivity class. If you run the app now, clicking the Send button starts the second activity, but it's still using the default "Hello world" layout.
Receive the Intent
Every Activity is invoked by an Intent, regardless of how the user navigated there. You can get the Intent that started your activity by calling getIntent() and retrieve the data contained within it.
In the DisplayMessageActivity class’s onCreate() method, get the intent and extract the message delivered by MainActivity:
Intent intent = getIntent();
String message = intent.getStringExtra(MainActivity.EXTRA_MESSAGE);
Display the Message
To show the message on the screen, create a TextView widget and set the text using setText(). Then add the TextView as the root view of the activity’s layout by passing it to setContentView().
The complete onCreate() method for DisplayMessageActivity now looks like this:
@Override
public void onCreate(Bundle savedInstanceState) {
super.onCreate(savedInstanceState);
// Get the message from the intent
Intent intent = getIntent();
String message = intent.getStringExtra(MainActivity.EXTRA_MESSAGE);
// Create the text view
TextView textView = new TextView(this);
textView.setTextSize(40);
textView.setText(message);
// Set the text view as the activity layout
setContentView(textView);
}
You can now run the app. When it opens, type a message in the text field, click Send, and the message appears on the second activity.
Figure 2. Both activities in the final app, running on Android 4.0.
That's it, you've built your first Android app!
 android 自定義控件學習之三 控件布局常用知識總結
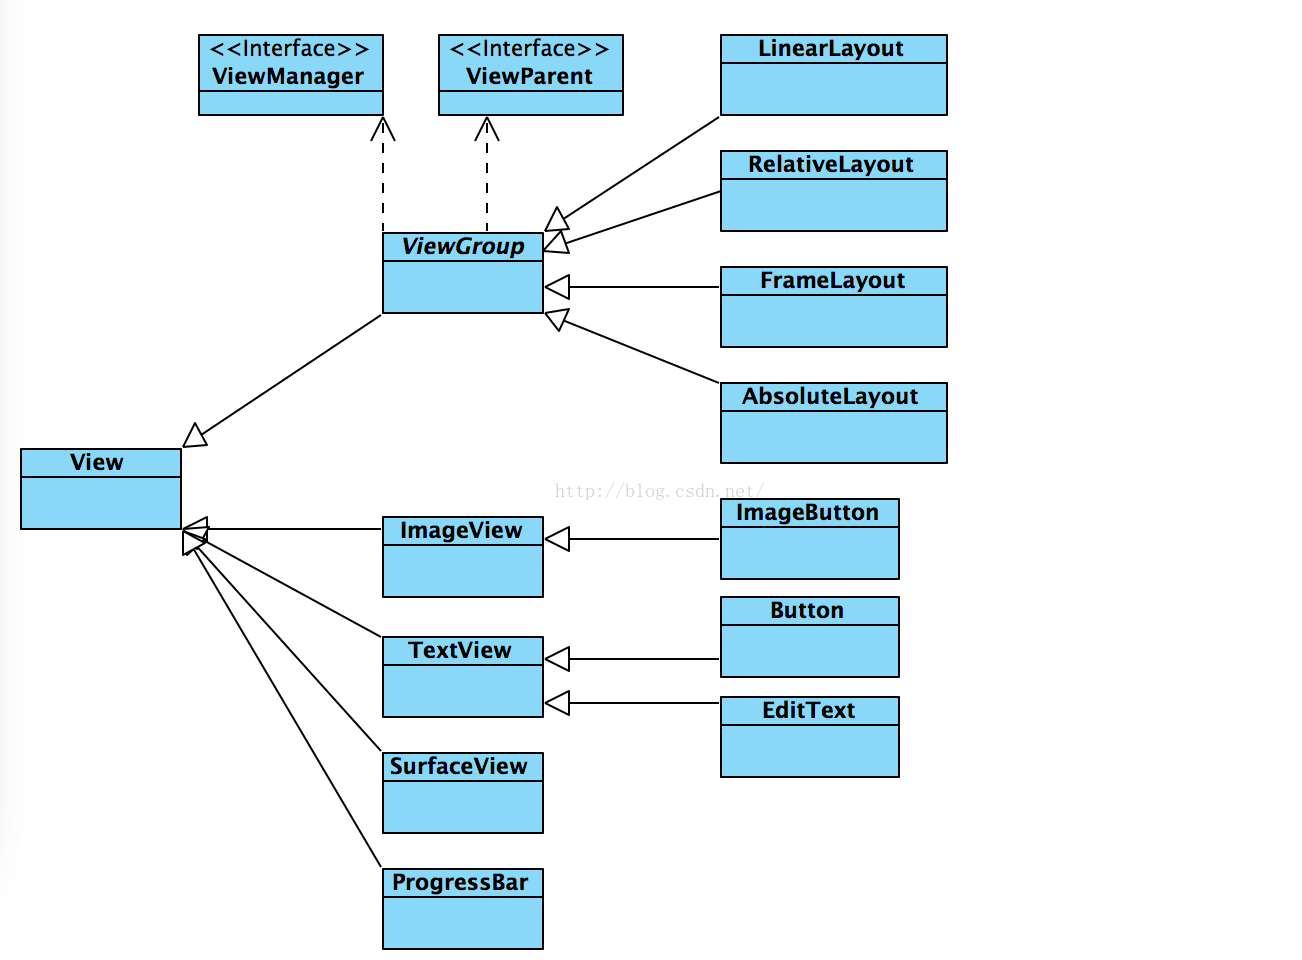
1、View是什麼View是Android所有控件的基類,簡單到TextView、Button,復雜到RelativeLayout,LinearLayout,其共同基類都
 Android 一個改善的okHttp封裝庫
一、概述之前寫了篇Android OkHttp完全解析 是時候來了解OkHttp了,其實主要是作為okhttp的普及文章,當然裡面也簡單封裝了工具類,沒想到
 Android編程實現的重力感應示例代碼
本文實例講述了Android編程實現的重力感應效果。分享給大家供大家參考,具體如下:android中的很多游戲的游戲都使用了重力感應的技術,就研究了一下重力感應以屏幕的左
 一起學android之ArrayAdapter使用(12)
Adapter常用的實現方式ArrayAdapter、simpleAdapter、SimpleCursorAdapter、BaseAdapter。 1、ArrayAdap
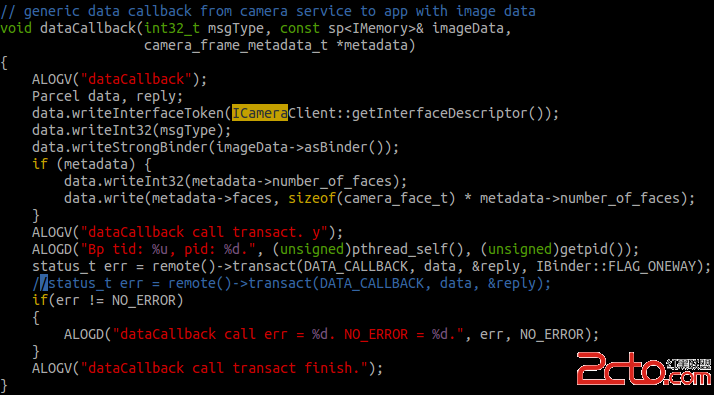 Android Native層Binder.transact()函數調用 Binder.onTransact() 函數失敗分析
Q:Android Native層Binder.transact()函數