編輯:關於Android編程
之前幾篇博客分析AMS中啟動Activity的時候,我們把主要流程理的差不多了。今天主要看下AMS中通過PKMS來獲取ActivityInfo。
之前我們知道startActivity流程,先是在AMS中調用startActivity然後調用startActivityMayWait函數,在這個函數中調用了resolveActivity來解析ActivityInfo信息。後面這個函數繼續往後會調用startActivityLocked函數,在這個函數中會新建一個ActivityRecord對象,這個對象的processName和info.applicartionInfo.uid這兩個值在後續進程啟動的時候起到很關鍵的作用,用來判斷進程是否啟動,這個在之前的博客中已經分析過了。而processName是利用ActivityInfo的processName。而info.applicationInfo.uid也是ActivityInfo中的ApplicationInfo的值。
    final int startActivityMayWait(IApplicationThread caller, int callingUid,
            String callingPackage, Intent intent, String resolvedType,
            IVoiceInteractionSession voiceSession, IVoiceInteractor voiceInteractor,
            IBinder resultTo, String resultWho, int requestCode, int startFlags,
            ProfilerInfo profilerInfo, WaitResult outResult, Configuration config,
            Bundle options, boolean ignoreTargetSecurity, int userId,
            IActivityContainer iContainer, TaskRecord inTask) {
        // Refuse possible leaked file descriptors
        if (intent != null && intent.hasFileDescriptors()) {
            throw new IllegalArgumentException("File descriptors passed in Intent");
        }
        boolean componentSpecified = intent.getComponent() != null;

        // Don't modify the client's object!
        intent = new Intent(intent);

        // Collect information about the target of the Intent.
        ActivityInfo aInfo =
                resolveActivity(intent, resolvedType, startFlags, profilerInfo, userId);
那我們下面來看看這個resolveActivity函數,這個函數最終還是通過PKMS的resolveIntent函數來獲取ResolveInfo,而ActivityInfo是其中的一個變量。
    ActivityInfo resolveActivity(Intent intent, String resolvedType, int startFlags,
            ProfilerInfo profilerInfo, int userId) {
        // Collect information about the target of the Intent.
        ActivityInfo aInfo;
        try {
            ResolveInfo rInfo =
                AppGlobals.getPackageManager().resolveIntent(
                        intent, resolvedType,
                        PackageManager.MATCH_DEFAULT_ONLY
                                    | ActivityManagerService.STOCK_PM_FLAGS, userId);
            aInfo = rInfo != null ? rInfo.activityInfo : null;
        } catch (RemoteException e) {
            aInfo = null;
        }

        if (aInfo != null) {
            // Store the found target back into the intent, because now that
            // we have it we never want to do this again.  For example, if the
            // user navigates back to this point in the history, we should
            // always restart the exact same activity.
            intent.setComponent(new ComponentName(
                    aInfo.applicationInfo.packageName, aInfo.name));

            // Don't debug things in the system process
            if ((startFlags&ActivityManager.START_FLAG_DEBUG) != 0) {
                if (!aInfo.processName.equals("system")) {
                    mService.setDebugApp(aInfo.processName, true, false);
                }
            }

            if ((startFlags&ActivityManager.START_FLAG_OPENGL_TRACES) != 0) {
                if (!aInfo.processName.equals("system")) {
                    mService.setOpenGlTraceApp(aInfo.applicationInfo, aInfo.processName);
                }
            }

            if (profilerInfo != null) {
                if (!aInfo.processName.equals("system")) {
                    mService.setProfileApp(aInfo.applicationInfo, aInfo.processName, profilerInfo);
                }
            }
        }
        return aInfo;
    }
我們來看下PKMS的resolveIntent函數,先看下是否有權限,然後調用queryIntentActivities來獲取滿足條件的ResolveInfo,然後調用chooseBestActivity挑選最合適的。
    @Override
    public ResolveInfo resolveIntent(Intent intent, String resolvedType,
            int flags, int userId) {
        if (!sUserManager.exists(userId)) return null;
        enforceCrossUserPermission(Binder.getCallingUid(), userId, false, false, "resolve intent");
        List query = queryIntentActivities(intent, resolvedType, flags, userId);
        return chooseBestActivity(intent, resolvedType, flags, query, userId);
    }
所以這裡我們主要看下queryIntentActivities函數,先會檢查權限。然後獲取ComponentName,如果不為空,那麼Intent是指定了模塊,只有一個匹配項。如果沒有指定模塊,還要區分是否指定了包名。
    public List queryIntentActivities(Intent intent,
            String resolvedType, int flags, int userId) {
        if (!sUserManager.exists(userId)) return Collections.emptyList();
        enforceCrossUserPermission(Binder.getCallingUid(), userId, false, false, "query intent activities");
        ComponentName comp = intent.getComponent();
        if (comp == null) {
            if (intent.getSelector() != null) {
                intent = intent.getSelector();
                comp = intent.getComponent();
            }
        }

        if (comp != null) {//如果Intent中指定了模塊,只會有一個匹配項
            final List list = new ArrayList(1);
            final ActivityInfo ai = getActivityInfo(comp, flags, userId);
            if (ai != null) {
                final ResolveInfo ri = new ResolveInfo();
                ri.activityInfo = ai;
                list.add(ri);
            }
            return list;
        }

        // reader
        synchronized (mPackages) {
            final String pkgName = intent.getPackage();
            if (pkgName == null) {//intent沒有指定包名,在系統所有包中查找
                List matchingFilters =
                        getMatchingCrossProfileIntentFilters(intent, resolvedType, userId);//獲取所有匹配的intent filter
                // Check for results that need to skip the current profile.
                ResolveInfo xpResolveInfo  = querySkipCurrentProfileIntents(matchingFilters, intent,
                        resolvedType, flags, userId);
                if (xpResolveInfo != null && isUserEnabled(xpResolveInfo.targetUserId)) {
                    List result = new ArrayList(1);
                    result.add(xpResolveInfo);
                    return filterIfNotPrimaryUser(result, userId);
                }

                // Check for results in the current profile.
                List result = mActivities.queryIntent(
                        intent, resolvedType, flags, userId);

                // Check for cross profile results.
                xpResolveInfo = queryCrossProfileIntents(
                        matchingFilters, intent, resolvedType, flags, userId);
                if (xpResolveInfo != null && isUserEnabled(xpResolveInfo.targetUserId)) {
                    result.add(xpResolveInfo);
                    Collections.sort(result, mResolvePrioritySorter);
                }
                result = filterIfNotPrimaryUser(result, userId);
                if (hasWebURI(intent)) {
                    CrossProfileDomainInfo xpDomainInfo = null;
                    final UserInfo parent = getProfileParent(userId);
                    if (parent != null) {
                        xpDomainInfo = getCrossProfileDomainPreferredLpr(intent, resolvedType,
                                flags, userId, parent.id);
                    }
                    if (xpDomainInfo != null) {
                        if (xpResolveInfo != null) {
                            // If we didn't remove it, the cross-profile ResolveInfo would be twice
                            // in the result.
                            result.remove(xpResolveInfo);
                        }
                        if (result.size() == 0) {
                            result.add(xpDomainInfo.resolveInfo);
                            return result;
                        }
                    } else if (result.size() <= 1) {
                        return result;
                    }
                    result = filterCandidatesWithDomainPreferredActivitiesLPr(intent, flags, result,
                            xpDomainInfo, userId);
                    Collections.sort(result, mResolvePrioritySorter);
                }
                return result;
            }
            final PackageParser.Package pkg = mPackages.get(pkgName);
            if (pkg != null) {//如果Intent中有包名,就在指定包中查找
                return filterIfNotPrimaryUser(
                        mActivities.queryIntentForPackage(
                                intent, resolvedType, flags, pkg.activities, userId),
                        userId);
            }
            return new ArrayList();
        }
    }
這個函數會根據Intent中的信息來分別處理。如果Intent有包名和Activity信息(指定了模塊)直接返回ActivityInfo,這是最快的方式。如果只有包名,調用queryIntentForPackage在指定的安裝包中查找Activity。如果包名也沒有,只能調用queryIntent來搜索所有安裝包了,這是最慢的一種查詢方式了。
我們這裡就看最直接的方式,我們看上面函數是直接調用了getActivityInfo方法來獲取ActivityInfo的。直接通過mActivities.mActivities中的component來獲取Activity,然後通過PackageParser.generateActivityInfo來產生一個ActivityInfo
    public ActivityInfo getActivityInfo(ComponentName component, int flags, int userId) {
        if (!sUserManager.exists(userId)) return null;
        enforceCrossUserPermission(Binder.getCallingUid(), userId, false, false, "get activity info");//檢查權限
        synchronized (mPackages) {
            PackageParser.Activity a = mActivities.mActivities.get(component);//獲取到Activity

            if (DEBUG_PACKAGE_INFO) Log.v(TAG, "getActivityInfo " + component + ": " + a);
            if (a != null && mSettings.isEnabledLPr(a.info, flags, userId)) {
                PackageSetting ps = mSettings.mPackages.get(component.getPackageName());
                if (ps == null) return null;
                return PackageParser.generateActivityInfo(a, flags, ps.readUserState(userId),//得到ActivityInfo
                        userId);
            }
            if (mResolveComponentName.equals(component)) {
                return PackageParser.generateActivityInfo(mResolveActivity, flags,
                        new PackageUserState(), userId);
            }
        }
        return null;
    }
我們來看下這個generateActivityInfo函數,其實就是利用Activity的成員變量info來重新構造了一個ActivityInfo,然後再賦值ApplicationInfo等。
    public static final ActivityInfo generateActivityInfo(Activity a, int flags,
            PackageUserState state, int userId) {
        if (a == null) return null;
        if (!checkUseInstalledOrHidden(flags, state)) {
            return null;
        }
        if (!copyNeeded(flags, a.owner, state, a.metaData, userId)) {
            return a.info;
        }
        // Make shallow copies so we can store the metadata safely
        ActivityInfo ai = new ActivityInfo(a.info);
        ai.metaData = a.metaData;
        ai.applicationInfo = generateApplicationInfo(a.owner, flags, state, userId);
        return ai;
    }
這裡最關鍵的就是mActivities成員變量了,它是ActivityIntentResolver對象
    final ActivityIntentResolver mActivities =
            new ActivityIntentResolver();
還是就是ActivityIntentResolver的成員變量mActivities是一個map key就是ComponentName,通過ComponentName來找到Activity的。
        // Keys are String (activity class name), values are Activity.
        private final ArrayMap mActivities
                = new ArrayMap();
之前的博客講PKMS的時候分析過無論是開機掃描各個目錄的apk文件,還是安裝新的apk最後都會調用scanPackageDirtyLI方法。
我們來簡單回顧下,開機掃描各個目錄的時候是調用scanDirLI函數,然後調用scanPackageLI函數這個函數第一個參數是File,這個函數會新建一個PackageParser對象,來解析文件。最後也會調用另一個scanPackageLI方法這個參數是Packageparser.Package類。而在這個scanPackageLI方法中最後調用了scanPackageDirtyLI方法。
在安裝一個新應用的時候先copy apk文件到指定目錄,後面會調用installPackageLI,這個函數也會創建一個PackageParser對象來解析apk文件,後面會調用installNewPackageLI繼續處理,最後會發送廣播通知其他應用,比如Launcher增加圖標等。在installNewPackageLI函數中也會調用scanPackageLI函數,是參數是Packageparser.Package類。而最後就會調用scanPackageDirtyLI方法。
所以其實無論開機掃描還是安裝應用其實流程差不多。
我們再來看下scanPackageDirtyLI方法中的一段代碼,首先從PackageParser.Package中遍歷其Activity,然後制定其info.processName最後把Activity放入到mActivities中。
            N = pkg.activities.size();
            r = null;
            for (i=0; i<n; packageparser.activity="" a="pkg.activities.get(i);" a.info.processname="fixProcessName(pkg.applicationInfo.processName," if="" r="new" else="" pre="">
再來看fixProcessName函數,結合上面的參數當a.info.processName有的話processName就是這個值,沒有的話才是pkg.applicationInfo.processName。
    private static String fixProcessName(String defProcessName,
            String processName, int uid) {
        if (processName == null) {
            return defProcessName;
        }
        return processName;
    }
下面我們再來看ActivityIntentResolver類的addActivity函數,其實主要就是放入了mActivities變量中,其key就是ComponentName。
        public final void addActivity(PackageParser.Activity a, String type) {
            final boolean systemApp = a.info.applicationInfo.isSystemApp();
            mActivities.put(a.getComponentName(), a);
            final int NI = a.intents.size();
            for (int j=0; j 0 && "activity".equals(type)) {
                    intent.setPriority(0);
                    Log.w(TAG, "Package " + a.info.applicationInfo.packageName + " has activity "
                            + a.className + " with priority > 0, forcing to 0");
                }
                if (DEBUG_SHOW_INFO) {
                    Log.v(TAG, "    IntentFilter:");
                    intent.dump(new LogPrinter(Log.VERBOSE, TAG), "      ");
                }
                if (!intent.debugCheck()) {
                    Log.w(TAG, "==> For Activity " + a.info.name);
                }
                addFilter(intent);
            }
        }
我們回過頭來看下,其實ActivityIntentResolver中mActivities中的值也是從PackageParser.Package中遍歷其Activity,稍微修改下在add到mActivities中的。所以還是主要看PackageParser.Package中的Activity的由來。
而PackageParser.Package的值無論是開機掃描還是新安裝應用都是新建一個PackageParser,然後解析文件得到的。
只是開機掃描是在scanPackageLI函數中調用:
    private PackageParser.Package scanPackageLI(File scanFile, int parseFlags, int scanFlags,
            long currentTime, UserHandle user) throws PackageManagerException {
        if (DEBUG_INSTALL) Slog.d(TAG, "Parsing: " + scanFile);
        parseFlags |= mDefParseFlags;
        PackageParser pp = new PackageParser();
        pp.setSeparateProcesses(mSeparateProcesses);
        pp.setOnlyCoreApps(mOnlyCore);
        pp.setDisplayMetrics(mMetrics);

        if ((scanFlags & SCAN_TRUSTED_OVERLAY) != 0) {
            parseFlags |= PackageParser.PARSE_TRUSTED_OVERLAY;
        }

        final PackageParser.Package pkg;
        try {
            pkg = pp.parsePackage(scanFile, parseFlags);
        } catch (PackageParserException e) {
            throw PackageManagerException.from(e);
        }
......
而安裝應用是在installPackageLI函數中調用:
    private void installPackageLI(InstallArgs args, PackageInstalledInfo res) {
        final int installFlags = args.installFlags;
        final String installerPackageName = args.installerPackageName;
        final String volumeUuid = args.volumeUuid;
        final File tmpPackageFile = new File(args.getCodePath());
        final boolean forwardLocked = ((installFlags & PackageManager.INSTALL_FORWARD_LOCK) != 0);
        final boolean onExternal = (((installFlags & PackageManager.INSTALL_EXTERNAL) != 0)
                || (args.volumeUuid != null));
        boolean replace = false;
        int scanFlags = SCAN_NEW_INSTALL | SCAN_UPDATE_SIGNATURE;
        if (args.move != null) {
            // moving a complete application; perfom an initial scan on the new install location
            scanFlags |= SCAN_INITIAL;
        }
        // Result object to be returned
        res.returnCode = PackageManager.INSTALL_SUCCEEDED;

        if (DEBUG_INSTALL) Slog.d(TAG, "installPackageLI: path=" + tmpPackageFile);
        // Retrieve PackageSettings and parse package
        final int parseFlags = mDefParseFlags | PackageParser.PARSE_CHATTY
                | (forwardLocked ? PackageParser.PARSE_FORWARD_LOCK : 0)
                | (onExternal ? PackageParser.PARSE_EXTERNAL_STORAGE : 0);
        PackageParser pp = new PackageParser();
        pp.setSeparateProcesses(mSeparateProcesses);
        pp.setDisplayMetrics(mMetrics);

        final PackageParser.Package pkg;
        try {
            pkg = pp.parsePackage(tmpPackageFile, parseFlags);
        } catch (PackageParserException e) {
            res.setError("Failed parse during installPackageLI", e);
            return;
        }
......
我們來看PackageParser的parsePackage函數,這裡是否是目錄的話調用的函數不一樣。
    public Package parsePackage(File packageFile, int flags) throws PackageParserException {
        if (packageFile.isDirectory()) {
            return parseClusterPackage(packageFile, flags);
        } else {
            return parseMonolithicPackage(packageFile, flags);
        }
    }
我們先來看下如果是目錄的話調用parseClusterPackage函數,而在這個函數先調用parseBaseApk,然後遍歷所有的split,調用函數parseSplitApk函數。
    private Package parseClusterPackage(File packageDir, int flags) throws PackageParserException {
        final PackageLite lite = parseClusterPackageLite(packageDir, 0);

        if (mOnlyCoreApps && !lite.coreApp) {
            throw new PackageParserException(INSTALL_PARSE_FAILED_MANIFEST_MALFORMED,
                    "Not a coreApp: " + packageDir);
        }

        final AssetManager assets = new AssetManager();
        try {
            // Load the base and all splits into the AssetManager
            // so that resources can be overriden when parsing the manifests.
            loadApkIntoAssetManager(assets, lite.baseCodePath, flags);

            if (!ArrayUtils.isEmpty(lite.splitCodePaths)) {
                for (String path : lite.splitCodePaths) {
                    loadApkIntoAssetManager(assets, path, flags);
                }
            }

            final File baseApk = new File(lite.baseCodePath);
            final Package pkg = parseBaseApk(baseApk, assets, flags);
            if (pkg == null) {
                throw new PackageParserException(INSTALL_PARSE_FAILED_NOT_APK,
                        "Failed to parse base APK: " + baseApk);
            }

            if (!ArrayUtils.isEmpty(lite.splitNames)) {
                final int num = lite.splitNames.length;
                pkg.splitNames = lite.splitNames;
                pkg.splitCodePaths = lite.splitCodePaths;
                pkg.splitRevisionCodes = lite.splitRevisionCodes;
                pkg.splitFlags = new int[num];
                pkg.splitPrivateFlags = new int[num];

                for (int i = 0; i < num; i++) {
                    parseSplitApk(pkg, i, assets, flags);
                }
            }

            pkg.codePath = packageDir.getAbsolutePath();
            return pkg;
        } finally {
            IoUtils.closeQuietly(assets);
        }
    }
而我們再看下parseMonolithicPackage函數,因為不是目錄,所以只有一個apk,直接調用了parseBaseApk。
    public Package parseMonolithicPackage(File apkFile, int flags) throws PackageParserException {
        if (mOnlyCoreApps) {
            final PackageLite lite = parseMonolithicPackageLite(apkFile, flags);
            if (!lite.coreApp) {
                throw new PackageParserException(INSTALL_PARSE_FAILED_MANIFEST_MALFORMED,
                        "Not a coreApp: " + apkFile);
            }
        }

        final AssetManager assets = new AssetManager();
        try {
            final Package pkg = parseBaseApk(apkFile, assets, flags);
            pkg.codePath = apkFile.getAbsolutePath();
            return pkg;
        } finally {
            IoUtils.closeQuietly(assets);
        }
    }
那我們來看下這個parseBaseApk函數,在這個函數中調用了另一個parseBaseApk函數,在這個函數新建了一個Package對象。然後遍歷xml中各個節點,這裡我們只關心application。在這個節點解析的時候直接調用了parseBaseApplication函數。
    private Package parseBaseApk(Resources res, XmlResourceParser parser, int flags,
            String[] outError) throws XmlPullParserException, IOException {
        ......
        final Package pkg = new Package(pkgName);
        boolean foundApp = false;

        TypedArray sa = res.obtainAttributes(attrs,
                com.android.internal.R.styleable.AndroidManifest);
        pkg.mVersionCode = pkg.applicationInfo.versionCode = sa.getInteger(
                com.android.internal.R.styleable.AndroidManifest_versionCode, 0);
        pkg.baseRevisionCode = sa.getInteger(
                com.android.internal.R.styleable.AndroidManifest_revisionCode, 0);
        pkg.mVersionName = sa.getNonConfigurationString(
                com.android.internal.R.styleable.AndroidManifest_versionName, 0);
        if (pkg.mVersionName != null) {
            pkg.mVersionName = pkg.mVersionName.intern();
        }
        ......

        int outerDepth = parser.getDepth();
        while ((type = parser.next()) != XmlPullParser.END_DOCUMENT
                && (type != XmlPullParser.END_TAG || parser.getDepth() > outerDepth)) {
            if (type == XmlPullParser.END_TAG || type == XmlPullParser.TEXT) {
                continue;
            }

            String tagName = parser.getName();
            if (tagName.equals("application")) {
                if (foundApp) {
                    if (RIGID_PARSER) {
                        outError[0] = " has more than one ";
                        mParseError = PackageManager.INSTALL_PARSE_FAILED_MANIFEST_MALFORMED;
                        return null;
                    } else {
                        Slog.w(TAG, " has more than one ");
                        XmlUtils.skipCurrentTag(parser);
                        continue;
                    }
                }

                foundApp = true;
                if (!parseBaseApplication(pkg, res, parser, attrs, flags, outError)) {
                    return null;
                }
            }
我們再來看下parseBaseApplication函數,先獲取了ApplicationInfo後面會修改器processName,再後面就開始就是xml中的application下的各個節點了。我們主要看下關於Activities的。是調用了parseActivity,然後保存在activities變量中。
    private boolean parseBaseApplication(Package owner, Resources res,
            XmlPullParser parser, AttributeSet attrs, int flags, String[] outError)
        throws XmlPullParserException, IOException {
        final ApplicationInfo ai = owner.applicationInfo;
        final String pkgName = owner.applicationInfo.packageName;
        ......

                    ai.processName = buildProcessName(ai.packageName, null, pname,
                    flags, mSeparateProcesses, outError);
        ......
        while ((type = parser.next()) != XmlPullParser.END_DOCUMENT
                && (type != XmlPullParser.END_TAG || parser.getDepth() > innerDepth)) {
            if (type == XmlPullParser.END_TAG || type == XmlPullParser.TEXT) {
                continue;
            }

            String tagName = parser.getName();
            if (tagName.equals("activity")) {
                Activity a = parseActivity(owner, res, parser, attrs, flags, outError, false,
                        owner.baseHardwareAccelerated);
                if (a == null) {
                    mParseError = PackageManager.INSTALL_PARSE_FAILED_MANIFEST_MALFORMED;
                    return false;
                }

                owner.activities.add(a);

            }
parseActivity新建了一個Activity對象,然後解析各種數據保存在info等變量中。但是仔細看沒有我們想要的東西。
1.沒有看到Activity的info.processName
2.沒有看到Activity的ComponentName
    private Activity parseActivity(Package owner, Resources res,
            XmlPullParser parser, AttributeSet attrs, int flags, String[] outError,
            boolean receiver, boolean hardwareAccelerated)
            throws XmlPullParserException, IOException {
        TypedArray sa = res.obtainAttributes(attrs, R.styleable.AndroidManifestActivity);

        if (mParseActivityArgs == null) {
            mParseActivityArgs = new ParseComponentArgs(owner, outError,
                    R.styleable.AndroidManifestActivity_name,
                    R.styleable.AndroidManifestActivity_label,
                    R.styleable.AndroidManifestActivity_icon,
                    R.styleable.AndroidManifestActivity_logo,
                    R.styleable.AndroidManifestActivity_banner,
                    mSeparateProcesses,
                    R.styleable.AndroidManifestActivity_process,
                    R.styleable.AndroidManifestActivity_description,
                    R.styleable.AndroidManifestActivity_enabled);
        }

        mParseActivityArgs.tag = receiver ? "" : "";
        mParseActivityArgs.sa = sa;
        mParseActivityArgs.flags = flags;

        Activity a = new Activity(mParseActivityArgs, new ActivityInfo());
我們先看下Activity的構造函數,其父類是public static class Component
        public Activity(final ParseComponentArgs args, final ActivityInfo _info) {
            super(args, _info);
            info = _info;
            info.applicationInfo = args.owner.applicationInfo;
        }
我們看其父類的函數,也沒有看到起關於ComponentName的設置,但是會對outInfo的processName進行設置,也就是Activity的info的processName。那這裡解了我們第一個疑惑info的processName。
        public Component(final ParseComponentArgs args, final ComponentInfo outInfo) {
            this(args, (PackageItemInfo)outInfo);
            if (args.outError[0] != null) {
                return;
            }

            if (args.processRes != 0) {
                CharSequence pname;
                if (owner.applicationInfo.targetSdkVersion >= Build.VERSION_CODES.FROYO) {
                    pname = args.sa.getNonConfigurationString(args.processRes,
                            Configuration.NATIVE_CONFIG_VERSION);
                } else {
                    // Some older apps have been seen to use a resource reference
                    // here that on older builds was ignored (with a warning).  We
                    // need to continue to do this for them so they don't break.
                    pname = args.sa.getNonResourceString(args.processRes);
                }
                outInfo.processName = buildProcessName(owner.applicationInfo.packageName,
                        owner.applicationInfo.processName, pname,
                        args.flags, args.sepProcesses, args.outError);
            }

            if (args.descriptionRes != 0) {
                outInfo.descriptionRes = args.sa.getResourceId(args.descriptionRes, 0);
            }

            outInfo.enabled = args.sa.getBoolean(args.enabledRes, true);
        }
那麼第二個ComponentName呢,我再來看上面這個函數第一句話是調用了另一個構造函數,在這裡我們構造了className。當然這裡獲取className的方式有點復雜,和一些資源相關。
        public Component(final ParsePackageItemArgs args, final PackageItemInfo outInfo) {
            owner = args.owner;
            intents = new ArrayList(0);
            String name = args.sa.getNonConfigurationString(args.nameRes, 0);
            if (name == null) {
                className = null;
                args.outError[0] = args.tag + " does not specify android:name";
                return;
            }

            outInfo.name
                = buildClassName(owner.applicationInfo.packageName, name, args.outError);
            if (outInfo.name == null) {
                className = null;
                args.outError[0] = args.tag + " does not have valid android:name";
                return;
            }

            className = outInfo.name;
而我們再看下Activity的getComponentName函數,只要有className就會新建一個ComponentName對象。
        public ComponentName getComponentName() {
            if (componentName != null) {
                return componentName;
            }
            if (className != null) {
                componentName = new ComponentName(owner.applicationInfo.packageName,
                        className);
            }
            return componentName;
        }
ComponentName的構造函數也就是保存兩個變量。
    public ComponentName(String pkg, String cls) {
        if (pkg == null) throw new NullPointerException("package name is null");
        if (cls == null) throw new NullPointerException("class name is null");
        mPackage = pkg;
        mClass = cls;
    }
那麼這樣ComponentName和processName的問題都解決了。
給AMS傳遞的ActivityInfo,還有一個重要的信息就是uid,是在ApplicationInfo中的。我們來看下在哪裡賦值的。
在scanPackageDirtyLI函數中有一句
pkg.applicationInfo.uid = pkgSetting.appId;
我們再看下Activity的構造函數,info.applicationInfo就是Package的applicationinfo。因此上面給uid賦值,就是ActivityInfo的applicationInfo的uid賦值。
        public Activity(final ParseComponentArgs args, final ActivityInfo _info) {
            super(args, _info);
            info = _info;
            info.applicationInfo = args.owner.applicationInfo;
        }
那我們再看看pkgSetting.appId的由來,同樣在scanPackageDirtyLI函數中有如下代碼,創建一個pkgSetting。
            pkgSetting = mSettings.getPackageLPw(pkg, origPackage, realName, suid, destCodeFile,
                    destResourceFile, pkg.applicationInfo.nativeLibraryRootDir,
                    pkg.applicationInfo.primaryCpuAbi,
                    pkg.applicationInfo.secondaryCpuAbi,
                    pkg.applicationInfo.flags, pkg.applicationInfo.privateFlags,
                    user, false);
我們來看下這個函數,它調用了另一個getPackageLPw函數
    PackageSetting getPackageLPw(PackageParser.Package pkg, PackageSetting origPackage,
            String realName, SharedUserSetting sharedUser, File codePath, File resourcePath,
            String legacyNativeLibraryPathString, String primaryCpuAbi, String secondaryCpuAbi,
            int pkgFlags, int pkgPrivateFlags, UserHandle user, boolean add) {
        final String name = pkg.packageName;
        PackageSetting p = getPackageLPw(name, origPackage, realName, sharedUser, codePath,
                resourcePath, legacyNativeLibraryPathString, primaryCpuAbi, secondaryCpuAbi,
                pkg.mVersionCode, pkgFlags, pkgPrivateFlags, user, add, true /* allowInstall */);
        return p;
    }
我們來看下這個函數,首先我們現在在mPackages沒有值,所以直接從p==null分支看,然後也沒有origPackage,沒有sharedUser,我們就直接看newUserIdLPw函數產生一個新的uid。
    private PackageSetting getPackageLPw(String name, PackageSetting origPackage,
            String realName, SharedUserSetting sharedUser, File codePath, File resourcePath,
            String legacyNativeLibraryPathString, String primaryCpuAbiString,
            String secondaryCpuAbiString, int vc, int pkgFlags, int pkgPrivateFlags,
            UserHandle installUser, boolean add, boolean allowInstall) {
        PackageSetting p = mPackages.get(name);
        UserManagerService userManager = UserManagerService.getInstance();
        if (p != null) {
            ......
        }
        if (p == null) {
            if (origPackage != null) {
                ......
            } else {
                p = new PackageSetting(name, realName, codePath, resourcePath,
                        legacyNativeLibraryPathString, primaryCpuAbiString, secondaryCpuAbiString,
                        null /* cpuAbiOverrideString */, vc, pkgFlags, pkgPrivateFlags);
                p.setTimeStamp(codePath.lastModified());
                p.sharedUser = sharedUser;
                // If this is not a system app, it starts out stopped.
                if ((pkgFlags&ApplicationInfo.FLAG_SYSTEM) == 0) {
                    if (DEBUG_STOPPED) {
                        RuntimeException e = new RuntimeException("here");
                        e.fillInStackTrace();
                        Slog.i(PackageManagerService.TAG, "Stopping package " + name, e);
                    }
                    List users = getAllUsers();
                    final int installUserId = installUser != null ? installUser.getIdentifier() : 0;
                    if (users != null && allowInstall) {
                        for (UserInfo user : users) {
                            // By default we consider this app to be installed
                            // for the user if no user has been specified (which
                            // means to leave it at its original value, and the
                            // original default value is true), or we are being
                            // asked to install for all users, or this is the
                            // user we are installing for.
                            final boolean installed = installUser == null
                                    || (installUserId == UserHandle.USER_ALL
                                        && !isAdbInstallDisallowed(userManager, user.id))
                                    || installUserId == user.id;
                            p.setUserState(user.id, COMPONENT_ENABLED_STATE_DEFAULT,
                                    installed,
                                    true, // stopped,
                                    true, // notLaunched
                                    false, // hidden
                                    null, null, null,
                                    false, // blockUninstall
                                    INTENT_FILTER_DOMAIN_VERIFICATION_STATUS_UNDEFINED, 0);
                            writePackageRestrictionsLPr(user.id);
                        }
                    }
                }
                if (sharedUser != null) {//是否有sharedUser,這樣就是在相同的uid下
                    p.appId = sharedUser.userId;
                } else {
                    // Clone the setting here for disabled system packages
                    PackageSetting dis = mDisabledSysPackages.get(name);//這裡我們也不關注
                    if (dis != null) {
                        // For disabled packages a new setting is created
                        // from the existing user id. This still has to be
                        // added to list of user id's
                        // Copy signatures from previous setting
                        if (dis.signatures.mSignatures != null) {
                            p.signatures.mSignatures = dis.signatures.mSignatures.clone();
                        }
                        p.appId = dis.appId;
                        // Clone permissions
                        p.getPermissionsState().copyFrom(dis.getPermissionsState());
                        // Clone component info
                        List users = getAllUsers();
                        if (users != null) {
                            for (UserInfo user : users) {
                                int userId = user.id;
                                p.setDisabledComponentsCopy(
                                        dis.getDisabledComponents(userId), userId);
                                p.setEnabledComponentsCopy(
                                        dis.getEnabledComponents(userId), userId);
                            }
                        }
                        // Add new setting to list of user ids
                        addUserIdLPw(p.appId, p, name);
                    } else {
                        // Assign new user id
                        p.appId = newUserIdLPw(p);//分配一個新的uid
                    }
                }
            }
            if (p.appId < 0) {
                PackageManagerService.reportSettingsProblem(Log.WARN,
                        "Package " + name + " could not be assigned a valid uid");
                return null;
            }
            if (add) {
                // Finish adding new package by adding it and updating shared
                // user preferences
                addPackageSettingLPw(p, name, sharedUser);
            }
        } else {
            .....
        }
        return p;
    }
newUserIdLPw函數先遍歷所有的uid。看哪個uid對應的對象空了,就重新用這個uid。如果都不為空,而且不超過最大uid值,用當前最大值的uid+1,作為新的uid。
    private int newUserIdLPw(Object obj) {
        // Let's be stupidly inefficient for now...
        final int N = mUserIds.size();
        for (int i = mFirstAvailableUid; i < N; i++) {
            if (mUserIds.get(i) == null) {
                mUserIds.set(i, obj);
                return Process.FIRST_APPLICATION_UID + i;
            }
        }

        // None left?
        if (N > (Process.LAST_APPLICATION_UID-Process.FIRST_APPLICATION_UID)) {
            return -1;
        }

        mUserIds.add(obj);
        return Process.FIRST_APPLICATION_UID + N;
    }
在scanPackageDirtyLI函數後面會保存mSettings和mPackages,主要是把PackageSetting保存在mSetting中,把Package保存在mPackages中。mPackages直接put了,我們就不分析了。我們看下mSettings保存PackageSetting。
        synchronized (mPackages) {
            // We don't expect installation to fail beyond this point

            // Add the new setting to mSettings
            mSettings.insertPackageSettingLPw(pkgSetting, pkg);
            // Add the new setting to mPackages
            mPackages.put(pkg.applicationInfo.packageName, pkg);
insertPackageSettingLPw函數先把pkg賦給了PackageSetting 的pkg,最後調用了addPackageSettingLPw函數保存PackageSetting 對象。
    void insertPackageSettingLPw(PackageSetting p, PackageParser.Package pkg) {
        p.pkg = pkg;
        // pkg.mSetEnabled = p.getEnabled(userId);
        // pkg.mSetStopped = p.getStopped(userId);
        final String volumeUuid = pkg.applicationInfo.volumeUuid;
        final String codePath = pkg.applicationInfo.getCodePath();
        final String resourcePath = pkg.applicationInfo.getResourcePath();
        final String legacyNativeLibraryPath = pkg.applicationInfo.nativeLibraryRootDir;
        // Update volume if needed
        if (!Objects.equals(volumeUuid, p.volumeUuid)) {
            Slog.w(PackageManagerService.TAG, "Volume for " + p.pkg.packageName +
                    " changing from " + p.volumeUuid + " to " + volumeUuid);
            p.volumeUuid = volumeUuid;
        }
        // Update code path if needed
        if (!Objects.equals(codePath, p.codePathString)) {
            Slog.w(PackageManagerService.TAG, "Code path for " + p.pkg.packageName +
                    " changing from " + p.codePathString + " to " + codePath);
            p.codePath = new File(codePath);
            p.codePathString = codePath;
        }
        //Update resource path if needed
        if (!Objects.equals(resourcePath, p.resourcePathString)) {
            Slog.w(PackageManagerService.TAG, "Resource path for " + p.pkg.packageName +
                    " changing from " + p.resourcePathString + " to " + resourcePath);
            p.resourcePath = new File(resourcePath);
            p.resourcePathString = resourcePath;
        }
        // Update the native library paths if needed
        if (!Objects.equals(legacyNativeLibraryPath, p.legacyNativeLibraryPathString)) {
            p.legacyNativeLibraryPathString = legacyNativeLibraryPath;
        }

        // Update the required Cpu Abi
        p.primaryCpuAbiString = pkg.applicationInfo.primaryCpuAbi;
        p.secondaryCpuAbiString = pkg.applicationInfo.secondaryCpuAbi;
        p.cpuAbiOverrideString = pkg.cpuAbiOverride;
        // Update version code if needed
        if (pkg.mVersionCode != p.versionCode) {
            p.versionCode = pkg.mVersionCode;
        }
        // Update signatures if needed.
        if (p.signatures.mSignatures == null) {
            p.signatures.assignSignatures(pkg.mSignatures);
        }
        // Update flags if needed.
        if (pkg.applicationInfo.flags != p.pkgFlags) {
            p.pkgFlags = pkg.applicationInfo.flags;
        }
        // If this app defines a shared user id initialize
        // the shared user signatures as well.
        if (p.sharedUser != null && p.sharedUser.signatures.mSignatures == null) {
            p.sharedUser.signatures.assignSignatures(pkg.mSignatures);
        }
        addPackageSettingLPw(p, pkg.packageName, p.sharedUser);
    }
addPackageSettingLPw主要把PackageSetting 放在了mSettings的成員變量mPackages中。
    private void addPackageSettingLPw(PackageSetting p, String name,
            SharedUserSetting sharedUser) {
        mPackages.put(name, p);
......
這裡只是保存了這兩個成員變量,而在每次開機的時候都會重新掃描各個目錄的apk,然後重新把各個PackageSetting放入mSettings中,最後也會把mSettings中的數據寫入packages.xml文件中。
在AMS中我們從PKMS中通過Intent參數獲取ActivityInfo對象,並且其processName和uid這兩個變量在後續啟動進程的時候很重要。而PKMS通過Intent查詢Activity,如果Intent有ComponentName我們可以直接找到對應的Activity,並且把ActivityInfo傳給AMS。如果沒有ComponentName,就要通過包名或者全局查找了。
後續可以通過這一系列文章AMS和PKMS可以研究安裝兩個應用,比如微信。但是uid的產生和processName還要多打log驗證下。
 Android rom解包打包工具
eMMC主要是針對手機和平板電腦等產品的內嵌式存儲器,由於其在封裝中集成了一個控制器,且提供標准接口並管理閃存等優勢,越來越受到Android手機廠商的青睐,以eMMC為
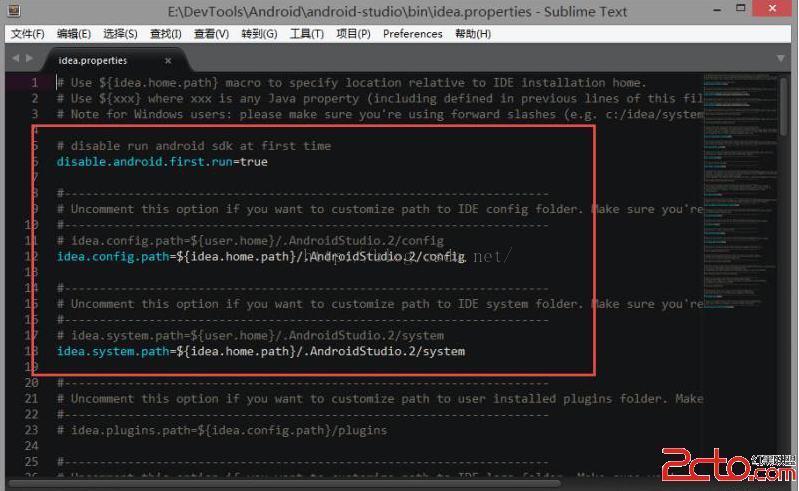 14條Android Studio常用的的配置
14條Android Studio常用的的配置1,修改idea.properties文件找到\bin\idea.properties文件,打開,改成這樣:#禁止第一次運行
 Android使用android-wheel實現省市縣三級聯動
今天沒事跟群裡面侃大山,有個哥們說道Android Wheel這個控件,以為是Andriod內置的控件,google一把,發現是個github上的一個控件。下載地址:ht
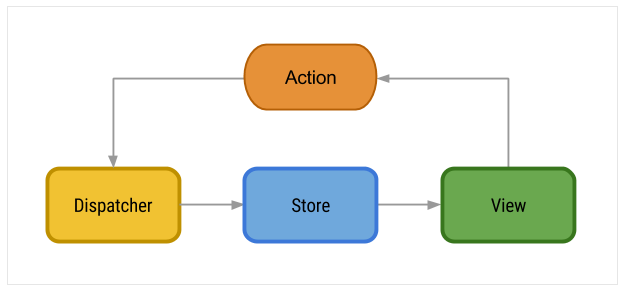 Android學習之Flux架構入門
Flux 架構介紹Flux 架構 被Facebook使用來構建他們的客戶端web應用。跟Clean Architecture一樣,它不是為移動應用設計的,但是它的特性和簡