自定義dialog肯定是用的很多了但是感覺每次做都是很亂 單純完成任務而已,現在封裝了一下 以後用到直接copy
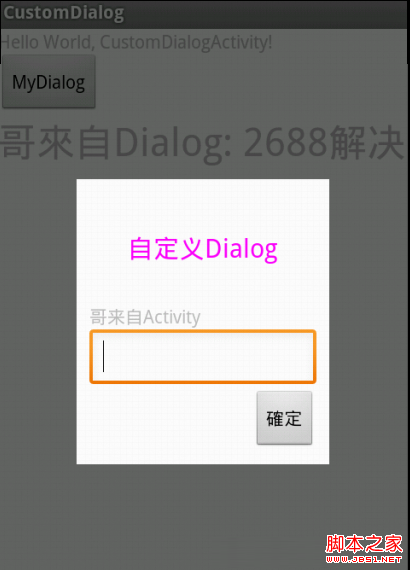
先上圖:
主activity
復制代碼 代碼如下:
package com.su.testcustomdialog;
import com.su.testcustomdialog.MyDialog.Dialogcallback;
import android.app.Activity;
import android.os.Bundle;
import android.view.View;
import android.widget.Button;
import android.widget.TextView;
public class CustomDialogActivity extends Activity {
private TextView textView;
/** Called when the activity is first created. */
@Override
public void onCreate(Bundle savedInstanceState) {
super.onCreate(savedInstanceState);
setContentView(R.layout.main);
textView = (TextView) findViewById(R.id.textView11);
Button button = (Button) findViewById(R.id.button1);
button.setOnClickListener(new View.OnClickListener() {
@Override
public void onClick(View v) {
MyDialog myDialog = new MyDialog(CustomDialogActivity.this);
myDialog.setContent("哥來自Activity");
myDialog.setDialogCallback(dialogcallback);
myDialog.show();
}
});
}
/**
* 設置mydialog需要處理的事情
*/
Dialogcallback dialogcallback = new Dialogcallback() {
@Override
public void dialogdo(String string) {
textView.setText("哥來自Dialog: " + string);
}
};
}
然後是MyDialog的核心了
復制代碼 代碼如下:
package com.su.testcustomdialog;
import android.app.Dialog;
import android.content.Context;
import android.view.View;
import android.widget.Button;
import android.widget.EditText;
import android.widget.TextView;
/**
* 自定義dialog
* @author sfshine
*
*/
public class MyDialog {
Context context;
Dialogcallback dialogcallback;
Dialog dialog;
Button sure;
TextView textView;
EditText editText;
/**
* init the dialog
* @return
*/
public MyDialog(Context con) {
this.context = con;
dialog = new Dialog(context, R.style.dialog);
dialog.setContentView(R.layout.dialog);
textView = (TextView) dialog.findViewById(R.id.textview);
sure = (Button) dialog.findViewById(R.id.button1);
editText = (EditText) dialog.findViewById(R.id.editText1);
sure.setOnClickListener(new View.OnClickListener() {
@Override
public void onClick(View v) {
dialogcallback.dialogdo(editText.getText().toString());
dismiss();
}
});
}
/**
* 設定一個interfack接口,使mydialog可以處理activity定義的事情
* @author sfshine
*
*/
public interface Dialogcallback {
public void dialogdo(String string);
}
public void setDialogCallback(Dialogcallback dialogcallback) {
this.dialogcallback = dialogcallback;
}
/**
* @category Set The Content of the TextView
* */
public void setContent(String content) {
textView.setText(content);
}
/**
* Get the Text of the EditText
* */
public String getText() {
return editText.getText().toString();
}
public void show() {
dialog.show();
}
public void hide() {
dialog.hide();
}
public void dismiss() {
dialog.dismiss();
}
}
dialog的布局
復制代碼 代碼如下:
<?xml version="1.0" encoding="utf-8"?>
<LinearLayout xmlns:android="http://schemas.android.com/apk/res/android"
android:layout_width="match_parent"
android:layout_height="wrap_content"
android:layout_margin="30.0dp"
android:orientation="vertical"
android:padding="10dip" >
<!-- 這裡如果使用android:layout_width="5000dip"設置一個極大的值 系統就會 -->
<TextView
android:layout_width="wrap_content"
android:layout_height="wrap_content"
android:layout_margin="30.0dp"
android:gravity="center"
android:text="自定義Dialog"
android:textColor="#F0F"
android:textSize="20dip" />
<TextView
android:id="@+id/textview"
android:layout_width="wrap_content"
android:layout_height="wrap_content" />
<EditText
android:id="@+id/editText1"
android:layout_width="match_parent"
android:layout_height="wrap_content"
android:ems="10" >
</EditText>
<Button
android:id="@+id/button1"
android:layout_width="wrap_content"
android:layout_height="wrap_content"
android:layout_gravity="right"
android:text="確定" />
</LinearLayout>
style 的文件
復制代碼 代碼如下:
<?xml version="1.0" encoding="utf-8"?>
<resources>
<style name="dialog" parent="@android:style/Theme.Dialog">
<item name="android:windowFrame">@null</item>
<item name="android:windowIsFloating">true</item>
<item name="android:windowIsTranslucent">false</item>
<item name="android:windowNoTitle">true</item>
<item name="android:background">#FFF</item>
<item name="android:windowBackground">@android:color/transparent</item>
<item name="android:backgroundDimEnabled">true</item>
</style>
</resources>
 Android WebView 應用界面開發教程
 Android Design Support Library(5)- CoordinatorLayout的入門使用
 AndroidStudio 使用AIDL
 使用ExpandableListView實現時間軸效果