就像Button控件有監聽器一樣,動畫效果也有監聽器,只需要實現AnimationListener就可以實現對動畫效果的監聽,其中需要重載三個函數,就是下面的這幾個函數:
復制代碼 代碼如下:
private class MyListenr implements AnimationListener{
@Override
public void onAnimationEnd(Animation arg0) {
// TODO Auto-generated method stub
}
@Override
public void onAnimationRepeat(Animation arg0) {
// TODO Auto-generated method stub
}
@Override
public void onAnimationStart(Animation arg0) {
// TODO Auto-generated method stub
}
}
其中第一個函數的意思是在動畫執行完之後需要開發者做什麼,第二個函數的意思是在動畫重復執行的過程中應該做什麼,第三個函數的意思是當動畫開始執行時有什麼動作發生。
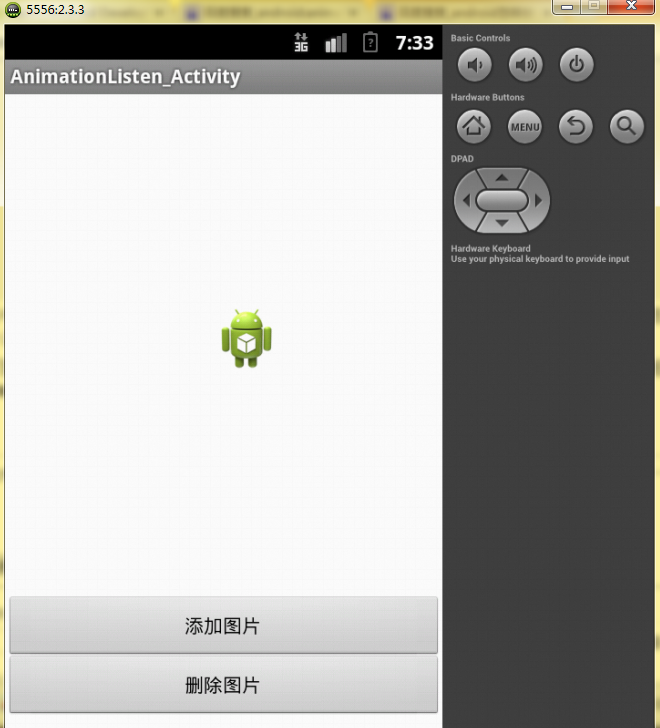
下面我實現了一個例子,點擊刪除按鈕,圖片慢慢淡去,並最終刪除,當點擊添加按鈕時向viewGroup中添加一個imageview,實現的截圖如下:
具體的實現代碼如下:
復制代碼 代碼如下:
public class MainActivity extends Activity {
private Button button;
private Button button2;
private ImageView imageView;
private ViewGroup viewGroup;
@Override
protected void onCreate(Bundle savedInstanceState) {
super.onCreate(savedInstanceState);
setContentView(R.layout.activity_main);
button=(Button)findViewById(R.id.button_add);
button2=(Button)findViewById(R.id.button_delete);
imageView=(ImageView)findViewById(R.id.imageView1);
viewGroup=(ViewGroup)findViewById(R.id.viewGroup);
button.setOnClickListener(new Mybutton());
button2.setOnClickListener(new Mybutton());
}
private class Mybutton implements OnClickListener{
@Override
public void onClick(View v) {
// TODO Auto-generated method stub
switch (v.getId()) {
case R.id.button_add:
Add();
break;
case R.id.button_delete:
Delete();
break;
default:
break;
}
}
}
public void Add() {
AlphaAnimation alphaAnimation=new AlphaAnimation(0.0f, 1.0f);
alphaAnimation.setDuration(2000);
alphaAnimation.setStartOffset(500);
ImageView imageViewAdd=new ImageView(MainActivity.this);
imageViewAdd.setImageResource(R.drawable.ic_launcher);
viewGroup.addView(imageViewAdd);
// viewGroup.addView(imageViewAdd, new LayoutParams(
// LayoutParams.WRAP_CONTENT,LayoutParams.WRAP_CONTENT));
imageViewAdd.startAnimation(alphaAnimation);
}
public void Delete() {
AlphaAnimation alphaAnimation=new AlphaAnimation(1.0f, 0.0f);
alphaAnimation.setDuration(2000);
alphaAnimation.setStartOffset(500);
imageView.startAnimation(alphaAnimation);
alphaAnimation.setAnimationListener(new MyListenr());
}
private class MyListenr implements AnimationListener{
@Override
public void onAnimationEnd(Animation arg0) {
// TODO Auto-generated method stub
viewGroup.removeView(imageView);
Log.d("BruceZhang", "Animation End!");
}
@Override
public void onAnimationRepeat(Animation arg0) {
// TODO Auto-generated method stub
Log.d("BruceZhang", "Animation Repeat!");
}
@Override
public void onAnimationStart(Animation arg0) {
// TODO Auto-generated method stub
Log.d("BruceZhang", "Animation Start!");
}
}
@Override
public boolean onCreateOptionsMenu(Menu menu) {
// Inflate the menu; this adds items to the action bar if it is present.
getMenuInflater().inflate(R.menu.activity_main, menu);
return true;
}
}
此實例的布局文件如下,注意,需要在根標簽下給出viewGroup的id:
復制代碼 代碼如下:
<AbsoluteLayout xmlns:android="http://schemas.android.com/apk/res/android"
xmlns:tools="http://schemas.android.com/tools"
android:layout_width="match_parent"
android:layout_height="match_parent"
tools:context=".MainActivity"
android:id="@+id/viewGroup"
>
<Button
android:id="@+id/button_add"
android:layout_width="match_parent"
android:layout_height="wrap_content"
android:layout_x="0dp"
android:layout_y="367dp"
android:text="添加圖片" />
<Button
android:id="@+id/button_delete"
android:layout_width="match_parent"
android:layout_height="wrap_content"
android:layout_x="0dp"
android:layout_y="410dp"
android:text="刪除圖片" />
<ImageView
android:id="@+id/imageView1"
android:layout_width="wrap_content"
android:layout_height="wrap_content"
android:layout_x="153dp"
android:layout_y="155dp"
android:src="@drawable/ic_launcher" />
</AbsoluteLayout>
 分享一個Android設置圓形圖片的特別方法
 Android開發實現高德地圖定位
 Android開發之Mediaplayer
 Android三大設計模式之一----MVP設計模式(包括rxjava+retrofit網絡請求框架)