編輯:關於Android編程
在html中大家都知道布局是什麼意思了,簡單來說就是將頁面劃分模塊,比如html中的div、table等。那麼Android中也是這樣的。Android五大布局讓界面更加美化,開發起來也更加方便。當然布局方式不一樣應用的地方也不一樣,當然了有的布局方式也是可以相互轉換和嵌套使用的。它們都各有各的優缺點,具體頁面要怎麼布局還是得看開發需求,但是用的最多的還是相對布局、線性布局以及相對布局和線性布局的嵌套使用。當然,我說的是安卓,並沒有指定是安卓手機,比如平板、智能家居(電視...)很多都是Android系統。那麼下面我們就具體來講Android開發中的五大布局,我以一個簡單的撥號器為例。
一、Android五大布局分類
1、相對布局
2、絕對布局
3、線性布局
4、表格布局
5、幀布局
二、具體布局的使用
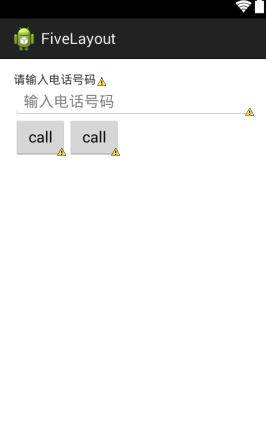
1、相對布局(RelativeLayout)
在我們創建Android項目時,默認的activity_main.xml這個文件默認的布局方式就是RelativeLayout相對布局。那麼相對布局就是按照各子元素之間的位置關系完成布局。在此布局中的子元素裡與位置相關的屬性將生效。可以這樣理解:在安卓屏幕中的父元素就是整個屏幕,而子元素就是那些按鈕、文本框之類的東西。
相對布局是Android布局中最為常用的布局之一,也是最強大的布局:
1)它可以設置的屬性非常的多
2)可以做的事情最多
3)安卓屏幕的分辨率大小不一,所以想到屏幕的自適應性,開發中建議大家去使用相對布局。
4)相對於元素來說,比較容易定位
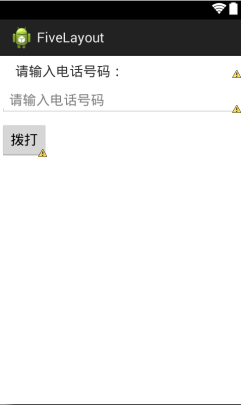
a、以下是相對布局的XML代碼
<RelativeLayout xmlns:android="http://schemas.android.com/apk/res/android"
  xmlns:tools="http://schemas.android.com/tools"
  android:layout_width="match_parent"
  android:layout_height="match_parent"
  android:paddingBottom="@dimen/activity_vertical_margin"
  android:paddingLeft="@dimen/activity_horizontal_margin"
  android:paddingRight="@dimen/activity_horizontal_margin"
  android:paddingTop="@dimen/activity_vertical_margin"
  tools:context="com.example.fivelayout.MainActivity" >


  <!-- 默認RelativeLayout相對布局 -->

    <TextView
      android:id="@+id/tv_number"
      android:layout_width="wrap_content"
      android:layout_height="wrap_content"
      android:text="請輸入電話號碼:"
      />

    <EditText
      android:id="@+id/et_number"
      android:layout_width="match_parent"
      android:layout_height="wrap_content"
      android:hint="輸入電話號碼"
      android:layout_below="@id/tv_number"
      />

    <Button
      android:id="@+id/btn_call"
      android:layout_width="wrap_content"
      android:layout_height="wrap_content"
      android:text="call"
      android:layout_below="@id/et_number"

      />

    <Button
      android:layout_width="wrap_content"
      android:layout_height="wrap_content"
      android:text="call"
      android:layout_below="@id/et_number"
      android:layout_toRightOf="@id/btn_call"
      />


</RelativeLayout>
b、部分標簽屬性說明
c、效果
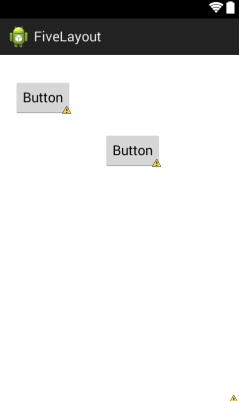
2、絕對布局
在這裡打一個比方:我們手機斗地主,三個玩家的位置是固定在三個角落的,那麼用相對布局就不容易實現。那麼我們就可以用絕對布局(AbsoluteLayout)就比較容易去實現這個功能。
但是在實際開發中:
1)通常不采用此布局格式
2)它的界面代碼過於剛性
3)有可能不能很好的適配各種終端
所以絕對布局的方式已經被Google公司的Android開發團隊捨棄了。在此布局中的子元素的android:layout_x和android:layout_y屬性將生效,用於描述該子元素的坐標位置。屏幕左上角為坐標原點(0,0),第一個0代表橫坐標,向右移動此值增大,第二個0代表縱坐標,向下移動,此值增大。在此布局中的子元素可以相互重疊。
a、一下是絕對布局的xml實現代碼
<?xml version="1.0" encoding="utf-8"?>
<AbsoluteLayout xmlns:android="http://schemas.android.com/apk/res/android"
  android:layout_width="match_parent"
  android:layout_height="match_parent" >

  <!-- 絕對布局AbsoluteLayout -->

  <Button
    android:id="@+id/button1"
    android:layout_width="wrap_content"
    android:layout_height="wrap_content"
    android:layout_x="22dp"
    android:layout_y="33dp"
    android:text="Button" />

  <Button
    android:id="@+id/button2"
    android:layout_width="wrap_content"
    android:layout_height="wrap_content"
    android:layout_x="141dp"
    android:layout_y="103dp"
    android:text="Button" />

</AbsoluteLayout>
b、部分標簽屬性說明:
c、效果
3、線性布局(LinearLayout)
線性布局就好像我們串羊肉串一樣,是一條直線連接起來的。這裡呢又分為橫向和縱向。
線性布局按照垂直或者水平的順序依次排列子元素,每一個子元素都位於前一個元素之後。
1)垂直排列,那麼將是一個N行單列的結構,每一行只會有一個元素,而不論這個元素的寬度為多少;
2)水平排列,那麼將是一個單行N列的結構。
3)搭建兩行兩列的結構,通常的方式是先垂直排列兩個元素,每一個元素裡再包含一個LinearLayout進行水平排列
也就是說縱向和橫向還是可以相互嵌套使用的哦,可以實現表格布局的效果。
a、以下是線性布局的XML實現代碼
<?xml version="1.0" encoding="utf-8"?>
<LinearLayout xmlns:android="http://schemas.android.com/apk/res/android"
  android:layout_width="match_parent"
  android:layout_height="match_parent"
  android:orientation="vertical" >

  <!-- 線性布局LinearLayout -->

  <TextView
    android:id="@+id/tv_number"
    android:layout_width="match_parent"
    android:layout_height="wrap_content"
    android:layout_marginLeft="20dp"
    android:layout_marginTop="10dp"
    android:textSize="18sp"
    android:text="請輸入電話號碼:"
    />

  <EditText
    android:layout_width="match_parent"
    android:layout_height="wrap_content"
    android:layout_marginTop="10dp"
    android:hint="請輸入電話號碼"
    />

  <Button
    android:layout_width="wrap_content"
    android:layout_height="wrap_content"
    android:layout_marginTop="10dp"
    android:text="撥打"
    />

</LinearLayout>
b、部分標簽屬性說明
c、效果
4、表格布局
相比大家對於表格都有很大的了解,比如我們常用到的Excel表格,再比如我們html中用到的table標簽,其實在Android中的表格布局也是類似的,所以當需要像表格一樣布 局,那麼推薦使用表格布局
表格布局適用於多行多列的布局格式。一個TableLayout由許多TableRow組成,一個TableRow就代表TableLayout中的一行。
1)TableRow是LinearLayout的子類,ablelLayout並不需要明確地聲明包含多少行、多少列,而是通過TableRow,以及其他組件來控制表格的行數和列數,
2)TableRow就好比是table中的tr,它是一個容器,因此可以向TableRow裡面添加其他組件也就是我們常說的標簽屬性,每添加一個組件該表格就增加一列。如果想TableLayout裡面添加組件,那麼該組件就直接占用一行。
3)在表格布局中,列的寬度由該列中最寬的單元格決定,整個表格布局的寬度取決於父容器的寬度,默認是占滿父容器本身的,這裡的父容器就相當於我們的整個屏幕。
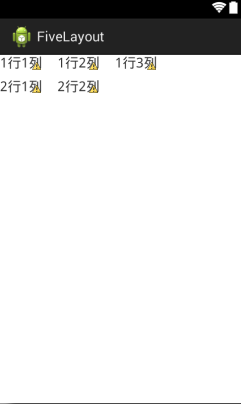
a、一下是表格布局的xml實現代碼
<?xml version="1.0" encoding="utf-8"?>
<TableLayout xmlns:android="http://schemas.android.com/apk/res/android"
  android:layout_width="match_parent"
  android:layout_height="match_parent" >

  <!-- 表格布局tablelayout -->
  <!-- tablerow代表一行,行裡面有多少個標簽內容就代表多少列 -->
  <TableRow
    android:layout_width="match_parent"
    android:layout_height="wrap_content">

    <TextView
      android:layout_width="wrap_content"
      android:layout_height="wrap_content"
      android:text="1行1列"
      android:textSize="18sp"
      />

    <TextView
      android:layout_width="wrap_content"
      android:layout_height="wrap_content"
      android:text="1行2列"
      android:textSize="18sp"
      android:layout_marginLeft="20dp"
      />

    <TextView
      android:layout_width="wrap_content"
      android:layout_height="wrap_content"
      android:text="1行3列"
      android:textSize="18sp"
      android:layout_marginLeft="20dp"
      />

  </TableRow>

  <TableRow
    android:layout_width="match_parent"
    android:layout_height="wrap_content"
    android:layout_marginTop="10dp">

    <TextView
      android:layout_width="wrap_content"
      android:layout_height="wrap_content"
      android:text="2行1列"
      android:textSize="18sp"
      />

    <TextView
      android:layout_width="wrap_content"
      android:layout_height="wrap_content"
      android:text="2行2列"
      android:textSize="18sp"
      android:layout_marginLeft="20dp"
      />

   </TableRow>

</TableLayout>
b、部分標簽屬性說明
TableRow:行
c、效果
5、幀布局(框架布局)
幀布局有的地方也稱之為框架布局,是最簡單的布局形式,所以在實際開發中用得比較少。所有添加到這個布局中的視圖都以層疊的方式顯示。第一個添加的控件被放在最底層,最後一個添加到框架布局中的視圖顯示在最頂層,上一層的控件會覆蓋下一層的控件。這種顯示方式有些類似於堆棧。
a、以下是幀布局xml的實現代碼
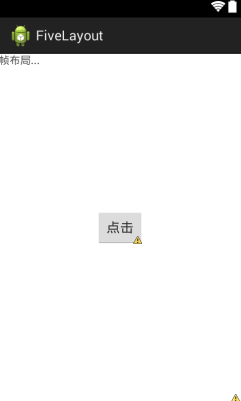
<?xml version="1.0" encoding="utf-8"?>
<FrameLayout xmlns:android="http://schemas.android.com/apk/res/android"
  android:layout_width="match_parent"
  android:layout_height="match_parent" >

  <!-- 幀布局FrameLayout -->

  <TextView
    android:layout_width="match_parent"
    android:layout_height="match_parent"
    android:text="幀布局..."
    />

  <Button
    android:layout_width="wrap_content"
    android:layout_height="wrap_content"
    android:layout_gravity="center"
    android:text="點擊"
    />

</FrameLayout>
b、部分標簽說明
發現這裡沒有啥標簽好說明哒~~哈哈哈,那我就當做是已經省略了……
c、效果
PS:以上的效果也許大家看得不是很理解,那麼久需要大家自己去實踐啦,把那些標簽一個一個的去調試看一下~最後才會發現原來效果相差這麼大,對就是這麼大~~~
三、總結
1、在實際開發中,各各布局不是獨立存在的,而是可以相互嵌套使用的,就好比html中div嵌套表格,然後表格再嵌套div一樣
2、具體使用哪一個布局得看某個頁面要用怎樣的布局才更方便快捷的實現,也更方便的去維護這方面去思考
3、雖說絕對布局被捨棄了,但是在具體的開發中還是有可能用到的,大家也只要理解一下就好啦
4、布局不僅能夠方便快捷便於維護,還能帶來更好的頁面美觀效果
5、部分布局與布局之間可以可以替換使用,比如相對布局與線性布局與表格布局的相互替換使用等
6、還有很多布局的屬性,那麼聰明的大家也許都看出來規律了,跟我們學的CSS是不是很熟悉呢,大家可以自己去學習哈……
以上就是本文的全部內容,希望對大家的學習有所幫助,也希望大家多多支持本站。
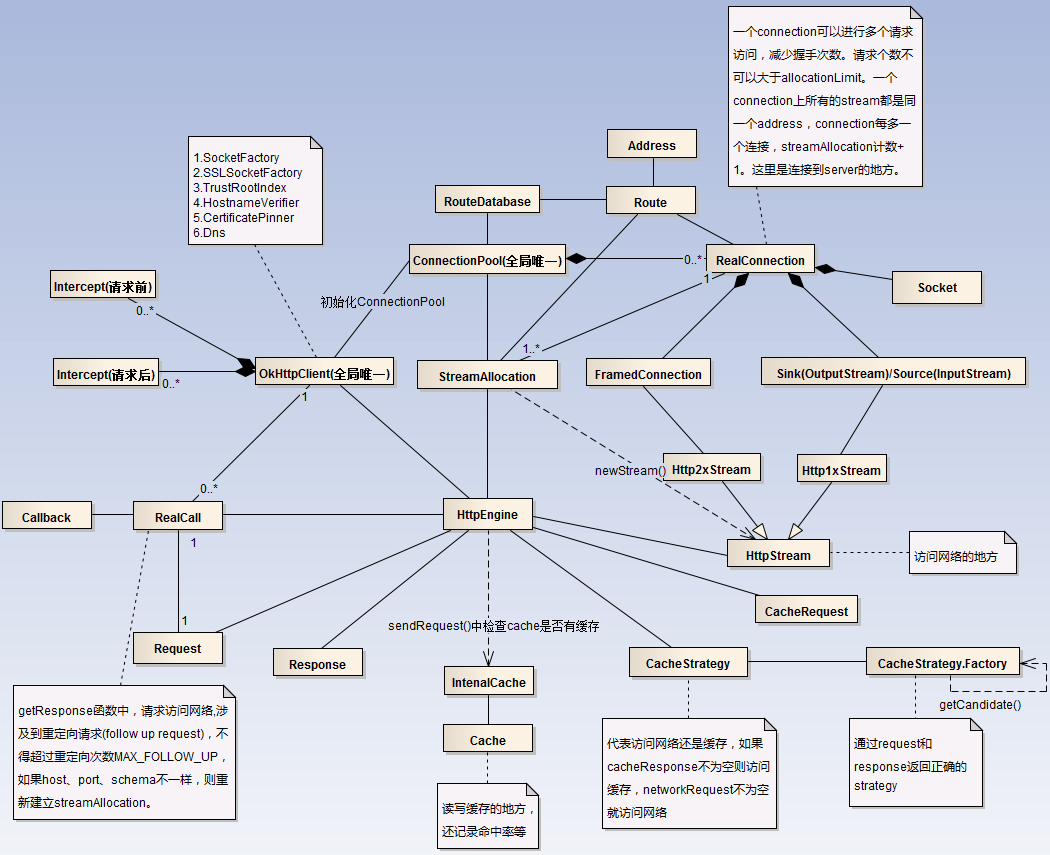 OkHttp完全解析
然後直接進入正題。看完上面這篇文章,主要理解的幾個點:外部通過構造Request,初始化OkHttpClient,並由兩者共同構造出Call。 訪問網絡通過Call,Ca
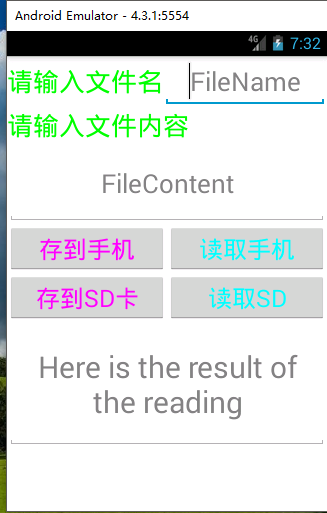 Android實現文件存儲並讀取的示例代碼
要求: 輸入文件名,文件內容分別存儲在手機內存和外存中,並且都可以讀去取出來。 步驟: 1.創建一個名為CDsaveFile的Android項目2.編寫布局文件activ
 Android LinearLayout布局的layout_weight屬性探究
Android布局文件中的layout_weight屬性僅在LinearLayout布局中有效。google推薦:當設置了控件的layout_weight屬性時,該控件相
 ListView常用拓展(Android群英傳)
ListView雖然使用廣泛,但系統原生的ListView顯然是不能滿足用戶在審美、功能上不斷提高的需求。不過也不要緊,Android完全可以定制化,讓我們非常方便地對原
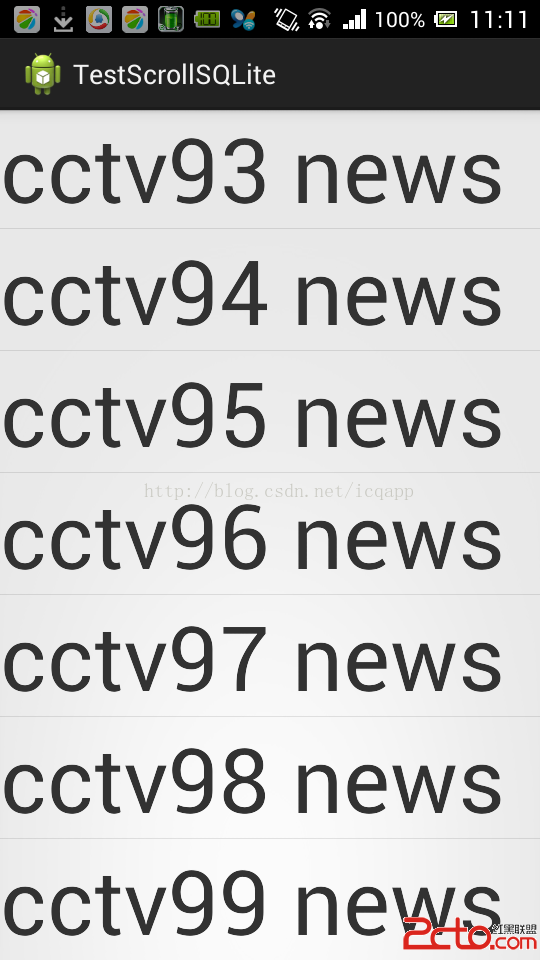 android listview scroll滑屏顯示sqlite分頁,類似聊天記錄,listview動態添加sqlite分頁數據
前言:最近做基於openfire聊天(仿QQ、微信)翻頁查看聊天記錄,為