在開發應用程序的時候,經常會遇到這樣的情況,會在運行時動態根據條件來決定顯示哪個View或某個布局。那麼最通常的想法就是把可能用到的View都寫在上面,先把它們的可見性都設為View.GONE,然後在代碼中動態的更改它的可見性。這樣的做法的優點是邏輯簡單而且控制起來比較靈活。但是它的缺點就是,耗費資源。雖然把View的初始可見View.GONE但是在Inflate布局的時候View仍然會被Inflate,也就是說仍然會創建對象,會被實例化,會被設置屬性。也就是說,會耗費內存等資源。
推薦的做法是使用android.view.ViewStub,ViewStub是一個輕量級的View,它一個看不見的,不占布局位置,占用資源非常小的控件。可以為ViewStub指定一個布局,在Inflate布局的時候,只有ViewStub會被初始化,然後當ViewStub被設置為可見的時候,或是調用了ViewStub.inflate()的時候,ViewStub所向的布局就會被Inflate和實例化,然後ViewStub的布局屬性都會傳給它所指向的布局。這樣,就可以使用ViewStub來方便的在運行時,要還是不要顯示某個布局。
但ViewStub也不是萬能的,下面總結下ViewStub能做的事兒和什麼時候該用ViewStub,什麼時候該用可見性的控制。
首先來說說ViewStub的一些特點:
1. ViewStub只能Inflate一次,之後ViewStub對象會被置為空。按句話說,某個被ViewStub指定的布局被Inflate後,就不會夠再通過ViewStub來控制它了。
2. ViewStub只能用來Inflate一個布局文件,而不是某個具體的View,當然也可以把View寫在某個布局文件中。
基於以上的特點,那麼可以考慮使用ViewStub的情況有:
1. 在程序的運行期間,某個布局在Inflate後,就不會有變化,除非重新啟動。
因為ViewStub只能Inflate一次,之後會被置空,所以無法指望後面接著使用ViewStub來控制布局。所以當需要在運行時不止一次的顯示和隱藏某個布局,那麼ViewStub是做不到的。這時就只能使用View的可見性來控制了。
2. 想要控制顯示與隱藏的是一個布局文件,而非某個View。
因為設置給ViewStub的只能是某個布局文件的Id,所以無法讓它來控制某個View。
所以,如果想要控制某個View(如Button或TextView)的顯示與隱藏,或者想要在運行時不斷的顯示與隱藏某個布局或View,只能使用View的可見性來控制。
下面來看一個實例
在這個例子中,要顯示二種不同的布局,一個是用TextView顯示一段文字,另一個則是用ImageView顯示一個圖片。這二個是在onCreate()時決定是顯示哪一個,這裡就是應用ViewStub的最佳地點。
先來看看布局,一個是主布局,裡面只定義二個ViewStub,一個用來控制TextView一個用來控制ImageView,另外就是一個是為顯示文字的做的TextView布局,一個是為ImageView而做的布局:
復制代碼 代碼如下:
<?xml version="1.0" encoding="utf-8"?>
<LinearLayout
xmlns:android="http://schemas.android.com/apk/res/android"
android:orientation="vertical"
android:layout_width="fill_parent"
android:layout_height="fill_parent"
android:gravity="center_horizontal">
<ViewStub
android:id="@+id/viewstub_demo_text"
android:layout_width="wrap_content"
android:layout_height="wrap_content"
android:layout_marginLeft="5dip"
android:layout_marginRight="5dip"
android:layout_marginTop="10dip"
android:layout="@layout/viewstub_demo_text_layout"/>
<ViewStub
android:id="@+id/viewstub_demo_image"
android:layout_width="wrap_content"
android:layout_height="wrap_content"
android:layout_marginLeft="5dip"
android:layout_marginRight="5dip"
android:layout="@layout/viewstub_demo_image_layout"/>
</LinearLayout>
為TextView的布局:
復制代碼 代碼如下:
<?xml version="1.0" encoding="utf-8"?>
<LinearLayout
xmlns:android="http://schemas.android.com/apk/res/android"
android:orientation="vertical"
android:layout_width="wrap_content"
android:layout_height="wrap_content">
<TextView
android:id="@+id/viewstub_demo_textview"
android:layout_width="fill_parent"
android:layout_height="wrap_content"
android:background="#aa664411"
android:textSize="16sp"/>
</LinearLayout>
為ImageView的布局:
復制代碼 代碼如下:
<?xml version="1.0" encoding="utf-8"?>
<LinearLayout
xmlns:android="http://schemas.android.com/apk/res/android"
android:orientation="vertical"
android:layout_width="wrap_content"
android:layout_height="wrap_content">
<ImageView
android:id="@+id/viewstub_demo_imageview"
android:layout_width="wrap_content"
android:layout_height="wrap_content"/>
</LinearLayout>
下面來看代碼,決定來顯示哪一個,只需要找到相應的ViewStub然後調用其infalte()就可以獲得相應想要的布局:
復制代碼 代碼如下:
package com.effective;
import android.app.Activity;
import android.os.Bundle;
import android.view.ViewStub;
import android.widget.ImageView;
import android.widget.TextView;
public class ViewStubDemoActivity extends Activity {
@Override
public void onCreate(Bundle savedInstanceState) {
super.onCreate(savedInstanceState);
setContentView(R.layout.viewstub_demo_activity);
if ((((int) (Math.random() * 100)) & 0x01) == 0) {
// to show text
// all you have to do is inflate the ViewStub for textview
ViewStub stub = (ViewStub) findViewById(R.id.viewstub_demo_text);
stub.inflate();
TextView text = (TextView) findViewById(R.id.viewstub_demo_textview);
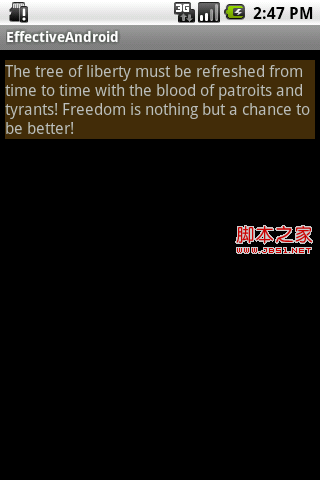
text.setText("The tree of liberty must be refreshed from time to time" +
" with the blood of patroits and tyrants! Freedom is nothing but " +
"a chance to be better!");
} else {
// to show image
// all you have to do is inflate the ViewStub for imageview
ViewStub stub = (ViewStub) findViewById(R.id.viewstub_demo_image);
stub.inflate();
ImageView image = (ImageView) findViewById(R.id.viewstub_demo_imageview);
image.setImageResource(R.drawable.happy_running_dog);
}
}
}
運行結果:

使用的時候的注意事項:
1. 某些布局屬性要加在ViewStub而不是實際的布局上面,才會起作用,比如上面用的android:layout_margin*系列屬性,如果加在TextView上面,則不會起作用,需要放在它的ViewStub上面才會起作用。而ViewStub的屬性在inflate()後會都傳給相應的布局。
 android ViewPager學習筆記1
 Activity之間的動畫切換學習筆記(一)
 Android studio1.5.1 NDK配置開發
 安卓實現高斯模糊