編輯:關於Android編程
使用Button時為了讓用戶有“按下”的效果,有兩種實現方式:
1.在代碼裡面。
復制代碼 代碼如下:
imageButton.setOnTouchListener(new OnTouchListener(){
@Override
public boolean onTouch(View v, MotionEvent event) {
if(event.getAction() == MotionEvent.ACTION_DOWN){
//更改為按下時的背景圖片
v.setBackgroundResource(R.drawable.pressed);
}else if(event.getAction() == MotionEvent.ACTION_UP){
//改為抬起時的圖片
v.setBackgroundResource(R.drawable.released);
}
return false;
}
});
2.用XML文件實現。
復制代碼 代碼如下:
<?xml version="1.0" encoding="UTF-8"?>
<selector xmlns:android="http://schemas.android.com/apk/res/android">
<item
android:state_pressed="false"
android:drawable="@drawable/button_add" />
<item
android:state_pressed="true"
android:drawable="@drawable/button_add_pressed" />
<item
android:state_focused="true"
android:drawable="@drawable/button_add_pressed" />
<item
android:drawable="@drawable/button_add" />
</selector>
這個文件放在drawable目錄下面。命名為button_add_x.xml
使用的時候
復制代碼 代碼如下:
<ImageButton
android:id="@+id/ImageButton"
android:layout_width="wrap_content"
android:layout_height="wrap_content"
android:background="#00000000"
android:src="@drawable/button_add_x" >
</ImageButton>
我自己摸索摸索,發現這樣的實現過程雖然通用性好,但是很麻煩,一個按鈕實現效果需要多張圖片甚至再加一個布局…
那一個游戲要是有幾百個按鈕怎麼辦呢?
於是:以下代碼被醞釀出來了:
復制代碼 代碼如下:
/**
* 按下這個按鈕進行的顏色過濾
*/
public final static float[] BT_SELECTED=new float[] {
2, 0, 0, 0, 2,
0, 2, 0, 0, 2,
0, 0, 2, 0, 2,
0, 0, 0, 1, 0 };
/**
* 按鈕恢復原狀的顏色過濾
*/
public final static float[] BT_NOT_SELECTED=new float[] {
1, 0, 0, 0, 0,
0, 1, 0, 0, 0,
0, 0, 1, 0, 0,
0, 0, 0, 1, 0 };
/**
* 按鈕焦點改變
*/
public final static OnFocusChangeListener buttonOnFocusChangeListener=new OnFocusChangeListener() {
@Override
public void onFocusChange(View v, boolean hasFocus) {
if (hasFocus) {
v.getBackground().setColorFilter(new ColorMatrixColorFilter(BT_SELECTED));
v.setBackgroundDrawable(v.getBackground());
}
else
{
v.getBackground().setColorFilter(new ColorMatrixColorFilter(BT_NOT_SELECTED));
v.setBackgroundDrawable(v.getBackground());
}
}
};
/**
* 按鈕觸碰按下效果
*/
public final static OnTouchListener buttonOnTouchListener=new OnTouchListener() {
@Override
public boolean onTouch(View v, MotionEvent event) {
if(event.getAction() == MotionEvent.ACTION_DOWN){
v.getBackground().setColorFilter(new ColorMatrixColorFilter(BT_SELECTED));
v.setBackgroundDrawable(v.getBackground());
}
else if(event.getAction() == MotionEvent.ACTION_UP){
v.getBackground().setColorFilter(new ColorMatrixColorFilter(BT_NOT_SELECTED));
v.setBackgroundDrawable(v.getBackground());
}
return false;
}
};
/**
* 設置圖片按鈕獲取焦點改變狀態
* @param inImageButton
*/
public final static void setButtonFocusChanged(View inView)
{
inView.setOnTouchListener(buttonOnTouchListener);
inView.setOnFocusChangeListener(buttonOnFocusChangeListener);
}
使用時,調用方法
public final static void setButtonFocusChanged(View inView)
即可。
【原理】
利用Drawable類的setColorFilter方法對圖片進行顏色偏移過濾處理。
 Android 官方推薦 : DialogFragment 怎樣創建對話框
1、 概述DialogFragment在android 3.0時被引入。是一種特殊的Fragment,用於在Activity的內容之上展示一個模態的對話框。典型的用於:
 Android Fragment的生命周期詳解
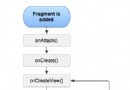
Fragments的生命周期 每一個fragments 都有自己的一套生命周期回調方法和處理自己
 android下調試3G之自動撥號
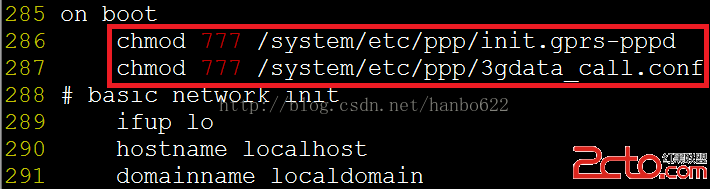
本章簡單講述下android實現自動撥號的功能,該功能利用了系統啟動的rild的服務來實現,因為rild的服務是殺不死的,所以利用這一點,可以使撥號失敗或網絡斷掉後自動重
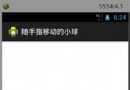 Android自定義控件實現隨手指移動的小球
一個關於自定義控件的小Demo,隨著手指移動的小球。先看下效果圖:實現代碼如下:1.自定義控件類package com.dc.customview.view;import