編輯:關於Android編程
1、概述
之前寫了一個Android 高仿 QQ5.0 側滑菜單效果 自定義控件來襲 ,恰逢QQ5.2又加了一個右側菜單,剛好看了下DrawerLayout,一方面官方的東西,我都比較感興趣;另一方面,這玩意用起來的確方便,於是簡單寫了個demo,高仿QQ5.2雙向側滑,分享給大家。
首先看看效果圖:
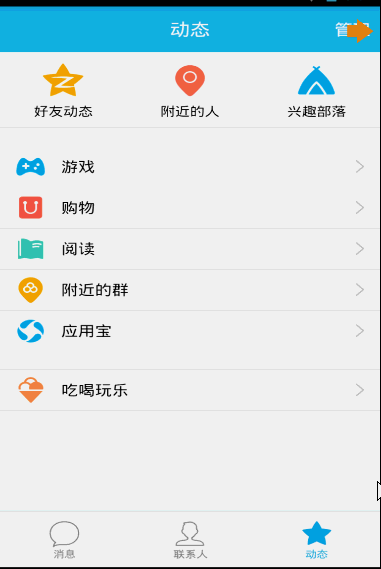
DrawerLayout用起來真的很方便,下面一起看看用法~
2、DrawerLayout的使用
直接將DrawerLayout作為根布局,然後其內部第一個View為內容區域,第二個View為左側菜單,第三個View為右側側滑菜單,當前第三個是可選的。
第一個View的寬高應當設置為match_parent,當然了,這也理所當然。
第二、三個View需要設置android:layout_gravity="left",和android:layout_gravity="right"且一搬高度設置為match_parent,寬度為固定值,即側滑菜單的寬度。
按照上面的描述寫個布局文件,然後設置給Activity就添加好了左右側滑了,是不是很簡單~~~
比如我們的布局文件:
<android.support.v4.widget.DrawerLayout xmlns:android="http://schemas.android.com/apk/res/android"
  xmlns:tools="http://schemas.android.com/tools"
  android:id="@+id/id_drawerLayout"
  android:layout_width="match_parent"
  android:layout_height="match_parent"
  android:background="@drawable/img_frame_background" >

  <RelativeLayout
    android:layout_width="match_parent"
    android:layout_height="match_parent"
    android:background="@drawable/qq" >

    <Button
      android:layout_width="40dp"
      android:layout_height="30dp"
       android:layout_marginTop="10dp"
      android:layout_alignParentRight="true"
      android:background="@drawable/youce"
      android:onClick="OpenRightMenu" />
  </RelativeLayout>

  <fragment
    android:id="@+id/id_left_menu"
    android:name="com.zhy.demo_zhy_17_drawerlayout.MenuLeftFragment"
    android:layout_width="200dp"
    android:layout_height="match_parent"
    android:layout_gravity="left"
    android:tag="LEFT" />

  <fragment
    android:id="@+id/id_right_menu"
    android:name="com.zhy.demo_zhy_17_drawerlayout.MenuRightFragment"
    android:layout_width="100dp"
    android:layout_height="match_parent"
    android:layout_gravity="right"
    android:tag="RIGHT" />

</android.support.v4.widget.DrawerLayout>
這裡我們的主內容區域為RelativeLayout
菜單用的兩個Fragment,左側為200dp,右側為100dp;
好了,看了我們的布局文件,接下來看下我們的詳細代碼。
3、代碼是最好的老師
1、MenuLeftFragment
package com.zhy.demo_zhy_17_drawerlayout;

import android.os.Bundle;
import android.support.v4.app.Fragment;
import android.view.LayoutInflater;
import android.view.View;
import android.view.ViewGroup;

public class MenuLeftFragment extends Fragment
{

  @Override
  public View onCreateView(LayoutInflater inflater, ViewGroup container,
      Bundle savedInstanceState)
  {
    return inflater.inflate(R.layout.layout_menu, container, false);
  }
}
對應的布局文件:
<?xml version="1.0" encoding="utf-8"?>
<RelativeLayout xmlns:android="http://schemas.android.com/apk/res/android"
  android:layout_width="match_parent"
  android:layout_height="match_parent"
  android:background="#00000000" >

  <LinearLayout
    android:layout_width="match_parent"
    android:layout_height="wrap_content"
    android:layout_centerVertical="true"
    android:orientation="vertical" >

    <RelativeLayout
      android:layout_width="match_parent"
      android:layout_height="wrap_content" >

      <ImageView
        android:id="@+id/one"
        android:layout_width="50dp"
        android:layout_height="50dp"
        android:layout_centerVertical="true"
        android:layout_marginLeft="20dp"
        android:layout_marginTop="20dp"
        android:src="@drawable/img_1" />

      <TextView
        android:layout_width="fill_parent"
        android:layout_height="wrap_content"
        android:layout_centerVertical="true"
        android:layout_marginLeft="20dp"
        android:layout_toRightOf="@id/one"
        android:text="第1個Item"
        android:textColor="#f0f0f0"
        android:textSize="20sp" />
    </RelativeLayout>

    <RelativeLayout
      android:layout_width="match_parent"
      android:layout_height="wrap_content" >

      <ImageView
        android:id="@+id/two"
        android:layout_width="50dp"
        android:layout_height="50dp"
        android:layout_centerVertical="true"
        android:layout_marginLeft="20dp"
        android:layout_marginTop="20dp"
        android:src="@drawable/img_2" />

      <TextView
        android:layout_width="fill_parent"
        android:layout_height="wrap_content"
        android:layout_centerVertical="true"
        android:layout_marginLeft="20dp"
        android:layout_toRightOf="@id/two"
        android:text="第2個Item"
        android:textColor="#f0f0f0"
        android:textSize="20sp" />
    </RelativeLayout>

    <RelativeLayout
      android:layout_width="match_parent"
      android:layout_height="wrap_content" >

      <ImageView
        android:id="@+id/three"
        android:layout_width="50dp"
        android:layout_height="50dp"
        android:layout_centerVertical="true"
        android:layout_marginLeft="20dp"
        android:layout_marginTop="20dp"
        android:src="@drawable/img_3" />

      <TextView
        android:layout_width="fill_parent"
        android:layout_height="wrap_content"
        android:layout_centerVertical="true"
        android:layout_marginLeft="20dp"
        android:layout_toRightOf="@id/three"
        android:text="第3個Item"
        android:textColor="#f0f0f0"
        android:textSize="20sp" />
    </RelativeLayout>

    <RelativeLayout
      android:layout_width="match_parent"
      android:layout_height="wrap_content" >

      <ImageView
        android:id="@+id/four"
        android:layout_width="50dp"
        android:layout_height="50dp"
        android:layout_centerVertical="true"
        android:layout_marginLeft="20dp"
        android:layout_marginTop="20dp"
        android:src="@drawable/img_4" />

      <TextView
        android:layout_width="fill_parent"
        android:layout_height="wrap_content"
        android:layout_centerVertical="true"
        android:layout_marginLeft="20dp"
        android:layout_toRightOf="@id/four"
        android:text="第4個Item"
        android:textColor="#f0f0f0"
        android:textSize="20sp" />
    </RelativeLayout>

    <RelativeLayout
      android:layout_width="match_parent"
      android:layout_height="wrap_content" >

      <ImageView
        android:id="@+id/five"
        android:layout_width="50dp"
        android:layout_height="50dp"
        android:layout_centerVertical="true"
        android:layout_marginLeft="20dp"
        android:layout_marginTop="20dp"
        android:src="@drawable/img_5" />

      <TextView
        android:layout_width="fill_parent"
        android:layout_height="wrap_content"
        android:layout_centerVertical="true"
        android:layout_marginLeft="20dp"
        android:layout_toRightOf="@id/five"
        android:text="第5個Item"
        android:textColor="#f0f0f0"
        android:textSize="20sp" />
    </RelativeLayout>
  </LinearLayout>

</RelativeLayout>
其實就是堆出來的布局~~沒撒意思~
2、MenuRightFragment
package com.zhy.demo_zhy_17_drawerlayout;

import android.os.Bundle;
import android.support.v4.app.Fragment;
import android.view.LayoutInflater;
import android.view.View;
import android.view.ViewGroup;

public class MenuRightFragment extends Fragment
{

  @Override
  public View onCreateView(LayoutInflater inflater, ViewGroup container,
      Bundle savedInstanceState)
  {
    return inflater.inflate(R.layout.menu_layout_right, container, false);
  }
}
對應布局文件:
<?xml version="1.0" encoding="utf-8"?>
<LinearLayout xmlns:android="http://schemas.android.com/apk/res/android"
  android:layout_width="match_parent"
  android:layout_height="match_parent"
  android:gravity="center_vertical"
  android:orientation="vertical" >

  <LinearLayout
    android:layout_width="match_parent"
    android:layout_height="wrap_content"
    android:layout_centerVertical="true"
    android:layout_gravity="center_vertical"
    android:layout_marginBottom="20dp"
    android:orientation="vertical" >

    <ImageView
      android:layout_width="60dp"
      android:layout_height="60dp"
      android:layout_gravity="center"
      android:src="@drawable/wode" />

    <TextView
      android:layout_width="fill_parent"
      android:layout_height="wrap_content"
      android:gravity="center"
      android:text="掃一掃"
      android:textColor="#ffffff" />
  </LinearLayout>

  <LinearLayout
    android:layout_width="match_parent"
    android:layout_height="wrap_content"
    android:layout_centerVertical="true"
    android:layout_gravity="center_vertical"
    android:layout_marginBottom="20dp"
    android:orientation="vertical" >

    <ImageView
      android:layout_width="60dp"
      android:layout_height="60dp"
      android:layout_gravity="center"
      android:src="@drawable/saoma" />

    <TextView
      android:layout_width="fill_parent"
      android:layout_height="wrap_content"
      android:gravity="center"
      android:text="討論組"
      android:textColor="#ffffff" />
  </LinearLayout>

  <LinearLayout
    android:layout_width="match_parent"
    android:layout_height="wrap_content"
    android:layout_centerVertical="true"
    android:layout_gravity="center_vertical"
    android:layout_marginBottom="20dp"
    android:orientation="vertical" >

    <ImageView
      android:layout_width="60dp"
      android:layout_height="60dp"
      android:layout_gravity="center"
      android:src="@drawable/wode" />

    <TextView
      android:layout_width="fill_parent"
      android:layout_height="wrap_content"
      android:gravity="center"
      android:text="掃一掃"
      android:textColor="#ffffff" />
  </LinearLayout>

  <LinearLayout
    android:layout_width="match_parent"
    android:layout_height="wrap_content"
    android:layout_centerVertical="true"
    android:layout_gravity="center_vertical"
    android:layout_marginBottom="20dp"
    android:orientation="vertical" >

    <ImageView
      android:layout_width="60dp"
      android:layout_height="60dp"
      android:layout_gravity="center"
      android:src="@drawable/saoma" />

    <TextView
      android:layout_width="fill_parent"
      android:layout_height="wrap_content"
      android:gravity="center"
      android:text="討論組"
      android:textColor="#ffffff" />
  </LinearLayout>

</LinearLayout>
依舊很簡單,除了圖標比較難找以外~~
3、MainActivity
MainActivity的布局文件已經貼過了~~
package com.zhy.demo_zhy_17_drawerlayout;

import android.os.Bundle;
import android.support.v4.app.FragmentActivity;
import android.support.v4.widget.DrawerLayout;
import android.support.v4.widget.DrawerLayout.DrawerListener;
import android.view.Gravity;
import android.view.View;
import android.view.Window;

import com.nineoldandroids.view.ViewHelper;

public class MainActivity extends FragmentActivity
{

  private DrawerLayout mDrawerLayout;

  @Override
  protected void onCreate(Bundle savedInstanceState)
  {
    super.onCreate(savedInstanceState);
    requestWindowFeature(Window.FEATURE_NO_TITLE);
    setContentView(R.layout.activity_main);

    initView();
    initEvents();

  }

  public void OpenRightMenu(View view)
  {
    mDrawerLayout.openDrawer(Gravity.RIGHT);
    mDrawerLayout.setDrawerLockMode(DrawerLayout.LOCK_MODE_UNLOCKED,
        Gravity.RIGHT);
  }

  private void initEvents()
  {
    mDrawerLayout.setDrawerListener(new DrawerListener()
    {
      @Override
      public void onDrawerStateChanged(int newState)
      {
      }

      @Override
      public void onDrawerSlide(View drawerView, float slideOffset)
      {
        View mContent = mDrawerLayout.getChildAt(0);
        View mMenu = drawerView;
        float scale = 1 - slideOffset;
        float rightScale = 0.8f + scale * 0.2f;

        if (drawerView.getTag().equals("LEFT"))
        {

          float leftScale = 1 - 0.3f * scale;

          ViewHelper.setScaleX(mMenu, leftScale);
          ViewHelper.setScaleY(mMenu, leftScale);
          ViewHelper.setAlpha(mMenu, 0.6f + 0.4f * (1 - scale));
          ViewHelper.setTranslationX(mContent,
              mMenu.getMeasuredWidth() * (1 - scale));
          ViewHelper.setPivotX(mContent, 0);
          ViewHelper.setPivotY(mContent,
              mContent.getMeasuredHeight() / 2);
          mContent.invalidate();
          ViewHelper.setScaleX(mContent, rightScale);
          ViewHelper.setScaleY(mContent, rightScale);
        } else
        {
          ViewHelper.setTranslationX(mContent,
              -mMenu.getMeasuredWidth() * slideOffset);
          ViewHelper.setPivotX(mContent, mContent.getMeasuredWidth());
          ViewHelper.setPivotY(mContent,
              mContent.getMeasuredHeight() / 2);
          mContent.invalidate();
          ViewHelper.setScaleX(mContent, rightScale);
          ViewHelper.setScaleY(mContent, rightScale);
        }

      }

      @Override
      public void onDrawerOpened(View drawerView)
      {
      }

      @Override
      public void onDrawerClosed(View drawerView)
      {
        mDrawerLayout.setDrawerLockMode(
            DrawerLayout.LOCK_MODE_LOCKED_CLOSED, Gravity.RIGHT);
      }
    });
  }

  private void initView()
  {
    mDrawerLayout = (DrawerLayout) findViewById(R.id.id_drawerLayout);
    mDrawerLayout.setDrawerLockMode(DrawerLayout.LOCK_MODE_LOCKED_CLOSED,
        Gravity.RIGHT);
  }

}
嗯,代碼基本沒什麼注釋~~維撒呢?是因為的確沒什麼好注釋的。
提幾點:
1、為了模擬QQ的右側菜單需要點擊才能出現,所以在初始化DrawerLayout的時候,使用了mDrawerLayout.setDrawerLockMode(DrawerLayout.LOCK_MODE_LOCKED_CLOSED,Gravity.RIGHT);意思是只有編程才能將其彈出。
然後在彈出以後,需要讓手勢可以滑動回去,所以在OpenRightMenu中又編寫了:
mDrawerLayout.setDrawerLockMode(DrawerLayout.LOCK_MODE_UNLOCKED,Gravity.RIGHT); UNLOCK了一下。
最後在onDrawerClosed回調中,繼續設置mDrawerLayout.setDrawerLockMode(DrawerLayout.LOCK_MODE_LOCKED_CLOSED,Gravity.RIGHT);
2、動畫效果
動畫用了nineoldandroids,關於動畫各種偏移量、縮放比例的計算請參考Android 高仿 QQ5.0 側滑菜單效果 自定義控件來襲 基本是一致的,唯一的不同的地方,給Content設置了ViewHelper.setTranslationX(mContent, mMenu.getMeasuredWidth() * (1 - scale));讓Content在菜單的右側,默認情況下Menu在菜單之上,所以我們根據菜單劃出的距離給Content設置X方向的偏移量。
好了,其實看到可以這麼做,基本上任何的側滑菜單效果都能寫出來了。有興趣的話,可以拿DrawerLayout實現這篇博客的所有效果:Android 實現形態各異的雙向側滑菜單 自定義控件來襲 。
3、setDrawerListener
通過代碼也能看出來,可以使用setDrawerListener監聽菜單的打開與關閉等等。這裡對於當前操作是哪個菜單的判斷是通過TAG判斷的,我覺得使用gravity應該也能判斷出來~~
好了,沒撒了,由於DrawerLayout默認只能從邊界劃出菜單,但是QQ劃出菜單的手勢區域比較大,大家有興趣,可以重寫Activity的onTouchEvent,在裡面判斷,如果是左右滑動手勢神馬的,彈出菜單,應該不麻煩~~~
 Android Volley框架完全解析
2013年Google I/O大會上推出了一個新的網絡通信框架——Volley。Volley可是說是把AsyncHttpClient和Univer
 layout_weight屬性圖解
layout_height的作用:首先按照聲明的尺寸分配,剩余的空間再按照layout_weight進行分配一平均分配:代碼:<code class="h
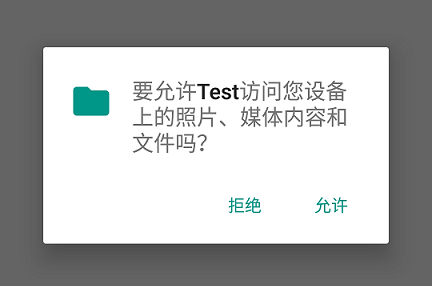 談談Android6.0運行時的權限處理
運行時權限介紹Android 6.0在我們原有的AndroidManifest.xml聲明權限的基礎上,又新增了運行時權限動態檢測,以下權限都需要在運行時判斷:
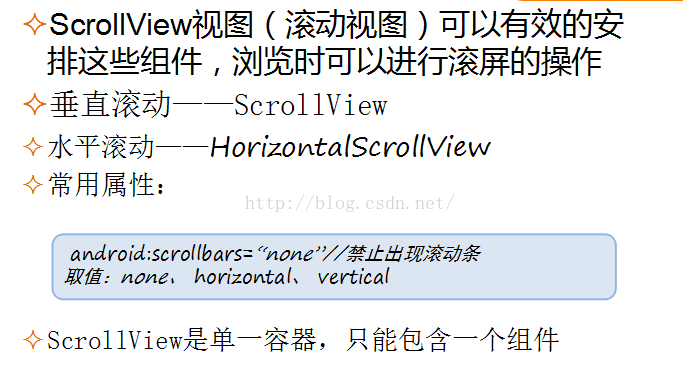 Android高級控件——GridView ScrollView ViewPager (上)
GridView網格視圖,網格視圖組件,九宮圖顯示數據表格(一種控件)ScrollView滾動視圖是一個單一容器,只能包含一個組件。ViewPager左右滑動SlideM