編輯:關於Android編程
本文實例講述了Android編程之簡單逐幀動畫Frame的實現方法。分享給大家供大家參考,具體如下:
1、逐幀動畫
即是通過播放預先排序好的圖片來實現動態的畫面,感覺像是放電影。
2、實現步驟:
① 在工程裡面導入要播放的圖片。此簡單例子中為start_icon1,2,3.
② 在工程res文件目錄下新建一個anim文件夾,在裡面新建一個start_animation.xml格式文件,此文件用來定義動畫播放圖片的順序及每一張圖片顯示停留時間。
代碼如下:
<?xml version="1.0" encoding="utf-8"?>
<animation-list xmlns:android="http://schemas.android.com/apk/res/android"
  android:oneshot="false">
  <item android:drawable="@drawable/start_icon1" android:duration="1000" />
  <item android:drawable="@drawable/start_icon2" android:duration="500" />
  <item android:drawable="@drawable/start_icon3" android:duration="600" />
</animation-list>
注:此藍色部分依次顯示的圖片,存放在drawable-mdpi文件下,一般1秒鐘播放24張圖片(幀)就感覺播放流暢了,即duration為40左右,默認單位為毫秒。
3、布局文件:
布局文件中添加一ImageView控件,用來播放動畫圖片。具體布局如下:
<?xml version="1.0" encoding="utf-8"?>
<LinearLayout xmlns:android="http://schemas.android.com/apk/res/android"
  android:layout_width="match_parent"
  android:layout_height="match_parent"
  android:orientation="vertical" >
  <Button
    android:id="@+id/button1"
    android:layout_width="wrap_content"
    android:layout_height="wrap_content"
    android:layout_gravity="center"
    android:text="開始" />
  <Button
    android:id="@+id/button2"
    android:layout_width="wrap_content"
    android:layout_height="wrap_content"
     android:layout_gravity="center"
    android:text="結束" />
  <ImageView
    android:id="@+id/image"
    android:background="@anim/start_animation"
    android:layout_width="fill_parent"
    android:layout_height="fill_parent"/>
</LinearLayout>
4、代碼部分:
public class TestActivity extends Activity
{
AnimationDrawable anim;
public void onCreate(Bundle savedInstanceState)
{
super.onCreate(savedInstanceState);
setContentView(R.layout.start_screen);
ImageView image = (ImageView) findViewById(R.id.image);
// image.setBackgroundResource(R.anim.start_animation);
anim = (AnimationDrawable) image.getBackground();
Button start = (Button) findViewById(R.id.button1);
Button stop = (Button) findViewById(R.id.button2);
start.setOnClickListener(new OnClickListener()
{
public void onClick(View arg0)
{
anim.start();
}
});
stop.setOnClickListener(new OnClickListener()
{
public void onClick(View arg0)
{
anim.stop();
}
});
}
}
注:第三步中的android:background="@anim/start_animation"和第四步中的 image.setBackgroundResource(R.anim.start_animation);只要選擇一個就可以,兩個都寫顯得累贅,主要功能是指定播放的資源圖片。
小結:這種應用在實際應用中應該不會用到,對於初學著來說,拿著玩下還是蠻有意思的,不僅增強了對Android學習的興趣,同時也能加深對制造電影的一些了解
希望本文所述對大家Android程序設計有所幫助。
 Android wear 初體驗
最近一直在研究android wear SDK,總體感受來說就是和現有的android 其他的開發SDK還是有很多新的東西。例如手機終端與手表端的通信機制,手表端的UI規
 Google Play服務已停止運行解決方法
很多朋友在啟動應用或者玩游戲的時候都出現Google Play服務已停止運行,或者之前運行正常的應用突然不能使用了。這是為什麼?在這我們就來講解一下Goog
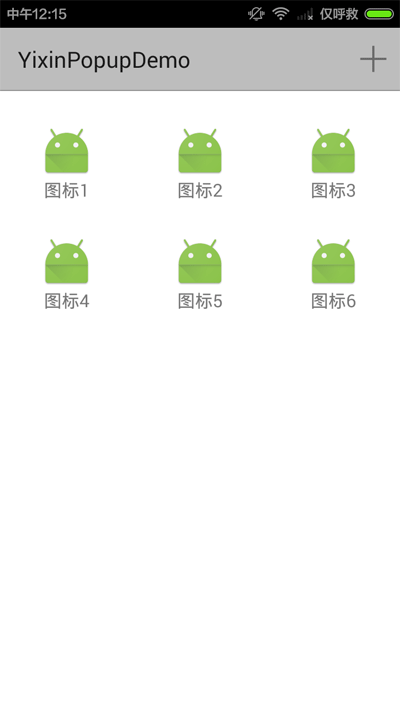 Android編程實現仿易信精美彈出框效果【附demo源碼下載】
本文實例講述了Android編程實現仿易信精美彈出框效果。分享給大家供大家參考,具體如下:截圖:動畫效果介紹:1.點擊ActionBar上“+”按鈕,菜單從上方彈出(帶反
 Json數據解析模擬美團界面顯示
<?xml version=. encoding=UTF-?><RelativeLayout xmlns:android=http://