編輯:關於Android編程
ExpandableListView是一個垂直滾動顯示兩級列表項的視圖,與ListView不同的是,它可以有兩層:每一層都能夠被獨立的展開並顯示其子項。
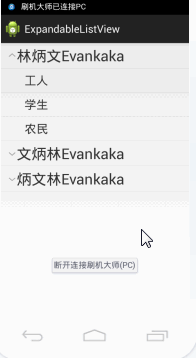
好友QQ列表,可以展開,可以收起,在android中,以往用的比較多的是listview,雖然可以實現列表的展示,但在某些情況下,我們還是希望用到可以分組並實現收縮的列表,那就要用到android的ExpandableListView,今天研究了一下這個的用法,也參考了很多資料動手寫了一個小demo,實現了基本的功能,下面直接上效果圖以及源代碼~!
本文效果:


一、實現原理
1、首先必須在布局文件中定義一個ExpandableListView
2、其次創建一級條目對應的布局文件group
3、創建二級條目對應的布局文件child
4、加載ExpandableListView組件的Activity必須繼承自ExpandableListActivity
二、布局與代碼
1、首先在主布局中activity_main.xml
<LinearLayout xmlns:android="http://schemas.android.com/apk/res/android"
  android:layout_width="fill_parent"
  android:layout_height="fill_parent"
  android:orientation="vertical" >

  <ExpandableListView
    android:id="@id/android:list"
    android:layout_width="fill_parent"
    android:layout_height="fill_parent" />

</LinearLayout>
2、其次在drawable文件夾定義布局一級列表groups.xml
<LinearLayout
  xmlns:android="http://schemas.android.com/apk/res/android"
  android:orientation="vertical"
  android:layout_width="fill_parent"
  android:layout_height="fill_parent"
>
  <TextView
    android:id="@+id/textGroup"
    android:layout_width="fill_parent"
    android:layout_height="fill_parent"
    android:paddingLeft="40px"
    android:paddingTop="6px"
    android:paddingBottom="6px"
    android:textSize="25sp"
    android:text="No data"
  />

</LinearLayout>
3、接著在drawable文件夾定義布局二級列表childs.xml
<LinearLayout
  xmlns:android="http://schemas.android.com/apk/res/android"
 android:orientation="vertical"
  android:layout_width="fill_parent"
  android:layout_height="fill_parent"
>
   <TextView
    android:id="@+id/textChild"
  android:layout_width="fill_parent"
    android:layout_height="fill_parent"
    android:paddingLeft="60px"
    android:paddingTop="10px"
    android:paddingBottom="10px"
    android:textSize="20sp"
  android:text="No Data"
/>

</LinearLayout>
4、然後就是初始化和使用了
package com.example.expandablelistview;

import java.util.ArrayList;
import java.util.HashMap;
import java.util.List;
import java.util.Map;
import android.os.Bundle;
import android.app.ExpandableListActivity;
import android.util.DisplayMetrics;
import android.view.View;
import android.widget.ExpandableListView;
import android.widget.SimpleExpandableListAdapter;
import android.widget.Toast;

public class MainActivity extends ExpandableListActivity {
  /**
   * 創建一級條目容器
   */
  List<Map<String, String>> gruops = new ArrayList<Map<String, String>>();
  /**
   * 存放內容, 以便顯示在列表中
   */
  List<List<Map<String, String>>> childs = new ArrayList<List<Map<String, String>>>();

  @Override
  public void onCreate(Bundle savedInstanceState) {
    super.onCreate(savedInstanceState);
    setContentView(R.layout.activity_main);
    setListData();
  }

  /**
   * 設置列表內容
   */
  public void setListData() {
    // 創建二個一級條目標題
    Map<String, String> title_1 = new HashMap<String, String>();
    Map<String, String> title_2 = new HashMap<String, String>();
    Map<String, String> title_3 = new HashMap<String, String>();
    title_1.put("group", "林炳文");
    title_2.put("group", "文炳林");
    gruops.add(title_1);
    gruops.add(title_2);

    // 創建二級條目內容
    // 內容一
    Map<String, String> title_1_content_1 = new HashMap<String, String>();
    Map<String, String> title_1_content_2 = new HashMap<String, String>();
    Map<String, String> title_1_content_3 = new HashMap<String, String>();
    title_1_content_1.put("child", "工人");
    title_1_content_2.put("child", "學生");
    title_1_content_3.put("child", "農民");

    List<Map<String, String>> childs_1 = new ArrayList<Map<String, String>>();
    childs_1.add(title_1_content_1);
    childs_1.add(title_1_content_2);
    childs_1.add(title_1_content_3);

    // 內容二
    Map<String, String> title_2_content_1 = new HashMap<String, String>();
    Map<String, String> title_2_content_2 = new HashMap<String, String>();
    Map<String, String> title_2_content_3 = new HashMap<String, String>();
    title_2_content_1.put("child", "猩猩");
    title_2_content_2.put("child", "老虎");
    title_2_content_3.put("child", "獅子");
    List<Map<String, String>> childs_2 = new ArrayList<Map<String, String>>();
    childs_2.add(title_2_content_1);
    childs_2.add(title_2_content_2);
    childs_2.add(title_2_content_3);

    childs.add(childs_1);
    childs.add(childs_2);

    /**
     * 創建ExpandableList的Adapter容器 參數: 1.上下文 2.一級集合 3.一級樣式文件 4. 一級條目鍵值
     * 5.一級顯示控件名 6. 二級集合 7. 二級樣式 8.二級條目鍵值 9.二級顯示控件名
     *
     */
    SimpleExpandableListAdapter sela = new SimpleExpandableListAdapter(
        this, gruops, R.drawable.groups, new String[] { "group" },
        new int[] { R.id.textGroup }, childs, R.drawable.childs,
        new String[] { "child" }, new int[] { R.id.textChild });
    // 加入列表
    setListAdapter(sela);
  }

  /**
   * 列表內容按下
   */
  @Override
  public boolean onChildClick(ExpandableListView parent, View v,
      int groupPosition, int childPosition, long id) {
    Toast.makeText(
        MainActivity.this,
        "您選擇了"
            + gruops.get(groupPosition).toString()
            + "子編號"
            + childs.get(groupPosition).get(childPosition)
                .toString(), Toast.LENGTH_SHORT).show();
    return super.onChildClick(parent, v, groupPosition, childPosition, id);
  }

  /**
   * 二級標題按下
   */
  @Override
  public boolean setSelectedChild(int groupPosition, int childPosition,
      boolean shouldExpandGroup) {
    return super.setSelectedChild(groupPosition, childPosition,
        shouldExpandGroup);
  }

  /**
   * 一級標題按下
   */
  @Override
  public void setSelectedGroup(int groupPosition) {
    super.setSelectedGroup(groupPosition);
  }
}
5、效果
這是我手機上的效果,點擊工人。學生等二級列表時,我手機上會有提示框出現的,但是不知為什麼錄制下來就是沒有。
三、自定義列表圖標
上面的圖標是系統自己生成的,下面我們要改成自己的
1、更改自定義圖標
在drawable文件夾下新建expandablelistview_change.xml
<?xml version = "1.0"  encoding = "utf-8"?>
<selector  xmlns:android = "http://schemas.android.com/apk/res/android" >
   <item android:state_expanded = "true"  android:drawable = "@drawable/w2"/>
   <item android:drawable = "@drawable/w1"/>
</selector >
2、修改上面布局Activity.main.xml
<LinearLayout xmlns:android="http://schemas.android.com/apk/res/android"
  android:layout_width="fill_parent"
  android:layout_height="fill_parent"
  android:orientation="vertical" >

  <ExpandableListView
    android:id="@id/android:list"
    android:layout_width="fill_parent"
    android:layout_height="fill_parent"
    android:background="#f5f5f5"
    android:cacheColorHint="#f5f5f5"
    android:groupIndicator="@drawable/expandablelistview_change" />

</LinearLayout>
其實就是加了一句
android:groupIndicator="@drawable/expandablelistview_change"
下面我們再來看看效果:

四、圖標放置右邊
在上面MainActivity.java的函數setListData()加中:
// 得到屏幕的大小
DisplayMetrics dm = new DisplayMetrics();
getWindowManager().getDefaultDisplay().getMetrics(dm);
//圖標設置在右邊
getExpandableListView().setIndicatorBounds(dm.widthPixels-60, dm.widthPixels); // 設置指示圖標的位置
效果:

以上就是本文的全部內容,希望對大家的學習Android軟件編程有所幫助。
 qq厘米秀挑戰厘米神搶手怎麼玩
QQ厘米秀是騰訊手機QQ新出的功能,玩家在手機QQ聊天中可以放上自己的厘米秀,也能發很多特定的帶有聲音的表情。QQ厘米秀讓用戶在手機QQ聊天中更有趣,而且目
 android注解框架ButterKnife學習
不同於其他的注解框架通過反射在代碼運行階段實現對View的賦值和設置監聽事件,ButterKnife是在代碼編譯階段直接生成可執行的代碼。這樣就可以避免反射帶來的運行緩慢
 Android附近基站+Wifi+IP+GPS多渠道定位方案
前言:在移動客戶端的開發中,地理位置定位是一個非常重要的環節,有些時候用戶可能會限制web app或者Android app的一些權限,或者由於信號不佳的原因無法獲得准確
 Android 開發:帶觸控的圖表(基金圖表的實現)
帶觸控的圖表類,後期會把這個功能類,添加到這個框架裡:效果如下public class BaseFundChartView extends View implements