1.將號碼“12345678”存為聯系人Test後
2.進入短信編輯界面,在收件人一欄輸入“13712345678”,再切換到文字輸入框,使收件人那個控件失焦,可以看到收件人立即顯示為“Test”,再返回去點擊那個收件人,發現目標號碼變成了“12345678”。
3.發送信息,提示發送失敗。
PS:用戶本來想要把短信發送到“13712345678”的,結果因為電話薄裡面存了個“12345678”的聯系人,系統就把發送目標的號碼給變更了,導致信息發送失敗。
號碼匹配相關的問題都可以先用以下方式驗證,如果還有異常,請提交eService到mediatek.
alps\frameworks\ex\chips\src\com\android\ex\chips\RecipientAlternatesAdapter.java中getRecipientEntryByPhoneNumber() 替換成下面的code:
public static RecipientEntry getRecipientEntryByPhoneNumber(Context context, String phoneNumber) {
Log.d(TAG, "[getRecipientEntryByPhoneNumber] phoneNumber: " + phoneNumber); /// M: MTK debug log
if (phoneNumber == null || TextUtils.isEmpty(phoneNumber)) {
return null;
}
final String[] PHONE_LOOKUP_PROJECTION = new String[] {
Phone._ID, // 0
Phone.CONTACT_ID, // 1
Phone.NUMBER, // 2
Phone.NORMALIZED_NUMBER, // 3
Phone.DISPLAY_NAME, // 4
};
long index = -1;
String currentNumber = "";
String normalizedNumber = PhoneNumberUtils.normalizeNumber(phoneNumber);
/// M: Query CONTACT_ID by giving phone number
Cursor cursorNormalize = context.getContentResolver().query(
Uri.withAppendedPath(PhoneLookup.CONTENT_FILTER_URI, normalizedNumber), PHONE_LOOKUP_PROJECTION, null, null, null);
/// M: Return null if query result is empty
if (cursorNormalize == null) {
Log.d(TAG, "[getRecipientEntryByPhoneNumber] cursorNormalize is null"); /// M: MTK debug log
return null;
}
if (cursorNormalize.moveToFirst()) {
do {
index = cursorNormalize.getLong(1); /// M: Phone.CONTACT_ID
if (Log.isLoggable(TAG, Log.DEBUG)) {
Log.d(TAG, "[getRecipientEntryByPhoneNumber] Query ID for " + phoneNumber
+ " RESULTS: "
+ " NAME : " + cursorNormalize.getString(4)
+ " CONTACT ID : " + cursorNormalize.getLong(1)
+ " ADDRESS :" + cursorNormalize.getString(2));
}
} while (cursorNormalize.moveToNext());
}
cursorNormalize.close();
/// M: No matched contact
if (index == -1) {
return null;
}
/// M: Query contact information by giving CONTACT_ID
RecipientEntry entry = null;
for (long i = index; i > 0; i--) {
Log.d(TAG, " getRecipientEntryByPhoneNumber i = "+ i);
Cursor cursor = context.getContentResolver().query(
Queries.PHONE.getContentUri(),
Queries.PHONE.getProjection(),
Queries.PHONE.getProjection()[Queries.Query.CONTACT_ID] + " IN (" + String.valueOf(i) + ")", null, null);
if (cursor.moveToFirst()) {
do {
if (cursor.getString(Queries.Query.DESTINATION).length() < currentNumber.length())
break;
if (true) {
Log.d(TAG, "[getRecipientEntryByPhoneNumber] Query detail for " + phoneNumber
+ " RESULTS: "
+ " NAME : " + cursor.getString(Queries.Query.NAME)
+ " CONTACT ID : " + cursor.getLong(Queries.Query.CONTACT_ID)
+ " ADDRESS :" + cursor.getString(Queries.Query.DESTINATION));
}
currentNumber = cursor.getString(1); /// M:Phone.NUMBER
if (PhoneNumberUtils.compare(PhoneNumberUtils.normalizeNumber(currentNumber), normalizedNumber)) {
entry = RecipientEntry.constructTopLevelEntry(
cursor.getString(Queries.Query.NAME),
cursor.getInt(Queries.Query.DISPLAY_NAME_SOURCE),
cursor.getString(Queries.Query.DESTINATION),
cursor.getInt(Queries.Query.DESTINATION_TYPE),
cursor.getString(Queries.Query.DESTINATION_LABEL),
cursor.getLong(Queries.Query.CONTACT_ID),
cursor.getLong(Queries.Query.DATA_ID),
cursor.getString(Queries.Query.PHOTO_THUMBNAIL_URI),
true, false);
break;
}
} while (cursor.moveToNext());
}
Log.d(TAG, "[getRecipientEntryByPhoneNumber] cursor count: " + (cursor != null ? cursor.getCount() : "null")); /// M: MTK debug log
cursor.close();
}
if (phoneNumber.length() - entry.getDestination().length() != 3 || entry.getDestination().length() < 11) {
Log.d(TAG, " the query do not meet the conditon, drop it");
entry = null;
}
return entry;
}
注意事項:
1. 先mm build frameworks/ex/chips
2. 然後 mm build packages/app/Mms
將生成的Mms push 到手機
 Android Studio 進階詳細配置
 Android 官方推薦 : DialogFragment 創建對話框
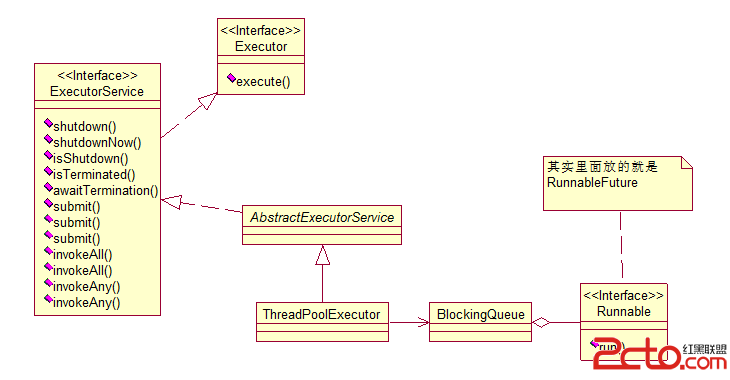 Android Java 線程池 ThreadPoolExecutor源碼篇
 Android手機聯系人快速索引(手機通訊錄)