編輯:關於Android編程
關於沉浸式狀態欄相信大家都不陌生,IOS系統很早就有,android5.0及以後版本都支持給狀態欄著色,而目前android主流版本還是4.4,網上通用實現4.4(API19)沉浸式狀態欄也都是依賴於可以將狀態欄變為透明的屬性,再為其著色,主要實現代碼:
@Override
 protected void onCreate(Bundle savedInstanceState) {
  super.onCreate(savedInstanceState);
  setContentView(R.layout.activity_match_actionbar);
    //只對api19以上版本有效
  if (Build.VERSION.SDK_INT >= Build.VERSION_CODES.KITKAT) {
   setTranslucentStatus(true);
  }
    //為狀態欄著色
  SystemBarTintManager tintManager = new SystemBarTintManager(this);
  tintManager.setStatusBarTintEnabled(true);
  tintManager.setStatusBarTintResource(R.color.statusbar_bg);

 }

 @TargetApi(19)
 private void setTranslucentStatus(boolean on) {
  Window win = getWindow();
  WindowManager.LayoutParams winParams = win.getAttributes();
  final int bits = WindowManager.LayoutParams.FLAG_TRANSLUCENT_STATUS;
  if (on) {
   winParams.flags |= bits;
  } else {
   winParams.flags &= ~bits;
  }
  win.setAttributes(winParams);
 }
再在根布局添加以下兩個屬性:
 android:fitsSystemWindows="true"
 android:clipToPadding="false"
這樣就可以了,以上著色使用了SystemBarTint。
為什麼我要尋找其他的方案?
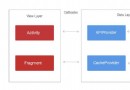
面對大多數的界面自然是沒有多大問題,但是針對類似QQ這種側滑的界面,如圖:

我的手機系統版本是4.4的,如果想做成QQ側滑背景這樣的效果,使用上面的方案就變成了這樣

這樣出來的效果就會很丑,於是才有了改進版的方案,不知QQ是否是這樣做的。
除了上述的缺陷以外,還有一點看著不是很舒服,就是當我使用抽屜菜單或者滑動返回效果的時候是這樣的

狀態欄並沒有陰影效果
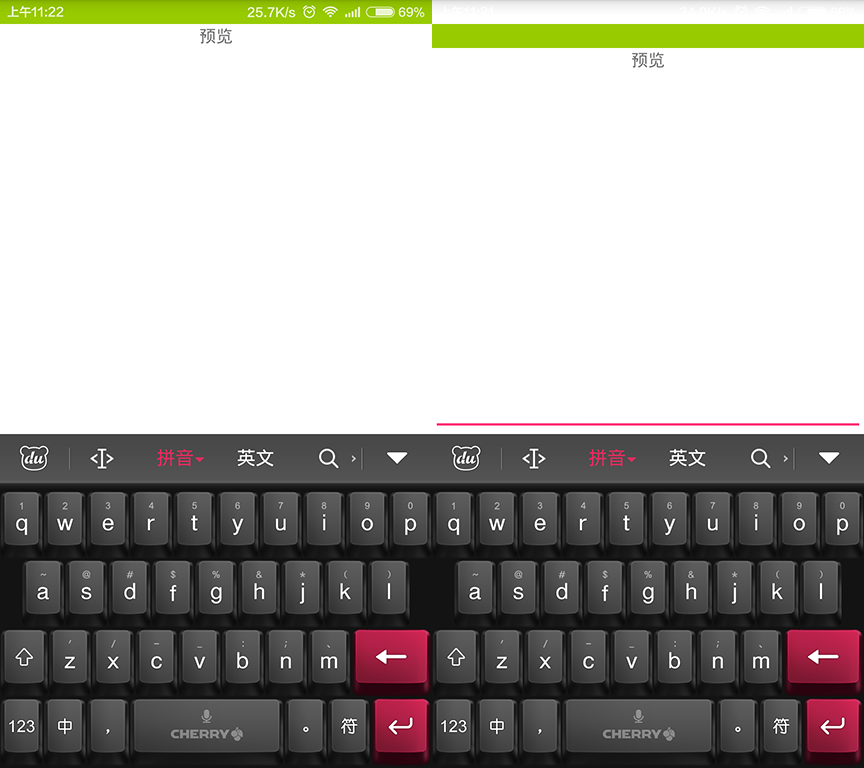
我想要的效果是這樣的

狀態欄也會跟著一起滑動
第一種思路
自定義一個狀態欄,不能添加“ android:fitsSystemWindows="true"
”這個屬性,不然無法填充到狀態欄,如下
<?xml version="1.0" encoding="utf-8"?>
<LinearLayout xmlns:android="http://schemas.android.com/apk/res/android"
    android:layout_width="match_parent"
    android:layout_height="match_parent"
    android:background="@color/colorAccent"
    android:orientation="vertical">

 <View
  android:id="@+id/status_bar"
  android:layout_width="match_parent"
  android:layout_height="20dp"/>

 <FrameLayout
  android:layout_width="match_parent"
  android:layout_height="match_parent"/>

</LinearLayout>
在到代碼中判斷
 @Override
 protected void onCreate(Bundle savedInstanceState) {
  super.onCreate(savedInstanceState);
  View statusBar = findViewById(R.id.status_bar);

  setContentView(R.layout.activity_test);
  //判斷SDK版本是否大於等於19,大於就讓他顯示,小於就要隱藏,不然低版本會多出來一個
  if (Build.VERSION.SDK_INT >= Build.VERSION_CODES.KITKAT) {
   setTranslucentStatus(true);
   statusBar.setVisibility(View.VISIBLE);
   //還有設置View的高度,因為每個型號的手機狀態欄高度都不相同
  }else{
   statusBar.setVisibility(View.GONE);
  }
 }
 @TargetApi(19)
 private void setTranslucentStatus(boolean on) {
  Window win = getWindow();
  WindowManager.LayoutParams winParams = win.getAttributes();
  final int bits = WindowManager.LayoutParams.FLAG_TRANSLUCENT_STATUS;
  if (on) {
   winParams.flags |= bits;
  } else {
   winParams.flags &= ~bits;
  }
  win.setAttributes(winParams);
 }
其實,這樣已經解決了我上面提出的兩個問題
第二種實現方案
第二種方案是為了解決第一種方案中遇到的奇葩問題,設置了透明屬性的界面(聊天及底下評論的框框)不能被系統輸入法頂上去,之前寫過一篇Android 聊天界面背景圖片被輸入法“頂上去”問題解析,現在遇到的就是無論如何聊天的輸入框都不能被系統輸入法頂上去(就是打字看不到輸入框),經過一番測試,發現竟然和“ android:fitsSystemWindows="true"
”這個屬性有關,加上去輸入框就沒問題,但自定義的狀態欄不能被填充到真正的狀態欄位置
陷入了兩難的境地,加還是不加都有問題,而且都特別明顯,說了半天,來看看第二種方案。
<?xml version="1.0" encoding="utf-8"?>
<RelativeLayout
 xmlns:android="http://schemas.android.com/apk/res/android"
 xmlns:tools="http://schemas.android.com/tools"
 android:layout_width="match_parent"
 android:layout_height="match_parent"
 android:background="@android:color/holo_green_light"
 android:fitsSystemWindows="true"
 tools:context="com.saidtx.myapplication.TestActivity">

 <ScrollView
  android:layout_width="match_parent"
  android:layout_height="match_parent"
  android:layout_above="@+id/edit"
  android:background="@android:color/white">

  <LinearLayout
   android:layout_width="match_parent"
   android:layout_height="wrap_content">

   <TextView
    android:layout_width="match_parent"
    android:layout_height="wrap_content"
    android:gravity="center"
    android:padding="20dp"
    android:text="@string/previews"/>
  </LinearLayout>
 </ScrollView>

 <LinearLayout
  android:id="@+id/edit"
  android:layout_width="match_parent"
  android:layout_height="wrap_content"
  android:layout_alignParentBottom="true"
  android:background="@android:color/white">

  <EditText
   android:layout_width="match_parent"
   android:layout_height="wrap_content"/>
 </LinearLayout>

</RelativeLayout>
關鍵在於下面兩個屬性,還有需要在其他子布局添加背景,不然就跟隨了最外層的背景,代碼部分還是采用網上通用方案,只是不需要自定義的狀態欄了,也不需要計算狀態欄的高度
android:fitsSystemWindows="true"
android:background="@android:color/holo_green_light"
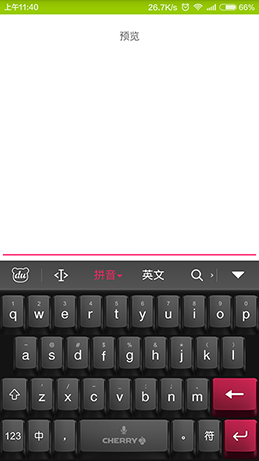
最終效果
以上就是本文的全部內容,希望對大家的學習Android軟件編程有所幫助。
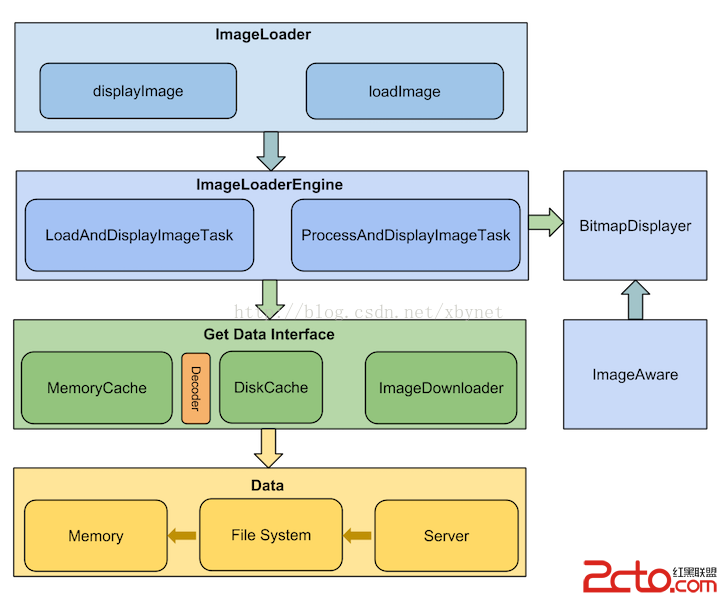 Android 圖像異步加載之Android-Universal-Image-Loader
概述:項目地址:https://github.com/nostra13/Android-Universal-Image-Loader UIL(Universal-Imag
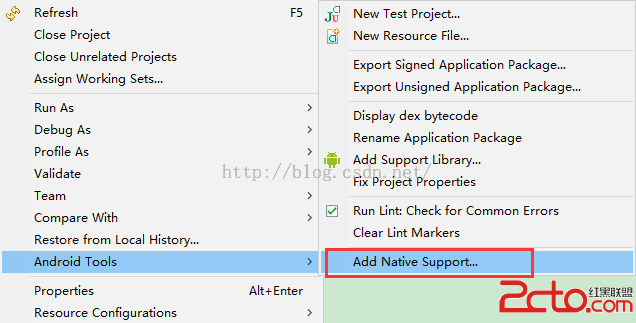 AndroidStudio如何快速制作.so
之前寫過一篇Eclipse制作.so的文章,使用的是GNUstep模擬Linux環境,過程現在看來是想相當麻煩,後來發現一個簡單的方法就是通過項目右鍵添加Native S
 安卓動態調試七種武器之離別鉤 – Hooking(下)
0x00 序隨著移動安全越來越火,各種調試工具也都層出不窮,但因為環境和需求的不同,並沒有工具是萬能的。另外工具是死的,人是活的,如果能搞懂工具的原理再結合上自身的經驗,
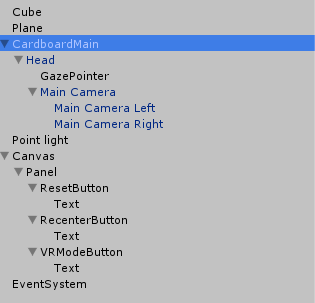 寫給VR手游開發小白的教程:(六)Cardboard如何實現沉浸式VR體驗之構造雙眼
沉浸體驗是VR的核心也是一直以來的技術難點,虛擬現實的發展一直專注於怎樣讓用戶獲得更好的沉浸式體驗,這涉及到多個領域的多項技術,上至渲染優化,性能優化,下至人眼的構造,肢