編輯:關於Android編程
TabHost布局文件
我們先來了解一下布局文件的基本內容:
1. 根標簽及id
設置Android自帶id : XML布局文件中, 可以使用 標簽設置, 其中的id 需要引用 android的自帶id :
android:id=@android:id/tabhost ;
getHost()獲取前提 : 設置了該id之後, 在Activity界面可以使用 getHost(), 獲取這個TabHost 視圖對象;
示例 :
復制代碼 代碼如下:
<tabhost android:id="@android:id/tabhost" android:layout_height="match_parent" android:layout_width="match_parent"></tabhost>
2. TabWidget組件
選項卡切換 : 該組件是選項卡切換按鈕, 通過點擊該組件可以切換選項卡;
設置android自帶id : 這個組件的id要設置成android的自帶id : android:id=@android:id/tabs ;
TabHost必備組件 : 該組件與FrameLayout組件是TabHost組件中必備的兩個組件;
切換按鈕下方顯示 : 如果想要將按鈕放到下面, 可以將該組件定義在下面, 但是注意,FrameLayout要設置android:layout_widget = 1;
設置TabWidget大小 : 如果想要設置該按鈕組件的大小, 可以設置該組件與FrameLayout組件的權重;
示例 :
復制代碼 代碼如下:
<tabwidget android:id="@android:id/tabs" android:layout_height="wrap_content" android:layout_width="fill_parent" android:orientation="horizontal/"></tabwidget>
3. FrameLayout組件
組件作用 : 該組件中定義的子組件是TabHost中每個頁面顯示的選項卡, 可以將TabHost選項卡顯示的視圖定義在其中;
設置android自帶id : 這個組件的id要設置成android的自帶的id : android:id=@android:id/tabcontent ;
示例 :
復制代碼 代碼如下:
<framelayout android:id="@android:id/tabcontent" android:layout_height="fill_parent" android:layout_weight="1" android:layout_width="fill_parent"></framelayout>
示例
上圖為最終效果圖
代碼結構圖
main.xml
<?xml version="1.0" encoding="utf-8"?>
<LinearLayout xmlns:android="http://schemas.android.com/apk/res/android"
 android:id="@+id/hometabs"
 android:orientation="vertical"
 android:layout_width="fill_parent"
 android:layout_height="fill_parent">
 <!-- TabHost必須包含一個 TabWidget和一個FrameLayout-->
 <TabHost android:id="@+id/tabhost"
  android:layout_width="fill_parent"
  android:layout_height="wrap_content"
  >
  <LinearLayout
   android:orientation="vertical"
   android:layout_width="fill_parent"
   android:layout_height="fill_parent">
   <!-- TabWidget的id屬性必須為 @android:id/tabs-->
   <TabWidget android:id="@android:id/tabs"
    android:orientation="horizontal"
    android:layout_width="fill_parent"
    android:layout_height="wrap_content">
   </TabWidget>
   <!-- FrameLayout的id屬性必須為 @android:id/tabcontent-->
    <FrameLayout android:id="@android:id/tabcontent"
     android:layout_width="fill_parent"
     android:layout_height="fill_parent">
     <TextView android:id="@+id/view1"
      android:layout_width="fill_parent"
      android:layout_height="fill_parent"/>
     <TextView android:id="@+id/view2"
      android:layout_width="fill_parent"
      android:layout_height="fill_parent"/>
     <TextView android:id="@+id/view3"
      android:layout_width="fill_parent"
      android:layout_height="fill_parent"/>
    </FrameLayout>

   </LinearLayout>
 </TabHost>
</LinearLayout>
java代碼如下
package cn.com.tagHost.test;

import android.app.Activity;
import android.os.Bundle;
import android.widget.TabHost;
import android.widget.TabWidget;

public class TagHostTest2 extends Activity {
 @Override
 public void onCreate(Bundle savedInstanceState) {
  super.onCreate(savedInstanceState);
  setContentView(R.layout.main);
  // 獲取TabHost對象
  TabHost tabHost = (TabHost) findViewById(R.id.tabhost);
  // 如果沒有繼承TabActivity時,通過該種方法加載啟動tabHost
  tabHost.setup();
  tabHost.addTab(tabHost.newTabSpec("tab1").setIndicator("第一個標簽",
    getResources().getDrawable(R.drawable.icon)).setContent(
    R.id.view1));

  tabHost.addTab(tabHost.newTabSpec("tab3").setIndicator("第三個標簽")
    .setContent(R.id.view3));

  tabHost.addTab(tabHost.newTabSpec("tab2").setIndicator("第二個標簽")
    .setContent(R.id.view2));
 }
}
運行得到正確的結果。
廢話連篇:這裡需要注意的是
第一:布局文件的格式。以及TabWidget和FrameLayout的id屬性值。
第二:TabWidget代表的是標簽部分,FrameLayout代表的點擊標簽後看到的內容部分。FrameLayout裡面聲明的組件意為具備成為標簽內容的資格,具體的還要在代碼中具體指定。
你是否也想要這種結果呢。讓標簽在下部分顯示
那麼你只需要給main.xml進行下布局修改就可以了。
main.xml
<?xml version="1.0" encoding="utf-8"?>
<LinearLayout xmlns:android="http://schemas.android.com/apk/res/android"
 android:id="@+id/hometabs" android:orientation="vertical"
 android:layout_width="fill_parent" android:layout_height="fill_parent">
 <!-- TabHost必須包含一個 TabWidget和一個FrameLayout-->
 <TabHost android:id="@+id/tabhost" android:layout_width="fill_parent"
  android:layout_height="wrap_content">
  <LinearLayout android:orientation="vertical"
   android:layout_width="fill_parent" android:layout_height="fill_parent">

   <!-- FrameLayout的id屬性必須為 @android:id/tabcontent-->
   <FrameLayout android:id="@android:id/tabcontent"
    android:layout_width="fill_parent" android:layout_height="fill_parent">
    <TextView android:id="@+id/view1" android:layout_width="fill_parent"
     android:layout_height="fill_parent"
     android:text="hello baby!"
     />
    <TextView android:id="@+id/view2" android:layout_width="fill_parent"
     android:layout_height="fill_parent" />
    <TextView android:id="@+id/view3" android:layout_width="fill_parent"
     android:layout_height="fill_parent" />
   </FrameLayout>
   <RelativeLayout android:layout_width="fill_parent"
    android:layout_height="fill_parent">

    <!-- TabWidget的id屬性必須為 @android:id/tabs-->
    <TabWidget android:id="@android:id/tabs"
     android:orientation="horizontal" android:layout_width="fill_parent"
     android:layout_height="wrap_content"
     android:layout_alignParentBottom="true"
     android:paddingBottom="0dp"
     >
    </TabWidget>
   </RelativeLayout>
  </LinearLayout>
 </TabHost>
</LinearLayout>
為了讓標簽和父容器底部持平,我們使用了android:layout_alignParentBottom="true",該屬性只有在RelativeLayout布局中才會存在哦、這也是為什麼我們將tabWidget放入一個RelativeLayout中的原因。
此外,在lineaerLayout布局中,TabWidget和FrameLayout的位置可是調換了哦。
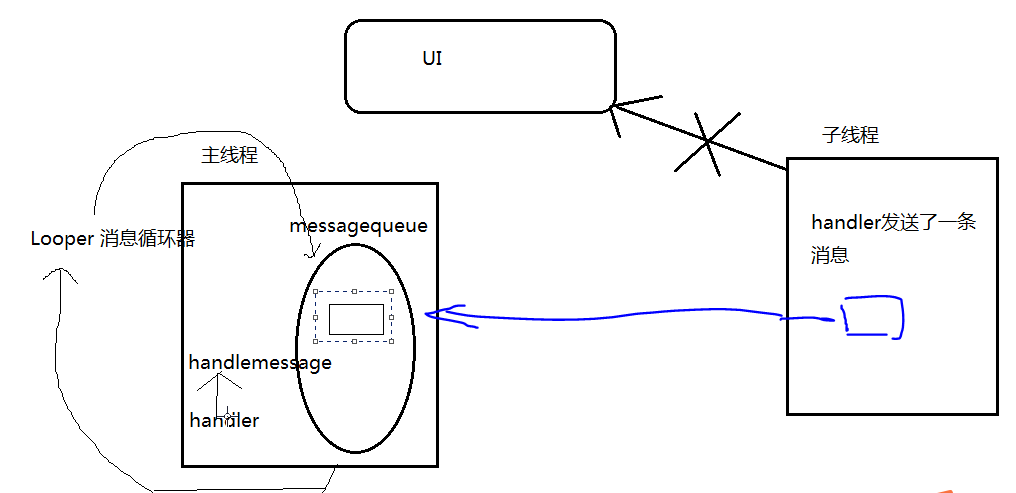 Android多線程及Handler使用
當我們需要執行一些耗時操作,比如說發起一條網絡請求時,考慮到網速等其他原因,服務器未必會立刻響應我們的請求,如果不將這類操作放在子線程裡去運行,就會導致主線程被阻塞住,從
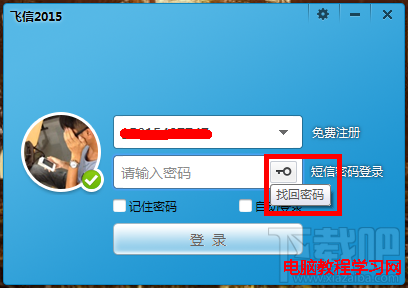 飛信忘記密碼怎麼辦?
飛信現在在生活之中運用越來越廣泛,他是中國移動推出的一款可以免費點對點短信的軟件,那麼如果我們把密碼忘記了怎麼辦呢?怎樣修改呢?下面小編來給大家介紹怎樣去找
 融雲如何實現文件發送(高級進階)
干貨來啦~! 想在聊天中發 小視頻?gif 動圖? 發紅包? 發 自定義表情? 沒有問題!在融雲統統都可以實現! 以上不管是 小視頻 還是 gif 還是 紅包 或者是 自
 Android開發之天氣趨勢折線圖
先來看下效果:控件內容比較簡單,就是一個普通的折線圖,上下分別帶有數字,點擊的時候顯示當天溫度的差值。 創建一個類繼承自View,並添加兩個構造方法:publi
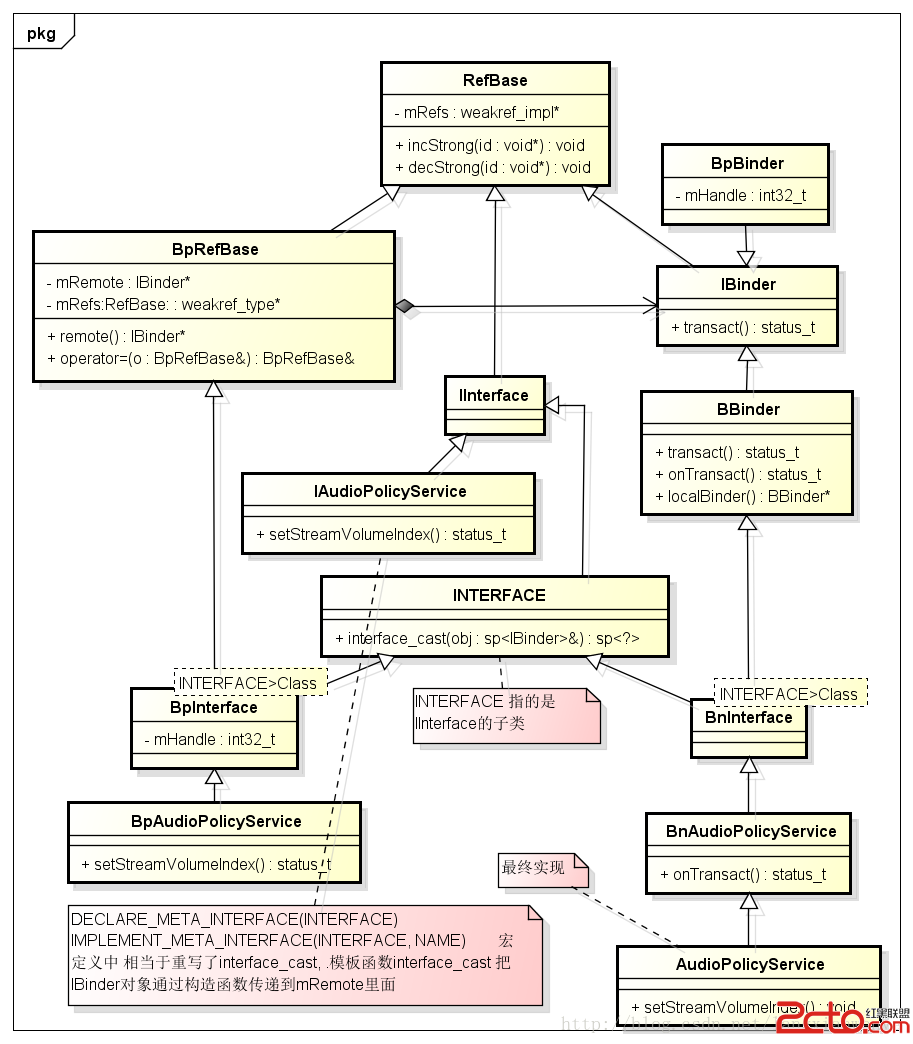 Android framework回顧(3)binder利用及IBinder BpRefbase IInterface INTERFACE 之間關系
status_t AudioSystem::setStreamVolum