編輯:關於Android編程
在Android開發當中,Thread、Handler、Looper這幾個類是特別常見,在剛開始學習Android的時候對這些類可能並不是很清晰。下面我們就一起從源碼的角度剖析一下這幾個類的工作原理。
首先是Thread, 我們都知道一個Thread就是一個線程對象,只要在run方法中填寫自己的代碼然後啟動該線程就可以實現多線程操作。例如 :
        new Thread(){
            public void run() {
                // 耗時的操作
            };
}.start(); 我們知道,針對上面的代碼中,當執行完run中的操作時,整個線程就會結束,並不會一直執行下去。而我們的應用程序會一直執行,除非你退出或者應用程序拋出異常。這又引入了另外一個概念,即消息隊列。在Android應用啟動時,會默認有一個主線程(UI線程),在這個線程中會關聯一個消息隊列,所有的操作都會被封裝成消息然後交給主線程來處理。為了保證主線程不會主動退出,會將取消息的操作放在一個死循環中,這樣程序就相當於一直在執行死循環,因此不會退出。示例圖如下 :

Android應用程序的入口為ActivityThread.main方法,詳情請參考Android應用程序進程啟動過程的源代碼分析,UI線程的消息循環就是在這個方法中創建的,源碼如下:
   public static void main(String[] args) {
        SamplingProfilerIntegration.start();
        CloseGuard.setEnabled(false);

        Environment.initForCurrentUser();

        // Set the reporter for event logging in libcore
        EventLogger.setReporter(new EventLoggingReporter());

        Process.setArgV0("");

        Looper.prepareMainLooper();// 1、創建消息循環Looper

        ActivityThread thread = new ActivityThread();
        thread.attach(false);

        if (sMainThreadHandler == null) {
            sMainThreadHandler = thread.getHandler(); // UI線程的Handler
        }

        AsyncTask.init();

        if (false) {
            Looper.myLooper().setMessageLogging(new
                    LogPrinter(Log.DEBUG, "ActivityThread"));
        }

        Looper.loop();   // 2、執行消息循環

        throw new RuntimeException("Main thread loop unexpectedly exited");
    }
執行ActivityThread.main方法後,應用程序就啟動了,並且會一直從消息隊列中取消息,然後處理消息。那麼系統是如何將消息投遞到消息隊列中的?又是如何從消息隊列中獲取消息並且處理消息的呢? 答案就是Handler。 class MyHandler extends Handler {
@Override
public void handleMessage(Message msg) {
// 更新UI
}
}
MyHandler mHandler = new MyHandler() ;
// 開啟新的線程
new Thread(){
public void run() {
// 耗時操作
mHandler.sendEmptyMessage(123) ;
};
}.start();為什麼必須要這麼做呢?其實每個Handler都會關聯一個消息隊列,消息隊列被封裝在Lopper中,而每個Looper又會關聯一個線程(ThreadLocal),也就是每個消息隊列會關聯一個線程。Handler就是一個消息處理器,將消息投遞給消息隊列,然後再由對應的線程從消息隊列中挨個取出消息,並且執行。默認情況下,消息隊列只有一個,即主線程的消息隊列,這個消息隊列是在ActivityThread.main方法中創建的,通過Lopper.prepareMainLooper()來創建,然後最後執行Looper.loop()來啟動消息循環。那麼Handler是如何關聯消息隊列以及線程的呢?我們看看如下源碼 :
    public Handler() {
        if (FIND_POTENTIAL_LEAKS) {
            final Class klass = getClass();
            if ((klass.isAnonymousClass() || klass.isMemberClass() || klass.isLocalClass()) &&
                    (klass.getModifiers() & Modifier.STATIC) == 0) {
                Log.w(TAG, "The following Handler class should be static or leaks might occur: " +
                    klass.getCanonicalName());
            }
        }

        mLooper = Looper.myLooper();   // 獲取Looper
        if (mLooper == null) {
            throw new RuntimeException(
                "Can't create handler inside thread that has not called Looper.prepare()");
        }
        mQueue = mLooper.mQueue;       // 獲取消息隊列
        mCallback = null;
    }
從Handler默認的構造函數中我們可以看到,Handler會在內部通過Looper.getLooper()來獲取Looper對象,並且與之關聯,最重要的就是消息隊列。那麼Looper.getLooper()又是如何工作的呢?我們繼續往下看. /**
* Return the Looper object associated with the current thread. Returns
* null if the calling thread is not associated with a Looper.
*/
public static Looper myLooper() {
return sThreadLocal.get();
}
/**
* Initialize the current thread as a looper, marking it as an
* application's main looper. The main looper for your application
* is created by the Android environment, so you should never need
* to call this function yourself. See also: {@link #prepare()}
*/
public static void prepareMainLooper() {
prepare();
setMainLooper(myLooper());
myLooper().mQueue.mQuitAllowed = false;
}
private synchronized static void setMainLooper(Looper looper) {
mMainLooper = looper;
}
/** Initialize the current thread as a looper.
* This gives you a chance to create handlers that then reference
* this looper, before actually starting the loop. Be sure to call
* {@link #loop()} after calling this method, and end it by calling
* {@link #quit()}.
*/
public static void prepare() {
if (sThreadLocal.get() != null) {
throw new RuntimeException("Only one Looper may be created per thread");
}
sThreadLocal.set(new Looper());
} 我們看到myLooper()方法是通過sThreadLocal.get()來獲取的,關於ThreadLocal的資料請參考ThreadLocal多線程實例詳解。那麼Looper對象又是什麼時候存儲在sThreadLocal中的呢? 眼尖的朋友可能看到了,上面貼出的代碼中給出了一個熟悉的方法,prepareMainLooper(),在這個方法中調用了prepare()方法,在這個方法中創建了一個Looper對象,並且將該對象設置給了sThreadLocal。這樣,隊列就與線程關聯上了!!!不同的線程是不能訪問對方的消息隊列的。再回到Handler中來,消息隊列通過Looper與線程關聯上,而Handler又與Looper關聯,因此Handler最終就和線程、線程的消息隊列關聯上了。這就能解釋上面提到的問題了,“為什麼要更新UI的Handler必須要在主線程中創建?”。就是因為Handler要與主線程的消息隊列關聯上,這樣handleMessage才會執行在UI線程,此時更新UI才是線程安全的!!!創建了Looper後,如何執行消息循環呢?通過Handler來post消息給消息隊列( 鏈表 ),那麼消息是如何被處理的呢?答案就是在消息循環中,消息循環的建立就是通過Looper.loop()方法。源碼如下 :
    /**
     * Run the message queue in this thread. Be sure to call
     * {@link #quit()} to end the loop.
     */
    public static void loop() {
        Looper me = myLooper();
        if (me == null) {
            throw new RuntimeException("No Looper; Looper.prepare() wasn't called on this thread.");
        }
        MessageQueue queue = me.mQueue;    // 1、獲取消息隊列

        // 代碼省略


        while (true) {                   // 2、死循環,即消息循環
            Message msg = queue.next(); // 3、獲取消息 (might block )
            if (msg != null) {
                if (msg.target == null) {
                    // No target is a magic identifier for the quit message.
                    return;
                }

                long wallStart = 0;
                long threadStart = 0;

                // This must be in a local variable, in case a UI event sets the logger
                Printer logging = me.mLogging;
                if (logging != null) {
                    logging.println(">>>>> Dispatching to " + msg.target + " " +
                            msg.callback + ": " + msg.what);
                    wallStart = SystemClock.currentTimeMicro();
                    threadStart = SystemClock.currentThreadTimeMicro();
                }

                msg.target.dispatchMessage(msg);    // 4、處理消息

               // 代碼省略

                msg.recycle();
            }
        }
    }
可以看到,loop方法中實質上就是建立一個死循環,然後通過從消息隊列中挨個取出消息,最後處理消息的過程。對於Looper我們總結一下 : 通過Looper.prepare()來創建Looper對象(消息隊列封裝在Looper對象中),並且保存在sThreadLoal中,然後通過Looper.loop()來執行消息循環,這兩步通常是成對出現的!!
最後我們看看消息處理機制,我們看到代碼中第4步通過msg.target.dispatchMessage(msg)來處理消息。其中msg是Message類型,我們看源碼 :
public final class Message implements Parcelable {

    public int what;

    public int arg1;

    public int arg2;

    public Object obj;


    int flags;

    long when;

    Bundle data;

    Handler target;         // target處理

    Runnable callback;      // Runnable類型的callback

    // sometimes we store linked lists of these things
    Message next;           // 下一條消息,消息隊列是鏈式存儲的


    // 代碼省略 ....
} /**
* Subclasses must implement this to receive messages.
*/
public void handleMessage(Message msg) {
}
private final void handleCallback(Message message) {
message.callback.run();
}
/**
* Handle system messages here.
*/
public void dispatchMessage(Message msg) {
if (msg.callback != null) {
handleCallback(msg);
} else {
if (mCallback != null) {
if (mCallback.handleMessage(msg)) {
return;
}
}
handleMessage(msg);
}
} 可以看到,dispatchMessage只是一個分發的方法,如果Runnable類型的callback為空則執行handlerMessage來處理消息,該方法為空,我們會將更新UI的代碼寫在該函數中;如果callback不為空,則執行handleCallback來處理,該方法會調用callback的run方法。其實這是Handler分發的兩種類型,比如我們post(Runnable callback)則callback就不為空,當我們使用Handler來sendMessage時通常不會設置callback,因此也就執行handlerMessage這個分支。我們看看兩種實現 : public final boolean post(Runnable r)
{
return sendMessageDelayed(getPostMessage(r), 0);
}
private final Message getPostMessage(Runnable r) {
Message m = Message.obtain();
m.callback = r;
return m;
}
public final boolean sendMessageDelayed(Message msg, long delayMillis)
{
if (delayMillis < 0) {
delayMillis = 0;
}
return sendMessageAtTime(msg, SystemClock.uptimeMillis() + delayMillis);
}
public boolean sendMessageAtTime(Message msg, long uptimeMillis)
{
boolean sent = false;
MessageQueue queue = mQueue;
if (queue != null) {
msg.target = this; // 設置消息的target為當前Handler對象
sent = queue.enqueueMessage(msg, uptimeMillis); // 將消息插入到消息隊列
}
else {
RuntimeException e = new RuntimeException(
this + " sendMessageAtTime() called with no mQueue");
Log.w("Looper", e.getMessage(), e);
}
return sent;
} public final boolean sendMessage(Message msg)
{
return sendMessageDelayed(msg, 0);
} 不管是post一個Runnbale還是Message,都會調用sendMessageDelayed(msg, time)方法。 new Thread(){
Handler handler = null;
public void run() {
handler = new Handler();
};
}.start(); 上面的代碼有問題嗎 ? 如果你能夠發現並且解釋上述代碼的問題,那麼應該說您對Handler、Looper、Thread這幾個概念已經很了解了。如果您還不太清楚,那麼我們一起往下學習。 前面說過,Looper對象是ThreadLocal的,即每個線程都有自己的Looper,這個Looper可以為空。但是當你要在子線程中創建Handler對象時,如果Looper為空,那麼就會拋出“Can't create handler inside thread that has not called Looper.prepare()”異常,為什麼會這樣呢?我們一起看源碼吧。 /**
* Default constructor associates this handler with the queue for the
* current thread.
*
* If there isn't one, this handler won't be able to receive messages.
*/
public Handler() {
// 代碼省略
mLooper = Looper.myLooper(); // 獲取myLooper
if (mLooper == null) {
throw new RuntimeException(
"Can't create handler inside thread that has not called Looper.prepare()");// 拋出異常
}
mQueue = mLooper.mQueue;
mCallback = null;
} new Thread(){
Handler handler = null;
public void run() {
Looper.prepare(); // 1、創建Looper,並且會綁定到ThreadLocal中
handler = new Handler();
Looper.loop(); // 2、啟動消息循環
};
}.start(); 在代碼中我們加了2處,第一是通過Looper.prepare()來創建Looper,第二是通過Looper.loop()來啟動消息循環。這樣該線程就有了自己的Looper,也就是有了自己的消息隊列。如果之創建Looper,而不啟動消息循環,雖然不會拋出異常,但是你通過handler來post或者sendMessage也不會有效,因為雖然消息被追加到消息隊列了,但是並沒有啟動消息循環,也就不會從消息隊列中獲取消息並且執行了! Android 5.0 SharedElement 簡單應用分析(adp-activity-transitions)
好久沒寫點東西了,最近看到了一個轉場動畫比較酷炫,今天就來簡單滴分析一下。先看下今天的效果圖。分析下效果: 進入詳情頁的時候有共享元素,圓形動畫,文字部分的上移動畫,源碼
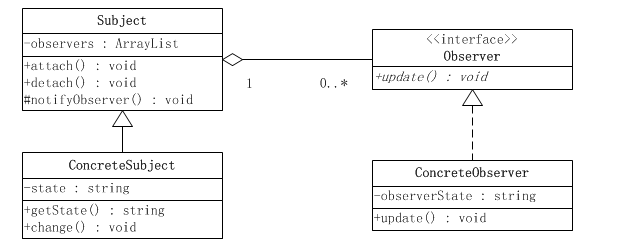 當觀察者模式和回調機制遇上Android源碼
上一篇博客跟大家分享了Android源碼中的裝飾者模式,有點意猶未盡,今天跟大家分享下Android中的觀察者模式,順便說一說觀察者模式和回調機制的關系,歡迎大家拍磚。觀
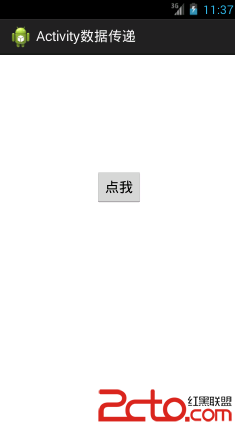 android:Activity數據傳遞之靜態變量
使用Intent可以很方便在不同activity之間傳遞數據,這個也是官方推薦的方式,但是也有一定的局限性就是Intent無法傳遞不能序列化的對象,我們可以使用靜態變量來
 Android 自定義仿IOS上拉菜單實現
最近在做一個歪果仁給我外包的項目,主頁需要做一個類似於IOS那種上拉菜單的功能,於是一時間試了各種方法,什麼Spinner、Drawlayout,SlidingMenu等