編輯:關於Android編程
在android中提供了常見的幾種ViewGroup的實現,包括LinearLayout、Relativeayout、FrameLayout等。這些ViewGroup可以滿足我們一般的開發需求,但是對於界面要求復雜的,這幾個布局就顯得捉襟見肘了。所以自定義的ViewGroup在我們接觸過的應用中比比皆是。
要想實現一個自定義的ViewGroup,第一步是學會自定義屬性,這些自定義的屬性將讓我們配置布局文件的時候更加的靈活。自定義屬性是在value目錄下聲明一個attrs.xml文件。
<?xml version="1.0" encoding="utf-8"?>
<resources>
 <declare-styleable name="CascadeViewGroup">
  <attr name="verticalspacing" format="dimension"/>
  <attr name="horizontalspacing" format="dimension"/>
 </declare-styleable>

 <declare-styleable name="CascadeViewGroup_LayoutParams">
  <attr name="layout_paddingleft" format="dimension"/>
  <attr name="layout_paddinTop" format="dimension"/>
 </declare-styleable>
</resources>
在這裡我們聲明了兩個自定義屬性集,CascadeViewGroup中的屬性是針對我們自定義的CascadeViewGroup組件設置的,也就是可以在布局文件中<CascadeViewGroup>標簽中可以使用的屬性。另外一個CascadeViewGroup_LayoutParams則是針對於CascadeViewGroup中的子View設置的屬性。
在編寫代碼前,我們還設置了一個默認的寬度和高度供CascadeLayout使用。這兩個屬性在dimens.xml定義。
<?xml version="1.0" encoding="utf-8"?>
<resources>
  <dimen name="default_horizontal_spacing">10dp</dimen>
 <dimen name="default_vertical_spacing">10dp</dimen>
</resources>
下面開始編寫自定義的組件CascadeLayout了。
package com.app.CustomViewMotion;

import android.content.Context;
import android.content.res.TypedArray;
import android.util.AttributeSet;
import android.view.View;
import android.view.ViewGroup;

/**
 * Created by charles on 2015/8/13.
 */
public class CascadeViewGroup extends ViewGroup {

 //自定義布局中設置的寬度和高度
 private int mHoriztonalSpacing;
 private int mVerticalSpacing;

 public CascadeViewGroup(Context context) {
  this(context, null);
 }

 public CascadeViewGroup(Context context, AttributeSet attrs) {
  this(context, attrs, 0);
 }

 public CascadeViewGroup(Context context, AttributeSet attrs, int defStyle) {
  super(context, attrs, defStyle);
  TypedArray a = context.obtainStyledAttributes(attrs, R.styleable.CascadeViewGroup);
  try {
   //獲取設置的寬度
   mHoriztonalSpacing = a.getDimensionPixelSize(R.styleable.CascadeViewGroup_horizontalspacing,
     this.getResources().getDimensionPixelSize(R.dimen.default_horizontal_spacing));
   //獲取設置的高度
   mVerticalSpacing = a.getDimensionPixelSize(R.styleable.CascadeViewGroup_verticalspacing,
     this.getResources().getDimensionPixelSize(R.dimen.default_vertical_spacing));

  } catch (Exception e) {
   e.printStackTrace();

  } finally {
   a.recycle();
  }
 }

 @Override
 protected void onMeasure(int widthMeasureSpec, int heightMeasureSpec) {
  final int count = this.getChildCount();
  int width = this.getPaddingLeft();
  int height = this.getPaddingTop();
  for (int i = 0; i < count; i++) {
   final View currentView = this.getChildAt(i);
   this.measureChild(currentView, widthMeasureSpec, heightMeasureSpec);
   CascadeViewGroup.LayoutParams lp = (CascadeViewGroup.LayoutParams) currentView.getLayoutParams();
   if(lp.mSettingPaddingLeft != 0){
    width +=lp.mSettingPaddingLeft;
   }
   if(lp.mSettingPaddingTop != 0){
    height +=lp.mSettingPaddingTop;
   }
   lp.x = width;
   lp.y = height;
   width += mHoriztonalSpacing;
   height += mVerticalSpacing;
  }
  width +=getChildAt(this.getChildCount() - 1).getMeasuredWidth() + this.getPaddingRight();
  height += getChildAt(this.getChildCount() - 1).getMeasuredHeight() + this.getPaddingBottom();
  this.setMeasuredDimension(resolveSize(width, widthMeasureSpec), resolveSize(height, heightMeasureSpec));

 }

 @Override
 protected void onLayout(boolean b, int l, int i1, int i2, int i3) {
  final int count = this.getChildCount();
  for (int i = 0; i < count; i++) {
   final View currentView = this.getChildAt(i);
   CascadeViewGroup.LayoutParams lp = (CascadeViewGroup.LayoutParams) currentView.getLayoutParams();
   currentView.layout(lp.x, lp.y, lp.x + currentView.getMeasuredWidth(),
     lp.y + currentView.getMeasuredHeight());
  }


 }

 public static class LayoutParams extends ViewGroup.LayoutParams {
  int x;
  int y;
  int mSettingPaddingLeft;
  int mSettingPaddingTop;

  public LayoutParams(Context c, AttributeSet attrs) {
   super(c, attrs);
   TypedArray a = c.obtainStyledAttributes(attrs, R.styleable.CascadeViewGroup_LayoutParams);
   mSettingPaddingLeft = a.getDimensionPixelSize(R.styleable.CascadeViewGroup_LayoutParams_layout_paddingleft, 0);
   mSettingPaddingTop = a.getDimensionPixelSize(R.styleable.CascadeViewGroup_LayoutParams_layout_paddinTop, 0);
   a.recycle();
  }

  public LayoutParams(int width, int height) {
   super(width, height);
  }

  public LayoutParams(ViewGroup.LayoutParams source) {
   super(source);
  }
 }

 @Override
 protected ViewGroup.LayoutParams generateDefaultLayoutParams() {
  return new LayoutParams(LayoutParams.WRAP_CONTENT, LayoutParams.WRAP_CONTENT);
 }

 @Override
 protected ViewGroup.LayoutParams generateLayoutParams(ViewGroup.LayoutParams p) {
  return new LayoutParams(p);
 }

 @Override
 public ViewGroup.LayoutParams generateLayoutParams(AttributeSet attrs) {
  return new LayoutParams(this.getContext(), attrs);
 }
}
代碼稍微優點長,但是結構還是很清晰的。
1)構造方法中或者XML文件中配置屬性的值。通過TypedArray中的方法獲取我們在layout布局中設置的屬性,並且將他們保存在成員變量中。
2)構造自定義的內部類LayoutParams。構造這個內部類,可以方便我們在測量我們的子View的時候保存他們的屬性值,以便在Layout階段布局。
3)generateLayoutParams()、generateDefaultParams()等方法。在這些方法中返回我們自定義的layoutParams。至於為什麼要重寫這些方法,可以查看ViewGroup類的addView()方法就很清楚了。
4)measure階段。在measure階段,我們會測量自己的大小,同時也要測量子View的大小,並且將子View的信息保存在LayoutParams中。
5)layout階段。根據各個子View的信息,布局他們的位置。
最後加上布局文件。
<?xml version="1.0" encoding="utf-8"?>
<!--添加自定義屬性給viewGroup-->
<!--新添加的命名空間的後綴必須保持和.xml中聲明的包名一致-->
<com.app.CustomViewMotion.CascadeViewGroup
xmlns:android="http://schemas.android.com/apk/res/android"
xmlns:ts="http://schemas.android.com/apk/res/com.app.CustomViewMotion"
android:layout_width="match_parent"
android:layout_height="match_parent"
ts:horizontalspacing="15dp"
ts:verticalspacing="15dp">
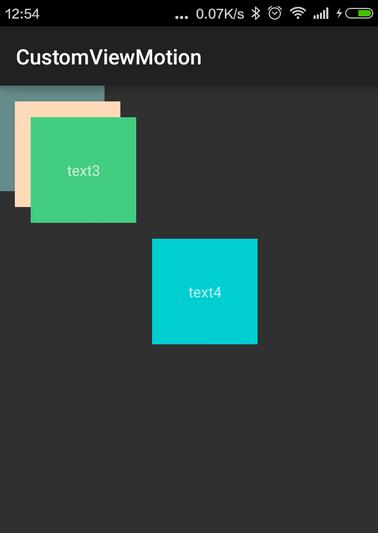
<TextView android:layout_width="100dp"
android:layout_height="100dp"
android:gravity="center"
android:text="text1"
android:background="#668B8B"/>
<TextView android:layout_width="100dp"
android:layout_height="100dp"
android:gravity="center"
android:text="text2"
android:background="#FFDAB9"/>
<TextView android:layout_width="100dp"
android:layout_height="100dp"
android:gravity="center"
android:text="text3"
android:background="#43CD80"/>
<!--這個子view中添加自定義子view屬性-->
<TextView android:layout_width="100dp"
android:layout_height="100dp"
android:gravity="center"
android:text="text4"
ts:layout_paddingleft="100dp"
ts:layout_paddinTop="100dp"
android:background="#00CED1"/>
</com.app.CustomViewMotion.CascadeViewGroup>
實現的效果如下:
以上就是的全部內容,希望能給大家一個參考,也希望大家多多支持本站。
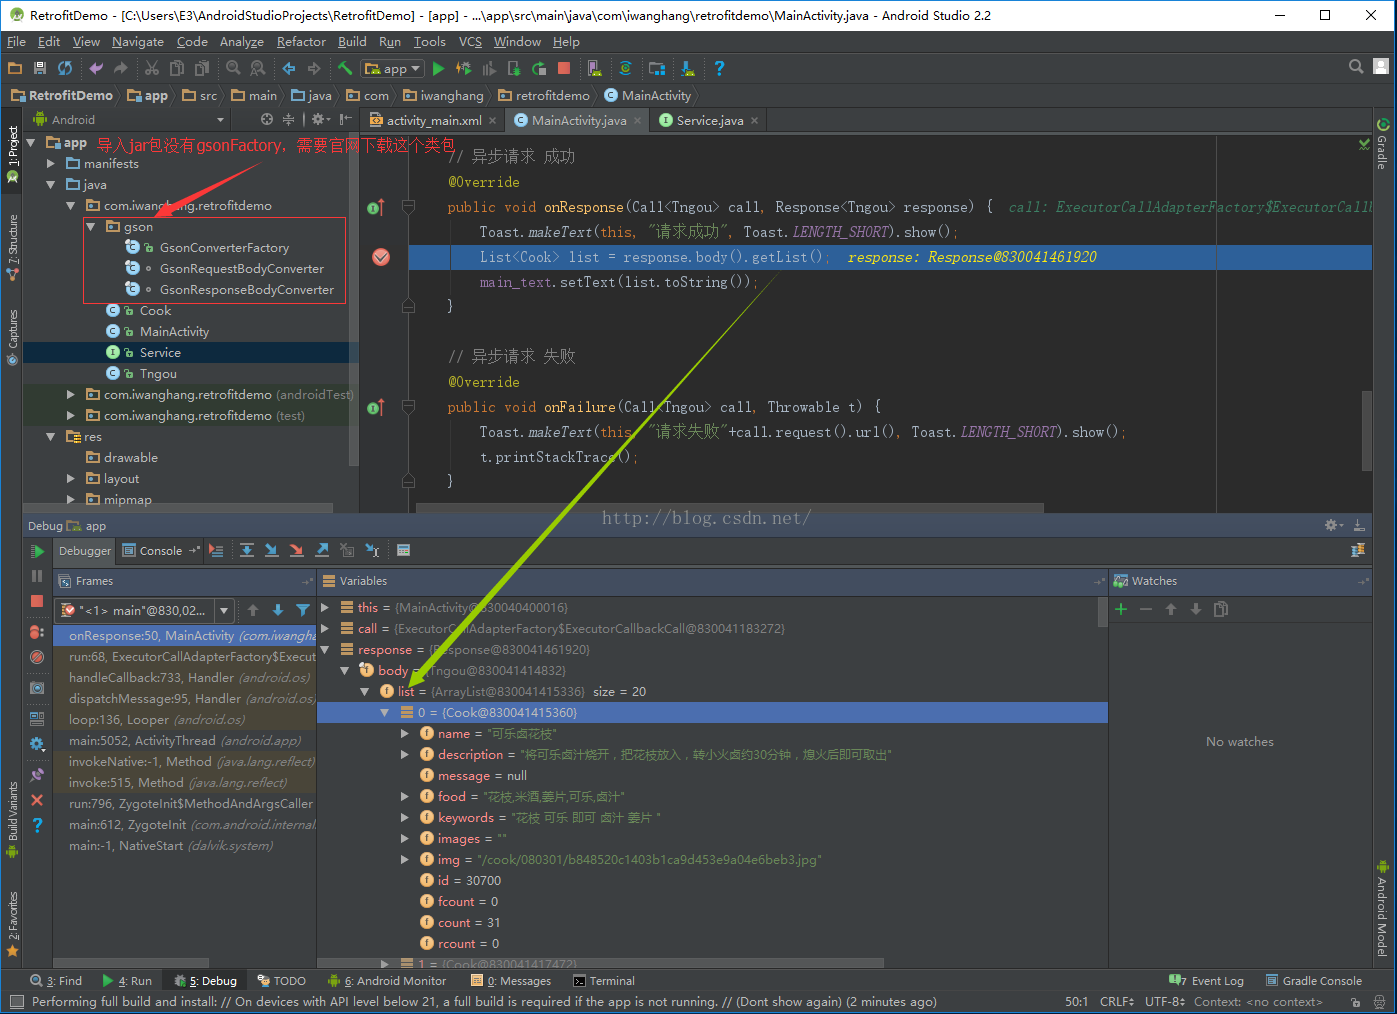 Android開發-Retrofit-AndroidStudio(二)Json
文字說明都在代碼和圖片上了。唯一要注意的是,Json或者圖片等工程類包,需要自己去官網下載~~另外,這邊還用到一個Google的注解jar包~~ &
 Android自定義控件之創建可復用的組合控件
前面已學習了一種自定義控件的實現,是Andriod 自定義控件之音頻條,還沒學習的同學可以學習下,學習了的同學也要去溫習下,一定要自己完全的掌握了,再繼續學習,貪多嚼不爛
 android 簡單動畫之 animtion
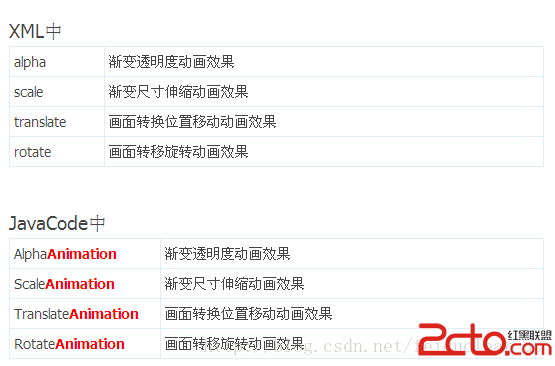
Android 簡單的動畫效果有Animtion 類提供 1.在XML中實現動畫效果;2.在java代碼中實現動畫效果。 動畫相關的屬性 表一:SET屬性 名稱
 Android開發筆記(一百一十二)開發工具
Eclipse/ADTADT是Google在Eclipse基礎上封裝了Android開發工具的環境,最新版本是2014年7月2日發布的adt-bundle-windows