編輯:關於Android編程
一、TabHost用法
通常情況下我們會通過繼承TabActivity,調用getTabHost()獲取TabHost實例,下面是具體過程。
TabHostActivity.java
public class TabHostActivity extends TabActivity {
 private TabHost tabHost;
 private Intent certificateIntent;
 private Intent feeIntent;
 private Intent scoreIntent;
 private Intent studyIntent;
 private Intent moreIntent;

 @Override
 publicvoid onCreate(Bundle savedInstanceState) {
  super.onCreate(savedInstanceState);
  tabHost = getTabHost();
  initIntent();
  addSpec();
 }
 /**
  * 初始化各個tab標簽對應的intent
  */
 privatevoid initIntent() {
  studyIntent = new Intent(this, StudyActivity.class);
  scoreIntent = new Intent(this, ScoreActivity.class);
  feeIntent = new Intent(this, FeeActivity.class);
  certificateIntent = new Intent(this, CertificateActivity.class);
  moreIntent = new Intent(this, MoreActivity.class);
 }
 /**
  * 為tabHost添加各個標簽項
  */
 privatevoid addSpec() {
  tabHost.addTab(this.buildTagSpec("tab_study",
R.string.study_progress,R.drawable.account01, studyIntent));
 tabHost.addTab(this.buildTagSpec("tab_score",
R.string.test_score,R.drawable.account02, scoreIntent));
  tabHost.addTab(this.buildTagSpec("tab_fee",
R.string.fee_pay,R.drawable.account03, feeIntent));
  tabHost.addTab(this.buildTagSpec("tab_certificate", R.string.certificate_grant,R.drawable.accountcertificateIntent));
  tabHost.addTab(this.buildTagSpec("tab_more", R.string.more,
    R.drawable.account05, moreIntent));
 }
 /**
  * 自定義創建標簽項的方法
  * @param tagName 標簽標識
  * @param tagLable 標簽文字
  * @param icon 標簽圖標
  * @param content 標簽對應的內容
  * @return
  */
 private TabHost.TabSpec buildTagSpec(String tagName, int tagLable,
   int icon, Intent content) {
  returntabHost
    .newTabSpec(tagName)
    .setIndicator(getResources().getString(tagLable),
      getResources().getDrawable(icon)).setContent(content);
 }}
運行結果如下圖所示
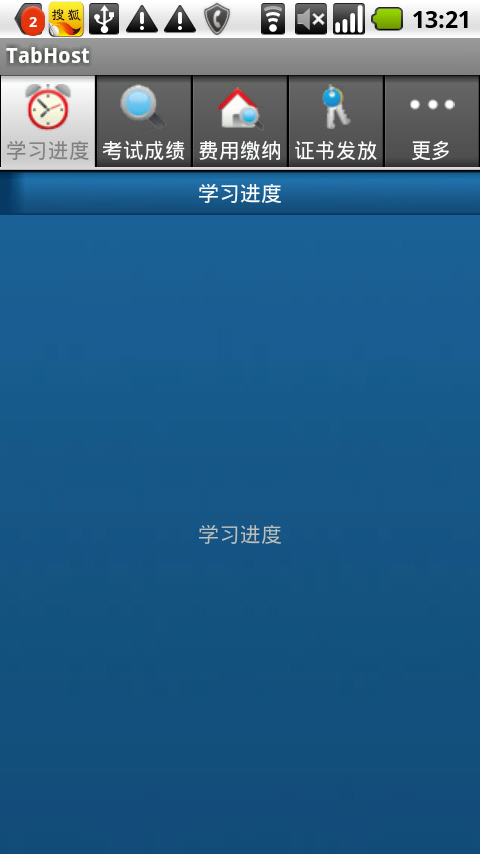
我們發現標簽位置處於界面上方,但是我們看到的很多應用的標簽都處於界面底部。
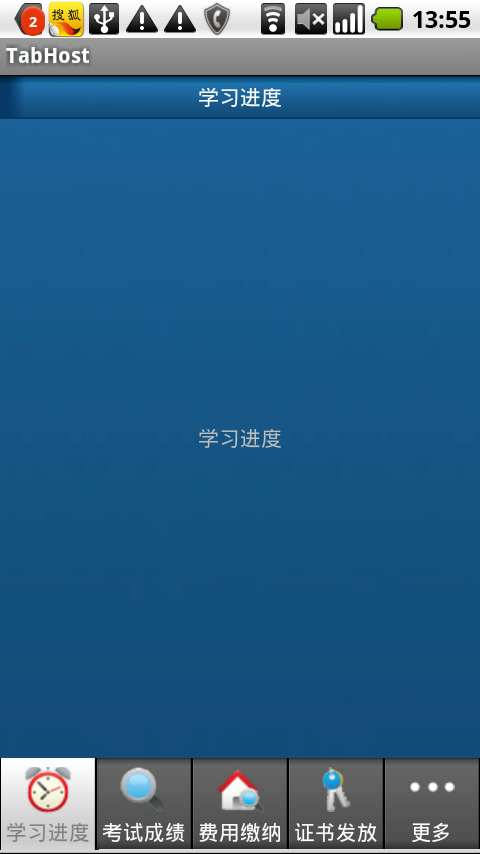
如下圖所示

我們要實現這種效果只需要將TabActivity的默認布局覆蓋即可。新布局只需將標簽和標簽對應內容的相對位置調換一下就可以了,這裡是用相對布局將標簽對應內容的位置放到了標簽的上方。不要改動id(會拋異常,提示必須要用指定的id)。不要忘了在onCreate()裡設置新布局將TabActivity的默認布局覆蓋。
 @Override
 publicvoid onCreate(Bundle savedInstanceState) {
  super.onCreate(savedInstanceState);
setContentView(R.layout.tab);
  tabHost = getTabHost();
  initIntent();
  addSpec();
 }
tab.xml
<?xml version="1.0" encoding="UTF-8"?>
<!-- TabHost組件id值不可變-->
<TabHostxmlns:android=http://schemas.android.com/apk/res/android
 android:id="@android:id/tabhost"
 android:layout_height="fill_parent"
 android:layout_width="fill_parent">

 <RelativeLayout android:orientation="vertical"
  android:layout_width="fill_parent"
  android:layout_height="fill_parent">

  <!-- TabWidget組件id值不可變-->
  <TabWidget android:id="@android:id/tabs"
   android:layout_width="fill_parent"
   android:layout_height="wrap_content"
   android:layout_alignParentBottom="true">
  </TabWidget>

  <!-- FrameLayout布局,id值不可變-->
  <FrameLayout android:id="@android:id/tabcontent"
   android:layout_width="fill_parent"
   android:layout_height="fill_parent"
   android:layout_above="@android:id/tabs">
  </FrameLayout>

 </RelativeLayout>
</TabHost>
通常在項目中我們都會有一個自定義的Activity基類,我們會讓所有的界面Activity去繼承這個基類。但是要使用TabHost就要繼承TabActivity,所以我們可以定義兩個基類,一個是普通Activity界面的基類,另一個是包含TabHost界面的基類,讓這個基類繼承TabActivity即可。
二、TabHost用法—定義Tab標簽樣式
第一節“TabHost用法”中我們介紹了通過TabHost實現標簽頁效果。但是在實際項目中我們可能更希望定義自己的Tab標簽樣式使界面效果更佳。既然不能改變系統的Tab樣式,那麼我們可以選擇隱藏系統的東西,使用自己定義的東西(這種方式很好用,以後會詳細介紹)。反編譯新浪微博的項目後會發現,他們在布局中隱藏了TabWidget即Tab標簽而使用一組RadioButton來代替。既然是自己定義的,那肯定是可以自己決定顯示樣式了,那我們的問題也就解決了。
這裡我使用的是“TabHost用法—兩種實現方式”一文種提到的第二種實現方式,繼承Activity來使用TabHost的。先把代碼貼上來(紅色字體部分為修改或添加的代碼)。
TabHostActivity.java
public class TabHostActivity extends Activity implements
  OnCheckedChangeListener {
 private TabHost tabHost;


 private Intent certificateIntent;
 private Intent feeIntent;
 private Intent scoreIntent;
 private Intent studyIntent;
 private Intent moreIntent;

 @Override
 publicvoid onCreate(Bundle savedInstanceState) {
  super.onCreate(savedInstanceState);
  setContentView(R.layout.tab);
  // tabHost = getTabHost();
  tabHost = (TabHost) findViewById(R.id.my_tabhost);
  LocalActivityManager groupActivity =
new LocalActivityManager(this,false);
  groupActivity.dispatchCreate(savedInstanceState);
  tabHost.setup(groupActivity);
  initIntent();
  addSpec();
  ((RadioGroup) findViewById(R.id.tab_radiogroup))
    .setOnCheckedChangeListener(this);

 }

 /**
  * 初始化各個tab標簽對應的intent
  */
 privatevoid initIntent() {
  studyIntent = new Intent(this, StudyActivity.class);
  scoreIntent = new Intent(this, ScoreActivity.class);
  feeIntent = new Intent(this, FeeActivity.class);
  certificateIntent = new Intent(this, CertificateActivity.class);
  moreIntent = new Intent(this, MoreActivity.class);
 }

 /**
  * 為tabHost添加各個標簽項
  */
 privatevoid addSpec() {
tabHost.addTab(this.buildTagSpec("tab_study", R.string.study_progress,
    R.drawable.account01, studyIntent));
tabHost.addTab(this.buildTagSpec("tab_score", R.string.test_score,
    R.drawable.account02, scoreIntent));
  tabHost.addTab(this.buildTagSpec("tab_fee", R.string.fee_pay,
    R.drawable.account03, feeIntent));
  tabHost.addTab(this.buildTagSpec("tab_certificate",
    R.string.certificate_grant, R.drawable.account04,
    certificateIntent));
  tabHost.addTab(this.buildTagSpec("tab_more", R.string.more,
    R.drawable.account05, moreIntent));
 }

 /**
  * 自定義創建標簽項的方法
  * @param tagName 標簽標識
  * @param tagLable 標簽文字
  * @param icon 標簽圖標
  * @param content 標簽對應的內容
  * @return
  */
 private TabHost.TabSpec buildTagSpec(String tagName, int tagLable,
   int icon, Intent content) {
  returntabHost
    .newTabSpec(tagName)
    .setIndicator(getResources().getString(tagLable),
      getResources().getDrawable(icon)).setContent(content);
 }

 @Override
 public void onCheckedChanged(RadioGroup group, int checkedId) {
  switch (checkedId) {
  case R.id.radio_button_study:
   tabHost.setCurrentTabByTag("tab_study");
   break;
  case R.id.radio_button_score:
   tabHost.setCurrentTabByTag("tab_score");
   break;
  case R.id.radio_button_certificate:
   tabHost.setCurrentTabByTag("tab_certificate");
   break;
  case R.id.radio_button_fee:
   tabHost.setCurrentTabByTag("tab_fee");
   break;
  case R.id.radio_button_more:
   tabHost.setCurrentTabByTag("tab_more");
   break;
  }

 }
}
tab.xml
<?xml version="1.0" encoding="UTF-8"?>
<TabHost android:id="@+id/my_tabhost" android:layout_width="fill_parent"
   android:layout_height="fill_parent" xmlns:android="http://schemas.android.com/apk/res/android">
 <LinearLayout android:orientation="vertical"
android:layout_width="fill_parent" android:layout_height="fill_parent">
  <FrameLayout android:id="@android:id/tabcontent"
     android:layout_width="fill_parent" android:layout_height="0.0dip"
      android:layout_weight="1.0" />
<TabWidget android:id="@android:id/tabs" android:visibility="gone"
android:layout_width="fill_parent" android:layout_height="wrap_content"
     android:layout_weight="0.0" />
  <RadioGroup android:id="@+id/tab_radiogroup"
    android:background="@drawable/tabs_bg" android:layout_width="fill_parent"
   android:layout_height="wrap_content" android:gravity="center_vertical"
   android:layout_gravity="bottom" android:orientation="horizontal">
   <RadioButton android:id="@+id/radio_button_study"
    android:layout_marginTop="2.0dip" android:text="學習進度"
    android:drawableTop="@drawable/account01"
    android:checked="true" />
   <RadioButton android:id="@+id/radio_button_score"
    android:layout_marginTop="2.0dip" android:text="考試成績"
    android:drawableTop="@drawable/account02"  />
   <RadioButton android:id="@+id/radio_button_certificate"
    android:layout_marginTop="2.0dip" android:text="證書發放"
    android:drawableTop="@drawable/account03"  />
   <RadioButton android:id="@+id/radio_button_fee"
    android:layout_marginTop="2.0dip" android:text="費用繳納"
    android:drawableTop="@drawable/account04"  />
   <RadioButton android:id="@+id/radio_button_more"
    android:layout_marginTop="2.0dip" android:text="更多"
    android:drawableTop="@drawable/account05"  />
  </RadioGroup>
 </LinearLayout>
</TabHost>
styles.xml
<?xml version="1.0" encoding="utf-8"?>
<resources>
 <!-- TabHost標簽按鈕樣式 -->
 <style name="tab_button_bottom">
  <item name="android:textSize">12px</item>
  <item name="android:textColor">#ffffffff</item>
  <item name="android:ellipsize">marquee</item>
  <item name="android:gravity">center_horizontal</item>
  <item name="android:background">@drawable/tab_btn_bg</item>
  <item name="android:layout_marginTop">2.0dip</item>
  <item name="android:button">@null</item>
  <item name="android:paddingTop">6dip</item>
  <item name="android:drawablePadding">4dip</item>
  <item name="android:layout_width">fill_parent</item>
  <item name="android:layout_height">wrap_content</item>
  <item name="android:layout_weight">1.0</item>
  <item name="android:singleLine">true</item>
 </style>

 <!-- 頁面標題LinearLayout樣式 -->
 <style name="activity_title_background">
 <item name="android:background">@drawable/title_background</item>
  <item name="android:layout_width">fill_parent</item>
  <item name="android:layout_height">wrap_content</item>
  <item name="android:layout_alignParentTop">true</item>
  <item name="android:gravity">center</item>
 </style>

 <!-- 界面標題TextView樣式 -->
 <style name="activity_title_text">
  <item name="android:textSize">14dip</item>
  <item name="android:textColor">@drawable/white</item>
  <item name="android:layout_width">wrap_content</item>
  <item name="android:layout_height">wrap_content</item>
  <item name="android:gravity">center</item>
 </style>
</resources>
運行結果如下圖所示
程序重要部分:
1. 紅色字體部分。
2. 布局文件tab.xml,可以看到該布局文件中將TabWidget隱藏(android:visibility="gone")而以一個RadioGroup取而代之。
3. 為RadioGroup設置OnCheckedChangeListener監聽,通過onCheckedChanged方法對各個RadioButton點擊事件的處理完成標簽切換。
其實我當初考慮過為什麼要用RadioButton而不用普通的Button。後來通過自己做項目,發現使用RadioGroup有以下優點:
1.另外就是布局上比較方便易懂,不用再去用LinearLayout等布局去包含Button。
2. 我們可以很方便的獲得當前選中的標簽,當然通過TabHost的tabHost.getCurrentTabTag()和getCurrentTab()也是可以的。
3.設置監聽很方便,只需要為RadioGroup設置監聽就行了,程序中對應的代碼是
((RadioGroup) findViewById(R.id.tab_radiogroup))
       .setOnCheckedChangeListener(this);
如果用Button的話我們需要為所有的Button一個一個去設置監聽,相對來說比較麻煩。
4. 或許最重要的一點是因為RadioButton本身就支持圖片和文字的上下布局,只需指定圖片和文字是什麼就可以了而不需要我們自己去實現這種布局。
<RadioButton android:id="@+id/radio_button_more"
   android:layout_marginTop="2.0dip"
android:text="更多"
   android:drawableTop="@drawable/account05"
    />
當然如果如果RadioButton不能滿足我們的項目需求,比如我們不需要圖片又不想讓文字靠底部顯示,而是居中顯示,這時我們就可以用其他組件代替RadioButton。其實我們可以通過修改或自定義等方式實現多種漂亮的效果,比如“人人網”手機客戶端的個人主頁中Tab標簽是可以左右滑動的。
原創作者:男人應似海
以上就是本文的全部內容,希望能給大家一個參考,也希望大家多多支持本站。
 如何使用RecyclerView
1. Overview這是一篇翻譯文章,自己作為android工程師以來,第一次翻譯國外網站的文章,所以不免會有一些遺漏和錯誤。原文請參考RecyclerView 是一種
 Activity啟動清空原任務棧
若有這樣的需求或場景,要求每次啟動Activity時都清空原有的任務棧,也就是finish掉原任務棧中的所有Activity,有沒有一種鸠占鵲巢的趕腳?下面介紹的這個方法
 Android 實現控件懸浮效果
隨著移動互聯網的快速發展,它已經和我們的生活息息相關了,在公交地鐵裡面都能看到很多人的人低頭看著自己的手機屏幕,從此“低頭族”一詞就產生了,作為一
 Android創建與解析XML(三)——詳解Sax方式
1. Sax概述SAX是一種占用內存少且解析速度快的解析器,它采用的是事件啟動,不需要解析完整個文檔,而是按照內容順序看文檔某個部分是否符合xml語法,如果符合就觸發相應