編輯:關於Android編程
本文實例講述了Android開發之自定義控件用法。分享給大家供大家參考,具體如下:
今天和大家分享下組合控件的使用。很多時候android自定義控件並不能滿足需求,如何做呢?很多方法,可以自己繪制一個,可以通過繼承基礎控件來重寫某些環節,當然也可以將控件組合成一個新控件,這也是最方便的一個方法。今天就來介紹下如何使用組合控件,將通過兩個實例來介紹。
第一個實現一個帶圖片和文字的按鈕,如圖所示:

整個過程可以分四步走。第一步,定義一個layout,實現按鈕內部的布局。代碼如下:
custom_button.xml
<?xml version="1.0" encoding="utf-8"?>
<LinearLayout xmlns:android=http://schemas.android.com/apk/res/android"
  android:orientation="horizontal"
  android:layout_width="fill_parent"
  android:layout_height="fill_parent"
  >
 <ImageView
 android:id="@+id/iv"
   android:layout_width="wrap_content"
   android:layout_height="wrap_content"
   android:layout_gravity="center_vertical"
   android:paddingLeft="10.0dip"
   android:paddingTop="10.0dip"
   android:paddingBottom="10.0dip"
   />
 <TextView
 android:id="@+id/tv"
   android:layout_width="wrap_content"
   android:layout_height="wrap_content"
   android:textColor="#ffffff"
   android:layout_marginLeft="8dip"
   android:layout_gravity="center_vertical"
   android:paddingLeft="5.0dip"
   android:paddingTop="10.0dip"
   android:paddingBottom="10.0dip"
   android:paddingRight="10.0dip"
   android:textSize="18.0sp"
   />
</LinearLayout>
這個xml實現一個左圖右字的布局,接下來寫一個類繼承LinearLayout,導入剛剛的布局,並且設置需要的方法,從而使的能在代碼中控制這個自定義控件內容的顯示。代碼如下:
CustomButton.java
package com.szy.customview;
import android.content.Context;
import android.util.AttributeSet;
import android.view.LayoutInflater;
import android.widget.ImageView;
import android.widget.LinearLayout;
import android.widget.TextView;
public class CustomButton extends LinearLayout
{
 private ImageView iv;
 private TextView tv;
 public CustomButton(Context context)
 {
 this(context, null);
 }
 public CustomButton(Context context, AttributeSet attrs)
 {
 super(context, attrs);
 // 導入布局
 LayoutInflater.from(context).inflate(R.layout.custom_button, this, true);
 iv = (ImageView) findViewById(R.id.iv);
 tv = (TextView) findViewById(R.id.tv);
 }
 /**
 * 設置圖片資源
 */
 public void setImageResource(int resId)
 {
 iv.setImageResource(resId);
 }
 /**
 * 設置顯示的文字
 */
 public void setTextViewText(String text)
 {
 tv.setText(text);
 }
}
第三步,在需要使用這個自定義控件的layout中加入這控件,只需要在xml中加入即可。方法如下:
main.xml
<LinearLayout xmlns:android="http://schemas.android.com/apk/res/android"
 android:layout_width="fill_parent"
 android:layout_height="fill_parent"
 android:orientation="vertical"
 >
 <com.szy.customview.CustomButton
   android:id="@+id/bt_confirm"
   android:layout_width="wrap_content"
   android:layout_height="wrap_content"
   android:background="@drawable/button_bg"
   />
 <com.szy.customview.CustomButton
   android:id="@+id/bt_cancel"
   android:layout_width="wrap_content"
   android:layout_height="wrap_content"
   android:background="@drawable/button_bg"
  />
</LinearLayout>
注意的是,控件標簽使用完整的類名即可。為了給按鈕一個點擊效果,你需要給他一個selector背景,這裡就不說了。
最後一步,即在activity中設置該控件的內容。當然,在xml中也可以設置,但是只能設置一個,當我們需要兩次使用這樣的控件,並且顯示內容不同時就不行了。在activity中設置也非常簡單,我們在CustomButton這個類中已經寫好了相應的方法,簡單調用即可。代碼如下:
package com.szy.customview;
import android.app.Activity;
import android.os.Bundle;
import android.view.View;
import android.view.View.OnClickListener;
public class MainActivity extends Activity
{
 private CustomButton btnConfirm;
 private CustomButton btnCancel;
 @Override
 public void onCreate(Bundle savedInstanceState)
 {
 super.onCreate(savedInstanceState);
 setContentView(R.layout.main);
 btnConfirm = (CustomButton) findViewById(R.id.bt_confirm);
 btnCancel = (CustomButton) findViewById(R.id.bt_cancel);
 btnConfirm.setTextViewText("確定");
 btnConfirm.setImageResource(R.drawable.confirm);
 btnCancel.setTextViewText("取消");
 btnCancel.setImageResource(R.drawable.cancel);
 btnConfirm.setOnClickListener(new OnClickListener()
 {
  @Override
  public void onClick(View v)
  {
  // 在這裡可以實現點擊事件
  }
 });
 }
}
這樣,一個帶文字和圖片的組合按鈕控件就完成了。這樣梳理一下,使用還是非常簡單的。組合控件能做的事還非常多,主要是在類似上例中的CustomButton類中寫好要使用的方法即可。
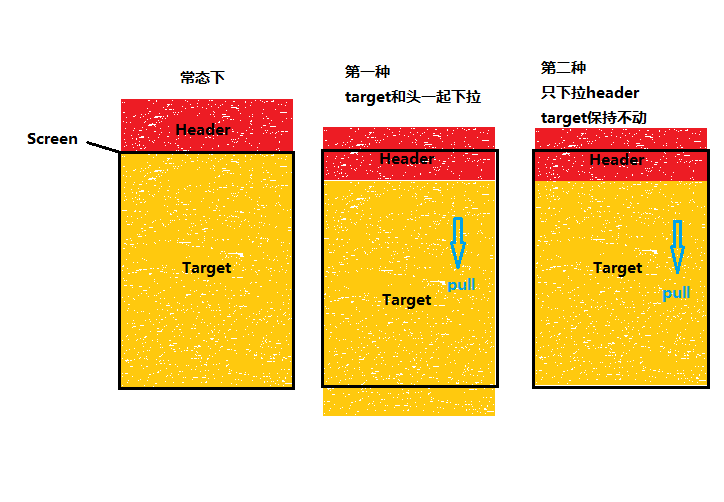
再來看一個組合控件,帶刪除按鈕的EidtText。即在用戶輸入後,會出現刪除按鈕,點擊即可取消用戶輸入。
定義方法和上例一樣。首先寫一個自定義控件的布局:
custom_editview.xml:
<?xml version="1.0" encoding="utf-8"?>
<RelativeLayout xmlns:android="http://schemas.android.com/apk/res/android"
  android:layout_width="fill_parent"
  android:layout_height="fill_parent"
  >
 <EditText
   android:id="@+id/et"
   android:layout_width="fill_parent"
   android:layout_height="wrap_content"
   android:singleLine="true"
   />
 <ImageButton
   android:id="@+id/ib"
   android:visibility="gone"
   android:src="@drawable/cancel"
   android:layout_width="wrap_content"
   android:layout_height="wrap_content"
   android:background="#00000000"
   android:layout_alignRight="@+id/et" />
</RelativeLayout>
實現輸入框右側帶按鈕效果,注意將按鈕隱藏。然後寫一個CustomEditView類,實現刪除用戶輸入功能。這裡用到了TextWatch這個接口,監聽輸入框中的文字變化。使用也很簡單,實現他的三個方法即可。看代碼:
CustomEditView.java
package com.szy.customview;
import android.content.Context;
import android.text.Editable;
import android.text.TextWatcher;
import android.util.AttributeSet;
import android.view.LayoutInflater;
import android.view.View;
import android.widget.EditText;
import android.widget.ImageButton;
import android.widget.LinearLayout;
public class CustomEditView extends LinearLayout implements EdtInterface
{
 ImageButton ib;
 EditText et;
 public CustomEditView(Context context)
 {
 super(context);
 }
 public CustomEditView(Context context, AttributeSet attrs)
 {
 super(context, attrs);
 LayoutInflater.from(context).inflate(R.layout.custom_editview, this, true);
 init();
 }
 private void init()
 {
 ib = (ImageButton) findViewById(R.id.ib);
 et = (EditText) findViewById(R.id.et);
 et.addTextChangedListener(tw);// 為輸入框綁定一個監聽文字變化的監聽器
 // 添加按鈕點擊事件
 ib.setOnClickListener(new OnClickListener()
 {
  @Override
  public void onClick(View v)
  {
  hideBtn();// 隱藏按鈕
  et.setText("");// 設置輸入框內容為空
  }
 });
 }
 // 當輸入框狀態改變時,會調用相應的方法
 TextWatcher tw = new TextWatcher()
 {
 @Override
 public void onTextChanged(CharSequence s, int start, int before, int count)
 {
  // TODO Auto-generated method stub
 }
 @Override
 public void beforeTextChanged(CharSequence s, int start, int count, int after)
 {
  // TODO Auto-generated method stub
 }
 // 在文字改變後調用
 @Override
 public void afterTextChanged(Editable s)
 {
  if (s.length() == 0)
  {
  hideBtn();// 隱藏按鈕
  } else
  {
  showBtn();// 顯示按鈕
  }
 }
 };
 @Override
 public void hideBtn()
 {
 // 設置按鈕不可見
 if (ib.isShown())
  ib.setVisibility(View.GONE);
 }
 @Override
 public void showBtn()
 {
 // 設置按鈕可見
 if (!ib.isShown())
 {
  ib.setVisibility(View.VISIBLE);
 }
 }
}
interface EdtInterface
{
 public void hideBtn();
 public void showBtn();
}
在TextWatch接口的afterTextChanged方法中對文字進行判斷,若長度為0,就隱藏按鈕,否則,顯示按鈕。
另外,實現ImageButton(即那個叉)的點擊事件,刪除輸入框中的內容,並隱藏按鈕。
後面兩步的實現就是加入到實際布局中:
main.xml
<LinearLayout xmlns:android="http://schemas.android.com/apk/res/android"
 android:layout_width="fill_parent"
 android:layout_height="fill_parent"
 android:orientation="vertical"
 >
 <com.szy.customview.CustomEditView
 android:layout_width="fill_parent"
   android:layout_height="wrap_content"
  />
</LinearLayout>
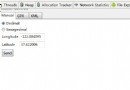
最後顯示效果如圖:

更多關於Android相關內容感興趣的讀者可查看本站專題:《Android控件用法總結》、《Android視圖View技巧總結》、《Android操作SQLite數據庫技巧總結》、《Android操作json格式數據技巧總結》、《Android數據庫操作技巧總結》、《Android文件操作技巧匯總》、《Android編程開發之SD卡操作方法匯總》、《Android開發入門與進階教程》及《Android資源操作技巧匯總》
希望本文所述對大家Android程序設計有所幫助。
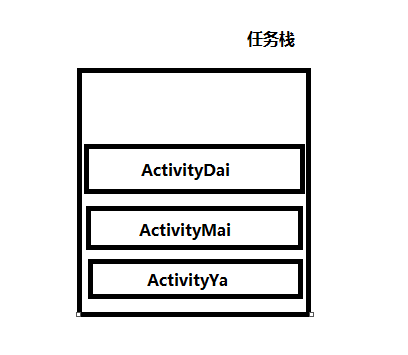 Activity的四種啟動模式與內存洩漏
初看這個博文名,我都蒙蔽了,Activity的啟動模式居然能扯到內存問題,還有內存洩漏問題,WTF!!!不要方,小司機我帶你理解和稍微深入的探討一下Activity的四種
 Android五種布局方式——LinearLayout、RelativeLayout、TableLayout....(四)
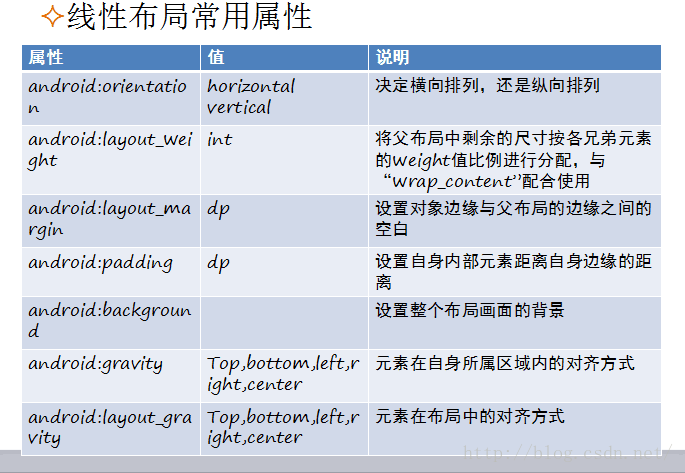
Android使用XML聲明界面布局將程序的表現層和控制層分離修改用戶界面時,無需更改程序的源代碼可視化工具設計用戶界面Android五種布局方式LinearLayout
 android設置軟鍵盤搜索鍵以及監聽搜索鍵點擊時發生兩次事件的問題解決
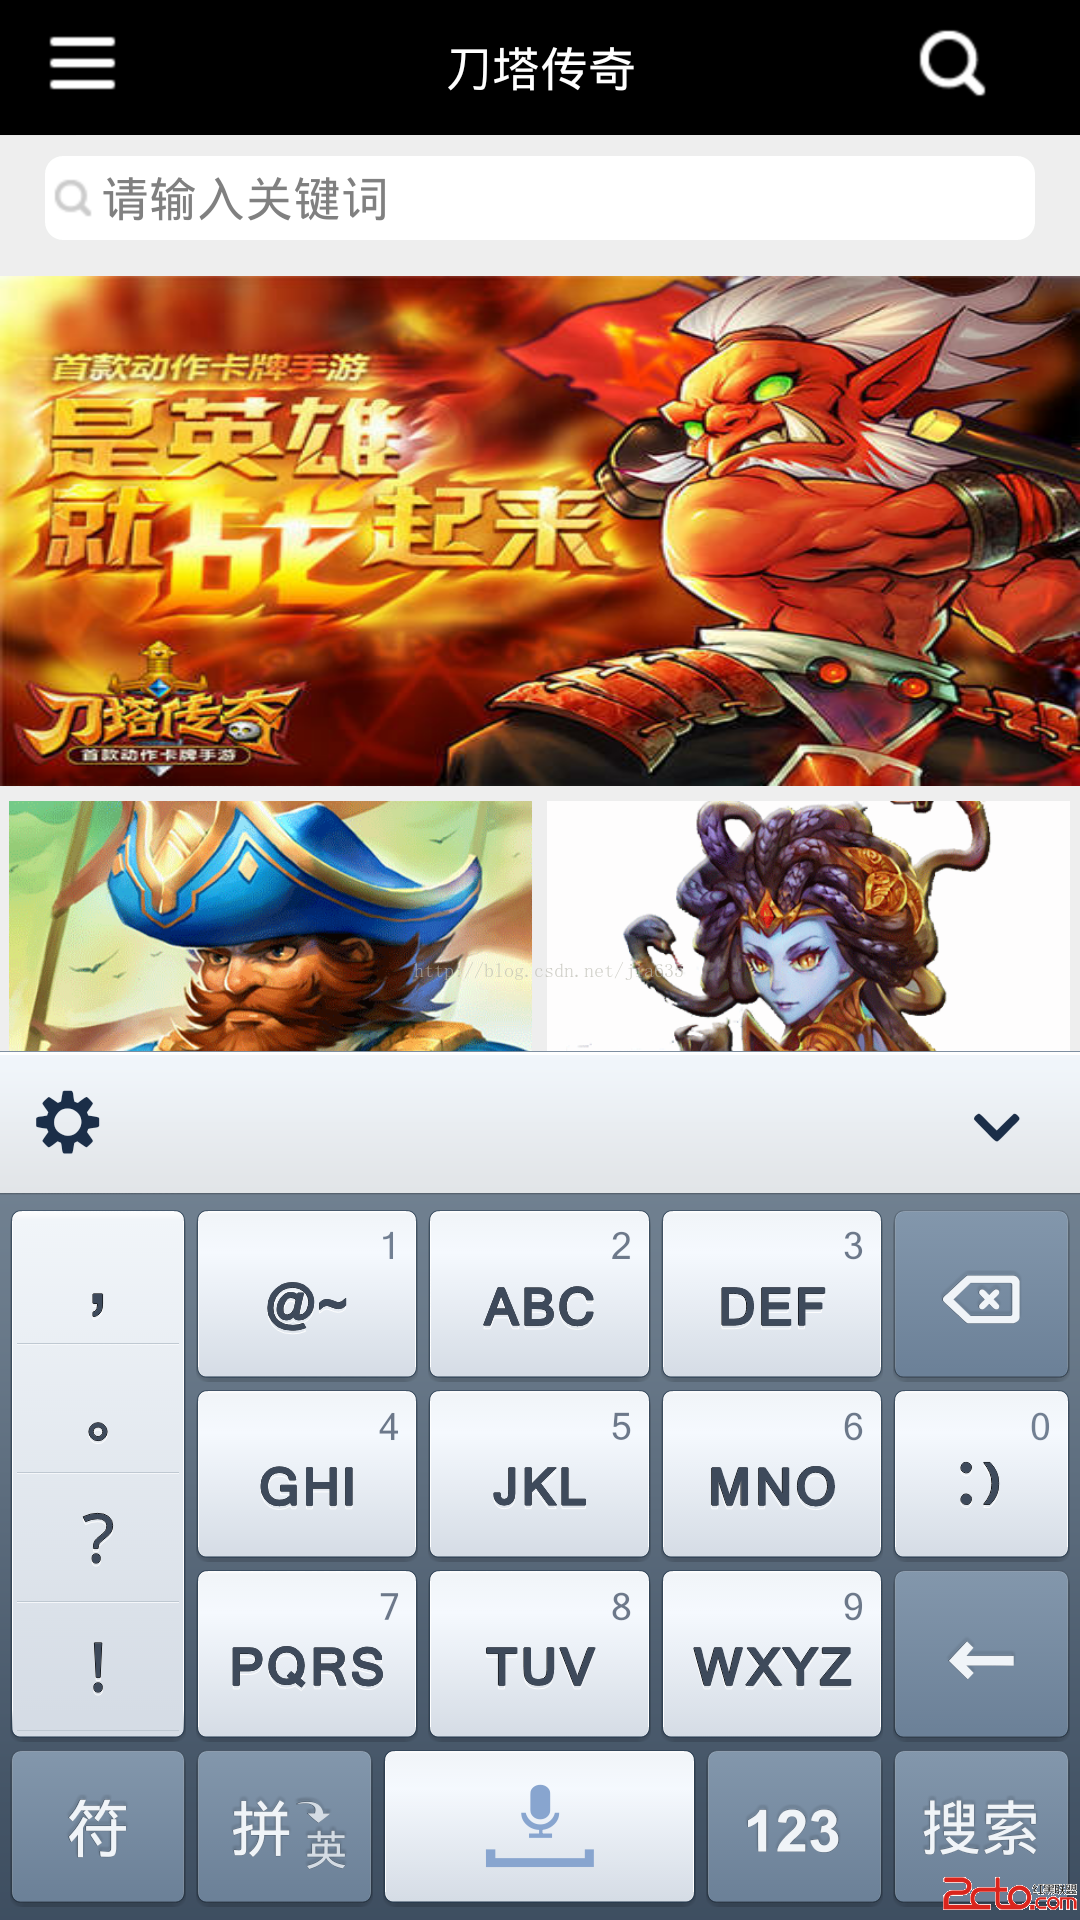
如圖所示,有時候為了布局美觀,在搜索時沒有搜索按鈕,而是調用軟件盤上的按鈕。調用的實現只需要在XML在輸入框中加入android:imeOptions=actionSe
 android notification完全解析
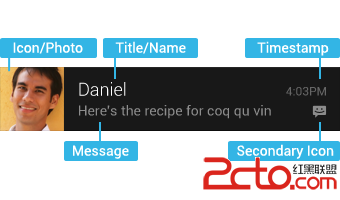
Notifications in Android 4.4 and Lower notification是很重要的部分,它與service,BroadcastReceive