編輯:關於Android編程
Notifications in Android 4.4 and Lower
notification是很重要的部分,它與service,BroadcastReceiver,Intent等密切相關,很好地使用notification可以使你的app的活躍度相對於沒有notification 的app大增。
很明顯這篇文章將詳細的介紹4.4及以下的notification。至於,android 5.0的相關特性,我計劃在假期裡開一個特輯來寫。下載就當是回顧知識了。畢竟,溫故而知新嘛,哈哈。
The notification system allows your app to keep the user informed about events, such as new chat messages or a calendar event. Think of notifications as a news channel that alerts the user to important events as they happen or a log that chronicles events while the user is not paying attention.
notification使得你的app可以告知用戶app中的事件,例如一條新的message或者一個日歷事件。可以認為notification是一個新聞渠道,它用來在用戶不注意到的時候來通知用戶一些重要事件。
Anatomy of a notification
Base Layout

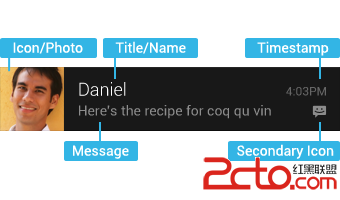
At a minimum, all notifications consist of a base layout, including:

the sending application's notification icon or the sender's photo
a notification title and message
a timestamp
a secondary icon to identify the sending application when the sender's image is     shown for the main icon
notification的基本布局
最低限度,所有的notifications 都由基本布局構成,包括:
發送notification的application的icon或者發送者的image。
notification的title和message。
時間戳
當main icon用來顯示sender’s image時 Secondary icon用來顯示發送application的icon。
Expanded layouts

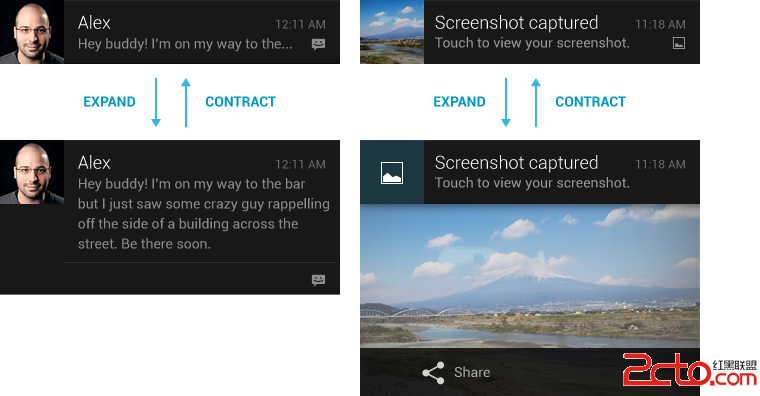
You have the option to provide more event detail. You can use this to show the
first few lines of a message or show a larger image preview. This provides the
user with additional context, and - in some cases - may allow the user to read
a message in its entirety. The user can pinch-zoom or two-finger glide in order
to toggle between base and expanded layouts. For single event notifications,
Android provides two expanded layout templates (text and image) for you to re-
use in your application.
notification的擴展布局
你可以選擇提供事件的更多細節。你可以用它來顯示一個message的一些行或者顯示一個圖片的預覽。這些給用戶提供了額外的內容,並且,在一些情況下,可以允許用戶閱讀完整的信息。用戶可以通過 pinch-zoom 或者雙手指滑動來打開擴展布局。android為單個notification提供了兩種擴展布局的方式(image,text)以供你在你的application中使用。
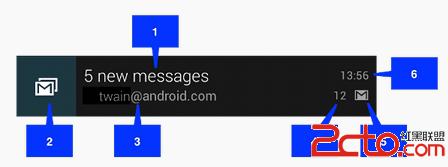
1.notification的title
2.發送notification的application的icon或者發送者的image。
3.notification的message
4.notification的數目顯示
5.當main icon用來顯示sender’s image時 Secondary icon用來顯示發送application的icon。
6.時間戳,默認為系統發出通知的時間。
Actions
Android supports optional actions that are displayed at the bottom of the
notification. With actions, users can handle the most common tasks for a
particular notification from within the notification shade without having to
open the originating application. This speeds up interaction and, in
conjunction with "swipe-to-dismiss", helps users to streamline their
notification triaging experience.

Be judicious with how many actions you include with a notification. The more
actions you include, the more cognitive complexity you create. Limit yourself
to the fewest number of actions possible by only including the most imminently
important and meaningful ones.

Good candidates for actions on notifications are actions that are:

essential, frequent and typical for the content type you're displaying
time-critical
not overlapping with neighboring actions
Avoid actions that are:

ambiguous,duplicative of the default action of the notification (such as "Read" or "Open")
android支持在notification的地步顯示可選的操作。有了這些actions,用戶可以處理大多數相同的tasks而無需打開應用。這集快樂交互的速度,並且結合滑動消失使得用戶簡化其通知處理的經歷。
明智的決定在你的notification裡面放置的action的數量。如果你包含了更多的action,那麼你便增加了交互的復雜性。請選擇一個或者兩個很重要並且有意義的action。
好的候選action有以下的特點:
.對該通知時重要的,典型的,並且頻繁使用的action。
.時間緊迫的
.不要和相鄰的action產生重疊
避免以下操作:
.含糊不清地
.和點擊notification的action重復的(such as “Read” or “Open”)
Design guidelines
.個性化
.導航到正確的地方
.正確的設置通知的優先級
主要看一下優先級的設置吧,其他的解釋大家可以參考官網。
用方法setPriority(int pri)來指定優先級
對應的屬性如下:
Notification.PRIORITY_DEFAULT(優先級為0)
Notification.PRIORITY_HIGH
Notification.PRIORITY_LOW
Notification.PRIORITY_MAX(優先級為2)
Notification.PRIORITY_MIN(優先級為-2)
現在,我們來看一下,如何實現一個notification。估計大家現在最常用的做法是下面這種:
 Notification notification = new Notification(R.drawable.ic_launcher,
 getText(R.string.app_name),
            System.currentTimeMillis());

    Intent notificationIntent = new Intent(this, MyService.class);
    PendingIntent pendingIntent = PendingIntent.getActivity(this, 0,
    notificationIntent, 0);
    notification.setLatestEventInfo(this, getText(R.string.hello_world),
            getText(R.string.hello_world), pendingIntent);
    startForeground(1, notification);
這是在service裡面啟動一個notification,但是大家一定記住這種方法已經過時了,也就是說Google官方已經不提倡使用這種方法來啟動一個notification了。官方推薦使用V4包下NotificationCompat.Builder,這樣,我們便可以設置各種屬性。
好了,現在我們具體來看一下,Notification的具體實現。
1.創建一個簡單的notification。

Required notification contents
notification必須要包含的內容

A Notification object must contain the following:
一個notification必須包含下面的屬性:

A small icon, set by setSmallIcon()
一個small icon,用setSmallIcon()來設置,對應於上圖中的2號區域

A title, set by setContentTitle()
一個title,用setContentTitle()來設置,對應於上圖中的1號區域

Detail text, set by setContentText()
詳細文本,用setContentText()來設置,對應於上圖中的3號區域
這三個是必須設置的,至於其他的擴展則是需求而定。代碼如下:
private NotificationManager manager;

NotificationCompat.Builder notifyBuilder;

@Override
protected void onCreate(Bundle savedInstanceState) {
    super.onCreate(savedInstanceState);
    setContentView(R.layout.activity_main);

    /*實例化NotificationManager以獲取系統服務*/
    manager = (NotificationManager) getSystemService(NOTIFICATION_SERVICE);

}

/**
 * 顯示最簡單的通知,以下method中的三個set方法是必須設置的
 *
 * @param view
 */
public void simNotification(View view) {

    Toast.makeText(this, "hha", Toast.LENGTH_LONG).show();

    notifyBuilder = new NotificationCompat.Builder(this)
            /*設置small icon*/
            .setSmallIcon(R.drawable.ic_launcher)
            /*設置title*/
            .setContentTitle("通知")
            /*設置詳細文本*/
            .setContentText("Hello world");
    manager.notify(100, notifyBuilder.build());
}
代碼裡的注釋已經很詳細了,simNotification綁定到了一個Button。這樣,我們已經實現了最簡單的notification。
2.創建一個點擊跳轉到其它Activity的Notification。
 /**
 * 點擊跳轉到指定Activity
 *
 * @param view
 */
public void largePicture(View view) {
     /*實例化NotificationManager以獲取系統服務*/
    manager = (NotificationManager) getSystemService(NOTIFICATION_SERVICE);

    //點擊的意圖ACTION是跳轉到Intent
    Intent resultIntent = new Intent(this, MainActivity.class);
    resultIntent.setFlags(Intent.FLAG_ACTIVITY_SINGLE_TOP);
    PendingIntent pendingIntent = PendingIntent.getActivity(this, 0, resultIntent, PendingIntent.FLAG_UPDATE_CURRENT);

    Bitmap bitmap = BitmapFactory.decodeResource(getResources(), R.drawable.ic_launcher);
    notifyBuilder = new NotificationCompat.Builder(this)
            /*設置large icon*/
            .setLargeIcon(bitmap)
             /*設置small icon*/
            .setSmallIcon(R.drawable.ic_launcher)
            /*設置title*/
            .setContentTitle("通知")
            /*設置詳細文本*/
            .setContentText("Hello world")
             /*設置發出通知的時間為發出通知時的系統時間*/
            .setWhen(System.currentTimeMillis())
             /*設置發出通知時在status bar進行提醒*/
            .setTicker("來自問月的祝福")
            /*setOngoing(boolean)設為true,notification將無法通過左右滑動的方式清除
            * 可用於添加常駐通知,必須調用cancle方法來清除
            */
            .setOngoing(true)
             /*設置點擊後通知消失*/
            .setAutoCancel(true)
             /*設置通知數量的顯示類似於QQ那種,用於同志的合並*/
            .setNumber(2)
             /*點擊跳轉到MainActivity*/
            .setContentIntent(pendingIntent);

    manager.notify(121, notifyBuilder.build());
}
代碼裡的注釋都很詳細,加上前面的介紹相信大家都能理解了。
3.創建一個顯示bitmap的notification,類似於屏幕截圖的顯示效果
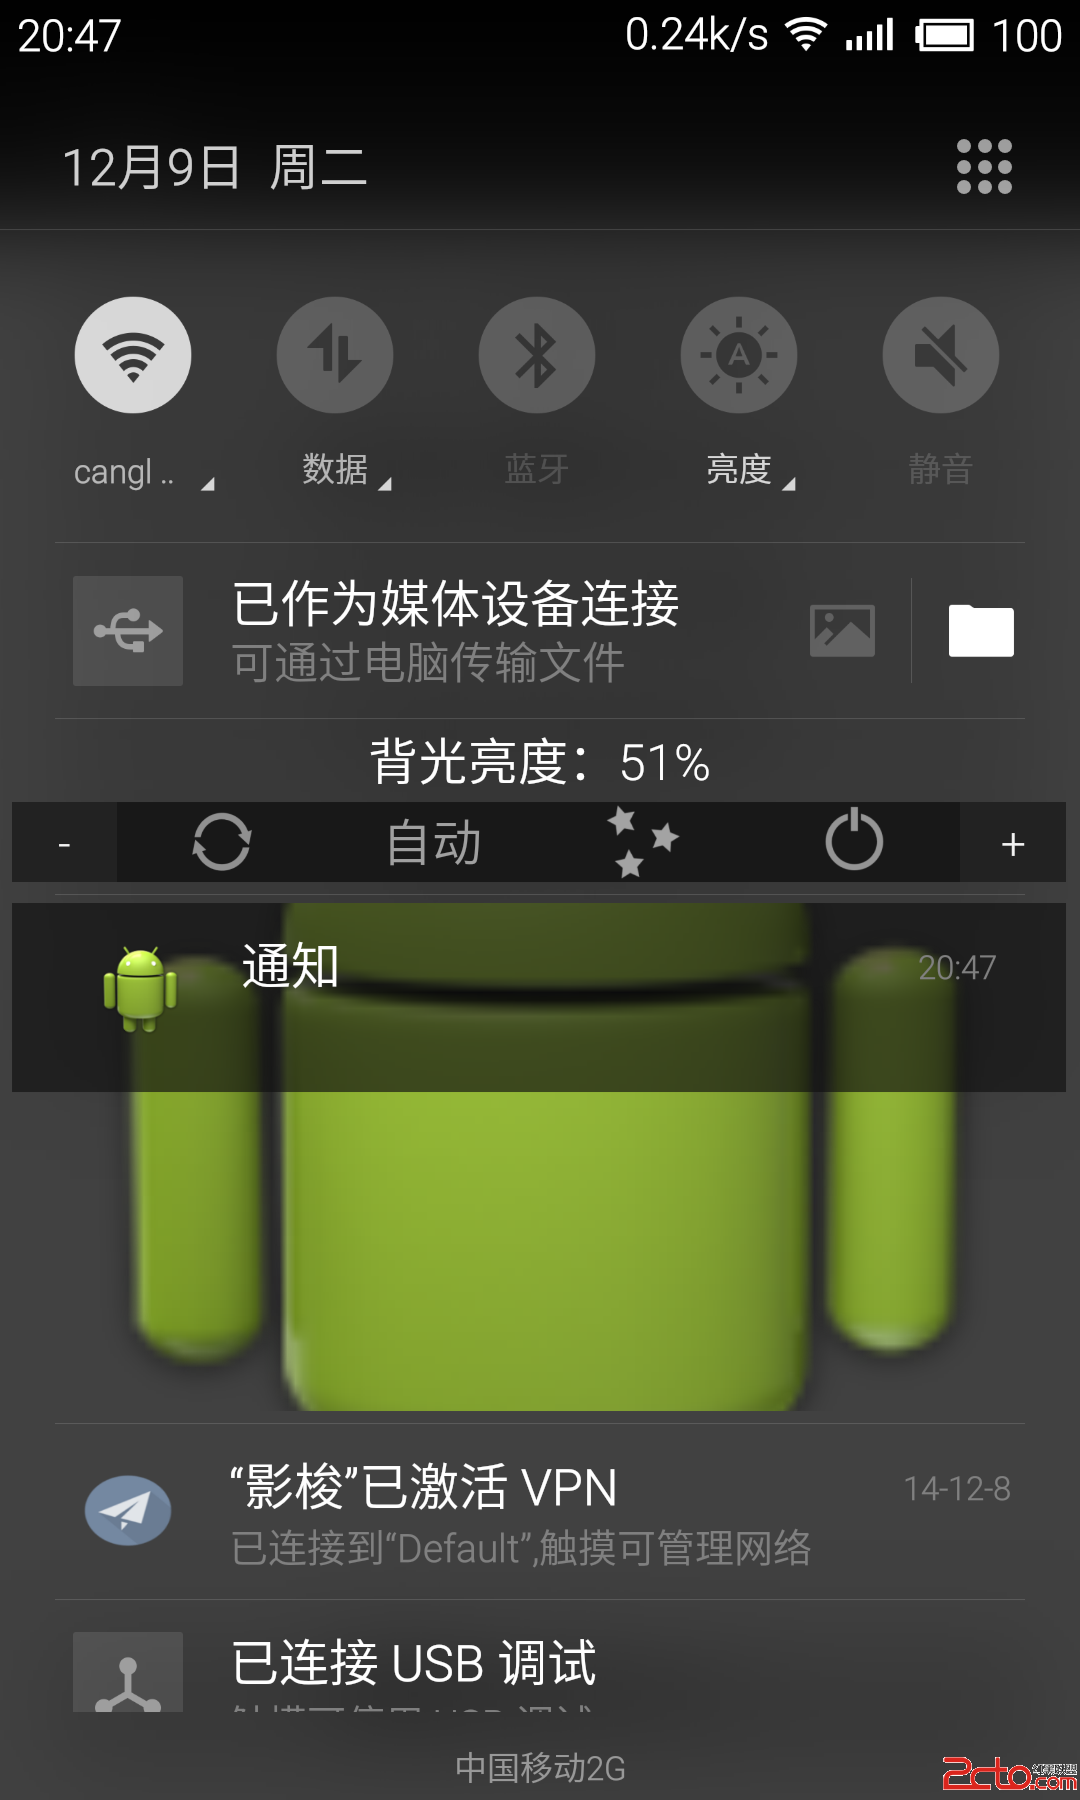
/**
 * 類似於系統截圖的效果
 *
 * @param view
 */
public void comNotification(View view) {

    /*實例化NotificationManager以獲取系統服務*/
    manager = (NotificationManager) getSystemService(NOTIFICATION_SERVICE);

    /*獲取bitmap*/
    Bitmap bitmap = BitmapFactory.decodeResource(getResources(), R.drawable.ic_launcher);
    notifyBuilder = new NotificationCompat.Builder(this)
             /*設置small icon*/
            .setSmallIcon(R.drawable.ic_launcher)
            /*設置title*/
            .setContentTitle("通知")
            /*設置詳細文本*/
            .setContentText("Hello world")
            .setWhen(System.currentTimeMillis())
            .setOngoing(true)
            .setNumber(2);

    NotificationCompat.BigPictureStyle bigPictureStyle = new NotificationCompat.BigPictureStyle();
    bigPictureStyle.bigPicture(bitmap);
    notifyBuilder.setStyle(bigPictureStyle);

    manager.notify(121, notifyBuilder.build());
}
這裡唯一需要注意的是加載圖片最好不要在UI線程進行(這裡只是為了演示)。
4.創建一個類似於日歷事件的notification,並與Service進行交互。
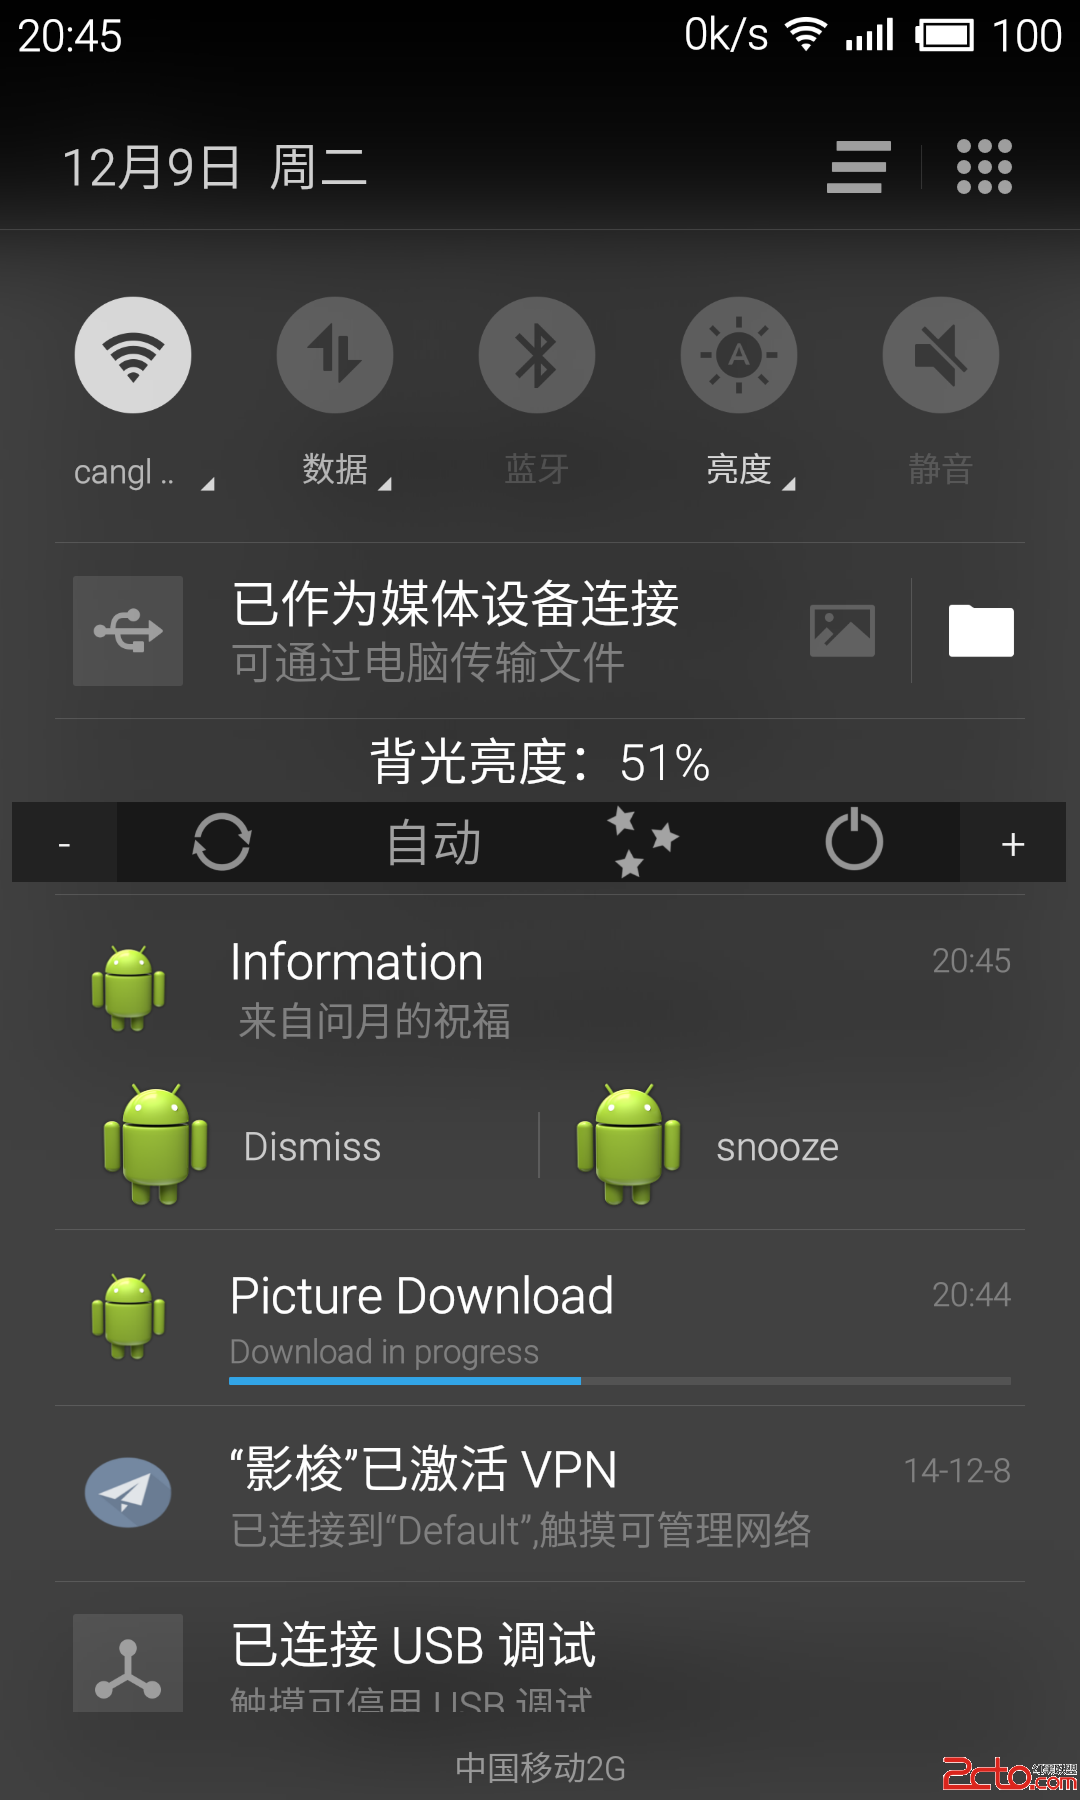
/**
 * 創建一個類似於日歷事件的notification
 * @param view
 */
public void add_action(View view) {

    myIntent = new Intent(getApplicationContext(), MyIntentService.class);

    myIntent.putExtra(myConstants.EXTRA_MESSAGE, " 來自問月的祝福");
    myIntent.setAction(myConstants.ACTION_PING);
    myIntent.putExtra(myConstants.EXTRA_TIMER, 1000);
    startService(myIntent);

}
IntentService代碼如下,之後在需要時可以在此擴展IntentService,這裡注意一下IntentService類的構造器的重載,super裡面是你的路徑名。
package me.androiddemo.canglangwenyue.test;

import android.app.IntentService;
import android.app.Notification;
import android.app.NotificationManager;
import android.app.PendingIntent;
import android.content.Intent;
import android.support.v4.app.NotificationCompat;
import android.util.Log;

/**
 * Created by canglangwenyue on 14-12-9.
 */
public class MyIntentService extends IntentService {

private NotificationManager manager;
private String message;
private int mMills;
NotificationCompat.Builder builder;

public MyIntentService() {
    // The super call is required. The background thread that IntentService
    // starts is labeled with the string argument you pass.
    super("me.androiddemo.canglangwenyuet.test");
}

@Override
protected void onHandleIntent(Intent intent) {

    message = intent.getStringExtra(myConstants.EXTRA_MESSAGE);

    mMills = intent.getIntExtra(myConstants.EXTRA_TIMER, myConstants.DEFAULT_TIMER_DURATION);

    NotificationManager notificationManager = (NotificationManager) getSystemService(NOTIFICATION_SERVICE);

    String action = intent.getAction();
    issueNotification(intent,message);

    if (action.equals(myConstants.ACTION_PING)) {
        issueNotification(intent,message);
    }else if (action.equals(myConstants.ACTION_SNOOZE)) {
        notificationManager.cancel(myConstants.NOTIFICATION_ID);
        issueNotification(intent,"");
    }else if (action.equals(myConstants.ACTION_DISMISS)) {
        notificationManager.cancel(myConstants.NOTIFICATION_ID);
    }


}

private void issueNotification(Intent intent, String msg) {
    manager = (NotificationManager) getSystemService(NOTIFICATION_SERVICE);
    Intent dissmissItent = new Intent(this,MyIntentService.class);
    dissmissItent.setAction(myConstants.ACTION_DISMISS);
    PendingIntent disIntent = PendingIntent.getService(this,0,dissmissItent,0);

    Intent snoozeIntent = new Intent(this,MyIntentService.class);
    snoozeIntent.setAction(myConstants.ACTION_SNOOZE);
    PendingIntent snoopIntent = PendingIntent.getService(this,0,snoozeIntent,0);

    builder = new NotificationCompat.Builder(this)
            .setSmallIcon(R.drawable.ic_launcher)
            .setContentTitle("Information")
            .setContentText("lalallalala")
            .setDefaults(Notification.DEFAULT_ALL)
            .setStyle(new NotificationCompat.BigTextStyle().bigText(msg))
            .addAction(R.drawable.ic_launcher, "Dismiss", disIntent)
            .addAction(R.drawable.ic_launcher,"snooze",snoopIntent);


    Intent resultIntent = new Intent(this,MainActivity2.class);
    resultIntent.putExtra(myConstants.EXTRA_MESSAGE,msg);
    resultIntent.setFlags(Intent.FLAG_ACTIVITY_NEW_TASK | Intent.FLAG_ACTIVITY_CLEAR_TASK);


    PendingIntent resultPendingIntent = PendingIntent.getActivity(this,0,resultIntent,PendingIntent.FLAG_UPDATE_CURRENT);

    builder.setContentIntent(resultPendingIntent);
    //        manager.notify(myConstants.NOTIFICATION_ID,builder.build());
    startTimer(mMills);


}

private void startTimer(int mMills) {
    try {

        Thread.sleep(mMills);

    }catch (Exception e) {
        Log.d(myConstants.DEBUG_TAG, "ERROR");
    }
    issueNotification(builder);
}

private void issueNotification(NotificationCompat.Builder builder) {
    manager = (NotificationManager) getSystemService(NOTIFICATION_SERVICE);

    manager.notify(myConstants.NOTIFICATION_ID,builder.build());
}
}
這裡只是實現了一個簡單的Timer。參考一下就好。
5.創建一個自定義的notification,只要通過RemoteViews來獲取你的XML布局文件,並通過.setContent(remoteViews)就好,大家只需要對比不同之處。

/**
 * 自定義notification樣式
 *
 * @param view
 */
public void Cus_Notification(View view) {

    Toast.makeText(MainActivity.this, "AHa", Toast.LENGTH_LONG).show();
    /*實例化NotificationManager以獲取系統服務*/
    manager = (NotificationManager) getSystemService(NOTIFICATION_SERVICE);
    RemoteViews remoteViews = new RemoteViews(getPackageName(), R.layout.customnotification);

    remoteViews.setImageViewResource(R.id.imageView, R.drawable.psb);
    remoteViews.setTextViewText(R.id.textView, "Your Haven");

    remoteViews.setTextViewText(R.id.textView2, "YUI");
    remoteViews.setTextViewText(R.id.textView3, "豆瓣-FNM -我的紅心 MHZ");

    remoteViews.setViewVisibility(R.id.my_large_button, View.VISIBLE);
    notifyBuilder = new NotificationCompat.Builder(this)
            .setContent(remoteViews)
            .setContentIntent(getDefalutIntent(Notification.FLAG_AUTO_CANCEL))
             /*設置small icon*/
            .setSmallIcon(R.drawable.ic_launcher)
            /*設置title*/
            .setContentTitle("通知")
            /*設置詳細文本*/
            .setTicker("Your Haven")
            .setContentText("Hello world")
            .setWhen(System.currentTimeMillis())
            .setPriority(Notification.PRIORITY_DEFAULT)// 設置該通知優先級
            .setOngoing(true);

    Notification noty = notifyBuilder.build();
    noty.contentView = remoteViews;
    manager.notify(313, noty);

}
這裡只是添加了一個ImageView和三個TextView,大家可以進一步擴充,例如添加ImageButton,並通過BroadcastReceiver來監聽。
6.最後在寫一個帶進度條指示器的notification吧,到了這裡大家應該理解什麼叫求同存異了吧,哈哈。至於其它的notification,例如FullScreen下的notification或者LockScreen的notification等,都是換湯不換藥,大家只要按需設置相應的屬性就好,具體可以查詢官方文檔。

/**
 * 有進度條的notification
 * @param view
 */
public void Pro_Notification(View view) {

    manager = (NotificationManager) getSystemService(NOTIFICATION_SERVICE);
    notifyBuilder = new NotificationCompat.Builder(this);
    notifyBuilder.setContentTitle("Picture Download")
            .setContentText("Download in progress")
            .setOngoing(true)
            .setSmallIcon(R.drawable.ic_launcher);
// Start a lengthy operation in a background thread
    new Thread(
            new Runnable() {
                @Override
                public void run() {
                    int incr;
                    // Do the "lengthy" operation 20 times
                    for (incr = 0; incr <= 100; incr += 5) {
                        // Sets the progress indicator to a max value, the
                        // current completion percentage, and "determinate"
                        // state
                        notifyBuilder.setProgress(100, incr, false);
                        // Displays the progress bar for the first time.
                        manager.notify(0, notifyBuilder.build());
                        // Sleeps the thread, simulating an operation
                        // that takes time
                        try {
                            // Sleep for 5 seconds
                            Thread.sleep(5 * 1000);
                        } catch (InterruptedException e) {
                            Log.d("NOTIFICATION", "sleep failure");
                        }
                    }
                    // When the loop is finished, updates the notification
                    notifyBuilder.setContentText("Download complete")
                            // Removes the progress bar
                            .setProgress(0, 0, false);
                    manager.notify(213, notifyBuilder.build());
                }
            }
// Starts the thread by calling the run() method in its Runnable
    ).start();

}
大概解釋一下,就是在一個異步線程裡面每隔5秒使notification的process增加5,循環結束後,在重新添加一個notification來顯示下載完成。至於進度還有其他方式設置,這裡就不一一介紹了,實際使用時可以傳入具體的下載進度。
好了,感覺已經寫了好多了,最後來總結一下notification的使用吧。
(一)通過以下幾個步驟就可以獲得一個notification的實現:
1.獲取NotificationManager實例,即獲得狀態通知欄管理權;
 /*實例化NotificationManager以獲取系統服務*/
    manager = (NotificationManager) getSystemService(NOTIFICATION_SERVICE);
2.實例化notification的constructor
notifyBuilder = new NotificationCompat.Builder(this)
3.對notifyBuilder設置各種屬性
 /**
             * 前三個屬性必須設置
             */
            /*設置small icon*/
            .setSmallIcon(R.drawable.ic_launcher)
            /*設置title*/
            .setContentTitle("通知")
            /*設置詳細文本*/
            .setContentText("Hello world")
             /*設置發出通知的時間為發出通知時的系統時間*/
            .setWhen(System.currentTimeMillis())
             /*設置發出通知時在status bar進行提醒*/
            .setTicker("來自問月的祝福")
             /*設置點擊後通知消失*/
            .setAutoCancel(true)
                    /**
                     * 設置
                     notification的默認效果有以下幾種
                     Notification.DEFAULT_ALL:鈴聲、閃光、震動均系統默認。
                     Notification.DEFAULT_SOUND:系統默認鈴聲。
                     Notification.DEFAULT_VIBRATE:系統默認震動。
                     Notification.DEFAULT_LIGHTS:系統默認閃光。
                     */
            .setDefaults(Notification.DEFAULT_VIBRATE)
             /*setOngoing(boolean)設為true,notification將無法通過左右滑動的方式清除
            * 可用於添加常駐通知,必須調用cancle方法來清除
            */
            .setOngoing(true)
             /*設置通知數量的顯示類似於QQ那種,用於同志的合並*/
            .setNumber(2);
4.顯示notification
manager.notify(100, notifyBuilder.build());
(二)一些常用的屬性函數
.setDefaults(int defaults)
用於向通知添加聲音、閃燈和振動效果的最簡單、使用默認(defaults)屬性,具體在上述代碼中有寫到。
.setVibrate(long[] pattern)
用於設置是否開啟震動,true為開啟
.setSound(Uri sound)
用於設置通知鈴聲
.setPriority(int pri)
用於設置優先級,同樣之前有詳細講解
.setOngoing(boolean ongoing)
設置為true則為常駐通知欄的通知類似於墨跡天氣那種的效果。
setProgress(int max, int progress,boolean indeterminate)
用於設置進度的notification中
嗯,今天就寫這些吧,最後附上demo的下載地址。http://download.csdn.net/detail/u010835702/8241469
 android之存儲數據的四大方式
下面詳細解釋這四大方式的特點第一種:文件存儲數據核心原理: Context提供了兩個方法來打開數據文件裡的文件IO流 FileInputStream openFileIn
 Android應用逆向——最好用的兩個無源碼調試器
要逆向分析並修改一個Android應用,首先是對APK進行解包和打包,這一部分網上資料鋪天蓋地,不再贅述了。值得一提的一點就是,如果apktool無法解包或打包的話,可以
 Android開發技巧——定制仿微信圖片裁剪控件
拍照——裁剪,或者是選擇圖片——裁剪,是我們設置頭像或上傳圖片時經常需要的一組操作。上篇講了Camera的使用,這篇講一下
 android中選中菜單的顯示跳轉和隱式跳轉的實例介紹
查了好多資料,現發還是不全,干脆自己整理吧,至少保證在我的做法正確的,以免誤導讀者,也是給自己做個記錄吧!簡介android供給了三種菜單類型,分別為options me