編輯:關於Android編程
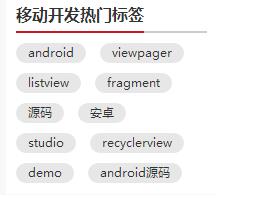
本篇繼續來講自定義ViewGroup,給大家帶來一個實例:FlowLayout。何為FlowLayout,就是控件根據ViewGroup的寬,自動的往右添加,如果當前行剩余空間不足,則自動添加到下一行,所以也叫流式布局。Android並沒有提供流式布局,但是某些場合中,流式布局還是非常適合使用的,比如關鍵字標簽,搜索熱詞列表等,比如下圖:
定義FlowLayout
LayoutParams,onLayout的寫法都和上一篇講WaterfallLayout一模一樣,在此不再贅述了,沒看過的可以參照上一篇Android自定義ViewGroup(二)之WaterfallLayout。
在這裡主要說的是onMeasure方法,注釋見下方:
 @Override
 protected void onMeasure(int widthMeasureSpec, int heightMeasureSpec) {
 super.onMeasure(widthMeasureSpec, heightMeasureSpec);
 // 獲得它的父容器為它設置的測量模式和大小
 int sizeWidth = MeasureSpec.getSize(widthMeasureSpec);
 int sizeHeight = MeasureSpec.getSize(heightMeasureSpec);
 int modeWidth = MeasureSpec.getMode(widthMeasureSpec);
 int modeHeight = MeasureSpec.getMode(heightMeasureSpec);

 int childCount = getChildCount();
 // 如果是wrap_content情況下,記錄寬和高
 int wrapWidth = 0;
 int wrapHeight = 0;
 //記錄每一行的寬度,width不斷取最大寬度
 int lineWidth = 0;
 //每一行的高度,累加至height
 int lineHeight = 0;

 // 遍歷每個子元素
 for (int i = 0; i < childCount; i++) {
 View child = getChildAt(i);
 // 測量每一個child的寬和高
 measureChild(child, widthMeasureSpec, heightMeasureSpec);
 // 得到child的lParams
 LayoutParams lParams = (LayoutParams) child.getLayoutParams();
 // 當前子空間實際占據的寬度
 int childWidth = child.getMeasuredWidth();
 // 當前子空間實際占據的高度
 int childHeight = child.getMeasuredHeight();
 // 如果加上當前child,則超出最大寬度,然後開啟新行
 if (lineWidth + childWidth > sizeWidth) {
 //記錄新行頭一個標簽坐標,為onLayout做准備
 lParams.left = 0;
 lParams.top = wrapHeight + lineHeight + vSpace;
 lParams.right = childWidth;
 lParams.bottom = lParams.top + childHeight;
 //取最大的,注意這裡lineWidth是包括右側hSpace的,需要減掉
 wrapWidth = Math.max(lineWidth - hSpace, childWidth);
 // 重新開啟新行,開始記錄,可以看到行寬包括最右側hSpace
 lineWidth = childWidth + hSpace;
 // 疊加當前高度,同理,加上下側vSpace
 wrapHeight += lineHeight + vSpace;
 // 開啟記錄下一行的高度
 lineHeight = childHeight;
 } else {
 //記錄每一個標簽坐標,為onLayout做准備
 lParams.left = lineWidth;
 lParams.top = wrapHeight;
 lParams.right = lParams.left + childWidth;
 lParams.bottom = lParams.top + childHeight;
 //在本行追加標簽,累加值到lineWidth,lineHeight取最大高度
 lineWidth += childWidth + hSpace;
 lineHeight = Math.max(lineHeight, childHeight);
 }
 // 如果是最後一個
 if (i == childCount - 1) {
 //將當前記錄的最大寬度和當前lineWidth做比較,取較大值
 wrapWidth = Math.max(wrapWidth, lineWidth - hSpace);
 //布局高加上最後一行高
 wrapHeight += lineHeight;
 }
 }
 setMeasuredDimension((modeWidth == MeasureSpec.EXACTLY) ? sizeWidth : wrapWidth, (modeHeight == MeasureSpec.EXACTLY) ? sizeHeight : wrapHeight);
 }
使用FlowLayout
直接看xml吧,一看便知:
<LinearLayout xmlns:android="http://schemas.android.com/apk/res/android"
 xmlns:tools="http://schemas.android.com/tools"
 xmlns:attr="http://schemas.android.com/apk/res/com.hx.flowlayout"
 android:layout_width="match_parent"
 android:layout_height="match_parent"
 android:background="#E1E6F6"
 android:orientation="vertical" >

 <com.hx.flowlayout.FlowLayout
 android:layout_width="match_parent"
 android:layout_height="wrap_content"
 android:layout_margin="10dp"
 attr:hSpace="20"
 attr:vSpace="10">

 <TextView

 android:text="標簽" />

 <TextView

 android:text="Welcome" />

 <TextView

 android:text="IT工程師" />

 <TextView

 android:text="程序猿" />

 <TextView

 android:text="Android" />

 <TextView

 android:text="Java" />

 <TextView

 android:text="ViewGroup" />

 <TextView

 android:text="FlowLayout" />
 </com.hx.flowlayout.FlowLayout>
</LinearLayout>
這裡寫的比較啰嗦,所有TextView都是寫在xml裡面的,當然我們也可以通過Java代碼來動態添加。
再來看看style吧,這裡我們定義了兩種不同的風格,具體見下面:
 <style name="flow_text_style_1">
 <item name="android:layout_width">wrap_content</item>
 <item name="android:layout_height">wrap_content</item>
 <item name="android:background">@drawable/flow_text_bg_1</item>
 <item name="android:textColor">#ffffff</item>
 <item name="android:textSize">16sp</item>
 </style>

 <style name="flow_text_style_2">
 <item name="android:layout_width">wrap_content</item>
 <item name="android:layout_height">wrap_content</item>
 <item name="android:background">@drawable/flow_text_bg_2</item>
 <item name="android:textColor">#4B0082</item>
 <item name="android:textSize">20sp</item>
 </style>
找到background我們再進去看看,這裡使用的是shapeDrawable,之後我會寫一些關於shapeDrawable的文章:
<?xml version="1.0" encoding="utf-8"?>
<shape xmlns:android="http://schemas.android.com/apk/res/android" >
 <solid android:color="#FFFFFF"/>
 <corners android:radius="40dp"/>
 <stroke android:color="#C9C9C9" android:width="2dp"/>
 <padding
 android:bottom="2dp"
 android:left="10dp"
 android:right="10dp"
 android:top="2dp" />
</shape>
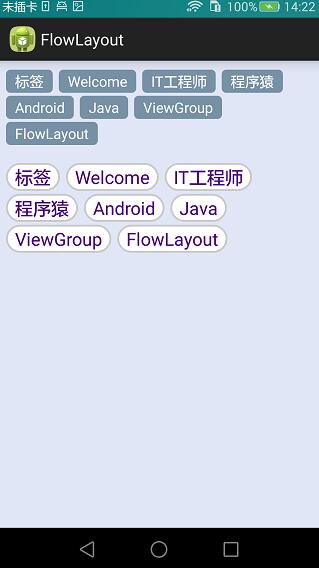
效果圖如下:
源碼下載:http://xiazai.jb51.net/201609/yuanma/Android-FlowLayout(jb51.net).rar
以上就是本文的全部內容,希望對大家的學習有所幫助,也希望大家多多支持本站。
 Android——百度APIstore+Json——獲取新聞頻道+新聞數據
package com.example.jreduch08.util;import android.content.Context;import androi
 [Android]OkHttp的簡單封裝-輔助框架
序言OkHttp 的強大算是毋庸置疑了;OkHttp 基本在網絡層能完成任何事情,適用任何情況;正因為如此 OkHttp 每次構建一個請求的時候不得不寫大量的代碼來完成相
 Android編程實現3D旋轉效果實例
本文實例講述了Android編程實現3D旋轉效果的方法。分享給大家供大家參考,具體如下:下面的示例是在Android中實現圖片3D旋轉的效果。實現3D效果一般使用Open
 Android開發之Location用法實例分析
本文實例講述了Android開發中Location用法。分享給大家供大家參考,具體如下:Location 在Android 開發中還是經常用到的,如通過經緯度獲取天氣,根