編輯:關於Android編程
本文實例講述了Android編程Widget創建與使用方法。分享給大家供大家參考,具體如下:
Android reference中有關於如何建立一個Widget的詳細方法,這裡簡要說明一下,詳情可以查看Android SDK中自帶的reference。
要建立一個Widget,分為如下幾個步驟:
(1) 創建一個類,讓其繼承類AppWidgetProvider,在AppWidgetProvider中有許多方法,例如onDelete(Context,int[]),onEnable(Context)等,但一般情況下我們只是覆寫onUpdate(Context,AppWidgetManager,int[])方法。在該方法中,我們啟動後台服務的類,一般是啟動Thread類或者Android中的Service類。在該類中我們進行從服務器端獲得數據並進行處理並在Widget中顯示。
(2) 在你的AndroidMenifest.xml中添加一個receiver標簽,讓其指向你的AppWidgetProvider子類。內容如下:
<receiver android:name="JiwaiWidget"
android:label="@string/app_name"
android:icon="@drawable/jiwai">
<intent-filter>
<action android:name="android.appwidget.action.APPWIDGET_UPDATE" />
</intent-filter>
<meta-data android:name="android.appwidget.provider"
      android:resource="@xml/info" />
</receiver>
對上面的代碼進行解釋:
第一行指定該Widget的接收者是JiwaiWidget,即你建立的AppWidgetProvider子類;
第二行指定該Widget的標簽名稱,值為value目錄下string.xml中的app_name值;
第三行指定該Widget的圖標,值為drawable目錄下jiwai圖片;
第四行-第六行是采用Android文檔中提供的;
第七行指定該Widget的描述者信息,該描述著中定義了Widget的相關信息,如該Widget的寬度、長度、自動更新的間隔時間等信息,該描述位於xml目錄下的info.xml中。
(3) 編寫你的Widget的provider文件信息(本例中是xml/info.xml)
<appwidget-provider xmlns:android="http://schemas.android.com/apk/res/android"
  android:minWidth="200dp"
  android:minHeight="90dp"
  android:updatePeriodMillis="43200000"
  android:initialLayout="@layout/appwidget"
  android:configure="com.lawrenst.jiwai.JiwaiConfigure">
</appwidget-provider>
其中android:updatePeriodMillis是自動更新的時間間隔,android:initialLayout是Widget的界面描述文件。Android:configure是可選的,如果你的Widget需要在啟動時先啟動一個Activity,則需要設定該項為你的Activity。本例中,需要你的嘀咕帳號和密碼,所以應先顯示一個Activity,輸入你的賬號和密碼,然後將得到的信息在你的Widget中顯示。
(4) 在layout目錄下編寫appwidget.xml文件,配置你的Widget的界面信息:
<?xml version="1.0" encoding="UTF-8"?>
<LinearLayout xmlns:android="http://schemas.android.com/apk/res/android"
android:layout_width="fill_parent"
android:layout_height="wrap_content"
android:orientation="vertical"
android:id="@+id/widget"
android:background="@drawable/title_a">
<LinearLayout android:layout_width="fill_parent"
android:orientation="horizontal"
android:layout_height="wrap_content"
android:background="@drawable/title">
<TextView android:id="@+id/username_display"
android:text
android:layout_width="wrap_content"
android:layout_height="fill_parent"
android:textColor="#ffffff"
android:textSize="15px"
android:gravity="left|center_vertical"
android:paddingLeft="6px" />
</LinearLayout>
<LinearLayout android:orientation="vertical"
android:layout_width="fill_parent"
android:layout_height="fill_parent">
<TextView android:id="@+id/text1"
android:layout_width="fill_parent"
android:textColor="#ffffff"
android:textSize="12px"
android:gravity="center_vertical|left"
android:paddingLeft="6px"
android:layout_height="30px">
</TextView>
<TextView android:id="@+id/text2"
android:textColor="#ffffff"
android:layout_height="30px"
android:gravity="center_vertical|left"
android:textSize="12px"
android:paddingLeft="6px"
android:layout_width="fill_parent">
</TextView>
</LinearLayout>
</LinearLayout>
該Widget中包括三個Textview,兩個用來顯示叽歪的信息,一個用來顯示用戶名,上述代碼比較簡單,故不做解釋。
(5) 由於需要一個Acvivity對象用來輸入賬戶信息,所以在layout目錄下新建一個login.xml,作為Activity的配置文件:
<?xml version="1.0" encoding="utf-8"?>
<LinearLayout xmlns:android="http://schemas.android.com/apk/res/android"
  android:orientation="vertical"
  android:layout_width="fill_parent"
  android:layout_height="fill_parent"
  >
<TextView android:layout_width="fill_parent"
android:layout_height="wrap_content"
android:text="@string/hello"
android:textColor="#ff8c00"
android:capitalize="characters"
android:text />
<LinearLayout android:orientation="horizontal"
android:layout_width="fill_parent"
android:layout_height="wrap_content"
android:gravity="center_horizontal">
<TextView android:layout_width="wrap_content"
android:layout_height="wrap_content"
android:text="@string/user"
android:textColor="#ff8cff"
android:capitalize="characters" />
<EditText android:id="@+id/username"
android:layout_width="200px"
android:layout_height="wrap_content" />
</LinearLayout>
<LinearLayout android:orientation="horizontal"
android:layout_width="fill_parent"
android:layout_height="wrap_content"
android:gravity="center_horizontal">
<TextView android:layout_width="wrap_content"
android:layout_height="wrap_content"
android:text="@string/code"
android:textColor="#ff8cff"
android:capitalize="characters" />
<EditText android:id="@+id/password"
android:layout_width="200px"
android:layout_height="wrap_content"
android:password="true" />
</LinearLayout>
<LinearLayout android:orientation="horizontal"
android:layout_width="fill_parent"
android:layout_height="wrap_content"
android:gravity="center_horizontal">
<Button
  android:id="@+id/submit"
  android:layout_width="wrap_content"
  android:layout_height="wrap_content"
  android:text="Submit"
  />
</LinearLayout>
</LinearLayout>
有兩個EditText用來輸入用戶名和密碼,另外還有一個Button對象。
准備工作差不多了,下面就可以寫代碼了。
這裡再分享一個案例供大家參考:http://www.jb51.net/books/40184.html
更多關於Android相關內容感興趣的讀者可查看本站專題:《Android基本組件用法總結》、《Android開發入門與進階教程》、《Android資源操作技巧匯總》、《Android視圖View技巧總結》及《Android控件用法總結》
希望本文所述對大家Android程序設計有所幫助。
 Android編程實現自定義PopupMenu樣式示例【顯示圖標與設置RadioButton圖標】
本文實例講述了Android編程實現自定義PopupMenu樣式。分享給大家供大家參考,具體如下:PopupMenu是Android中一個十分輕量級的組件。與PopupW
 Android Framework是怎麼啟動的?
Framework運行環境是怎樣的?安卓系統啟動過程其實是建立一套系統運行需要的環境。Framework運行環境如下:安卓系統中運行的第一個Dalvik虛擬機叫做zygo
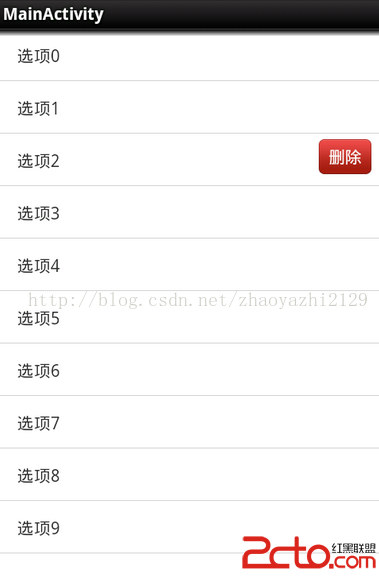 趙雅智_AndroidUI_listview的item滑動刪除效果
package com.example.listsildedel; import java.util.ArrayList; import java.util.List;
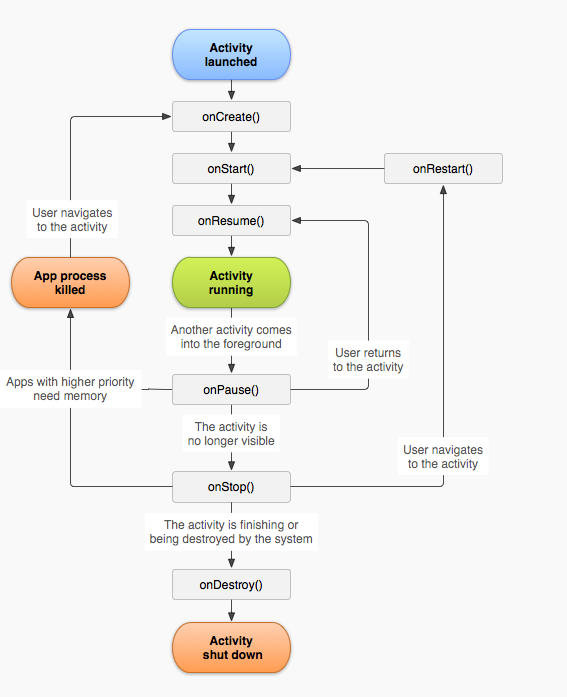 Activity數據保存探索
在開發中發現一個問題:當一個我通過Intent開啟一個前面已經打開的activty的界面時,新打開的activity的狀態會丟失。當時,當我直接按home減將acitvi