編輯:關於Android編程
最近項目需要,需要做一個BMI指數的指示條,先上效果圖:
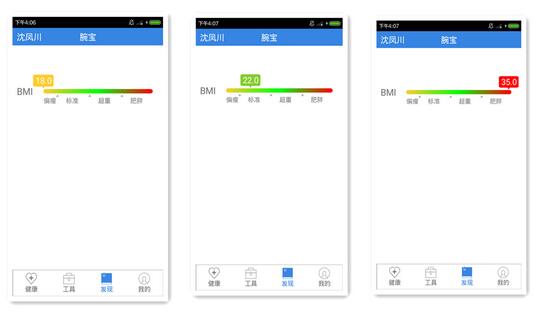
BMI指數從18到35,然後上面指示條的顏色會隨著偏移量的變化而改變,數字顯示當前的BMI指數,下面的BMI標准也是根據不同數值的范圍來判斷的。考慮到這個view的特殊性,最後采用的是自定義的view來完成的。
1.頁面布局:
 <LinearLayout
  android:layout_width="fill_parent"
  android:layout_height="100dp"
  android:layout_marginLeft="5dp"
  android:layout_marginRight="5dp"
  android:layout_marginTop="50dp"
  android:background="@color/white"
  android:orientation="horizontal" >

  <TextView

   android:layout_marginTop="@dimen/login_hei"
   android:text="@string/bmi_text"
   android:textColor="@color/gray"
   android:textSize="@dimen/login_edit_border_margin" />

  <com.jxj.jwotchhelper.view.NewBmiView
   android:id="@+id/bmiview"
   android:layout_width="fill_parent"
   android:layout_height="fill_parent" />
 </LinearLayout>
左邊是BMI文字,右邊是自定義的view,沒啥說的,下面是view的具體過程:
2.代碼實現:
新建一個NewBmiView類,並且繼承自view類,然後添加構造方法;
public class NewBmiView extends View {

 /** 分段顏色 */
 private static final int[] SECTION_COLORS = { Color.rgb(255, 204, 47), Color.GREEN,
   Color.RED };
 /** 畫筆 */
 private Paint mPaint;
 private Paint textPaint;
 private Paint drawablePaint;
 private Paint drawableBMIPaint;
 private Paint bmiTextpaint;
 private int bmiwidth, mWidth, mHeight, widthSum;
 private double value;
 private double i;
 private double bmi;

 private float valueWidth;
 private String bmiText;

 // 定義計算顏色的參數
 private int x, y, z;

 public NewBmiView(Context context) {

  super(context);
  initviews(context);
 }

 public NewBmiView(Context context, AttributeSet attrs) {
  super(context, attrs);
  initviews(context);
 }

 public NewBmiView(Context context, AttributeSet attrs, int defStyleAttr) {
  super(context, attrs, defStyleAttr);
  initviews(context);
 }

 private void initviews(Context context) {
 }
然後就是重寫onMeasure與onDraw這兩個方法,通過onMeasure這個方法獲取到了view的寬高,關於具體設置,可以參考鴻洋大神的相關說明:
http://www.jb51.net/article/86061.htm
protected void onMeasure(int widthMeasureSpec, int heightMeasureSpec) {
  int widthSpecMode = MeasureSpec.getMode(widthMeasureSpec);
  int widthSpecSize = MeasureSpec.getSize(widthMeasureSpec);
  int heightSpecMode = MeasureSpec.getMode(heightMeasureSpec);
  int heightSpecSize = MeasureSpec.getSize(heightMeasureSpec);
  if (widthSpecMode == MeasureSpec.EXACTLY
    || widthSpecMode == MeasureSpec.AT_MOST) {
   widthSum = widthSpecSize;
  } else {
   widthSum = 0;
  }
  if (heightSpecMode == MeasureSpec.AT_MOST
    || heightSpecMode == MeasureSpec.UNSPECIFIED) {
   mHeight = dipToPx(15);
  } else {
   mHeight = heightSpecSize;
  }
  setMeasuredDimension(widthSum, mHeight);
 }
然後重點就是onDraw這個方法了:
// 畫自定義的漸變條
  mPaint = new Paint();
  // 去除鋸齒
  mPaint.setAntiAlias(true);
  // 自定義圓角的弧度
  int round = mHeight / 20;
  // 新建矩形
  RectF rectBg = new RectF(bmiwidth, mHeight - (mHeight * 1 / 2), mWidth
    + bmiwidth, mHeight - (mHeight * 2 / 5));
  // 設置漸變色
  // CLAMP重復最後一個顏色至最後
  // MIRROR重復著色的圖像水平或垂直方向已鏡像方式填充會有翻轉效果
  // REPEAT重復著色的圖像水平或垂直方向
  LinearGradient shader = new LinearGradient(bmiwidth, mHeight
    - (mHeight * 1 / 2), mWidth + bmiwidth, mHeight
    - (mHeight * 2 / 5), SECTION_COLORS, null,
    Shader.TileMode.MIRROR);
  mPaint.setShader(shader);
  // rect:RectF對象。x方向上的圓角半徑。ry:y方向上的圓角半徑。paint:繪制時所使用的畫筆。
  canvas.drawRoundRect(rectBg, round, round, mPaint);

  // 畫下面的小箭頭
  drawablePaint = new Paint();
  drawablePaint.setAntiAlias(true);
  Bitmap arrowBitmap = BitmapFactory.decodeResource(getResources(),
    R.drawable.arrow_up);
  canvas.drawBitmap(arrowBitmap, mWidth * 2 / 17 + bmiwidth, mHeight
    - (mHeight * 2 / 5) + 5, drawablePaint);
  canvas.drawBitmap(arrowBitmap, mWidth * 7 / 17 + bmiwidth, mHeight
    - (mHeight * 2 / 5) + 5, drawablePaint);
  canvas.drawBitmap(arrowBitmap, mWidth * 12 / 17 + bmiwidth, mHeight
    - (mHeight * 2 / 5) + 5, drawablePaint);

  // 畫下方的文字
  String text = "偏瘦";
  Rect textBounds = new Rect();
  textPaint = new Paint();
  textPaint.setAntiAlias(true);
  textPaint.setColor(Color.GRAY);
  textPaint.setTextSize(30);
  // 獲取字體的高寬
  textPaint.getTextBounds(text, 0, text.length(), textBounds);
  float textWidth = textBounds.width();
  float textHeight = textBounds.height();

  canvas.drawText("偏瘦", (mWidth * 2 / 17) / 2 - textWidth / 2 + bmiwidth,
    mHeight * 7 / 10 + textHeight / 2 + 10, textPaint);
  canvas.drawText("標准", (mWidth * 2 / 17) + (mWidth * 5 / 17) / 2
    - textWidth / 2 + bmiwidth, mHeight * 7 / 10 + textHeight / 2
    + 10, textPaint);
  canvas.drawText("超重", (mWidth * 7 / 17) + (mWidth * 5 / 17) / 2
    - textWidth / 2 + bmiwidth, mHeight * 7 / 10 + textHeight / 2
    + 10, textPaint);
  canvas.drawText("肥胖", (mWidth * 12 / 17) + (mWidth * 5 / 17) / 2
    - textWidth / 2 + bmiwidth, mHeight * 7 / 10 + textHeight / 2
    + 10, textPaint);

  // 畫上方偏移的小方塊
  drawableBMIPaint = new Paint();
  drawableBMIPaint.setAntiAlias(true);
  // 設置顏色

  // 通過BMI來RGB計算顏色
  i = (value - 18) * (34 / 17);
  if (i >= 0 && i <= 17) {
   x = (int) ((17 - i) * (255 / 17));
   y = 204;
   z = 47;

  }
  if (i > 17 && i <= 34) {
   x = (int) ((i - 17) * (255 / 17));
   y = (int) ((34 - i) * (255 / 17));
   z = 0;
  }

  drawableBMIPaint.setColor(Color.rgb(x, y, z));
  System.out.println("顏色值為" + String.valueOf(x) + String.valueOf(y)
    + String.valueOf(z));

  canvas.drawRect(getvalue(), mHeight / 6, getvalue() + bmiBitmap.getWidth(),
    bmiBitmap.getHeight()+mHeight / 6, drawableBMIPaint);
  System.out.println("偏移量為" + getvalue());
  canvas.drawBitmap(bmiBitmap, getvalue(), mHeight / 6, drawablePaint);

  // 畫上方偏移的小方塊裡面的文字
  String bmitext = "40.0";
  Rect bmitextBounds = new Rect();
  bmiTextpaint = new Paint();
  bmiTextpaint.setAntiAlias(true);
  bmiTextpaint.setTextSize(35);
  bmiTextpaint.setColor(Color.WHITE);
  // 獲取字體的高寬
  bmiTextpaint.getTextBounds(bmitext, 0, bmitext.length(), bmitextBounds);
  canvas.drawText(bmiText, getvalue() - (bmitextBounds.width() / 2)
    + bmiwidth, mHeight / 3 + (bmitextBounds.height() / 3),
    bmiTextpaint);
其中需要注意的是,這裡小方塊的顏色值我是根據BMI值大小,算出RGB三原色的漸變值,沒有找到系統自帶渲染漸變條的方法中,提供的顏色值,所以就用這種方法計算出來,會有一定得誤差。
然後就是關於Textview,因為自帶寬高,所以在繪制Textview的時候,需要考慮寬高再繪制。
通過set方法傳遞參數
public void setBmi(double bmi) {
  this.value = bmi;
  // 設置顏色
  if (value < 18) {
   this.value = 18;
  } else if (value > 35) {
   this.value = 35;
  }
  invalidate();
 }

 public void setBmiText(String bmiText) {
  this.bmiText = bmiText;
 }
最後就是在activity中應用了:
bmiview= (NewBmiView) getView().findViewById(R.id.bmiview);
  //將BMI指數傳遞過去
  bmiview.setBmi(35);
  bmiview.setBmiText("35.0");
然後就達到了預期的效果,代碼有點亂~
以上就是本文的全部內容,希望對大家的學習有所幫助,也希望大家多多支持本站。
 Android簡易音樂播放器實現代碼
本文實例為大家分享了Android音樂播放器的具體代碼,供大家參考,具體內容如下1.播放項目內的音樂package com.thm.g150820_android26_p
 android圖片加載庫Glide
什麼是Glide?Glide是一個加載圖片的庫,作者是bumptech,它是在泰國舉行的google 開發者論壇上google為我們介紹的,這個庫被廣泛的運用在googl
 RecyclerView的使用之多種Item加載布局
本文給大家介石介紹下如何利用RecyclerView實現多Item布局的加載,多Item布局的加載的意思就是在開發過程中List的每一項可能根據需求的不同會加載不同的La
 QQ火炬好友火炬排行榜怎麼看 你是第幾位火炬手呢
你是qq火炬手嗎?在這個騰訊QQ為巴西裡約奧運會推出的火炬傳遞活動中你是第幾位火炬手了呢?QQ火炬好友火炬排行榜怎麼看?下面小編就來教教你!QQ火炬好友火炬