編輯:關於Android編程
Android Studio missing Subversion plugin
Please make sure that the “SubversionIntegration” plugin is enabled in Preferences > Plugins
檢查下是否多次引用同一個jar包
以下情況
1. module下jar包版本不同
同一個module 在libs中包含樂.jar,而在src下又把相應的source頁加入了
gradle中是否重復編譯,
比如
已經加了compile fileTree(include: [‘*.jar’], dir: ‘libs’)
然而在下面又加一句compile files(‘libs/xxx.jar’)
參考 Error:Execution failed for task ‘:app:dexDebug’. com.android.ide.common.process.ProcessException
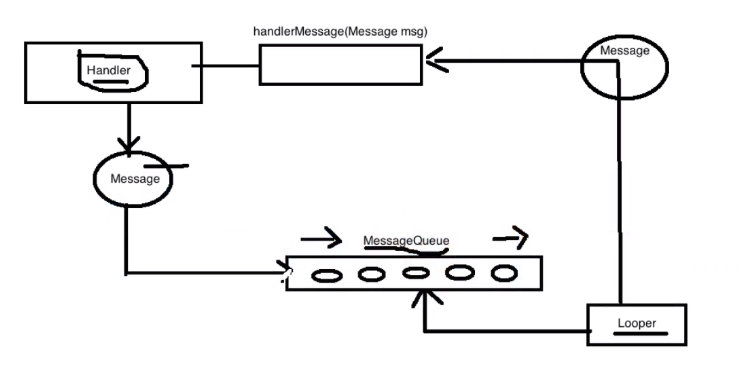
在使用Handler更新UI的時候public class SampleActivity extends Activity {
private final Handler mLeakyHandler = new Handler() {
@Override
public void handleMessage(Message msg) {
// TODO
}
}
}會包上述warning 會導致內存洩露
原因在於匿名內部類handler持有activity的引用,當activity finish後 handler還沒有處理完,導致activity的view和resource資源不能得到釋放,導致內存洩露
針對這個問題google官方給出了正確的做法
通過靜態內部類 包含activity的弱引用來處理。
public class SampleActivity extends Activity {
/**
* Instances of static inner classes do not hold an implicit
* reference to their outer class.
*/
private static class MyHandler extends Handler {
private final WeakReference mActivity;
public MyHandler(SampleActivity activity) {
  mActivity = new WeakReference(activity);
}

@Override
public void handleMessage(Message msg) {
  SampleActivity activity = mActivity.get();
  if (activity != null) {
    // ...
  }
}
}
private final MyHandler mHandler = new MyHandler(this);
/**
* Instances of anonymous classes do not hold an implicit
* reference to their outer class when they are “static”.
*/
private static final Runnable sRunnable = new Runnable() {
@Override
public void run() { }
};
@Override
protected void onCreate(Bundle savedInstanceState) {
super.onCreate(savedInstanceState);
// Post a message and delay its execution for 10 minutes.
mHandler.postDelayed(sRunnable, 60 * 10 * 1000);

// Go back to the previous Activity.
finish();
}
}
參考android handler的警告Handler Class Should be Static or Leaks Occur
For Windows/Linux, you can go to File -> Settings -> Editor -> General -> Auto Import -> Java and make the following changes:

change Insert imports on paste value to All

markAdd unambigious imports on the fly option as checked
On a Mac, do the same thing in Android Studio -> Preferences
參考What is the shortcut to Auto import all in Android Studio?
/home/cenuser/android/android-ndk-r7b/build/core/build-local.mk:130: *** Android NDK: Aborting    .  Stop.

cd到jni目錄。或者 ndk-build -C your_project_path
Make a bundle object and insert your data (in this example your Category object). Be careful, you can't pass this object directly into the bundle, unless it's serializable. I think it's better to build your object in the fragment, and put only an id or something else into bundle. This is the code to create and attach a bundle:

Bundle args = new Bundle();
args.putLong("key", value);
yourFragment.setArguments(args);
After that, in your fragment access data:

Type value = getArguments().getType("key");
That's all.
find -type d -name '.svn' -exec rm -rfv {} \;

參考 http://blog.csdn.net/zhaoyu7777777/article/details/9445717
git配置使用,已經把公鑰發給發給服務端,在終端命令行也是可以正常的pull push,但是在androidstudio push或者pull的時候確出現上述錯誤
解決方式
setting –> Version Control –>Git ,In the SSH executable dropdown, choose Native
keytool -list -keystore xxx.keystore
eg:查看debug.keystore
keytool -list -keystore ~/.android/debug.keystore
通過brew安裝,相當於ubuntu中得apt-get
首先安裝brew
curl -LsSf http://github.com/mxcl/homebrew/tarball/master | sudo tar xvz -C/usr/local –strip 1
然後就可以使用brew安裝軟件了
比如 使用brew安裝軟件 brew install wget
java.io.IOException: Can’t read [/libs/xxx.jar] (No such file or directory)
http://stackoverflow.com/questions/26028171/android-studio-proguard-java-io-ioexception-bin-classes-no-such-file-or-d
解答 proguard-android.txt文件中不用在指定 -injars, -outjars, or -libraryjars or libs.
The Android Gradle plugin already specifies all input and output for you, so you must not specify -injars, -outjars, or -libraryjars.
Moreover, the file proguard-android.txt in the Android SDK specifies all generic Android settings for you, so you shouldn’t specify them again.
Essentially, your file proguard-rules.txt can be empty, except for any application-specific settings to make sure any reflection continues to work
解決方法 :
第一步:
android:button=”@null”這條語句將原來系統的RadioButton圖標給隱藏起來。
第二步:
android:drawableRight=”@android:drawable/btn_radio”這條語句
參考 http://blog.csdn.net/sunnyfans/article/details/7901592
眾所周知,在跨程序的工程中,統一編碼是至關重要的,而目前最普遍的則是統一采用“utf8”編碼方案。
但是在采用utf8方案的時候,請注意編輯器的自作聰明。
比如editplus。
原因就在於某些編輯器會往utf8文件中添加utf8標記(editplus稱其為簽名),它會在文件開始的地方插入三個不可見的字符(0xEF 0xBB 0xBF,即BOM),它的表示的是 Unicode 標記(BOM)。
參考 http://hyl198611.iteye.com/blog/1336981
解決方式,需要remount /system
mount -o remount,rw /system
XXX\src\main\assets
public class MainActivity extends Activity {


    private Toast toast;

    @Override
    protected void onCreate(Bundle savedInstanceState) {
        super.onCreate(savedInstanceState);
        setContentView(R.layout.activity_main);
        toast = Toast.makeText(getApplicationContext(), "確定退出?", 0);

    }
    public void onBackPressed() {
        quitToast();
    }

    private void quitToast() {
        if(null == toast.getView().getParent()){
            toast.show();
        }else{
            System.exit(0);
        }
    }
}
或者
private Toast toast;
 protected void onCreate(Bundle savedInstanceState) {
    ...
         toast = Toast.makeText(this, "再按一次退出應用", Toast.LENGTH_SHORT);
        toast.setGravity(Gravity.BOTTOM, 0, ConversionUtil.dip2px(this, 150));
 }
@Override
public void onBackPressed() {
    if (doubleBackToExitPressedOnce) {
        if(toast!=null){
            toast.cancel();
        }
        super.onBackPressed();
        return;
    }

    this.doubleBackToExitPressedOnce = true;
    toast.show();

    new Handler().postDelayed(new Runnable() {

        @Override
        public void run() {
            doubleBackToExitPressedOnce=false;
        }
    }, 2000);
}
參考 Android關於雙擊退出應用的問題
android.view.InflateException: Binary XML file line #17: Error inflating class android.support.design.internal.NavigationMenuView
Caused by: java.lang.reflect.InvocationTargetException
Caused by: android.content.res.Resources$NotFoundException: Resource is not a Drawable (color or path): TypedValue{t=0x2/d=0x7f0100c5 a=-1}
You need to use a Theme.AppCompat theme (or descendant) with this activity.
解決方法 :使用NavigationMenuView的Activity【一般都是mainActivity】繼承自AppCompatActivity,並且修改AndroidManifest.xml中對應activity的theme,使用繼承自@style/Theme.AppCompat的主題。
public class AccessKeyValueOfHashMap {
        public static void main(String[] args) {
                // Create a Empty HashMap
                HashMap obHashMap = new HashMap();
                // Put values in hash map
                obHashMap.put("AB", "1");
                obHashMap.put("EF", "2");
                obHashMap.put("Gh", "3");
                obHashMap.put("CD", "4");
                //Store entry (Key/Value)of HashMap in set
                Set mapSet = (Set) obHashMap.entrySet();
                //Create iterator on Set
                Iterator mapIterator = mapSet.iterator();
                System.out.println("Display the key/value of HashMap.");
                while (mapIterator.hasNext()) {
                        Map.Entry mapEntry = (Map.Entry) mapIterator.next();
                        // getKey Method of HashMap access a key of map
                        String keyValue = (String) mapEntry.getKey();
                        //getValue method returns corresponding key's value
                        String value = (String) mapEntry.getValue();
                        System.out.println("Key : " + keyValue + "= Value : " + value);
                }
        }
}
        android:imeOptions="actionSend"
        android:inputType="text"
去掉下劃線只需把背景設置成為“@null”,
如果想設為其他樣式也是設置背景
latest version of the NDK (right now it's r10e)
Application.mk
APP_ABI := armeabi arm64-v8a armeabi-v7a x86 mips
You can fix this cleanly with a single line in Application.mk (docs):

APP_CFLAGS += -DSTDC_HEADERS
This has been updated to reflect the release of API 21, Lollipop. Be sure to download the latest SDK.

In one of my modules I had the following in build.gradle:

dependencies {
    compile 'com.android.support:support-v4:+'
}
Changing this to

dependencies {
    // do not use dynamic updating.
    compile 'com.android.support:support-v4:21.0.0'
}
fixed the issue.
參考Manifest merger failed : uses-sdk:minSdkVersion 14
修改了build.gradle中的gradle
也要修改gradle-wrapper.properties
例如:
build.gradle
  dependencies {
        classpath 'com.android.tools.build:gradle:1.2.3'
    }
    gradle-wrapper.properties
  distributionUrl=https\://services.gradle.org/distributions/gradle-2.4-all.zip
android {
    compileSdkVersion 21
    buildToolsVersion "21.1.0"

    defaultConfig {
        ...
        minSdkVersion 14
        targetSdkVersion 21
        ...

        // Enabling multidex support.
        multiDexEnabled true
    }
    ...
}

dependencies {
  compile 'com.android.support:multidex:1.0.0'
}
http://stackoverflow.com/questions/25477860/error-inflating-class-android-support-v7-widget-recyclerview
http://stackoverflow.com/questions/11753719/how-do-i-properly-extend-a-layout-class
http://stackoverflow.com/questions/6056564/installation-error-install-parse-failed-manifest-malformed
I was having this error because i had capital letters in my package name like this
Com.Example.packagename
after i had changed it to something like
com.example.packagename
it was solved
RelativeLayout中存在循環的相關
首先正確使用 google的multipartdex
修改Gradle,導入’com.android.support:multidex:1.0.0’,打開multiDexEnabled;
android {
    compileSdkVersion 21
    buildToolsVersion "21.1.0"

    defaultConfig {
        ...
        minSdkVersion 14
        targetSdkVersion 21
        ...

        // Enabling multidex support.
        multiDexEnabled true
    }
    ...
}

dependencies {
  compile 'com.android.support:multidex:1.0.0'
}
修改Application.兩種方法:
1) 直接把Application替換成MultiDexApplication
...
2) 在原來的Application中修改調用MultiDex.install(this);
public class HelloMultiDexApplication extends Application {
    @Override
    public void onCreate() {
        super.onCreate();
    }

    @Override
    protected void attachBaseContext(Context base) {
        super.attachBaseContext(base);
        MultiDex.install(this);
    }
}
如果做了上面處理,依舊NoClassDefFound error 通過如下方式處理:
一些在二級Dex加載之前,可能會被調用到的類(比如靜態變量的類),需要放在主Dex中.否則會ClassNotFoundError.
通過修改Gradle,可以顯式的把一些類放在Main Dex中.
參考Android 分Dex (MultiDex)
sudo apt-get install libc6:i386 libncurses5:i386 libstdc++6:i386 lib32z1
Android TabLayout,當tab總寬度少於一屏時候,擴展為屏幕寬度展示.當tab總寬度大於一屏時,滾動顯示
Tab gravity only effects MODE_FIXED.

One possible solution is to set your layout_width to wrap_content and layout_gravity to center_horizontal:


If the tabs are smaller than the screen width, the TabLayout itself will also be smaller and it will be centered because of the gravity. If the tabs are bigger than the screen width, the TabLayout will match the screen width and scrolling will activate.
參考Android Support Design TabLayout: Gravity Center and Mode Scrollable
目前采用的方案是,在AndroidManifest.xml文件中配置
在app的build.gradle文件中配置
android{
 //用於生成不同渠道號
    productFlavors {
        wandoujia {}
        baidu {}
        yingyongbao{}
        ...

    }

    productFlavors.all {
        flavor -> flavor.manifestPlaceholders = [UMENG_CHANNEL_VALUE: name]
    }

}
這樣編譯時會生成對應的渠道包apk.現在問題來了,如果有幾十個渠道,會生成對應幾十個apk包.打包編譯一個apk一般需要1分鐘左右(和電腦配置有關).那麼打包幾十個要幾十分鐘的時間.確實挺費時間的.那麼有沒有好的方式吶?
當然是有的
我們可以采用如下方案處理.通過文件配置只需要生成一個apk包
此種方法是需要創建文件的。
我們在寫完我們的代碼之後,在app/src下面,分別創建和main同級目錄的文件夾umeng, wandoujia, yingyongbao,這三個文件夾裡面都各只有一個AndroidManifest.xml文件,文件只需要如下:
[plain] view plain copy 在CODE上查看代碼片派生到我的代碼片


注意,上面的value的值要和你的渠道名所對應。比如wandoujia裡面要對應為你豌豆莢上的渠道名(如WANDOUJAI)。
然後在你的build.gradle的android{}節點裡面,添加productFlavors節點,代碼如下:
[plain] view plain copy 在CODE上查看代碼片派生到我的代碼片
android {
    // 這裡是你的其他配置

    productFlavors{
        umeng{  }
        wandoujai {  }
        yingyongbao{  }
    }
    // 你的其他配置
}
注意這裡的flavors的名字要和你的文件夾的名字對應。這樣配置之後,構建的就是多渠道的APK了。
有些模擬器比如genymotion自帶了tcpdump,如果沒有的話,需要下載tcpdump:
http://www.strazzere.com/android/tcpdump
把tcpdump push到/data/local下,抓包命令:
Linux抓包工具tcpdump詳解
很多開發者服務都需要綁定簽名信息,用下面的命令可以查看簽名:
keytool -list -v -keystore release.jks

這個一般用於提示信息對話框,如果文字是一行就居中,多行就居左。
在TextView外套一層wrap_content的ViewGroup即可簡單實現:

網上一大堆setCompoundDrawables()方法無效不顯示的問題,然後解決方法是setBounds,需要計算大小…
不用這麼麻煩,用setCompoundDrawablesWithIntrinsicBounds()這個方法最簡單!
以前做ROM的時候經常碰到一些第三方軟件(某音樂APP)下載了新文件或刪除文件之後,但是媒體庫並沒有更新,因為這個是需要第三方軟件主動觸發。

大家都知道,跑monkey的參數設置有一些要注意的地方,比如太快了不行不切實際,太慢了也不行等等,這裡給出一個參考:
一邊跑monkey,一遍抓log吧。

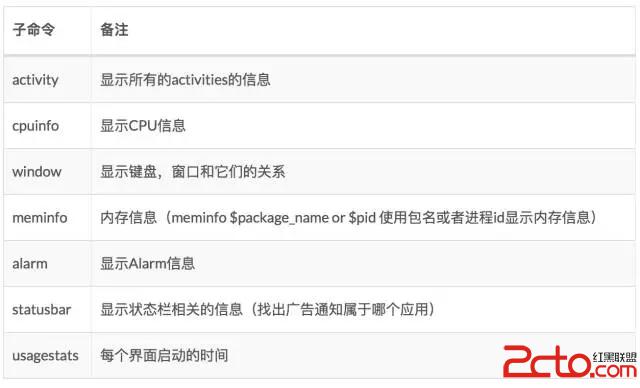
dumpsys可以查看系統服務和狀態,非常強大,可通過如下查看所有支持的子命令:

這裡列舉幾個稍微常用的:
 vczlv+K74dTayta7+sb0tq+jrFNEv6iy5bDOtcTH6b/2z8K9+NDQyKvFzMmow+ijrLK7ysfKtcqxtcS2+MfStPq827HIvc+086Osy/nS1LWluPbOxLz+tcTLotDCutzT0LHY0qqhozwvcD4NCjxwPteiWzI3OC0yODTAtNS009pdoaE8YnIgLz4NCjxhIGhyZWY9"https://mp.weixin.qq.com/s?__biz=MzA4MjU5NTY0NA==&mid=404388098&idx=1&sn=8bbbba7692dca68cdda2212dec4d86c0&scene=1&srcid=0320gXPloap70ixGeYnNUaAW&key=710a5d99946419d972fe638b34e38edcf7064c302f8526f10b927c7e27886585b83b5b60bc342db482d2a7846e24c284&ascene=0&uin=MTYzMjY2MTE1&devicetype=iMac+MacBookPro10%2C1+OSX+OSX+10.11.3+build%2815D21%29&version=11020201&pass_ticket=pvdhfR4lRer%2FtYDsP5cnFux5OK0GM%2FUQMgt5TOvHlpQ%3D">你應該知道的那些Android小經驗
比如:
<code class="language-java hljs "><!--{cke_protected}{C}%3C!%2D%2D%3Fxml%20version%3D%221.0%22%20encoding%3D%22utf-8%22%3F%2D%2D%3E-->
<relativelayout xmlns:android="http://schemas.android.com/apk/res/android" xmlns:tools="http://schemas.android.com/tools" android:id="@+id/rootView" android:layout_width="match_parent" android:layout_height="match_parent" android:gravity="center">

    <progressbar android:id="@+id/progress_loading" android:layout_width="75dp" android:layout_height="60dp">

    <textview android:id="@+id/tv_reload" android:layout_width="wrap_content" android:layout_height="wrap_content" android:background="@android:color/transparent" android:src="@drawable/refresh_big" android:scaletype="centerInside" android:visibility="gone" tools:text="點我,重新加載" tools:visibility="visible">
</textview></progressbar></relativelayout>
</code>
加填充xml文件時,TextView是隱藏的,但又想在xml中直觀的看到它顯示後的整體效果.借助xmlns:tools=”http://schemas.android.com/tools” 完美實現.
參考android中xml tools屬性詳解
Spellchecker inspection helps locate typos and misspelling in your code, comments and literals, and fix them in one click
android studio對於錯誤拼寫/不識別的英文單詞,給予波浪提示
選中單詞,單擊鼠標右鍵 spelling
Save ‘xxx’ to dictionary..
Package names are written in all lower case to avoid conflict with the names of classes or interfaces.
包名小寫,避免和類名或接口名沖突
android {
    defaultConfig {
        ndk {
            moduleName "your_module_name"
            ldLibs "log"
        }
    }
}
 Android網絡編程(三)Volley用法全解析
相關文章Android網絡編程(一)HTTP協議原理Android網絡編程(二)HttpClient與HttpURLConnection前言Volley想必很多人都用過,
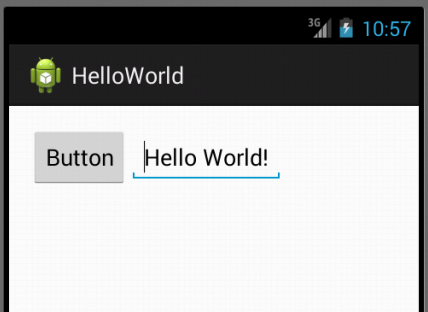 Android開發之創建可點擊的Button實現方法
本文實例講述了Android創建可點擊的Button實現方法。分享給大家供大家參考,具體如下:感覺到自己有必要學習下手機開發方面的知識,不論是為了以後的工作需求還是目前的
 Android實戰技巧之四十八:Android上的Java8和kotlin
Java和Android這對搭檔目前也在風雨飄搖中。技術圈子的事,往往被商業利益牽著鼻子走。世事莫過於此。Java8目前Android應用開發已經使用到Java7,但對J
 Android:IPC之AIDL的學習和總結
為了使得一個程序能夠在同一時間裡處理許多用戶的要求。即使用戶可能發出一個要求,也肯能導致一個操作系統中多個進程的運行(PS:聽音樂,看地圖)。而且多個進程間需要相互交換、