編輯:關於Android編程
本文實例講述了Android實現圖片拍照剪裁的方法。分享給大家供大家參考,具體如下:
調用系統的裁剪工具對相冊或者拍照的圖片進行裁剪。
startActivityforResult用的很恰當,一些系統action需要注意。
package com.photosizing;
import java.io.ByteArrayOutputStream;
import java.io.File;
import android.app.Activity;
import android.content.Intent;
import android.graphics.Bitmap;
import android.net.Uri;
import android.os.Bundle;
import android.os.Environment;
import android.provider.MediaStore;
import android.view.View;
import android.view.View.OnClickListener;
import android.widget.Button;
import android.widget.ImageView;
public class testActivity extends Activity {
 public static final int NONE = 0;
 public static final int PHOTOHRAPH = 1;// 拍照
 public static final int PHOTOZOOM = 2; // 縮放
 public static final int PHOTORESOULT = 3;// 結果
 public static final String IMAGE_UNSPECIFIED = "image/*";
 ImageView imageView = null;
 Button button0 = null;
 Button button1 = null;
 @Override
 public void onCreate(Bundle savedInstanceState) {
  super.onCreate(savedInstanceState);
  setContentView(R.layout.main);
  imageView = (ImageView) findViewById(R.id.imageID);
  button0 = (Button) findViewById(R.id.btn_01);
  button1 = (Button) findViewById(R.id.btn_02);
  button0.setOnClickListener(new OnClickListener() {
   @Override
   public void onClick(View v) {
    Intent intent = new Intent(Intent.ACTION_PICK, null);
    intent.setDataAndType(
      MediaStore.Images.Media.EXTERNAL_CONTENT_URI,
      IMAGE_UNSPECIFIED);
    startActivityForResult(intent, PHOTOZOOM);
   }
  });
  button1.setOnClickListener(new OnClickListener() {
   @Override
   public void onClick(View v) {
    Intent intent = new Intent(MediaStore.ACTION_IMAGE_CAPTURE);
    intent.putExtra(MediaStore.EXTRA_OUTPUT, Uri.fromFile(new File(
      Environment.getExternalStorageDirectory(), "temp.jpg")));
    startActivityForResult(intent, PHOTOHRAPH);
   }
  });
 }
 @Override
 protected void onActivityResult(int requestCode, int resultCode, Intent data) {
  if (resultCode == NONE)
   return;
  if (data == null)
   return;
  // 拍照
  if (requestCode == PHOTOHRAPH) {
   // 設置文件保存路徑這裡放在跟目錄下
   File picture = new File(Environment.getExternalStorageDirectory()
     + "/temp.jpg");
   startPhotoZoom(Uri.fromFile(picture));
  }
  // 讀取相冊縮放圖片
  if (requestCode == PHOTOZOOM) {
   startPhotoZoom(data.getData());
  }
  // 處理結果
  if (requestCode == PHOTORESOULT) {
   Bundle extras = data.getExtras();
   if (extras != null) {
    Bitmap photo = extras.getParcelable("data");
    ByteArrayOutputStream stream = new ByteArrayOutputStream();
    photo.compress(Bitmap.CompressFormat.JPEG, 75, stream);
    // (0 - 100)壓縮文件
    imageView.setImageBitmap(photo);
   }
  }
  super.onActivityResult(requestCode, resultCode, data);
 }
 public void startPhotoZoom(Uri uri) {
  Intent intent = new Intent("com.android.camera.action.CROP");
  intent.setDataAndType(uri, IMAGE_UNSPECIFIED);
  intent.putExtra("crop", "true");
  // aspectX aspectY 是寬高的比例
  intent.putExtra("aspectX", 1);
  intent.putExtra("aspectY", 1);
  // outputX outputY 是裁剪圖片寬高
  intent.putExtra("outputX", 64);
  intent.putExtra("outputY", 64);
  intent.putExtra("return-data", true);
  startActivityForResult(intent, PHOTORESOULT);
 }
}
XML文件:
<?xml version="1.0" encoding="utf-8"?>
<LinearLayout xmlns:android="http://schemas.android.com/apk/res/android"
 android:orientation="vertical" android:layout_width="fill_parent"
 android:layout_height="fill_parent">
 <TextView android:layout_width="fill_parent"
android:layout_height="wrap_content" android:text="@string/hello" />
<ImageView android:id="@+id/imageID"
android:adjustViewBounds="true" android:maxWidth="50dip"
android:maxHeight="50dip" android:layout_width="wrap_content"
android:layout_height="wrap_content" />
<Button android:id="@+id/btn_01" android:layout_height="50dip"
android:text="相冊" android:layout_width="150dip"/>
<Button android:id="@+id/btn_02" android:layout_height="50dip"
 android:text="拍照" android:layout_width="150dip"/>
</LinearLayout>
希望本文所述對大家Android程序設計有所幫助。
 Android中制作進度框和環形進度條的簡單實例分享
進度框import android.content.Context; import android.graphics.Canvas; import android.gra
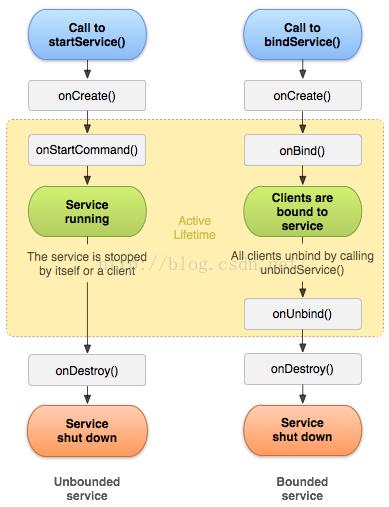 Android的四大組建Service 簡單、易懂的解析
Service 服務:四大組件之一特性: 沒有界面運行在後台,除了界面相關的之外,Activity能做的Service也能做。service的生命周期:上圖所述一共有兩種
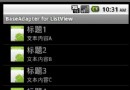 Android入門之ListView應用解析(二)
上一篇關於Android中ListView的介紹講的是如何制作一個具有兩行文本的自定義控件,作為ListView的Item的使用方法。本文接下來也是圍繞ListView和
 Android編寫簡單的聊天室應用
最近寫了一個簡單的聊天室應用,可以發送表情,更改頭像這些功能。主要技術點就是怎樣把表情圖片放到textview等Ui控件中展示。這裡廢話不多說,下面是效果圖: