編輯:關於Android編程
我們在做Android開發的時候經常會遇到後台線程執行的比如說下載文件的時候,這個時候我們希望讓客戶能看到後台有操作進行,這時候我們就可以使用進度條,那麼既然在後台運行,為的就是盡量不占用當前操作空間,用戶可能還要進行其他操作,最好的方法就是在通知欄有個通知消息並且有個進度條。本文給一個例子工讀者參考.
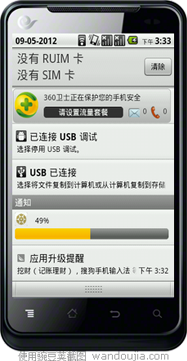
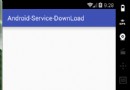
效果圖如下:
主界面只有一個按鈕就不上文件了
通知欄顯示所用到的布局文件content_view.xml
<?xml version="1.0" encoding="utf-8"?>
<RelativeLayout xmlns:android="http://schemas.android.com/apk/res/android"
  android:layout_width="fill_parent"
  android:layout_height="fill_parent"
  android:background="#00000000"
  android:orientation="vertical"
  android:padding="5dp">

  <ImageView
    android:id="@+id/content_view_image"
    android:layout_width="25dp"
    android:layout_height="25dp"
    android:src="@drawable/logo"

    />
  <TextView
    android:id="@+id/content_view_text1"
    android:layout_width="wrap_content"
    android:layout_height="wrap_content"
    android:text="0%"
    android:textColor="#000000"
    android:layout_toRightOf="@id/content_view_image"
    android:layout_centerHorizontal="true"
    android:layout_marginTop="5dp"
    android:layout_marginLeft="15dp"
   />
  <ProgressBar
    android:id="@+id/content_view_progress"
    android:layout_width="fill_parent"
    android:layout_height="wrap_content"

    android:max="100"
    android:layout_below="@id/content_view_image"
    android:layout_marginTop="4dp"
    />

</RelativeLayout>
主運行類:
package yyy.testandroid4;

import java.util.Timer;
import java.util.TimerTask;

import android.app.Activity;
import android.app.AlertDialog.Builder;
import android.app.Notification;
import android.app.NotificationManager;
import android.app.PendingIntent;
import android.content.DialogInterface;
import android.content.Intent;
import android.content.pm.PackageManager.NameNotFoundException;
import android.os.Bundle;
import android.os.Handler;
import android.os.Message;
import android.view.View;
import android.view.View.OnClickListener;
import android.widget.Button;
import android.widget.RemoteViews;
import android.widget.Toast;

public class TestAndroid4Activity extends Activity {


  private Handler handler = new Handler(){
    @Override
    public void handleMessage(Message msg) {
      // TODO Auto-generated method stub
      super.handleMessage(msg);
      switch (msg.what) {
      case 0:
        notif.contentView.setTextViewText(R.id.content_view_text1, len+"%");
        notif.contentView.setProgressBar(R.id.content_view_progress, 100, len, false);
        manager.notify(0, notif);

        break;
      case 1:
        Toast.makeText(TestAndroid4Activity.this, "下載完成", 0).show();
        break;
      default:
        break;
      }
    }

  };

  private Button update,cancel;
  private int localVersion,serverVersion;
  private int len;
  private NotificationManager manager;
  private Notification notif;
  /** Called when the activity is first created. */
  @Override
  public void onCreate(Bundle savedInstanceState) {
    super.onCreate(savedInstanceState);
    setContentView(R.layout.main);

    update = (Button) findViewById(R.id.update);

    update.setOnClickListener(new OnClickListener() {
      @Override
      public void onClick(View arg0) {
        // TODO Auto-generated method stub
        //點擊通知欄後打開的activity
        Intent intent = new Intent(TestAndroid4Activity.this,OtherActivity.class);

        PendingIntent pIntent = PendingIntent.getActivity(TestAndroid4Activity.this, 0, intent, 0);
           manager = (NotificationManager) getSystemService(NOTIFICATION_SERVICE);
        notif = new Notification();
        notif.icon = R.drawable.logo;
        notif.tickerText = "新通知";
        //通知欄顯示所用到的布局文件
        notif.contentView = new RemoteViews(getPackageName(), R.layout.content_view);
        notif.contentIntent = pIntent;
        manager.notify(0, notif);
        new DownLoadThread().start();
      }
    });


  }
 }

  private class DownLoadThread extends Thread{
    private Timer timer = new Timer();
    @Override
    public void run() {
      // TODO Auto-generated method stub
      super.run();
      timer.schedule(new TimerTask() {
        @Override
        public void run() {
          // TODO Auto-generated method stub

          Message msg = new Message();
          msg.what = 0;
          msg.obj = len;
          handler.sendMessage(msg);

          if(len == 100){
            timer.cancel();
            handler.sendEmptyMessage(1);
          }

        }
      }, 0, 1000);
      len = 0;
      try {
        while(len < 100){
          len++;
          Thread.sleep(1000);
        }
      } catch (InterruptedException e) {
        // TODO Auto-generated catch block
        e.printStackTrace();
      }
    }

  }


}
以上就是本文的全部內容,希望對大家的學習有所幫助,也希望大家多多支持本站。
 UI - UISearchController&UISearchDisplayController
簡介系統自帶的搜索頁面類 — UISearchDisplayController和UISearchController, 讓你更方便快捷的進行搜索功能開發.
 Android Volley框架完全解析
2013年Google I/O大會上推出了一個新的網絡通信框架——Volley。Volley可是說是把AsyncHttpClient和Univer
 Android實現Service下載文件,Notification顯示下載進度的示例
先放個gif。。最終效果如果: 主要演示了Android從服務器下載文件,調用Notification顯示下載進度,並且在下載完畢以後點擊通知會跳轉到安裝APK的界面,演
 谷歌約束控件(ConstraintLayout)扁平化布局入門
序在Google IO大會中不僅僅帶來了Android Studio 2.2預覽版,同時帶給我們一個依賴約束的庫。簡單來說,她是相對布局的升級版本,但是區別與相對布局更加