編輯:關於Android編程
概述:
首先簡單闡述一下我對於消息推送的理解,這裡拿QQ來舉例吧,當我們手機端的QQ離線了,並且退出了QQ應用,但是這時候如果別人給我們發了信息,我們沒有上線。服務器會將發送者發送的信息推送過來然後我們發布通知來顯示通知我們的用戶
原理簡單闡述:
通過以上概述,我們基本了解我們需要一個獨立進程的後台服務,在AndroidManifest
.xml中注冊Service時,有一個android:process屬性這個屬性有2種情況,即為.和:兩種,其中.代表為此服務開啟一個全局的獨立進程,如果以:開頭則為此服務開啟一個為此應用私有的獨立進程
編碼實現:
ServerPushService文件:
[java]
import android.app.Notification;
import android.app.NotificationManager;
import android.app.PendingIntent;
import android.app.Service;
import android.content.Intent;
import android.os.IBinder;
public class ServerPushService extends Service{
//獲取消息線程
private MessageThread messageThread = null;
//點擊查看
private Intent messageIntent = null;
private PendingIntent messagePendingIntent = null;
//通知欄消息
private int messageNotificationID = 1000;
private Notification messageNotification = null;
private NotificationManager messageNotificationManager = null;
@Override
public IBinder onBind(Intent intent) {
return null;
}
@Override
public int onStartCommand(Intent intent, int flags, int startId) {
//初始化
messageNotification = new Notification();
messageNotification.icon = R.drawable.ic_launcher; //通知圖片
messageNotification.tickerText = "新消息"; //通知標題
messageNotification.defaults = Notification.DEFAULT_SOUND;
messageNotificationManager = (NotificationManager) getSystemService(this.NOTIFICATION_SERVICE);
//點擊查看
messageIntent = new Intent(this,MessageActivity.class);
messagePendingIntent = PendingIntent.getActivity(this, 0, messageIntent, 0);
//開啟線程
MessageThread thread = new MessageThread();
thread.isRunning = true;
thread.start();
return super.onStartCommand(intent, flags, startId);
}
/***
* 從服務端獲取消息
* @author zhanglei
*
*/
class MessageThread extends Thread{
//運行狀態
public boolean isRunning = true;
@Override
public void run() {
while(isRunning){
try {
//休息10秒
Thread.sleep(10000);
if(getServerMessage().equals("yes")){
//設置消息內容和標題
messageNotification.setLatestEventInfo(ServerPushService.this, "您有新消息!", "這是一條新的測試消息", messagePendingIntent);
//發布消息
messageNotificationManager.notify(messageNotificationID, messageNotification);
//避免覆蓋消息,采取ID自增
messageNotificationID++;
}
} catch (Exception e) {
e.printStackTrace();
}
}
}
}
/***
* 模擬了服務端的消息。實際應用中應該去服務器拿到message
* @return
*/
public String getServerMessage(){
return "yes";
}
}
注冊該service在一個單獨的進程中
[html]
<!-- 為此應用私有的獨立進程 -->
<service
android:name="com.jay.serverpush.ServerPushService"
android:process=":message"
>
</service>
<!-- 為此應用私有的獨立進程 -->
<service
android:name="com.jay.serverpush.ServerPushService"
android:process=":message"
>
</service>
說明:該文件編寫了一個service用於後台運行,在manifest裡面將該service聲明成progress為:開頭的,這樣在一個單獨的進程裡面運行,以實現在程序關閉之後達到進程不關閉的目的以此來實現離線推送的目的,編碼中的注釋很明確,掃描服務器、判斷邏輯發布通知等,注釋很明確在此不在闡述
開啟服務的方式:
[java]
Override
protected void onCreate(Bundle savedInstanceState) {
super.onCreate(savedInstanceState);
setContentView(R.layout.activity_main);
this.startService(new Intent(this,ServerPushService.class));
}
this.startService(new Intent(this,ServerPushService.class));
@Override
protected void onCreate(Bundle savedInstanceState) {
super.onCreate(savedInstanceState);
setContentView(R.layout.activity_main);
this.startService(new Intent(this,ServerPushService.class));
}
this.startService(new Intent(this,ServerPushService.class));
通過這句話在第一次進入oncreate方法就開啟了單獨進程的服務
 Android Activity與Fragment實現底部導航器
單Activity多Fragment實現底部導航器最近由於Android基礎知識講解需要,采用單Activity多Fragment實現類似QQ底部導航器示例,這種開發模式
 Android基礎入門教程——8.3.16 Canvas API詳解(Part 1)
Android基礎入門教程——8.3.16 Canvas API詳解(Part 1)標簽(空格分隔): Android基礎入門教程本節引言: 前面
 CMD 使用emulator.exe啟動Android模擬器——emulator -data 鏡像文件名稱
在命令行[CMD]使用emulator.exe啟動Android模擬器兩種方式:- emulator -avd (AVD名稱)- emulator -data (鏡像文件
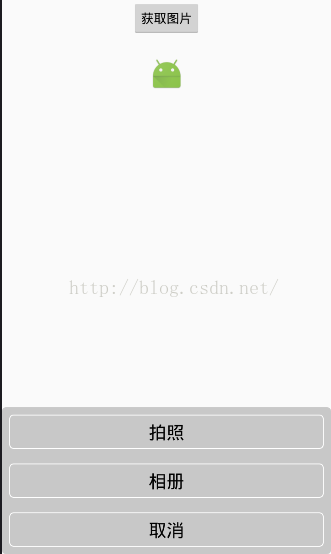 Android中拍照和從相冊選擇圖片,並剪裁(二)
從系統相冊中選擇照片或則調用系統相機。大部分的項目都會用到,我進行了一下封裝,仿ios的效果。效果如下:1、Camera的基類package com.zhang.test