編輯:關於Android編程
本文實例為大家分享了Android時光軸的制作方法,供大家參考,具體內容如下
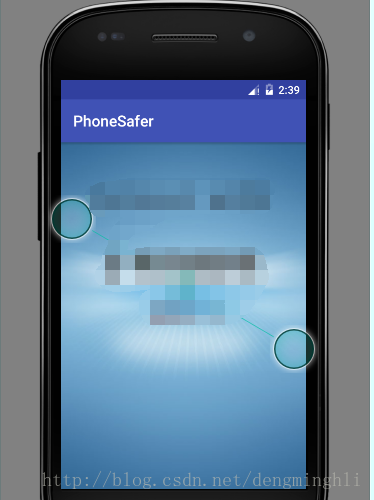
1. 效果
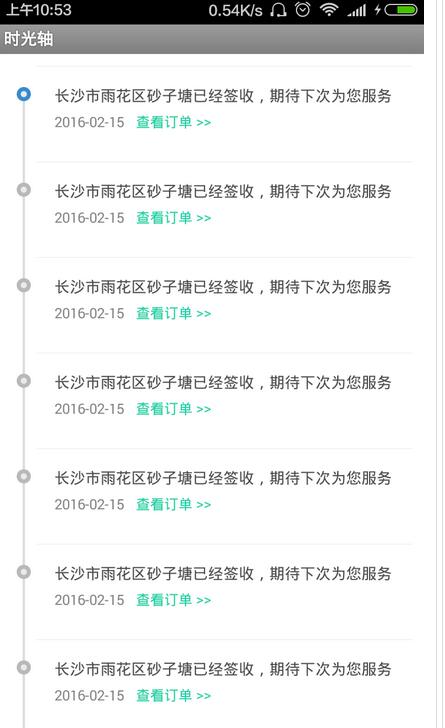
2.分析和實現
2.1效果實現:
之前想了一下這種效果,因為只需要用到自己的項目中所以采用圖片直接布局的形式去實現效果,雖然效果實現了,但是後來發現了出了很多問題:第一Android的分辨率太多了直接設置xxxdp難免有部分機型出現不適配的情況,第二我們與右邊這部分需要對齊的問題這個就比較頭大。
所以目前的實現效果方式是這樣子的:
1.自定義TimerLineMarker,根據自定義屬性獲取點和線的背景資源或是顏色以及寬度等等,在onMeasure中計算布局的寬度和高度;
2.在Item布居中我們給需要對齊那個View設置一個id為need_align_view,我們在onSizeChanged中去找到並計算對齊View距頭部的高度;
3.當我們得到對齊View的高度後,我們計算上面Line,中間Marker以及下面Line需要繪制的矩形區域,調用invalidate()然後在onDraw方法中分別繪制這三個部分;
4.很顯然我們需要顯示的方式是有些不同的,比如第一個沒有上面的線其中心標記顏色也不一樣,最後一個沒有下面的線,所以我們需要提供兩個方法:setStyle()設置顯示風格;setMarker(int resouceId)設置中間標記的資源
2.2分步實現:
1.自定義TimerLineMarker,根據自定義屬性獲取點和線的背景資源或是顏色以及寬度等等,在onMeasure中計算布局的寬度和高度
public class TimerLineMarker extends View {
 // 3個部分的drawable
 private Drawable mBeginLine, mEndLine, mMarker;
 // 顯示大小
 private int mMarkerSize = 26, mLineSize = 4;
 // 距離頭部的微調
 private int mMarkerMarginTop = 0;

 public TimerLineMarker(Context context) {
  this(context, null);
 }

 public TimerLineMarker(Context context, AttributeSet attrs) {
  this(context, attrs, 0);
 }

 public TimerLineMarker(Context context, AttributeSet attrs, int defStyleAttr) {
  super(context, attrs, defStyleAttr);
  initAttribute(attrs);
 }

 /**
  * 初始化自定義屬性
  */
 private void initAttribute(AttributeSet attrs) {
  final TypedArray typedArray = getContext().obtainStyledAttributes(
    attrs, R.styleable.TimerLineMarker);
  // 獲取size
  mMarkerSize = typedArray.getDimensionPixelSize(
    R.styleable.TimerLineMarker_markerSize, mMarkerSize);
  mLineSize = typedArray.getDimensionPixelSize(
    R.styleable.TimerLineMarker_lineSize, mLineSize);
  // 獲取drawable
  mBeginLine = typedArray
    .getDrawable(R.styleable.TimerLineMarker_beginLine);
  mEndLine = typedArray.getDrawable(R.styleable.TimerLineMarker_endLine);
  mMarker = typedArray.getDrawable(R.styleable.TimerLineMarker_marker);
  mMarkerMarginTop = typedArray.getDimensionPixelSize(
    R.styleable.TimerLineMarker_markerMarginTop, mMarkerMarginTop);
  typedArray.recycle();
 }

 @Override
 protected void onMeasure(int widthMeasureSpec, int heightMeasureSpec) {
  super.onMeasure(widthMeasureSpec, heightMeasureSpec);
  // 測量本View的寬高裡面子控件的寬度
  int with = mMarkerSize + getPaddingLeft() + getPaddingRight();
  int height = mMarkerSize + getPaddingTop() + getPaddingBottom();
  // 通過系統的一個方法做決策最終決定寬高
  int withSize = resolveSizeAndState(with, widthMeasureSpec, 0);
  int heightSize = resolveSizeAndState(height, heightMeasureSpec, 0);
  // 設置寬高
  setMeasuredDimension(withSize, heightSize);
 }
}
2.在Item布居中我們給需要對齊那個View設置一個id為need_align_view,我們在onSizeChanged中去找到並計算對齊View距頭部的高度;
 // 標記距離頭部的位置
 private int mMarkerTopDistance;
 @Override
 protected void onSizeChanged(int w, int h, int oldw, int oldh) {
  super.onSizeChanged(w, h, oldw, oldh);
  initAlignViewHeight();
  // 當View顯示的時候回調
  // 定位到當前幾個draw able的坐標,然後繪制
  initDrawable();
 }

 /**
  * 初始化獲取需要對齊的View高度
  */
 private void initAlignViewHeight() {
  // 獲取需要對齊的View
  ViewGroup parent = (ViewGroup) this.getParent();
  mNeedAlignView = findNeedAlignView(parent);

  // 獲取需要對齊的View距離頂部的高度
  if (mNeedAlignView != null) {
   mMarkerTopDistance = 0;
   // 與需要對齊View的中心點對齊
   mMarkerTopDistance += calcViewTop(mNeedAlignView)
     + mNeedAlignView.getMeasuredHeight() / 2;
  }
 }

 /**
  * 循環獲取距頂部的距離
  */
 private int calcViewTop(View view) {
  final ViewGroup parentView = (ViewGroup) view.getParent();
  final int childCount = parentView.getChildCount();
  // 先加上paddingTop
  int topDistance = parentView.getPaddingTop();
  for (int i = 0; i < childCount; i++) {
   final View childView = parentView.getChildAt(i);
   final ViewGroup.LayoutParams params = (ViewGroup.LayoutParams) childView
     .getLayoutParams();
   topDistance = addTopMargin(topDistance, params);
   if (childView == view) {
    return topDistance;
   }
   topDistance = addBottomMargin(topDistance, params);
   topDistance += childView.getMeasuredHeight();
  }
  return topDistance;
 }

 /**
  * 累加底部的margin高度
  */
 private int addBottomMargin(int topDistance, ViewGroup.LayoutParams params) {
  if (params instanceof RelativeLayout.LayoutParams) {
   RelativeLayout.LayoutParams param = (RelativeLayout.LayoutParams) params;
   topDistance += param.bottomMargin;
  }

  if (params instanceof LinearLayout.LayoutParams) {
   LinearLayout.LayoutParams param = (LinearLayout.LayoutParams) params;
   topDistance += param.bottomMargin;
  }

  if (params instanceof FrameLayout.LayoutParams) {
   FrameLayout.LayoutParams param = (FrameLayout.LayoutParams) params;
   topDistance += param.bottomMargin;
  }

  if (params instanceof TableLayout.LayoutParams) {
   TableLayout.LayoutParams param = (TableLayout.LayoutParams) params;
   topDistance += param.bottomMargin;
  }
  return topDistance;
 }

 /**
  * 累加頭部margin高度
  */
 private int addTopMargin(int topDistance, ViewGroup.LayoutParams params) {
  if (params instanceof RelativeLayout.LayoutParams) {
   RelativeLayout.LayoutParams param = (RelativeLayout.LayoutParams) params;
   topDistance += param.topMargin;
  }

  if (params instanceof LinearLayout.LayoutParams) {
   LinearLayout.LayoutParams param = (LinearLayout.LayoutParams) params;
   topDistance += param.topMargin;
  }

  if (params instanceof FrameLayout.LayoutParams) {
   FrameLayout.LayoutParams param = (FrameLayout.LayoutParams) params;
   topDistance += param.topMargin;
  }

  if (params instanceof TableLayout.LayoutParams) {
   TableLayout.LayoutParams param = (TableLayout.LayoutParams) params;
   topDistance += param.topMargin;
  }
  return topDistance;
 }
3.當我們得到對齊View的高度後,我們計算上面Line,中間Marker以及下面Line需要繪制的矩形區域,調用invalidate()然後在onDraw方法中分別繪制這三個部分;
 /**
  * 初始化Draw able
  */
 private void initDrawable() {
  initMarkerBounds();
  initLineBounds();
  postInvalidate();
 }

 /**
  * 初始化時光線Bounds
  */
 private void initLineBounds() {
  int height = getHeight();
  Rect bounds = mMarker.getBounds();

  int lineLeft = bounds.centerX() - (mLineSize >> 1);

  if (mBeginLine != null)
   mBeginLine.setBounds(lineLeft, 0, lineLeft + mLineSize, bounds.top);

  if (mEndLine != null)
   mEndLine.setBounds(lineLeft, bounds.bottom, lineLeft + mLineSize,
     height);
 }

 /**
  * 初始化標記Bounds
  */
 private void initMarkerBounds() {
  int pLeft = getPaddingLeft();
  int pRight = getPaddingRight();
  int pBottom = getPaddingBottom();
  int pTop = getPaddingTop();

  int width = getWidth();
  int height = getHeight();

  int cWidth = width - pLeft - pRight;
  int cHeight = height - pTop - pBottom;

  mMarkerSize = Math.min(mMarkerSize, Math.min(cWidth, cHeight));

  mMarkerTopDistance = mMarkerTopDistance - mMarkerSize / 2;
  if (mMarkerMarginTop < 0) {
   mMarkerMarginTop = 0;
  }

  mMarker.setBounds(pLeft, mMarkerTopDistance + mMarkerMarginTop, pLeft
    + mMarkerSize, mMarkerTopDistance + mMarkerMarginTop
    + mMarkerSize);
 }

 @Override
 protected void onDraw(Canvas canvas) {
  if (mMarker.getBounds().right <= 0) {
   // 如果bounds被弄丟了
   assignValue();
  }

  if (mMarkerStyle != MarkerStyle.START_STYLE) {
   if (mBeginLine != null)
    mBeginLine.draw(canvas);
  }

  mMarker.draw(canvas);
  if (mMarkerStyle != MarkerStyle.END_STYLE) {
   if (mEndLine != null)
    mEndLine.draw(canvas);
  }
 }

 /**
  * 從新賦值
  */
 private void assignValue() {
  initAlignViewHeight();
  initMarkerBounds();
  initLineBounds();
 }
4.很顯然我們需要顯示的方式是有些不同的,比如第一個沒有上面的線其中心標記顏色也不一樣,最後一個沒有下面的線,所以我們需要提供兩個方法:setStyle()設置顯示風格;setMarker(int resouceId)設置中間標記的資源。
 /**
  * 設置顯示的分隔
  */
 public void setStyle(MarkerStyle markerStyle) {
  this.mMarkerStyle = markerStyle;
  invalidate();
 }

 /**
  * 設置標記的Draw able
  */
 public void setMarker(Drawable marker) {
  this.mMarker = marker;
  postInvalidate();
 }

 /**
  * 設置標記資源
  *
  * @param resouceId
  *   資源id
  */
 public void setMarker(int resouceId) {
  this.mMarker = getResources().getDrawable(resouceId);
  postInvalidate();
 }

 /**
  * 時光軸顯示風格
  */
 public enum MarkerStyle {
  // 開始第一個
  START_STYLE,
  // 中間位置
  CENTER_STYLE,
  // 最後一個
  END_STYLE
 }
以後希望自己有點空,就把自己做的一些東西寫下來. 一方面鍛煉一下自己的寫文檔的能力,另一方面分享代碼的同時也希望能與大家交流一下技術,共同學習,共同進步。因為開發過程中遇到一些問題我總會先在網上找一些例子參考一下,類似的代碼,可能有些達不到效果或是用不上,沒辦法也只能自己造輪子。
源碼下載地址:http://xiazai.jb51.net/201611/yuanma/AndroidTimeLine(jb51.net).rar
以上就是本文的全部內容,希望對大家的學習有所幫助,也希望大家多多支持本站。
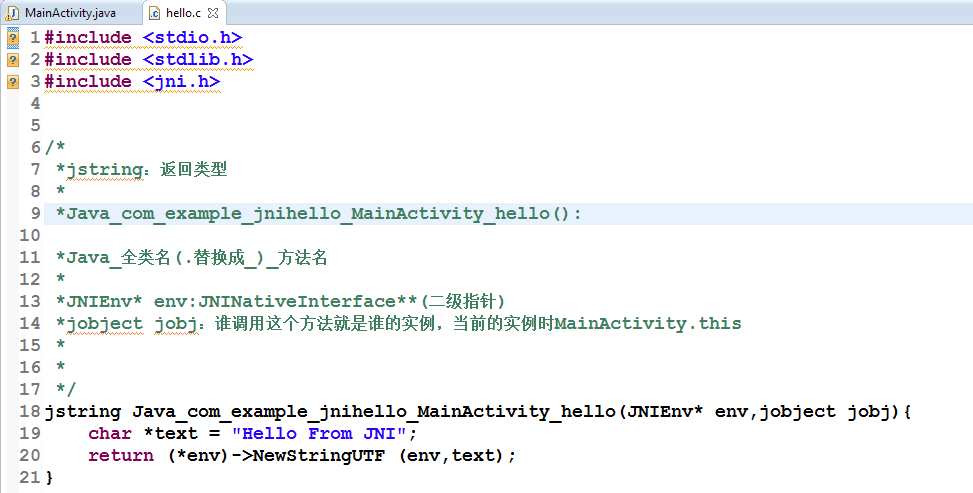 關於JNI
關於JNI
JNINDK開發環境的搭建將NDK的路徑拷貝到環境變量path中 cmd中運行ndk-build可驗證是否添加成功JNI_HelloWorld步驟1.創建Android工
 Android圖片占用內存全面分析
曾經有一個朋友問過我一個問題, 一張512*512 150KB PNG格式圖片和一張512*512 100KB 壓縮比是8的JPG格式的圖片,加載到內存中,也
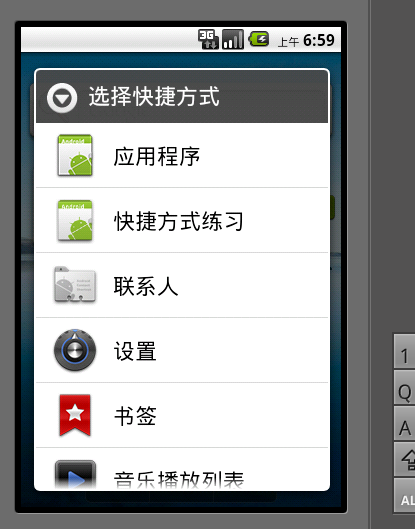 Android編程實現向桌面添加快捷方式的方法
本文實例講述了Android編程實現向桌面添加快捷方式的方法。分享給大家供大家參考,具體如下:有時候為了使用方便,需要在桌面上添加快捷方式,下面是兩種添加快捷方式的方法:
 加快Android SDK Manager的速度
1、明白Android SDK Manager是什麼? Android SDK Manager是用來安裝Android SDK的,裡面可以選擇不同版本的Android