編輯:關於Android編程
之前網上看了下自定義消息欄,通知欄,了解到了Notification這個控件,發現UC浏覽器等都是這種類型,今天寫個demo實現下,如圖:
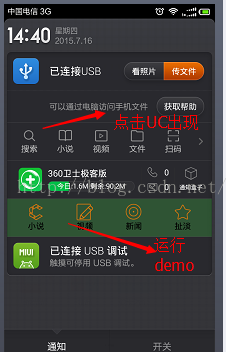
其中每個按鈕都有不同的功能,代碼如下:
package com.example.textwsjdemo;

import android.app.Activity;
import android.app.Notification;
import android.app.NotificationManager;
import android.app.PendingIntent;
import android.content.BroadcastReceiver;
import android.content.Context;
import android.content.Intent;
import android.content.IntentFilter;
import android.os.Bundle;
import android.view.KeyEvent;
import android.view.View;
import android.view.View.OnClickListener;
import android.widget.Button;
import android.widget.RemoteViews;
import android.widget.Toast;

public class MainActivity extends Activity {

 private Button bt_hehe;
 private NotificationManager notificationManager;
 private Notification notification;
 private int icon;
 private CharSequence tickerText;
 private long when;
 RemoteViews contentView;
 private Intent intent;
 private PendingIntent pendingIntent;
 private int notification_id = 0;
 private MyBroadCast receiver;
 private static String ACTION = "a";

 @Override
 protected void onCreate(Bundle savedInstanceState) {
  super.onCreate(savedInstanceState);
  setContentView(R.layout.activity_main);
  receiver = new MyBroadCast();
  IntentFilter filter = new IntentFilter();
  filter.addAction("a");
  filter.addAction("b");
  filter.addAction("c");
  filter.addAction("d");
  registerReceiver(receiver, filter);

  initView();
  initData();

 }

 private void initData() {
  icon = R.drawable.ic_launcher; // 通知圖標
  tickerText = "Hello"; // 狀態欄顯示的通知文本提示
  when = System.currentTimeMillis(); // 通知產生的時間,會在通知信息裡顯示
 }

 private void initView() {
  bt_hehe = (Button) findViewById(R.id.bt_hehe);
  bt_hehe.setOnClickListener(new OnClickListener() {

   @Override
   public void onClick(View v) {
    // TODO Auto-generated method stub
    // 啟動提示欄
    createNotification();
   }
  });
 }

 private void createNotification() {
  notificationManager = (NotificationManager) getSystemService(Context.NOTIFICATION_SERVICE);
  notification = new Notification();
  notification.icon = icon;
  notification.tickerText = tickerText;
  notification.when = when;

  /***
   * 在這裡我們用自定的view來顯示Notification
   */
  contentView = new RemoteViews(getPackageName(),
    R.layout.notification_item);
  contentView.setTextViewText(R.id.text11, "小說");
  contentView.setTextViewText(R.id.text22, "視頻");
  contentView.setTextViewText(R.id.text33, "新聞");
  contentView.setTextViewText(R.id.text44, "扯淡");
  // contentView.setTextViewText(R.id.notificationPercent, "0%");
  // contentView.setProgressBar(R.id.notificationProgress, 100, 0, false);
  // //進度條
  // contentView.setImageViewResource(R.id.image,R.drawable.more_advice);
  // //加載圖片
  // contentView.setImageViewResource(R.id.image,R.drawable.more_attention);
  // contentView.setImageViewResource(R.id.image,R.drawable.more_evaluate);
  // contentView.setImageViewResource(R.id.image,R.drawable.more_about);
  // contentView.setTextViewText(R.id.text,"Hello,this message is in a custom expanded view");
  // //文本


  notification.flags = Notification.FLAG_ONGOING_EVENT; // 設置常駐,不能滑動取消
  //默認跳轉的主界面
  intent = new Intent(this, MainActivity.class);
  intent.addFlags(Intent.FLAG_ACTIVITY_SINGLE_TOP);
  pendingIntent = PendingIntent.getActivity(this, 0, intent, 0);

  //自定義跳轉
  contentView.setOnClickPendingIntent(R.id.ll_11, PendingIntent.getBroadcast(MainActivity.this, 11, new Intent().setAction("a"), PendingIntent.FLAG_UPDATE_CURRENT));
  contentView.setOnClickPendingIntent(R.id.ll_22, PendingIntent.getBroadcast(MainActivity.this, 11, new Intent().setAction("b"), PendingIntent.FLAG_UPDATE_CURRENT));
  contentView.setOnClickPendingIntent(R.id.ll_33, PendingIntent.getBroadcast(MainActivity.this, 11, new Intent().setAction("c"), PendingIntent.FLAG_UPDATE_CURRENT));
  contentView.setOnClickPendingIntent(R.id.ll_44, PendingIntent.getBroadcast(MainActivity.this, 11, new Intent().setAction("d"), PendingIntent.FLAG_UPDATE_CURRENT));
  notification.contentView = contentView;
  notification.contentIntent = pendingIntent;
  notificationManager.notify(notification_id, notification);
 }

 // 取消通知
 private void cancelNotification() {
  notificationManager.cancelAll();
 }

 @Override
 protected void onDestroy() {
  cancelNotification();
  unregisterReceiver(receiver);

 }

 @Override
 public boolean onKeyDown(int keyCode, KeyEvent event) {
  if ((keyCode == KeyEvent.KEYCODE_BACK)) {
   System.out.println("按下了back鍵 onKeyDown()");
   cancelNotification();
  }
  return super.onKeyDown(keyCode, event);
 }

 class MyBroadCast extends BroadcastReceiver {

  @Override
  public void onReceive(Context context, Intent intent) {
   if(intent.getAction().equals("a")){
    Toast.makeText(MainActivity.this, "11111111111111",
      Toast.LENGTH_LONG).show();
    startActivity(new Intent(MainActivity.this, ActivityText1.class));
   }
   if(intent.getAction().equals("b")){
    Toast.makeText(MainActivity.this, "222222222222222",
      Toast.LENGTH_LONG).show();
    startActivity(new Intent(MainActivity.this, ActivityText2.class));
   }
   if(intent.getAction().equals("c")){
    Toast.makeText(MainActivity.this, "333333333333",
      Toast.LENGTH_LONG).show();
    startActivity(new Intent(MainActivity.this, ActivityText3.class));
   }
   if(intent.getAction().equals("d")){
    Toast.makeText(MainActivity.this, "4444444444444",
      Toast.LENGTH_LONG).show();
    startActivity(new Intent(MainActivity.this, ActivityText4.class));
   }

  }

 }

}
以下是一些屬性的設置:
/*
* 添加聲音
* notification.defaults |=Notification.DEFAULT_SOUND;
* 或者使用以下幾種方式
* notification.sound = Uri.parse("file:///sdcard/notification/ringer.mp3");
* notification.sound = Uri.withAppendedPath(Audio.Media.INTERNAL_CONTENT_URI, "6");
* 如果想要讓聲音持續重復直到用戶對通知做出反應,則可以在notification的flags字段增加"FLAG_INSISTENT"
* 如果notification的defaults字段包括了"DEFAULT_SOUND"屬性,則這個屬性將覆蓋sound字段中定義的聲音
*/
/*
* 添加振動
* notification.defaults |= Notification.DEFAULT_VIBRATE;
* 或者可以定義自己的振動模式:
* long[] vibrate = {0,100,200,300}; //0毫秒後開始振動,振動100毫秒後停止,再過200毫秒後再次振動300毫秒
* notification.vibrate = vibrate;
* long數組可以定義成想要的任何長度
* 如果notification的defaults字段包括了"DEFAULT_VIBRATE",則這個屬性將覆蓋vibrate字段中定義的振動
*/
/*
* 添加LED燈提醒
* notification.defaults |= Notification.DEFAULT_LIGHTS;
* 或者可以自己的LED提醒模式:
* notification.ledARGB = 0xff00ff00;
* notification.ledOnMS = 300; //亮的時間
* notification.ledOffMS = 1000; //滅的時間
* notification.flags |= Notification.FLAG_SHOW_LIGHTS;
*/
/*
* 更多的特征屬性
* notification.flags |= FLAG_AUTO_CANCEL; //在通知欄上點擊此通知後自動清除此通知
* notification.flags |= FLAG_INSISTENT; //重復發出聲音,直到用戶響應此通知
* notification.flags |= FLAG_ONGOING_EVENT; //將此通知放到通知欄的"Ongoing"即"正在運行"組中
* notification.flags |= FLAG_NO_CLEAR; //表明在點擊了通知欄中的"清除通知"後,此通知不清除,
* //經常與FLAG_ONGOING_EVENT一起使用
* notification.number = 1; //number字段表示此通知代表的當前事件數量,它將覆蓋在狀態欄圖標的頂部
* //如果要使用此字段,必須從1開始
* notification.iconLevel = ; //
最後附上源碼:源碼下載
以上就是本文的全部內容,希望對大家的學習有所幫助,也希望大家多多支持本站。
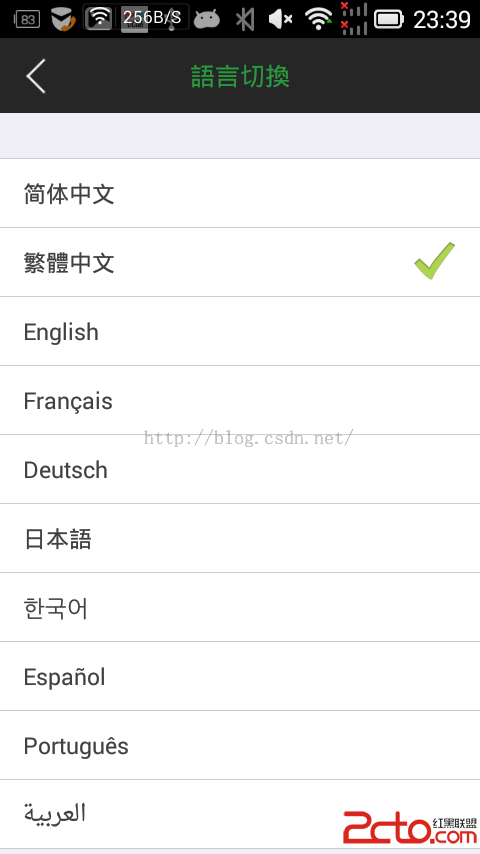 Android 史上最強多語言國際化,不僅第一次會跟隨系統,而且會保存用戶的語言設置
1.我等屌絲喜歡簡單粗暴,首先來一幅圖哥們我是大陸人,當然默認語言是 中文簡體,但是我剛剛切換成了繁體了 2.看下配置文件,按照這個格式 ,看圖吧,簡單粗暴,別
 小米手機通話時自動錄音設置使用教程
小米手機也是近兩年名噪一時啊,在性價上還是一款不錯的選擇的,小米手機擁有很多很實用的小功能。比如,它自帶了通話錄音功能,通常我們需要在通話時主動點擊錄音選項
 Android網絡開源庫-Retrofit(三) 批量上傳及上傳進度監聽
由於gif圖太大的原因,我將圖放在了github,如果博客中顯示不出來圖,傳送門 由於我是事先寫在md上的,導致代碼的可讀性差,大家將就著看吧。 1. 前言 在
 Android編程實現自定義系統菜單背景的方法
本文實例講述了Android編程實現自定義系統菜單背景的方法。分享給大家供大家參考,具體如下:不多說,上圖,見代碼。package lab.sodino.menutest