編輯:關於Android編程
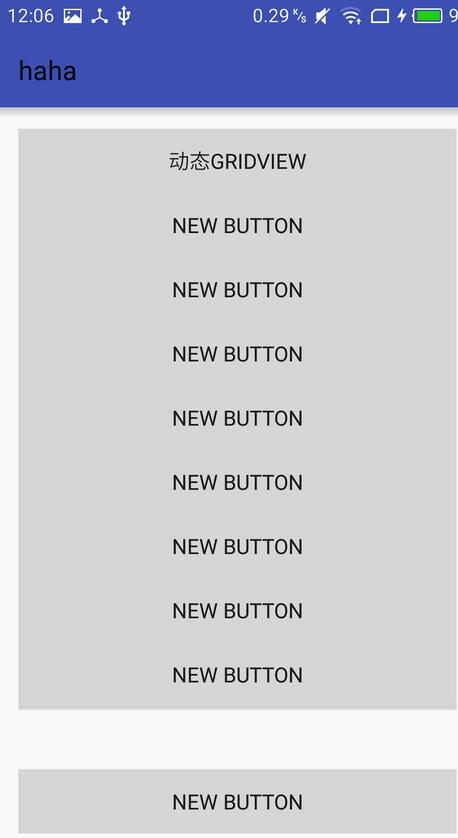
本文實例為大家分享了Android動態GridView控件使用的具體代碼,供大家參考,具體內容如下
MainActivity.java代碼:
package siso.haha;

import android.content.Intent;
import android.support.v7.app.AppCompatActivity;
import android.os.Bundle;
import android.view.View;
import android.widget.Button;

public class MainActivity extends AppCompatActivity {
 private Button btnStaggeredGridView;

 @Override
 protected void onCreate(Bundle savedInstanceState) {
 super.onCreate(savedInstanceState);
 setContentView(R.layout.activity_main);

 btnStaggeredGridView=(Button)findViewById(R.id.btnStaggeredGridView);
 btnStaggeredGridView.setOnClickListener(new View.OnClickListener() {
  @Override
  public void onClick(View v) {
  Intent intent = new Intent();
  intent.setClass(MainActivity.this,staggeredgridviewActivity.class);
  //直接啟動一個Activity
  startActivity(intent);
  }
 });


 }
}
staggeredgridviewActivity.java代碼:
package siso.haha;
import android.app.Activity;
import android.content.Context;
import android.os.Bundle;
import android.util.Log;
import android.view.LayoutInflater;
import android.view.Menu;
import android.view.View;
import android.view.ViewGroup;
import android.widget.BaseAdapter;
import java.util.Random;
import viewHelper.StaggeredGridView;
import viewHelper.StaggeredGridView.LayoutParams;
public class staggeredgridviewActivity extends Activity
{
private final static String TAG = staggeredgridviewActivity.class.getSimpleName();
private StaggeredGridView mSGV;
private SGVAdapter mAdapter;
private StaggeredGridView.OnScrollListener mScrollListener = new StaggeredGridView.OnScrollListener() {
@Override
public void onScrollStateChanged(ViewGroup view, int scrollState) {
Log.d(TAG, "[onScrollStateChanged] scrollState:" + scrollState);
switch (scrollState) {
case SCROLL_STATE_IDLE:
setTitle("SCROLL_STATE_IDLE");
break;
case SCROLL_STATE_FLING:
setTitle("SCROLL_STATE_FLING");
break;
case SCROLL_STATE_TOUCH_SCROLL:
setTitle("SCROLL_STATE_TOUCH_SCROLL");
break;
default:
break;
}
}
@Override
public void onScroll(ViewGroup view, int firstVisibleItem, int visibleItemCount, int totalItemCount) {
Log.d(TAG, "[onScroll] firstVisibleItem:" + firstVisibleItem + " visibleItemCount:"+visibleItemCount + " totalItemCount:" + totalItemCount);
}
};
@Override
protected void onCreate(Bundle savedInstanceState)
{
super.onCreate(savedInstanceState);
setContentView(R.layout.activity_staggeredgridview);
mAdapter = new SGVAdapter(this);
mSGV = (StaggeredGridView) findViewById(R.id.grid);
mSGV.setColumnCount(4);
mSGV.setAdapter(mAdapter);
mSGV.setOnScrollListener(mScrollListener);
}
@Override
public boolean onCreateOptionsMenu(Menu menu)
{
// Inflate the menu; this adds items to the action bar if it is present.
// getMenuInflater().inflate(R.menu.activity_main, menu);
return true;
}
private final class SGVAdapter extends BaseAdapter
{
LayoutInflater mInflater;
public SGVAdapter(Context ctx)
{
mInflater = LayoutInflater.from(ctx);
}
@Override
public int getCount()
{
return 30;
}
@Override
public Object getItem(int position)
{
return null;
}
@Override
public long getItemId(int position)
{
return 0;
}
Random r = new Random();
@Override
public View getView(int position, View convertView, ViewGroup parent)
{
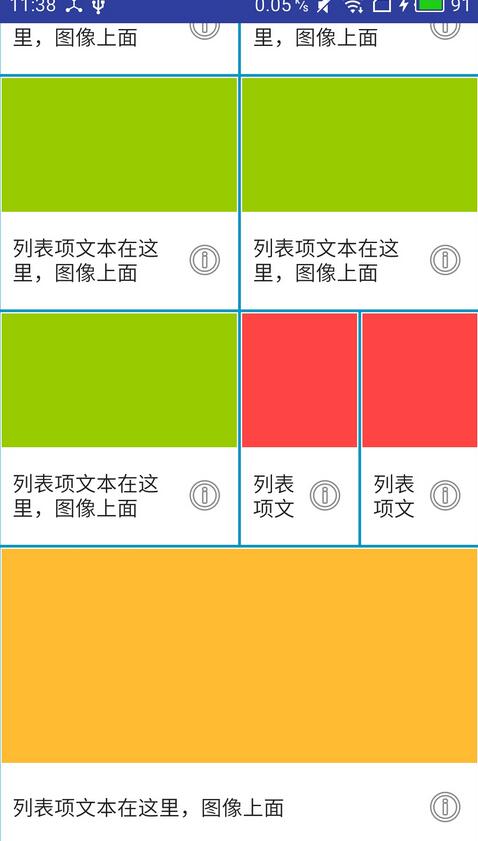
//LayoutParams相當於一個Layout的信息包,它封裝了Layout的位置、高、寬等信息。假設在屏幕上一塊區域是由一個Layout占領的,如果將一個View添加到一個Layout中,最好告訴Layout用戶期望的布局方式,也就是將一個認可的layoutParams傳遞進去。
/*可以這樣去形容LayoutParams,在象棋的棋盤上,每個棋子都占據一個位置,也就是每個棋子都有一個位置的信息,如這個棋子在4行4列,這裡的“4行4列”就是棋子的LayoutParams。
但LayoutParams類也只是簡單的描述了寬高,寬和高都可以設置成三種值:
1,一個確定的值;
2,FILL_PARENT,即填滿(和父容器一樣大小);
3,WRAP_CONTENT,即包裹住組件就好。*/
final LayoutParams lp;
final View v;
switch (position)
{
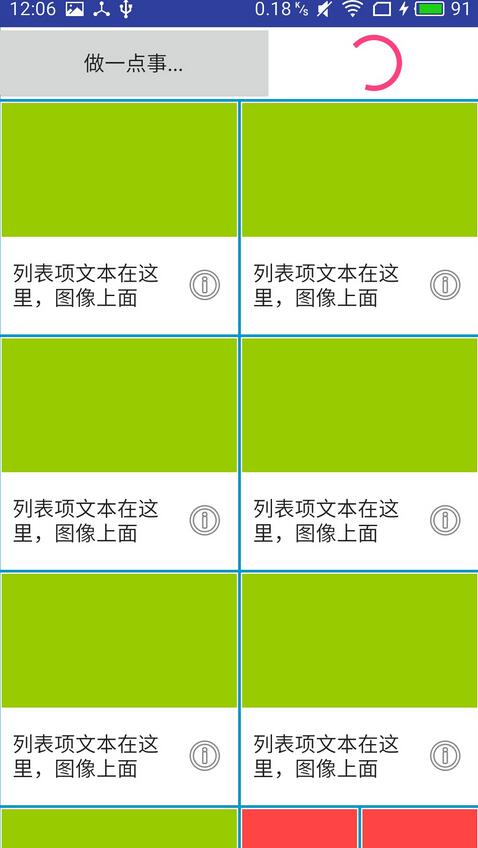
case 0:
case 29:
v = mInflater.inflate(R.layout.element_header, parent, false);
lp = new LayoutParams(v.getLayoutParams());
lp.span = mSGV.getColumnCount();
break;
case 8:
case 9:
case 18:
case 19:
v = mInflater.inflate(R.layout.element_item_small, parent, false);
lp = new LayoutParams(v.getLayoutParams());
lp.span = 1;
break;
case 10:
case 20:
v = mInflater.inflate(R.layout.element_item_large, parent, false);
lp = new LayoutParams(v.getLayoutParams());
lp.span = 4;
break;
default:
v = mInflater.inflate(R.layout.element_item, parent, false);
lp = new LayoutParams(v.getLayoutParams());
lp.span = 2;
break;
}
v.setLayoutParams(lp);
return v;
}
}
}
activity_main.xml內容:
<?xml version="1.0" encoding="utf-8"?>
<RelativeLayout
 xmlns:android="http://schemas.android.com/apk/res/android"
 xmlns:tools="http://schemas.android.com/tools"
 android:layout_width="match_parent"
 android:layout_height="match_parent"
 android:paddingLeft="@dimen/activity_horizontal_margin"
 android:paddingRight="@dimen/activity_horizontal_margin"
 android:paddingTop="@dimen/activity_vertical_margin"
 android:paddingBottom="@dimen/activity_vertical_margin"
 tools:context="siso.haha.MainActivity">


 <Button
 android:layout_width="match_parent"
 android:layout_height="wrap_content"
 android:text="動態GridView"
 android:id="@+id/btnStaggeredGridView"
 android:layout_alignParentTop="true"
 android:layout_centerHorizontal="true" />

 <Button
 android:layout_width="match_parent"
 android:layout_height="wrap_content"
 android:text="New Button"
 android:id="@+id/button2"
 android:layout_below="@+id/btnStaggeredGridView"
 android:layout_centerHorizontal="true" />

 <Button
 android:layout_width="match_parent"
 android:layout_height="wrap_content"
 android:text="New Button"
 android:id="@+id/button3"
 android:layout_below="@+id/button2"
 android:layout_centerHorizontal="true" />

 <Button
 android:layout_width="match_parent"
 android:layout_height="wrap_content"
 android:text="New Button"
 android:id="@+id/button4"
 android:layout_below="@+id/button3"
 android:layout_centerHorizontal="true" />

 <Button
 android:layout_width="match_parent"
 android:layout_height="wrap_content"
 android:text="New Button"
 android:id="@+id/button5"
 android:layout_below="@+id/button4"
 android:layout_centerHorizontal="true" />

 <Button
 android:layout_width="match_parent"
 android:layout_height="wrap_content"
 android:text="New Button"
 android:id="@+id/button6"
 android:layout_below="@+id/button5"
 android:layout_centerHorizontal="true" />

 <Button
 android:layout_width="match_parent"
 android:layout_height="wrap_content"
 android:text="New Button"
 android:id="@+id/button7"
 android:layout_below="@+id/button6"
 android:layout_centerHorizontal="true" />

 <Button
 android:layout_width="match_parent"
 android:layout_height="wrap_content"
 android:text="New Button"
 android:id="@+id/button8"
 android:layout_below="@+id/button7"
 android:layout_centerHorizontal="true" />

 <Button
 android:layout_width="match_parent"
 android:layout_height="wrap_content"
 android:text="New Button"
 android:id="@+id/button9"
 android:layout_below="@+id/button8"
 android:layout_centerHorizontal="true" />

 <Button
 android:layout_width="match_parent"
 android:layout_height="wrap_content"
 android:text="New Button"
 android:id="@+id/button10"
 android:layout_alignParentBottom="true"
 android:layout_centerHorizontal="true" />
</RelativeLayout>
activity_staggeredgridview.xml內容:
<?xml version="1.0" encoding="utf-8"?>

 <RelativeLayout xmlns:android="http://schemas.android.com/apk/res/android"
 xmlns:tools="http://schemas.android.com/tools"
 android:layout_width="match_parent"
 android:layout_height="match_parent"
 tools:context=".staggeredgridviewActivity" >

 <viewHelper.StaggeredGridView
  android:id="@+id/grid"
  android:layout_width="match_parent"
  android:layout_height="match_parent" />

 </RelativeLayout>
其他:
element_header.xml
<?xml version="1.0" encoding="utf-8"?>
<LinearLayout xmlns:android="http://schemas.android.com/apk/res/android"
 android:layout_width="match_parent"
 android:layout_height="56dp"
 android:background="@drawable/bg_white_box"
 android:gravity="center_vertical"
 android:orientation="horizontal" >

 <Button
 android:id="@+id/button1"
 android:layout_width="wrap_content"
 android:layout_height="wrap_content"
 android:layout_weight="1"
 android:text="做一點事..." />

 <ProgressBar
 android:id="@+id/progressBar1"
 android:layout_width="wrap_content"
 android:layout_height="wrap_content"
 android:layout_weight="1" />

</LinearLayout>
element_item.xml:
<?xml version="1.0" encoding="utf-8"?>
<LinearLayout xmlns:android="http://schemas.android.com/apk/res/android"
 android:layout_width="match_parent"
 android:layout_height="wrap_content"
 android:background="@drawable/bg_white_box"
 android:orientation="vertical"
 android:padding="2dp" >

 <ImageView
 android:id="@+id/imageView1"
 android:layout_width="match_parent"
 android:layout_height="100dp"
 android:src="@android:color/holo_green_light" />

 <TextView
 android:id="@+id/textView1"
 android:layout_width="match_parent"
 android:layout_height="56dp"
 android:layout_margin="8dp"
 android:drawableRight="@android:drawable/ic_menu_info_details"
 android:gravity="center_vertical"
 android:lines="2"
 android:text="列表項文本在這裡,圖像上面"
 android:textAppearance="?android:attr/textAppearance" />

</LinearLayout>
element_item_large.xml
<?xml version="1.0" encoding="utf-8"?>
<LinearLayout xmlns:android="http://schemas.android.com/apk/res/android"
 android:layout_width="match_parent"
 android:layout_height="wrap_content"
 android:background="@drawable/bg_white_box"
 android:orientation="vertical"
 android:padding="2dp" >

 <ImageView
 android:id="@+id/imageView1"
 android:layout_width="match_parent"
 android:layout_height="160dp"
 android:src="@android:color/holo_orange_light" />

 <TextView
 android:id="@+id/textView1"
 android:layout_width="match_parent"
 android:layout_height="wrap_content"
 android:layout_margin="8dp"
 android:drawableRight="@android:drawable/ic_menu_info_details"
 android:gravity="center_vertical"
 android:lines="2"
 android:text="列表項文本在這裡,圖像上面"
 android:textAppearance="?android:attr/textAppearance" />

</LinearLayout>
element_item_small.xml
<?xml version="1.0" encoding="utf-8"?>
<LinearLayout xmlns:android="http://schemas.android.com/apk/res/android"
 android:layout_width="match_parent"
 android:layout_height="wrap_content"
 android:background="@drawable/bg_white_box"
 android:orientation="vertical"
 android:padding="2dp" >

 <ImageView
 android:id="@+id/imageView1"
 android:layout_width="match_parent"
 android:layout_height="100dp"
 android:src="@android:color/holo_red_light" />

 <TextView
 android:id="@+id/textView1"
 android:layout_width="match_parent"
 android:layout_height="56dp"
 android:layout_margin="8dp"
 android:drawableRight="@android:drawable/ic_menu_info_details"
 android:gravity="center_vertical"
 android:lines="2"
 android:text="列表項文本在這裡,圖像上面"
 android:textAppearance="?android:attr/textAppearance" />

</LinearLayout>
bg_white_box.xml
<?xml version="1.0" encoding="utf-8"?>
<shape xmlns:android="http://schemas.android.com/apk/res/android"
 android:shape="rectangle" >

 <solid android:color="@android:drawable/screen_background_light" />

 <stroke
 android:width="1dp"
 android:color="@android:color/holo_blue_dark" />

</shape>
運行結果如圖:
以上就是本文的全部內容,希望對大家的學習有所幫助,也希望大家多多支持本站。
 貝塞爾曲線開發的藝術
貝塞爾曲線開發的藝術一句話概括貝塞爾曲線:將任意一條曲線轉化為精確的數學公式。很多繪圖工具中的鋼筆工具,就是典型的貝塞爾曲線的應用貝塞爾曲線中有一些比較關鍵的名詞,解釋如
 Android中適用於ListView、GridView等組件的通用Adapter
今天隨便逛逛CSDN,看到主頁上推薦了一篇文章Android 快速開發系列 打造萬能的ListView GridView 適配器,剛好這兩天寫項目自己也封裝了類似的Com
 Android - HttpURLConnection 拋出異常
HttpURLConnection 拋出異常 Http的URL鏈接, 會發生錯誤, 主要原因是 在主UI線程中, 使用網絡調用(network call),
 Android PraiseTextView實現朋友圈點贊功能
PraiseTextView說明我是將朋友圈分成了幾個獨立模塊單獨自定義的View,通過回調完成交互,耦合性算是非常低了,主要有以下及部分:1.評論布局(自定義TextV