編輯:關於Android編程
前言
最近因為公司項目需求,需要遠程調度啟動客戶端輸入法輸入內容。
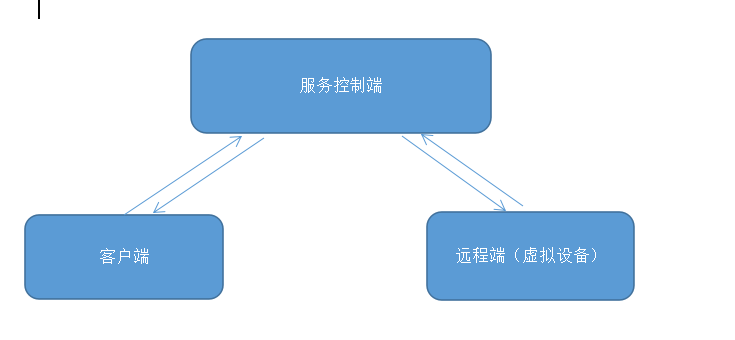
這就是大致的需求流程,這篇首先講遠程與服務控制端通訊。首先控制服務端定義好一個Service,且在ServiceManager注冊添加服務。
在這裡我講解遠程端與服務控制端通訊(主要通過C++往ServiceManager注冊服務)。
首先我們得獲取到服務控制端注冊在ServiceManager的服務IBinder對象,通過Java反射機制獲得Ibinder接口對象。
 public static IBinder getRemoteBinder(){
 try {
 Class<?> serviceManager = Class.forName("android.os.ServiceManager");
 Method getService = serviceManager.getMethod("getService", String.class);
 IBinder iBinder = (IBinder) getService.invoke(serviceManager.newInstance(), "InputService");

 if(iBinder==null){
 Log.e(PinyinIME.TAG,"getService InputService : is empty");
 printServerList();//打印系統所提供的所有服務
 }
 return iBinder;
 } catch (ClassNotFoundException e) {
 e.printStackTrace();
 } catch (NoSuchMethodException e) {
 e.printStackTrace();
 } catch (IllegalAccessException e) {
 e.printStackTrace();
 } catch (IllegalArgumentException e) {
 e.printStackTrace();
 } catch (InvocationTargetException e) {
 e.printStackTrace();
 } catch (InstantiationException e) {
 e.printStackTrace();
 }
 return null;
 }
//具體源碼在android.os.ServiceManager
 /**
 * Returns a reference to a service with the given name.
 *
 * @param name the name of the service to get
 * @return a reference to the service, or <code>null</code> if the service doesn't exist
 */
 public static IBinder getService(String name) {
 try {
 IBinder service = sCache.get(name);
 if (service != null) {
 return service;
 } else {
 return getIServiceManager().getService(name);
 }
 } catch (RemoteException e) {
 Log.e(TAG, "error in getService", e);
 }
 return null;
 }
獲取到IBinder對象作用是跨進程,舉個例子,輸入法程序是怎麼和應用編輯框通訊的呢?怎麼通過什麼控制輸入法彈起隱藏的呢。也是通過這個IBinder來通訊的,不信你翻翻源碼,這裡不做詳細介紹。
而服務控制端則是由C++層注入服務:
class IServiceManager : public IInterface
{
public:
 DECLARE_META_INTERFACE(ServiceManager);

 /**
 * Retrieve an existing service, blocking for a few seconds
 * if it doesn't yet exist.
 */
 virtual sp<IBinder> getService( const String16& name) const = 0;

 /**
 * Retrieve an existing service, non-blocking.
 */
 virtual sp<IBinder> checkService( const String16& name) const = 0;

 /**
 * Register a service.
 */
 virtual status_t addService( const String16& name,
   const sp<IBinder>& service,
   bool allowIsolated = false) = 0;

 /**
 * Return list of all existing services.
 */
 virtual Vector<String16> listServices() = 0;

 enum {
 GET_SERVICE_TRANSACTION = IBinder::FIRST_CALL_TRANSACTION,
 CHECK_SERVICE_TRANSACTION,
 ADD_SERVICE_TRANSACTION,
 LIST_SERVICES_TRANSACTION,
 };
};
//上面C++層注冊服務提供一個IBinder接口子類,需要實現onTransact方法
 virtual status_t onTransact(uint32_t code,
 const Parcel& data,
 Parcel* reply,
 uint32_t flags = 0)
 {
 LOGD("enter MyService onTransact and the code is %d", code);
 switch (code)
 {
 case BINDER_HANDLE:
 LOGD("MyService interface handle");
 reply->writeCString("handle reply");
 break;
 case BINDER_SET_SCREEN:
 LOGD("MyService interface set screen");
 reply->writeCString("set screen reply");
 break;
 case BINDER_SET_CHAR:
 {//call cb
 LOGD("MyService interface set char before");
 reply->writeCString("set char reply");
 cb = data.readStrongBinder();
 if (cb != NULL)
 {
 LOGD("MyService interface set char : %s", data.readCString());
 Parcel in, out;
 in.writeInterfaceToken(String16(BINDER_NAME));
 in.writeInt32(n++);
 in.writeString16(String16("This is a string."));
 cb->transact(1, in, &out, 0);
 show();
 }
 break;
 }
 default:
 return BBinder::onTransact(code, data, reply, flags);
 }
 return 0;
 }
這樣我們可以通過剛剛獲取到IBinder對象與之通訊了,這裡我只講個例子:
當遠程端設備輸入法激活的時候,我將傳遞輸入法輸入類型和輸入法展示的多功能鍵傳遞給服務控制端。
 //當輸入法被激活的時候,會調用onStartInputView(EditorInfo,boolean)
 Parcel data = Parcel.obtain();
 data.writeInt(editorInfo.inputType);
 data.writeInt(editorInfo.imeOptions);

 Log.d(TAG, "isActives:" + isActives);

 if (isActives) {
 if (mController != null) {
 mController.startInput(data, Parcel.obtain());
 } else {
 isNeedActives = true;
 tmp = data;
 mController = new Controller(remoteBinder,this);
 }
 } else {
 isNeedActives = true;
 tmp = data;
 if (mController != null) {
 mController.serviceConnection();
 } else {
 mController = new Controller(remoteBinder,this);
 }
 }

//這裡我將兩個int參數寫入到Parce對象中開始進行通訊

/**
 * 開始輸入
 *
 * @param data
 * 寫入輸入類型和多功能
 * @param reply
 */
 public void startInput(final Parcel data, final Parcel reply) {
 Log.d(PinyinIME.TAG, getClass().getName() + ":\t startInput");

 if (!PinyinIME.isActives) {
 Log.d(PinyinIME.TAG, "not yet check success , start input failure");
 dealHandler.sendEmptyMessage(Constant.HANDER_RELINK);
 return;
 }

 new Thread(new Runnable() {
 @Override
 public void run() {
 if (remoteBinder != null && remoteBinder.isBinderAlive()) {
  try {
  if (remoteBinder.transact(
  Constant.INPUT_METHOD_ACTIVATION, data, reply,
  IBinder.FLAG_ONEWAY)) {
  PinyinIME.isNeedActives = false;
  Log.d(PinyinIME.TAG,
   "input method to activate, notify the success");
  } else {
  Log.d(PinyinIME.TAG,
   "input method to activate, notify the failure");
  }
  } catch (RemoteException e) {
  e.printStackTrace();
  } finally {
  data.recycle();
  reply.recycle();
  }
 }else{
  dealHandler.sendEmptyMessage(Constant.HANDER_RELINK);
 }
 }
 }).start();
 }
這樣我們就可以通過獲取到的Ibinder對象的transact方法進行通訊。
//code必須雙方定義好,否則接收數據無法正常,
//第一個是我們裝載的序列化數據,
//第二我們可以直接傳個對象,最好一個是需要返回結果的標識,
//0代表需要返回內容,FLAG_ONEWAY單方面無需返回結果的標識

public boolean transact(int code, Parcel data, Parcel reply, int flags)
 throws RemoteException;
當我們調用了ibinder.transact(int,parce,parce,int)方法,這是注冊的服務中的IBinder對象的onTransact(int,parce,parce,int)方法就會被響應,這樣我們就實現了遠程端跟服務控制端通訊了。
到了這裡,有個問題,服務控制端接收到客戶端輸入的內容咋辦,怎通知遠程端輸入法輸入內容到編輯框中呢。
其實也很簡單,我們只需要在遠程端輸入法程序實現一個Ibinder對象,傳遞給服務控制端,這樣就可以實現,具體怎麼傳遞了?
//首先我們得讓遠程輸入法程序擁有屬於自己的ibinder類。
package com.redfinger.inputmethod.server;

import com.android.inputmethod.pinyin.PinyinIME;

import android.annotation.SuppressLint;
import android.os.Binder;
import android.os.IBinder;
import android.os.IInterface;
import android.os.Parcel;
import android.os.RemoteException;
import android.util.Log;
import android.view.KeyEvent;

public interface InputBinder extends IInterface{

 public static class Stub extends Binder implements InputBinder{
 private static final java.lang.String DESCRIPTOR = "com.redfinger.inputmethod.service.InputBinder";
 public PinyinIME pinyinIME;

 public Stub(PinyinIME pinyinIME) {
 this.pinyinIME = pinyinIME;
 this.attachInterface(this, DESCRIPTOR);
 }

 public InputBinder asInterface(IBinder obj){
 if(obj == null){
 return null;
 }
 IInterface iInterface = obj.queryLocalInterface(DESCRIPTOR);
 if(iInterface!=null&&iInterface instanceof InputBinder){
 return (InputBinder)iInterface;
 }
 return new Stub.Proxy(obj);
 }

 @Override
 public IBinder asBinder() {
 return this;
 }

 @SuppressLint({ "NewApi", "Recycle" })
 @Override
 protected boolean onTransact(int code, Parcel data, Parcel reply,
 int flags) throws RemoteException {
 switch (code) {
 case Constant.CONNECTION_HANDSHAKE2:
 String dataString = data.readString();
 Log.d(PinyinIME.TAG, "The second handshake start [data = "+dataString +"]");
 if("CONNECTION_RESPONED".equals(dataString)){
  Parcel parcel = Parcel.obtain();
  parcel.writeString("CONNECTION_FINISH");
  pinyinIME.getRemoteBinder().transact(Constant.CONNECTION_HANDSHAKE3, parcel, Parcel.obtain(), IBinder.FLAG_ONEWAY);
  PinyinIME.isActives = true;
  Log.d(PinyinIME.TAG, "The third handshake success");

  if (PinyinIME.isNeedActives) {
  PinyinIME.mController.startInput(pinyinIME.getTmp(), Parcel.obtain());
  }
  if (PinyinIME.isNeedCloseInputMethod) {
  PinyinIME.mController.finishInput();
  }

 }else{
  Log.d(PinyinIME.TAG, "The third handshake failure , agent connect ! ");
  PinyinIME.mController.serviceConnection();
 }
 break;
 case Constant.FUNCTION_INPUT:
 ....
 switch (keyCode) {
 case 14:
  pinyinIME.simulateKeyEventDownUp(KeyEvent.KEYCODE_DEL);
  return true;
 case 28:
  pinyinIME.simulateKeyEventDownUp(KeyEvent.KEYCODE_ENTER);
  return true;
 case 65:
  pinyinIME.requestHideSelfFromClient = true;
  pinyinIME.requestHideSelf(0);
  break;
 }
 break;
 case Constant.CHARACTER_INPUT:
 ....
 return true;
 case Constant.DISCONNECTION:
 ....
 break;
 case Constant.INPUT_METHOD_PLATFORM:
 ....
 break;
 }
 return super.onTransact(code, data, reply, flags);
 }

 public static class Proxy implements InputBinder{

 private android.os.IBinder mRemote;

 public Proxy(android.os.IBinder mRemote) {
 this.mRemote = mRemote;
 }
 @Override
 public IBinder asBinder() {
 return mRemote;
 }
 public java.lang.String getInterfaceDescriptor()
 {
 return DESCRIPTOR;
 }
 }
 static final int receiveChar = (android.os.IBinder.FIRST_CALL_TRANSACTION + 0);
 }
}
是不是特變像AIDL文件的內容一樣,aidl其實就是Android自己給我寫好的ibinder代碼一樣。
這樣我們就可以在獲取到服務控制端ibinder對象中寫入我們自己ibinder對象,傳遞過去讓他通過transact方法來與輸入法程序ibinder對象通訊了。
 //Parce類中提供了這樣的一個方法,就是用於寫入ibinder對象的。
 public final void writeStrongBinder(IBinder val) {
 nativeWriteStrongBinder(mNativePtr, val);
 }
這樣我們就可以在InputBinder類中來處理返回的數據了。
總結
以上就是這篇文章的全部內容了,希望本文的內容對大家的學習或者工作能帶來一定的幫助,如果有疑問大家可以留言交流。
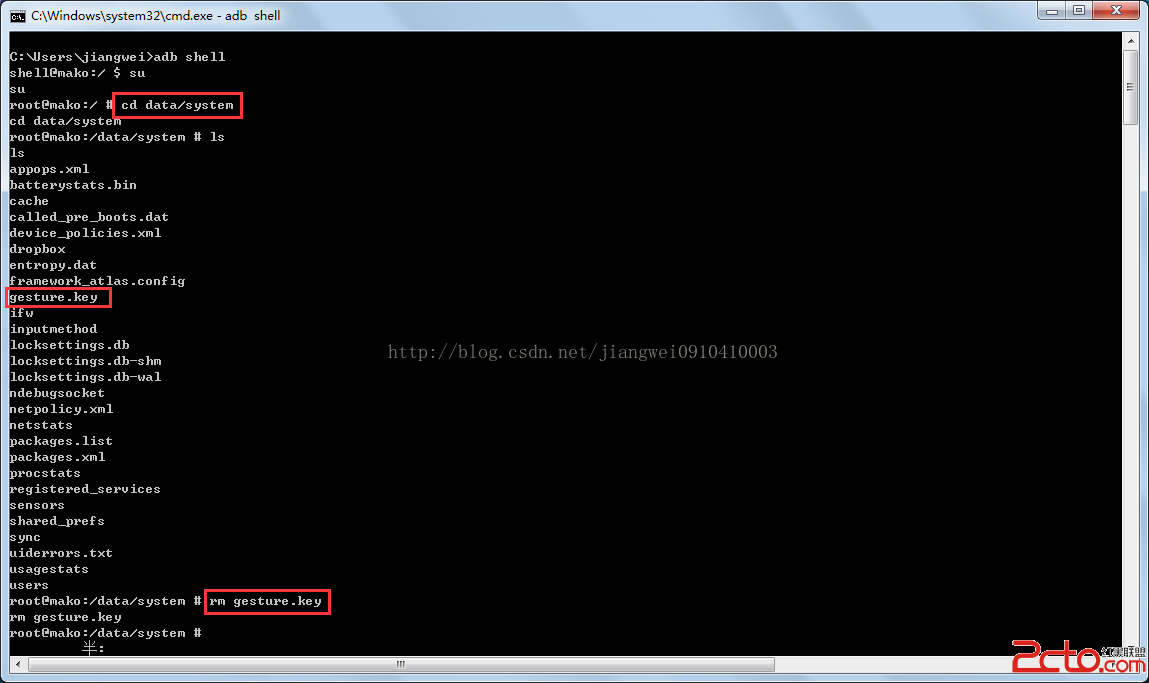 Android中可以做的兩件壞事---破解鎖屏密碼和獲取Wifi密碼
之前的文章一直在介紹OC,最近也是在找急忙慌的學習IOS,所以Android方面的知識分享就有點中斷了,但是我現在還是要靠Android吃飯,所以不能Android的工作
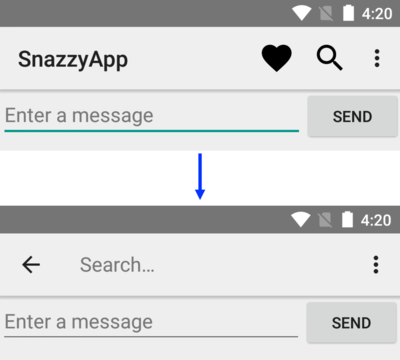 動作視圖和動作提供器(Action Views and Action Providers)
首先承認:這篇文章翻譯的有點不准確,因為這個action,我拿不准怎麼翻譯,不知道是翻譯成動詞還是名詞。所以我把有道詞典上的翻譯結果列在下面。action n. 行動;活
 微信怎麼群發消息 微信群發信息教程
現在大家很少用短信和飛信發信息了,自從微信出現後,微信可以說已經慢慢替代了短信,飛信,QQ等通信方式,很多朋友都選擇使用微信和朋友們溝通和交流,在節假日的時
 使用okhttp3做Android圖片框架Picasso的下載器和緩存器
最近項目裡把圖片加載框架從xUtils換到了Picasso,一些下載和緩存的策略也因此發生變化,Picasso的緩存沒有xUtils自動化那麼高,使用起來遇到了一些困難,