編輯:關於Android編程
本教程為大家分享了Android PopupWindow彈出菜單的具體代碼,供大家參考,具體內容如下

項目代碼:http://xiazai.jb51.net/201611/yuanma/PopupLeftMenu(jb51.net).rar
項目SDK是5.1,建議將代碼拷到自己的工程中去
代碼如下:
MainActivity類:
package com.example.popupleftmenu;
import android.app.Activity;
import android.content.Context;
import android.graphics.drawable.ColorDrawable;
import android.os.Bundle;
import android.view.Gravity;
import android.view.MotionEvent;
import android.view.View;
import android.view.View.OnClickListener;
import android.view.View.OnTouchListener;
import android.view.ViewGroup.LayoutParams;
import android.view.WindowManager;
import android.widget.Button;
import android.widget.PopupWindow;
import android.widget.Toast;
public class MainActivity extends Activity {
private Context context = null;
private PopupWindow popupWindow;
private int from = 0;
@Override
protected void onCreate(Bundle savedInstanceState) {
super.onCreate(savedInstanceState);
context = this;
setContentView(R.layout.activity_main);
Button popLeftBtn = (Button)findViewById(R.id.pop_left_btn);
Button popRightBtn = (Button)findViewById(R.id.pop_right_btn);
Button popBottomBtn = (Button)findViewById(R.id.pop_bottom_btn);
popLeftBtn.setOnClickListener(popClick);
popRightBtn.setOnClickListener(popClick);
popBottomBtn.setOnClickListener(popClick);
}
OnClickListener popClick = new OnClickListener() {
@Override
public void onClick(View v) {
switch(v.getId()){
case R.id.pop_left_btn:{
from = Location.LEFT.ordinal();
break;
}
case R.id.pop_right_btn:{
from = Location.RIGHT.ordinal();
break;
}
case R.id.pop_bottom_btn:{
from = Location.BOTTOM.ordinal();
break;
}
}
//調用此方法,menu不會頂置
//popupWindow.showAsDropDown(v);
initPopupWindow();
}
};
/**
* 添加新筆記時彈出的popWin關閉的事件,主要是為了將背景透明度改回來
*
*/
class popupDismissListener implements PopupWindow.OnDismissListener{
@Override
public void onDismiss() {
backgroundAlpha(1f);
}
}
protected void initPopupWindow(){
View popupWindowView = getLayoutInflater().inflate(R.layout.pop, null);
//內容,高度,寬度
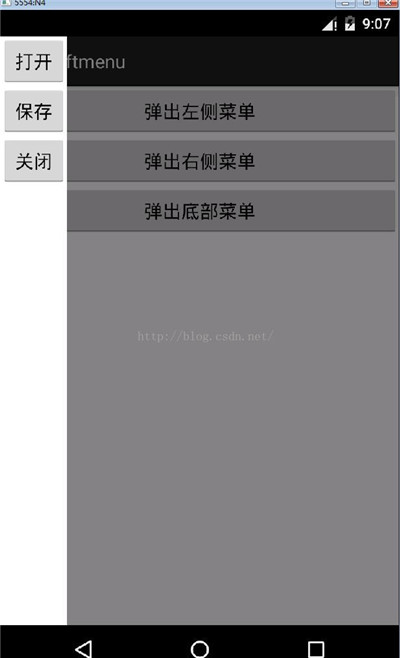
if(Location.BOTTOM.ordinal() == from){
popupWindow = new PopupWindow(popupWindowView, LayoutParams.FILL_PARENT, LayoutParams.WRAP_CONTENT, true);
}else{
popupWindow = new PopupWindow(popupWindowView, LayoutParams.WRAP_CONTENT, LayoutParams.FILL_PARENT, true);
}
//動畫效果
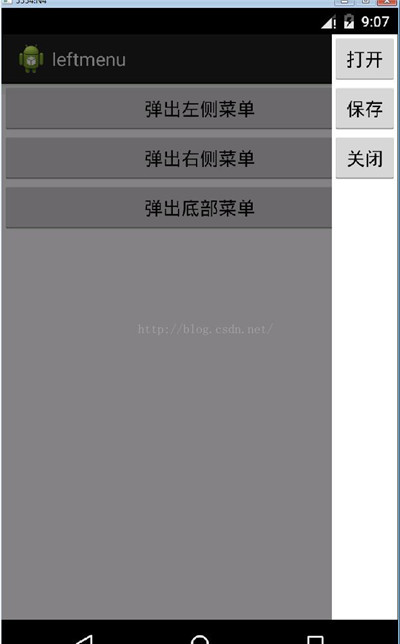
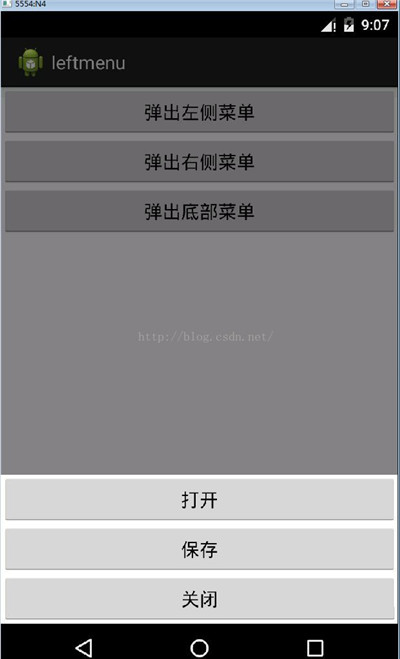
if(Location.LEFT.ordinal() == from){
popupWindow.setAnimationStyle(R.style.AnimationLeftFade);
}else if(Location.RIGHT.ordinal() == from){
popupWindow.setAnimationStyle(R.style.AnimationRightFade);
}else if(Location.BOTTOM.ordinal() == from){
popupWindow.setAnimationStyle(R.style.AnimationBottomFade);
}
//菜單背景色
ColorDrawable dw = new ColorDrawable(0xffffffff);
popupWindow.setBackgroundDrawable(dw);
//寬度
//popupWindow.setWidth(LayoutParams.WRAP_CONTENT);
//高度
//popupWindow.setHeight(LayoutParams.FILL_PARENT);
//顯示位置
if(Location.LEFT.ordinal() == from){
popupWindow.showAtLocation(getLayoutInflater().inflate(R.layout.activity_main, null), Gravity.LEFT, 0, 500);
}else if(Location.RIGHT.ordinal() == from){
popupWindow.showAtLocation(getLayoutInflater().inflate(R.layout.activity_main, null), Gravity.RIGHT, 0, 500);
}else if(Location.BOTTOM.ordinal() == from){
popupWindow.showAtLocation(getLayoutInflater().inflate(R.layout.activity_main, null), Gravity.BOTTOM|Gravity.CENTER_HORIZONTAL, 0, 0);
}
//設置背景半透明
backgroundAlpha(0.5f);
//關閉事件
popupWindow.setOnDismissListener(new popupDismissListener());
popupWindowView.setOnTouchListener(new OnTouchListener() {
@Override
public boolean onTouch(View v, MotionEvent event) {
/*if( popupWindow!=null && popupWindow.isShowing()){
popupWindow.dismiss();
popupWindow=null;
}*/
// 這裡如果返回true的話,touch事件將被攔截
// 攔截後 PopupWindow的onTouchEvent不被調用,這樣點擊外部區域無法dismiss
return false;
}
});
Button open = (Button)popupWindowView.findViewById(R.id.open);
Button save = (Button)popupWindowView.findViewById(R.id.save);
Button close = (Button)popupWindowView.findViewById(R.id.close);
open.setOnClickListener(new OnClickListener() {
@Override
public void onClick(View v) {
Toast.makeText(context, "Open", Toast.LENGTH_LONG).show();
popupWindow.dismiss();
}
});
save.setOnClickListener(new OnClickListener() {
@Override
public void onClick(View v) {
Toast.makeText(context, "Open", Toast.LENGTH_LONG).show();
popupWindow.dismiss();
}
});
close.setOnClickListener(new OnClickListener() {
@Override
public void onClick(View v) {
Toast.makeText(context, "Open", Toast.LENGTH_LONG).show();
popupWindow.dismiss();
}
});
}
/**
* 設置添加屏幕的背景透明度
* @param bgAlpha
*/
public void backgroundAlpha(float bgAlpha)
{
WindowManager.LayoutParams lp = getWindow().getAttributes();
lp.alpha = bgAlpha; //0.0-1.0
getWindow().setAttributes(lp);
}
/**
* 菜單彈出方向
*
*/
public enum Location {
LEFT,
RIGHT,
TOP,
BOTTOM;
}
}
兩個布局文件:
1.activity_main.xml,就三個Button
<LinearLayout xmlns:android="http://schemas.android.com/apk/res/android"
 xmlns:tools="http://schemas.android.com/tools"
 android:layout_width="fill_parent"
 android:layout_height="fill_parent"
 android:orientation="vertical">

 <Button
  android:id="@+id/pop_left_btn"
  android:layout_width="fill_parent"
  android:layout_height="wrap_content"
  android:text="@string/pop_left"/>

 <Button
  android:id="@+id/pop_right_btn"
  android:layout_width="fill_parent"
  android:layout_height="wrap_content"
  android:text="@string/pop_right"/>

 <Button
  android:id="@+id/pop_bottom_btn"
  android:layout_width="fill_parent"
  android:layout_height="wrap_content"
  android:text="@string/pop_bottom"/>


</LinearLayout>
2. pop.xml,也是三個Button,可以自己修改
<?xml version="1.0" encoding="utf-8"?>
<LinearLayout xmlns:android="http://schemas.android.com/apk/res/android"
 android:layout_width="fill_parent"
 android:layout_height="fill_parent"
 android:orientation="vertical" >

 <!-- <LinearLayout
  android:layout_width="wrap_content"
  android:layout_height="fill_parent"
  android:orientation="vertical"
  android:background="#ffffff"> -->

  <Button android:id="@+id/open"
   android:layout_width="fill_parent"
   android:layout_height="wrap_content"
   android:text="@string/open"/>

  <Button android:id="@+id/save"
   android:layout_width="fill_parent"
   android:layout_height="wrap_content"
   android:text="@string/save"/>

  <Button android:id="@+id/close"
   android:layout_width="fill_parent"
   android:layout_height="wrap_content"
   android:text="@string/close"/>

 <!-- </LinearLayout> -->

</LinearLayout>
strings.xml
<string name="pop_left">彈出左側菜單</string>
 <string name="pop_right">彈出右側菜單</string>
 <string name="pop_bottom">彈出底部菜單</string>
 <string name="open">打開</string>
 <string name="save">保存</string>
 <string name="close">關閉</string>
styles.xml
<style name="AnimationLeftFade">
  <item name="android:windowEnterAnimation">@anim/in_lefttoright</item>
  <item name="android:windowExitAnimation">@anim/out_righttoleft</item>
 </style>

 <style name="AnimationRightFade">
  <item name="android:windowEnterAnimation">@anim/in_righttoleft</item>
  <item name="android:windowExitAnimation">@anim/out_lefttoright</item>
 </style>

 <style name="AnimationBottomFade">
  <item name="android:windowEnterAnimation">@anim/in_bottomtotop</item>
  <item name="android:windowExitAnimation">@anim/out_toptobottom</item>
 </style>
左邊彈出菜單動畫文件:
in_lefttoright.xml:從左邊入
<?xml version="1.0" encoding="utf-8"?>
<set xmlns:android="http://schemas.android.com/apk/res/android">

 <translate
  android:fromXDelta="-100%"
  android:toXDelta="0"
  android:duration="500"/>

</set>
out_righttoleft.xml:從右邊出
<?xml version="1.0" encoding="utf-8"?>
<set xmlns:android="http://schemas.android.com/apk/res/android">

 <translate android:fromXDelta="0"
  android:toXDelta="-100%"
  android:duration="500"/>

</set>
其他動畫文件自己參考寫,就是fromXDelta, fromYDelta, toXDelta和toYDelta使用。
以上就是本文的全部內容,希望對大家的學習有所幫助,也希望大家多多支持本站。
 Android Handler 異步消息處理機制的妙用 創建強大的圖片加載類
最近創建了一個群,方便大家交流,群號:55032675 上一篇博客介紹了Android異步消息處理機制,如果你還不了解,可以看:Android 異步消息處理
 Android NDK學習筆記6-JNI對引用數據類型的操作
字符串操作JNI把Java字符串當成引用類型來處理,JNI提供了java字符串與C字符串之間相互轉換的必要函數。因為java字符串對象是不可變的,因此JNI不提供任何修改
 MSM8909+Android5.1.1之bootloader---修改UART0時鐘頻率致無法下載問題解決
MSM8909+Android5.1.1之bootloader---修改UART0時鐘頻率導致無法下載的問題解決 用高通的QFIL下載程序,正常下載界面後顯示如
 Android 面試題總結(二)
前言筆者最近離職找工作快兩周了,這段時間陸陸續續也見識了北上廣這邊跟西部城市對待技術理念的差異和學習深度.俗話說:知恥而後勇,在經歷了面試被虐得體無完膚的過程後,我也找到