編輯:關於Android編程
一、Bundle進行IPC介紹
四大組件中的三大組件(Activity、Service、Receiver)都是支持在Intent中傳遞Bundle數據的,由於Bundle實現了Parcelable接口,所以它可以方便地在不同的進程之間傳輸。當然,傳輸的數據必須能夠被序列化,比如基本類型、實現了Parcelable接口的對象、實現了Serializable接口的對象以及一些Android支持的特殊對象,具體內容可以看Bundle這個類,就可以看到所有它支持的類型。Bundle不支持的類型無法通過它在進程間傳遞數據。
二、使用方法
1.打包數據發送
Intent intent1 = new Intent(MainActivity.this, ThirdActivity.class);
Bundle bundle = new Bundle();
bundle.putCharSequence("name", "zhangmiao");
bundle.putInt("age", 20);
intent1.putExtras(bundle);
startActivity(intent1);
2.接受數據
Intent intent = getIntent();
Bundle bundle = intent.getExtras();
String name = bundle.getString("name");
int age = bundle.getInt("age");
3.在AndroidManifest.xml中開啟多進程
<activity
  ...
  android:process=":remote" />
三、小案例
1.修改activity_main.xml文件
<?xml version="1.0" encoding="utf-8"?>
<LinearLayout
  xmlns:android="http://schemas.android.com/apk/res/android"
  xmlns:tools="http://schemas.android.com/tools"
  android:layout_width="match_parent"
  android:layout_height="match_parent"
  android:fitsSystemWindows="true"
  tools:context="com.zhangmiao.ipcdemo.MainActivity"
  android:orientation="vertical"
  >
  <TextView
    android:layout_width="wrap_content"
    android:layout_height="wrap_content"
    android:layout_gravity="center_horizontal"
    android:text="Bundler">
  </TextView>

  <Button
    android:id="@+id/bundler_button"
    android:layout_width="wrap_content"
    android:layout_height="wrap_content"
    android:text="send message">
  </Button>

</LinearLayout>
2.添加activity_third.xml文件
<?xml version="1.0" encoding="utf-8"?>
<LinearLayout xmlns:android="http://schemas.android.com/apk/res/android"
  android:layout_width="match_parent"
  android:layout_height="match_parent"
  android:orientation="vertical">

  <TextView
    android:layout_width="wrap_content"
    android:layout_height="wrap_content"
    android:layout_gravity="center_horizontal"
    android:text="at activity Third" />

  <TextView
    android:id="@+id/textView1"
    android:layout_width="wrap_content"
    android:layout_height="wrap_content"
    android:text="Activity Third" />

</LinearLayout>
3.添加ThirdActivity類
package com.zhangmiao.ipcdemo;

import android.app.Activity;
import android.content.Intent;
import android.os.Bundle;
import android.widget.TextView;

/**
 * Created by zhangmiao on 2016/12/27.
 */
public class ThirdActivity extends Activity {

  @Override
  protected void onCreate(Bundle savedInstanceState) {
    super.onCreate(savedInstanceState);
    setContentView(R.layout.activity_third);
    Intent intent = getIntent();
    Bundle bundle = intent.getExtras();
    String name = bundle.getString("name");
    int age = bundle.getInt("age");
    TextView textView = (TextView) findViewById(R.id.textView1);
    textView.setText("name:" + name + ",age:" + age);
  }
}
4.修改MainActivity類
package com.zhangmiao.ipcdemo;

import android.content.ComponentName;
import android.content.Context;
import android.content.Intent;
import android.content.ServiceConnection;
import android.os.Bundle;
import android.os.Handler;
import android.os.IBinder;
import android.os.Message;
import android.os.Messenger;
import android.os.RemoteException;
import android.support.v7.app.AppCompatActivity;
import android.util.Log;
import android.view.View;
import android.widget.Button;
import android.widget.TextView;


import java.io.File;
import java.io.FileOutputStream;
import java.io.IOException;
import java.io.ObjectOutputStream;
import java.io.Serializable;

public class MainActivity extends AppCompatActivity {

  private static final String TAG = "MainActivity";

  @Override
  protected void onCreate(Bundle savedInstanceState) {
    super.onCreate(savedInstanceState);
    setContentView(R.layout.activity_main);

    Button button = (Button) findViewById(R.id.bundler_button);
    button.setOnClickListener(new View.OnClickListener() {
      @Override
      public void onClick(View v) {
        Intent intent1 = new Intent(MainActivity.this, ThirdActivity.class);
        Bundle bundle = new Bundle();
        bundle.putCharSequence("name", "zhangmiao");
        bundle.putInt("age", 20);
        intent1.putExtras(bundle);
        startActivity(intent1);
      }
    });
  }
}
5.修改AndroidManifest.xml文件
<?xml version="1.0" encoding="utf-8"?>
<manifest xmlns:android="http://schemas.android.com/apk/res/android"
  package="com.zhangmiao.ipcdemo">

  <uses-permission android:name="android.permission.WRITE_EXTERNAL_STORAGE" />

  <application
    android:allowBackup="true"
    android:icon="@mipmap/ic_launcher"
    android:label="@string/app_name"
    android:supportsRtl="true"
    android:theme="@style/AppTheme">
    <activity
      android:name=".MainActivity"
      android:label="@string/app_name"
      android:launchMode="standard"
      android:theme="@style/AppTheme.NoActionBar">
      <intent-filter>
        <action android:name="android.intent.action.MAIN" />
        <category android:name="android.intent.category.LAUNCHER" />
      </intent-filter>
    </activity>
    <activity
      android:name=".ThirdActivity"
      android:configChanges="screenLayout"
      android:label="@string/app_name"
      android:process=":remote" />
  </application>
</manifest>
完整代碼下載地址:demo
以上就是本文的全部內容,希望對大家的學習有所幫助,也希望大家多多支持本站。
 Android 百度地圖sdk集成
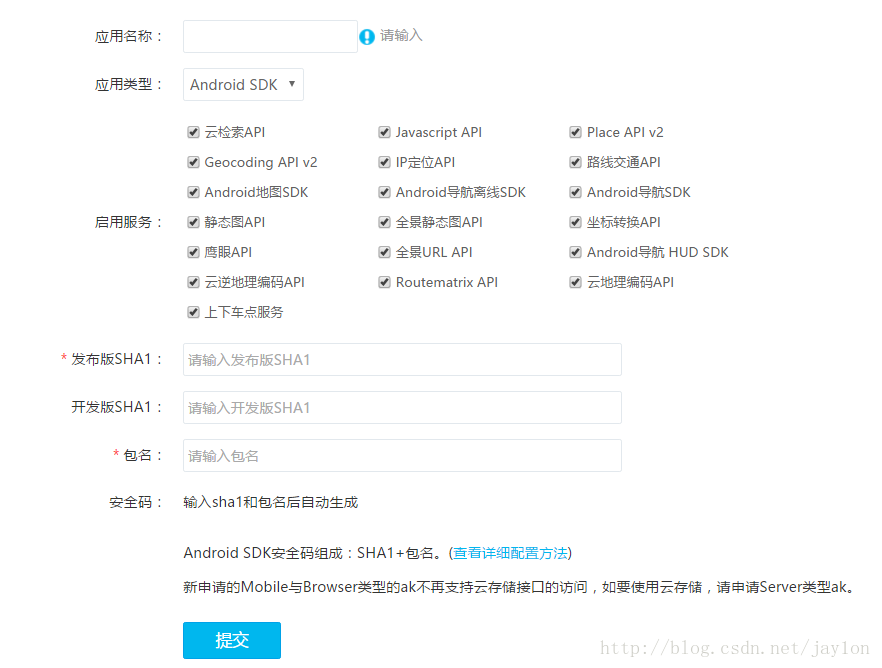
一.申請密鑰登陸百度開放平台,選擇創建應用,輸入應用名稱,選擇AndroidSDK、發布版SHA1值和包名 獲取sha1值– 使用AndroidStudio獲
 Android5.1中surface和CpuConsumer下生產者和消費者間的處理框架簡述
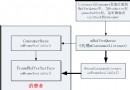
前沿: 如果對SurfaceFlinger架構的工作原理較為熟悉的話,本文閱讀起來會相對容易些。之所以撰寫本文是因為在閱讀Camera HAL3的實現過程中
 android產品研發(九)--)App網絡傳輸協議
上一篇文章中我們講解了App的數據統計,其主要分為兩種:使用第三方服務統計和自身實現數據統計。一般而言我們使用第三方統計服務已經可以很好的滿足我們的也無需求了,只是部分數
 Android手機同時使用Wi-Fi和數據流量
Android手機同時使用Wi-Fi和數據流量大家都知道,當手機成功連接到Wi-Fi熱點以後,手機所產生的上網流量都是通過Wi-Fi來傳輸的,而手機的移動流量會被禁用。但