編輯:Android編程入門
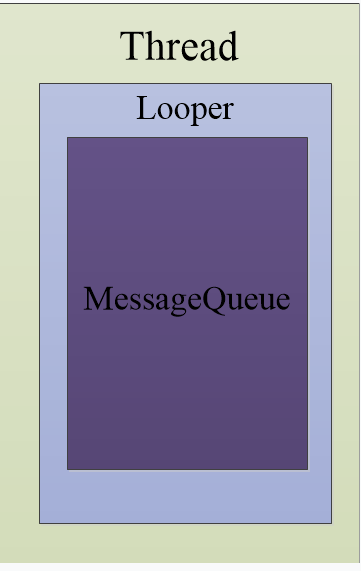
Handler是Android消息機制的上層接口,它為我們封裝了許多底層的細節,讓我們能夠很方便的使用底層的消息機制。Handler的最常見應用場景之一便是通過Handler在子線程中間接更新UI。Handler的作用主要有兩個:一是發送消息;二是處理消息,它的運作需要底層Looper和Message的支撐。MessageQueue即消息隊列,它的底層用單鏈表實現;Looper則負責在一個循環中不斷從MessageQueue中取消息,若取到了就交由Handler進行處理,否則便一直等待。關於Looper需要注意的一點是除了主線程之外的其他線程中默認是不存在Looper的。主線程中之所以存在,是因為在ActivityThread被創建時會完成初始化Looper的工作。
總的來說,Handler的作用是將一個任務切換到指定的線程中去執行。我們知道Android只允許主線程去更新用戶界面,而主線程需要時刻保持較高的響應性,因此我們要把一些耗時任務交給工作者線程去執行。那麼問題來了,如果工作者線程執行完任務後想要更新UI該怎麼破?我們要保證的是主線程不處於阻塞狀態的同時能夠接收到工作者線程的通知,並且能根據工作者線程執行任務的結果對用戶界面進行相應的更新。好消息是Handler能讓我們很方便的做到這些。Handler的工作過程大致如下圖所示:
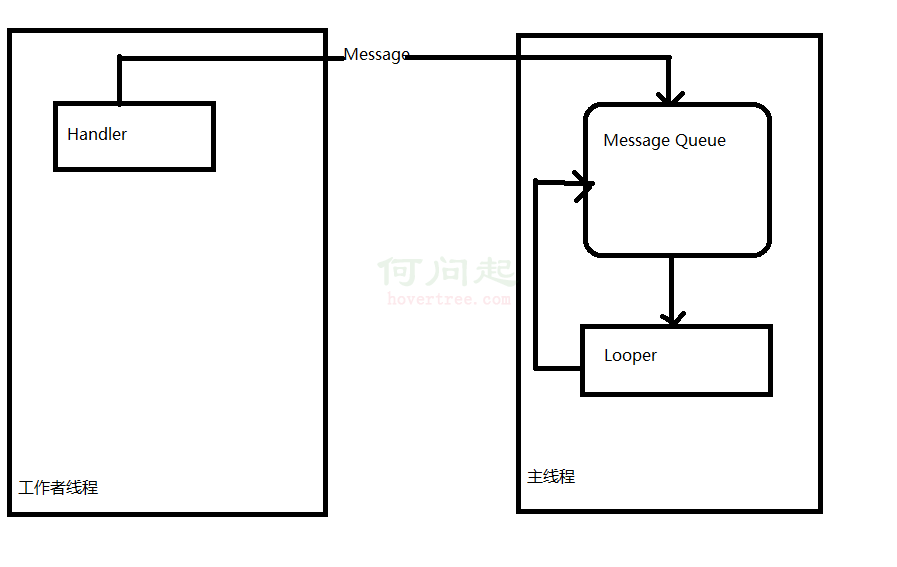
我們針對上圖做下簡單解釋(詳細的分析請見後文):首先我們在主線程中創建Handler對象並定義handleMessage方法,這個Handler對象默認會關聯主線程中的Looper。通過在工作者線程中使用該Handler對象發送消息,相應的消息處理工作(即handleMessage方法)會在主線程中運行,這樣就完成了將任務從工作者線程切換到了主線程。
總的來說,Handler對象在被創建時會使用當前線程的Looper來構建底層的消息循環系統,若當前線程不存在Looper,則會報錯。Handler對象創建成功後,就可以通過Handler的send或post方法發送消息了。調用send/post方法發送消息時,實際上會調用MessageQueue的enqueueMessage方法將該消息加入到MessageQueue中。之後Looper發現有新消息會取出,並把它交給Handler處理。下面我們通過分析相關源碼來詳細介紹這一過程。
ThreadLocal是一個線程內部的數據存儲類。通過使用ThreadLocal,能夠讓同一個數據對象在不同的線程中存在多個副本,而這些副本互不影響。Looper的實現中便使用到了ThreadLocal。通過使用ThreadLocal,每個線程都有自己的Looper,它們是同一個數據對象的不同副本,並且不會相互影響。下面我們現在探索下ThreadLocal的工作原理,為分析Looper的工作原理做好鋪墊。
作為ThreadLocal的一個簡單示例,我們先創建一個ThreadLocal對象:
private ThreadLocal<Integer> mIntegerThreadLocal = new ThreadLocal<Integer>();
然後創建兩個子線程,並在不同的線程中為ThreadLocal對象設置不同的值:
 mIntegerThreadLocal.set(0);
 Log.d(TAG, "In Main Thread, mIntegerThreadLocal = " + mIntegerThreadLocal.get());

 new Thread("Thread 1") {
     @Override
     public void run(){
         mIntegerThreadLocal.set(1);
         Log.d(TAG, "In Thread 1, mIntegerThreadLocal = " + mIntegerThreadLocal.get());
     }
 }.start();

 new Thread("Thread 2") {
     @Override
     public void run() {
         Log.d(TAG, "In Thread 2, mIntegerThreadLocal = " + mIntegerThreadLocal.get());
     }
 }.start();
在以上代碼中,我們在主線程中設置mIntegerThreadLocal的值為0,在Thread 1中該設置為1,而在Thread 2中未設置。我們看一下日志輸出:

通過日志輸出我們可以看到,主線程與Thread 1的值確實分別為我們為他設置的,而Thread 2中由於我們沒有給它賦值,所以就為null。我們雖然在不同的線程中訪問同一個數據對象,卻可以獲取不同的值。那麼ThreadLocal是如何做到這一點的呢?下面我們通過源碼來尋找答案。
Thread類內部有一個專門用來存儲線程對象ThreadLocal數據的實例域,它的聲明如下:
ThreadLocal.Values localValues;
這樣一來,每個線程中就可以維護ThreadLocal對象的一個副本,而且這些副本不會互相干擾,ThreadLocal的get方法只要到localValues中去取數據就好了,set方法也只需操作本線程的localValues。我們來看一下set方法的源碼:
 public void set(T value) {
     Thread currentThread = Thread.currentThread();
     Values values = values(currentThread);
     if (values == null) {
         values = initializeValues(currentThread);
     }
     values.put(this, value);
 }
第3行通過values方法獲取到當前線程的localValues並存入values中,接下來在第4行進行判斷,若localValues為null,則調用initializeValues方法進行初始化,否則會調用put方法將value存進去。實際上,localValues內部有一個名為table的Object數組,ThreadLocal的值就存在這個數組中。下面我們來看以下put方法的源碼,來了解如何將ThreadLocal的值保存到table數組中。
 void put(ThreadLocal<?> key, Object value) {
     cleanUp();

     // Keep track of first tombstone. That's where we want to go back
     // and add an entry if necessary.
     int firstTombstone = -1;

     for (int index = key.hash & mask;; index = next(index)) {
         Object k = table[index];

         if (k == key.reference) {
             // Replace existing entry.
             table[index + 1] = value;
             return;
         }

         if (k == null) {
             if (firstTombstone == -1) {
                 // Fill in null slot.
                 table[index] = key.reference;
                 table[index + 1] = value;
                 size++;
                 return;
             }

             // Go back and replace first tombstone.
             table[firstTombstone] = key.reference;
             table[firstTombstone + 1] = value;
             tombstones--;
             size++;
             return;
         }

         // Remember first tombstone.
         if (firstTombstone == -1 && k == TOMBSTONE) {
             firstTombstone = index;
         }
     }
 }
我們主要關注一下第11行到第15行,從這幾行代碼我們可以了解到,ThreadLocal的值在table數組中的索引是key(即ThreadLocal對象)的reference字段所標識的對象的索引的加一。意思就是,若ThreadLocal對象的reference字段在table數組中的索引為i,那麼ThreadLocal的值在table數組的索引就是i+1。
了解了set方法的大致邏輯後,我們再來看一下get方法都做了些什麼:
 public T get() {
     // Optimized for the fast path.
     Thread currentThread = Thread.currentThread();
     Values values = values(currentThread);
     if (values != null) {
         Object[] table = values.table;
         int index = hash & values.mask;
         if (this.reference == table[index]) {
             return (T) table[index + 1];
         }
     } else {
         values = initializeValues(currentThread);
     }

     return (T) values.getAfterMiss(this);
 }
第4行中,獲取localValues。第5行若判斷為null,則表示未進行設置(比如上面例子中的線程2),就會返回默認值;若判斷非空就先獲取table數組,然後再計算出index,根據index返回ThreadLocal的值。
經過以上對get和set方法的源碼的分析,我們了解到了這兩個方法實際上對不同的線程對象會分別操作它們內部的localValues,所以能夠實現多個ThreadLocal數據對象的副本之間的互不干擾。了解了ThreadLocal的實現原理,下面我們來探索下Looper是怎麼借助ThreadLocal來實現的。
在介紹Looper的工作機制之前,我們先來簡單的介紹下MessageQueue。MessageQueue對消息隊列進行了封裝,在它的內部使用單鏈表來保存消息。MessageQueue主要支持以下兩個操作:
大致了解了MessageQueue後,讓我們一起來探索Looper的內部工作機制,看看它是如何漂亮的完成將任務切換到另一個線程這個工作的。我們首先來看一下Looper的構造方法:
private Looper(boolean quitAllowed) {
    mQueue = new MessageQueue(quitAllowed);
    mThread = Thread.currentThread();
}
我們可以看到Looper的構造方法中創建了一個MessageQueue對象。之前我們提到過Handler只有在存在Looper的線程中才能創建,而我們看到Looper的構造方法是private的,那麼我們怎麼為一個線程創建Looper呢?答案是使用Looper.prepare方法,這個方法的源碼如下:
 public static void prepare() {
     prepare(true);
 }

 private static void prepare(boolean quitAllowed) {
     if (sThreadLocal.get() != null) {
         throw new RuntimeException("Only one Looper may be created per thread");
     }
     sThreadLocal.set(new Looper(quitAllowed));
 }
我們可以看到prepare方法內部調用了Looper的構造器來為當前線程初始化Looper,而且當前的線程的Looper已經初始化的情況下再調用prepare方法會拋出異常。
創建了Looper後,我們就可以開始通過Looper.loop方法進入消息循環了(注意,主線程中我們無需調用loop方法,因為ActivityThread的main方法中已經為我們調用了)。我們來看一下這個方法的源代碼:
 public static void loop() {
     final Looper me = myLooper();
     if (me == null) {
         throw new RuntimeException("No Looper; Looper.prepare() wasn't called on this thread.");
     }
     final MessageQueue queue = me.mQueue;

     // Make sure the identity of this thread is that of the local process,
     // and keep track of what that identity token actually is.
     Binder.clearCallingIdentity();
     final long ident = Binder.clearCallingIdentity();

     for (;;) {
         Message msg = queue.next(); // might block
         if (msg == null) {
             // No message indicates that the message queue is quitting.
             return;
         }

         // This must be in a local variable, in case a UI event sets the logger
         Printer logging = me.mLogging;
         if (logging != null) {
             logging.println(">>>>> Dispatching to " + msg.target + " " +
                         msg.callback + ": " + msg.what);
         }

         msg.target.dispatchMessage(msg);

         if (logging != null) {
             logging.println("<<<<< Finished to " + msg.target + " " + msg.callback);
         }

         // Make sure that during the course of dispatching the
         // identity of the thread wasn't corrupted.
         final long newIdent = Binder.clearCallingIdentity();
         if (ident != newIdent) {
             Log.wtf(TAG, "Thread identity changed from 0x"
                         + Long.toHexString(ident) + " to 0x"
                         + Long.toHexString(newIdent) + " while dispatching to "
                         + msg.target.getClass().getName() + " "
                         + msg.callback + " what=" + msg.what);
         }

         msg.recycleUnchecked();
     }
 }
通過以上代碼我們可以看到,在第13行會進入一個無限循環。接著在第14行,調用了MessageQueue的next方法,之前我們介紹過這個方法會一直阻塞直到從消息隊列中取出一個消息。退出這個無限循環的唯一方法就是MessageQueue返回null。這可以通過調用Looper的quit方法來實現。當Looper的quit/quitSafely方法被調用時,會導致MessageQueue的quit/quitSafely方法被調用,這會導致消息隊列被標記為“退出”狀態,如此一來,MessageQueue的next方法就會返回null了。這告訴了我們,如果我們不調用Looper的quit方法,他就會在loop方法中的循環裡一直運行下去。
若在第14行中成功從MessageQueue中取得了一個消息,接下來就會對這個消息進行處理。第27行調用了msg.target的dispatchMessage方法,其中msg.target指的是發送這條消息的Handler對象,也就是說這裡調用的是發送消息的Handler對象的dispatchMessage方法。注意,Handler的dispatchMessage方法實在創建該Handler時所使用的Looper中執行的,這樣一來,便成功地將任務切換到了Looper所在線程。接下來,我們以分析dispatchMessage方法的源碼為切入點研究一下Handler的工作原理。
首先,我們接著上一步,看一下dispatchMessage方法的源碼:
public void dispatchMessage(Message msg) {
    if (msg.callback != null) {
        handleCallback(msg);
    } else {
        if (mCallback != null) {
            if (mCallback.handleMessage(msg)) {
                return;
            }
        }
        handleMessage(msg);
    }
}
我們可以看到,這個方法中會首先判斷msg.callback是否為null,若不為null則調用handleCallback方法。msg.callback是一個Runnable對象,實際上就代表著我們調用post方法放入MessageQueue中的Runnable對象。也就是說,若我們post了一個Runnable對象,就會調用handleCallback方法,這個方法的源碼如下:
private static void handleCallback(Message message) {
    message.callback.run();
}
從以上代碼我們可以看到,這個方法就是簡單的調用了Runnable對象的run方法讓它開始運行。
回到dispatchMessage方法的代碼,若msg.callback為null,就會判斷mCallback是否為null,若不為null則調用mCallback的handleMessage方法,否則調用handleMessage方法。實際上這兩個handleMessage方法都是我們創建Handler對象時定義的消息處理函數,只不過分別對應了兩種不同的創建Handler對象的方式。調用mCallback的handleMessage方法表示我們創建Handler對象時傳入了一個實現了Callback接口的的對象,而調用handleMessage方法表示我們創建Handler對象時繼承了Handler類並重寫了handleMessage方法。那麼mCallback是什麼呢?讓我們先看一下Handler的構造方法:
 public Handler(Callback callback, boolean async) {
     if (FIND_POTENTIAL_LEAKS) {
         final Class<? extends Handler> klass = getClass();
         if ((klass.isAnonymousClass() || klass.isMemberClass() || klass.isLocalClass()) &&
                     (klass.getModifiers() & Modifier.STATIC) == 0) {
             Log.w(TAG, "The following Handler class should be static or leaks might occur: " +
                     klass.getCanonicalName());
         }
     }

     mLooper = Looper.myLooper();
     if (mLooper == null) {
         throw new RuntimeException(
                 "Can't create handler inside thread that has not called Looper.prepare()");
     }
     mQueue = mLooper.mQueue;
     mCallback = callback;
     mAsynchronous = async;
 }
我們可以看到,mCallback被賦值為我們傳入的第一個參數callback,callback即為實現了Callback接口的對象,Callback接口中只有一個方法,那就是handleMessage方法。
1. Android SDK Sources
2. 《Android開發藝術探索》
 Android消息機制
每一個Android應用在啟動的時候都會創建一個線程,這個線程被稱為主線程或者UI線程,Android應用的所有操作默認都會運行在這個線程中。但是當我們想要進行數據請求,
 Android Studio的git功能的使用介紹
本文介紹Android Studio(下面簡稱AS)中git工具的一些簡單使用。因為AS為git的使用提供了很多人性化的圖形界面操作,在很大程度上可以增加開發效率。本文面
 Android Activity的生命周期簡單總結
Android Activity的生命周期簡單總結這裡的內容參考官方的文檔,這篇文章的目的不是去總結Activity是如何啟動,如何創造,以及暫停和銷毀的,而是從實際開發
 Android Studio的基本使用
今天總結下這段時間對於android studio的使用情況,也對剛使用的朋友一些參考,之前一直使用Eclipse