編輯:Android編程入門
圖片處理在程序開發中也是經常用到的,手機上面經常就有圖片浏覽器,能將圖片放大顯示也能將圖片顯示為縮略圖,同時也可以將圖片豎著看或者橫著看。這些都需要對圖片進行處理,讓其能夠縮放和旋轉。下面來看看Android中處理圖片縮放和旋轉的步驟。
Matrix是在Android中用於操作圖像的類,這個類中postScale和postRotate和分別實現圖片縮放和旋轉,具體步驟如下:
一:對圖片的縮放
(1).先加載要操作的圖片
Bitmap bitmap = BitmapFactory.decodeResource(getResources(),R.drawable.gilr);
(2).然後得到以上加載圖片的高度跟寬度
int height = bitmap.getHeight();
int width = bitmap.getWidth();
(3).接著定義要縮放成最終的圖片高度跟寬度
int nHeight = 200;
int nWidth = 150;
(4).接著計算縮放比例
float scaleWidth = ((float) nWidth)/width;
float scaleHeight = ((float) nHeight)/height;
(5).然後創建Matrix對象
Matrix matrix = new Matrix();
(6).接著使用Matrix對象跟縮放比例實現縮放圖片
matrix.postScale(scaleWidth, scaleHeight);
(7).最後生成縮放後的圖片
Bitmap resizedBitmap = Bitmap.createBitmap(bitmap, 0, 0,width, height, matrix, true);
二,對圖片的旋轉:
(1)Matrix matrix = new Matrix();
(2)matrix.postRotate(60);
(3)Bitmap resizedBitmap = Bitmap.createBitmap(bitmap, 0, 0,width, height, matrix, true);
三,以下是對圖片進行縮放與旋轉的完整例子,完整代碼如下:
在.xml文件中
<LinearLayout xmlns:android="http://schemas.android.com/apk/res/android"
xmlns:tools="http://schemas.android.com/tools"
android:layout_width="match_parent"
android:layout_height="match_parent"
android:orientation="vertical">
<ImageView
android:id="@+id/imageview"
android:layout_width="200dp"
android:layout_height="150dp"
android:scaleType="fitCenter"
android:src="@drawable/gilr"/>
<TextView
android:id="@+id/textview1"
android:layout_width="fill_parent"
android:layout_height="wrap_content"
android:layout_marginTop="10dp"
android:text="圖像寬度:240圖像高度:160"/>
<SeekBar
android:id="@+id/seekbar1"
android:layout_width="200dp"
android:layout_height="wrap_content"
android:max="240"
android:progress="120"
android:layout_marginLeft="10dp"></SeekBar>
<TextView
android:id="@+id/textview2"
android:layout_width="fill_parent"
android:layout_height="wrap_content"
android:layout_marginTop="10dp"
android:text="0度"/>
<SeekBar
android:id="@+id/seekbar2"
android:layout_width="200dp"
android:layout_height="wrap_content"
android:max="360"></SeekBar>
</LinearLayout>
在.java文件中:
public class MainActivity extends Activity implements OnSeekBarChangeListener{

    private int minWidth = 80;  //圖片最小寬度
    private ImageView imageView;
    private TextView textView1;
    private TextView textView2;
    private SeekBar seekBar1;
    private SeekBar seekBar2;
    private Matrix matrix = new Matrix();

    @Override
    protected void onCreate(Bundle savedInstanceState) {
        super.onCreate(savedInstanceState);
        setContentView(R.layout.main);

        imageView = (ImageView) findViewById(R.id.imageview);
        textView1 = (TextView) findViewById(R.id.textview1);
        textView2 = (TextView) findViewById(R.id.textview2);
        seekBar1 = (SeekBar) findViewById(R.id.seekbar1);
        seekBar2 = (SeekBar) findViewById(R.id.seekbar2);
        seekBar1.setOnSeekBarChangeListener(this);
        seekBar2.setOnSeekBarChangeListener(this);

        DisplayMetrics dm = new DisplayMetrics();
        getWindowManager().getDefaultDisplay().getMetrics(dm);
        seekBar1.setMax(dm.widthPixels - minWidth);
    }

    @Override
    public boolean onCreateOptionsMenu(Menu menu) {
        // Inflate the menu; this adds items to the action bar if it is present.
        getMenuInflater().inflate(R.menu.main, menu);
        return true;
    }

    @Override
    public void onProgressChanged(SeekBar seekBar, int progress,
            boolean fromUser) {
        // TODO 自動生成的方法存根
        if(seekBar.getId() == R.id.seekbar1){
            int newWidth = progress + mainWidth;
            int newHeight = (int)(newWidth * 3 / 4);  //圖片高寬比列一定要以.xml文件中的ImageVie中高寬比列相同,否則實效
            imageView.setLayoutParams(new LinearLayout.LayoutParams(newWidth, newHeight));  //這裡是通過布局大縮放圖片大小
            textView1.setText("圖像寬度:" + newWidth + "圖像高度" + newHeight);
        }else if (seekBar.getId() == R.id.seekbar2) {

             Bitmap bitmap = ((BitmapDrawable)(getResources().getDrawable(R.drawable.gilr))).getBitmap();
             matrix.setRotate(progress);//設置翻轉的角度
             bitmap = Bitmap.createBitmap(bitmap,0,0,bitmap.getWidth(),bitmap.getHeight(),matrix,true);
            imageView.setImageBitmap(bitmap);
            textView2.setText(progress + "度");

        }
    }

    @Override
    public void onStartTrackingTouch(SeekBar seekBar) {
        // TODO 自動生成的方法存根

    }

    @Override
    public void onStopTrackingTouch(SeekBar seekBar) {
        // TODO 自動生成的方法存根

    }


}
注意:
Andorid.util 包下的DisplayMetrics 類提供了一種關於顯示的通用信息,如顯示大小,分辨率和字體。
為了獲取DisplayMetrics 成員,首先初始化一個對象如下:
DisplayMetrics display= new DisplayMetrics();
Log.d("DisplayMetrics ", display.toString());//直接在這裡輸出,信息都是0.
getWindowManager().getDefaultDisplay().getMetrics(display);//將當前窗口的一些信息放在DisplayMetrics類中,
Log.d("DisplayMetrics", display.toString());//然後就可以通過dispalyMetrics類來獲取當前窗口的一些信息
注:構造函數DisplayMetrics 不需要傳遞任何參數;getDefaultDisplay() 方法將取得的寬高維度存放於DisplayMetrics 對象中,而取得的寬高維度是以像素為單位(Pixel) ,“像素”所指的是“絕對像素”而非“相對像素”。
通過 DisplayMetrics的 toString()方法可以獲取到 DisplayMetrics的大部分 fields信息。
 Android四大組件之BroadcastReceiver
一、在這裡我會先說明兩個基本概念,Broadcast(廣播)和BroadcastReceiver(廣播接收器) 1、Broadcast:是運用在
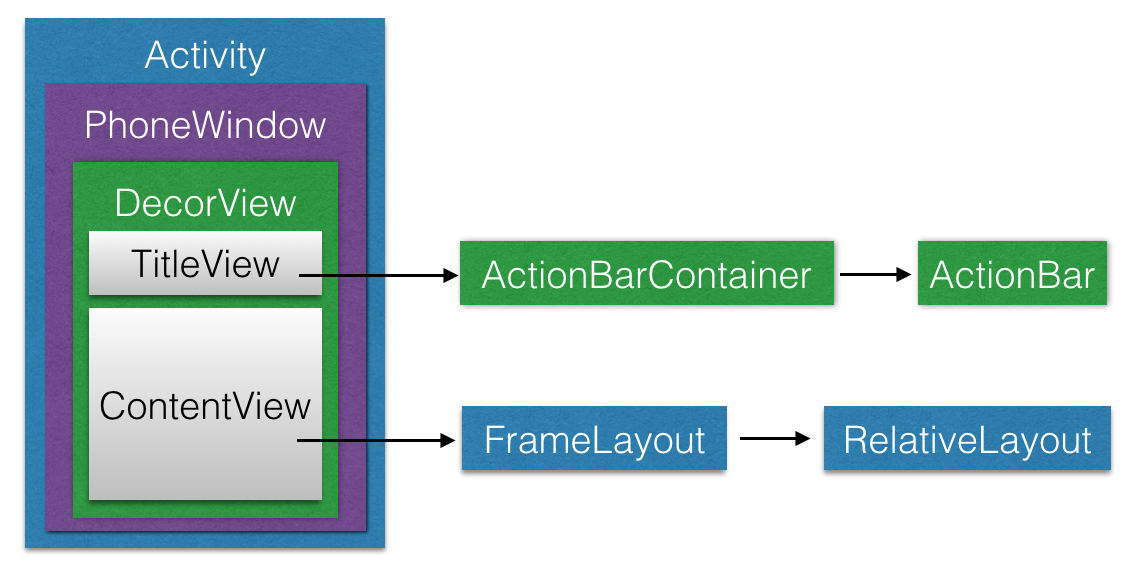 深入了解View的繪制流程
1. ViewRoot ViewRoot是連接WindowManager與DecorView的紐帶,View的整個繪制流程的三大步(
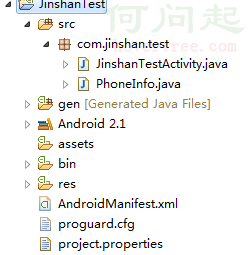 android 安卓APP獲取手機設備信息和手機號碼的代碼示例
下面我從安卓開發的角度,簡單寫一下如何獲取手機設備信息和手機號碼 准備條件:一部安卓手機、手機SIM卡確保插入手機裡、eclipse ADT和android-s
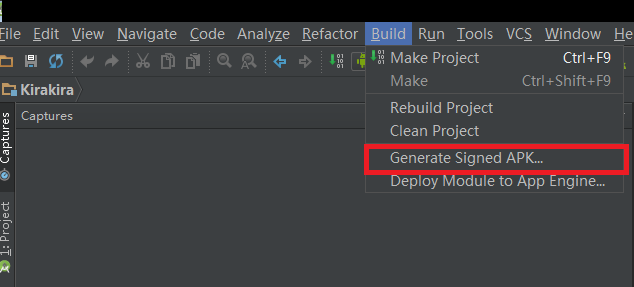
 Android開發學習之路-Android Studio真神器!
放假之後電腦配置升級就開始用Android Studio(下面簡稱AS)了,那個酸爽真的不是一般的啊,這裡開一篇博客來記錄下AS裡面各種酷炫的功能,有更好玩的,大家不要吝