編輯:關於android開發
package com.example.yanlei.picture;

import android.support.v7.app.AppCompatActivity;
import android.os.Bundle;
import android.view.Menu;
import android.view.MenuItem;
import java.io.File;
import java.io.IOException;

import android.app.Activity;
import android.content.Intent;
import android.database.Cursor;
import android.graphics.Bitmap;
import android.graphics.BitmapFactory;
import android.graphics.Matrix;
import android.media.ExifInterface;
import android.net.Uri;
import android.os.Bundle;
import android.os.Environment;
import android.provider.MediaStore;
import android.util.Log;
import android.view.View;
import android.widget.Button;
import android.widget.ImageView;
import android.widget.Toast;

public class MainActivity extends AppCompatActivity {


    private static final String tag = "MainActivity";
    private static final int CAPTURE_IMAGE_ACTIVITY_REQUEST_CODE = 100;
    private static final int PICK_IMAGE_ACTIVITY_REQUEST_CODE = 200;

    private ImageView imageView;
    @Override
    protected void onCreate(Bundle savedInstanceState) {
        super.onCreate(savedInstanceState);
        setContentView(R.layout.activity_main);
        imageView = (ImageView) this.findViewById(R.id.image_view);

        Button button = (Button) this.findViewById(R.id.open_camera);
        button.setOnClickListener(new View.OnClickListener() {
            @Override
            public void onClick(View v) {
                takePicture();
            }
        });

        Button pickImageBtn = (Button) this.findViewById(R.id.pick_image);
        pickImageBtn.setOnClickListener(new View.OnClickListener() {
            @Override
            public void onClick(View v) {
                openAlbum();
            }
        });

    }

    @Override
    public boolean onCreateOptionsMenu(Menu menu) {
        // Inflate the menu; this adds items to the action bar if it is present.
        getMenuInflater().inflate(R.menu.menu_main, menu);
        return true;
    }

    @Override
    public boolean onOptionsItemSelected(MenuItem item) {
        // Handle action bar item clicks here. The action bar will
        // automatically handle clicks on the Home/Up button, so long
        // as you specify a parent activity in AndroidManifest.xml.
        int id = item.getItemId();

        //noinspection SimplifiableIfStatement
        if (id == R.id.action_settings) {
            return true;
        }

        return super.onOptionsItemSelected(item);
    }
    private static String picFileFullName;
    //拍照
    public void takePicture(){
        String state = Environment.getExternalStorageState();
        if (state.equals(Environment.MEDIA_MOUNTED)) {
            Intent intent = new Intent(MediaStore.ACTION_IMAGE_CAPTURE);
            File outDir = Environment.getExternalStoragePublicDirectory(Environment.DIRECTORY_PICTURES);
            if (!outDir.exists()) {
                outDir.mkdirs();
            }
            File outFile =  new File(outDir, System.currentTimeMillis() + ".jpg");
            picFileFullName = outFile.getAbsolutePath();
            intent.putExtra(MediaStore.EXTRA_OUTPUT, Uri.fromFile(outFile));
            intent.putExtra(MediaStore.EXTRA_VIDEO_QUALITY, 1);
            startActivityForResult(intent, CAPTURE_IMAGE_ACTIVITY_REQUEST_CODE);
        } else{
            Log.e(tag, "請確認已經插入SD卡");
        }
    }

    //打開本地相冊
    public void openAlbum(){
        Intent intent = new Intent();
        intent.setType("image/*");
        intent.setAction(Intent.ACTION_GET_CONTENT);
        this.startActivityForResult(intent, PICK_IMAGE_ACTIVITY_REQUEST_CODE);
    }

    @Override
    protected void onActivityResult(int requestCode, int resultCode, Intent data) {
        super.onActivityResult(requestCode, resultCode, data);
        if (requestCode == CAPTURE_IMAGE_ACTIVITY_REQUEST_CODE) {
            if (resultCode == RESULT_OK) {
                Log.e(tag, "獲取圖片成功,path="+picFileFullName);
                toast("獲取圖片成功,path="+picFileFullName);
                setImageView(picFileFullName);
            } else if (resultCode == RESULT_CANCELED) {
                // 用戶取消了圖像捕獲
            } else {
                // 圖像捕獲失敗,提示用戶
                Log.e(tag, "拍照失敗");
            }
        } else if (requestCode == PICK_IMAGE_ACTIVITY_REQUEST_CODE) {
            if (resultCode == RESULT_OK) {
                Uri uri = data.getData();
                if(uri != null){
                    String realPath = getRealPathFromURI(uri);
                    Log.e(tag, "獲取圖片成功,path="+realPath);
                    toast("獲取圖片成功,path="+realPath);
                    setImageView(realPath);
                }else{
                    Log.e(tag, "從相冊獲取圖片失敗");
                }
            }
        }
    }

    private void setImageView(String realPath){
        Bitmap bmp = BitmapFactory.decodeFile(realPath);
        int degree = readPictureDegree(realPath);
        if(degree <= 0){
            imageView.setImageBitmap(bmp);
        }else{
            Log.e(tag, "rotate:"+degree);
            //創建操作圖片是用的matrix對象
            Matrix matrix=new Matrix();
            //旋轉圖片動作
            matrix.postRotate(degree);
            //創建新圖片
            Bitmap resizedBitmap=Bitmap.createBitmap(bmp,0,0,bmp.getWidth(),bmp.getHeight(),matrix,true);
            imageView.setImageBitmap(resizedBitmap);
        }
    }

    /**
     * This method is used to get real path of file from from uri<br/>
     * http://stackoverflow.com/questions/11591825/how-to-get-image-path-just-captured-from-camera
     *
     * @param contentUri
     * @return String
     */
    public String getRealPathFromURI(Uri contentUri){
        try{
            String[] proj = {MediaStore.Images.Media.DATA};
            // Do not call Cursor.close() on a cursor obtained using this method,
            // because the activity will do that for you at the appropriate time
            Cursor cursor = this.managedQuery(contentUri, proj, null, null, null);
            int column_index = cursor.getColumnIndexOrThrow(MediaStore.Images.Media.DATA);
            cursor.moveToFirst();
            return cursor.getString(column_index);
        }catch (Exception e){
            return contentUri.getPath();
        }
    }

    /**
     * 讀取照片exif信息中的旋轉角度<br/>
     * http://www.eoeandroid.com/thread-196978-1-1.html
     *
     * @param path 照片路徑
     * @return角度
     */
    public static int readPictureDegree(String path) {
        int degree  = 0;
        try {
            ExifInterface exifInterface = new ExifInterface(path);
            int orientation = exifInterface.getAttributeInt(ExifInterface.TAG_ORIENTATION, ExifInterface.ORIENTATION_NORMAL);
            switch (orientation) {
                case ExifInterface.ORIENTATION_ROTATE_90:
                    degree = 90;
                    break;
                case ExifInterface.ORIENTATION_ROTATE_180:
                    degree = 180;
                    break;
                case ExifInterface.ORIENTATION_ROTATE_270:
                    degree = 270;
                    break;
            }
        } catch (IOException e) {
            e.printStackTrace();
        }
        return degree;
    }

    public void toast(String msg){
        Toast.makeText(this, msg, Toast.LENGTH_SHORT).show();
    }
}
<LinearLayout xmlns:android="http://schemas.android.com/apk/res/android"
    xmlns:tools="http://schemas.android.com/tools"
    android:layout_width="match_parent"
    android:layout_height="match_parent"
    android:orientation="vertical">

    <Button
        android:id="@+id/open_camera"
        android:layout_width="wrap_content"
        android:layout_height="wrap_content"
        android:text="打開攝像頭"
        />
    <Button
        android:id="@+id/pick_image"
        android:layout_width="wrap_content"
        android:layout_height="wrap_content"
        android:text="打開相冊"
        />

    <ImageView
        android:id="@+id/image_view"
        android:layout_width="300dp"
        android:layout_height="300dp"
        android:scaleType="fitCenter"/>


</LinearLayout>
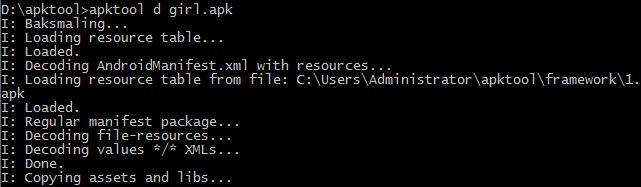 Android 應用程序的反編譯,android反編譯
Android 應用程序的反編譯,android反編譯1、ApkTool工具 安裝ApkTool工具,該工具可以解碼得到資源文件,但不能得到Java源文件。安裝環境:需要
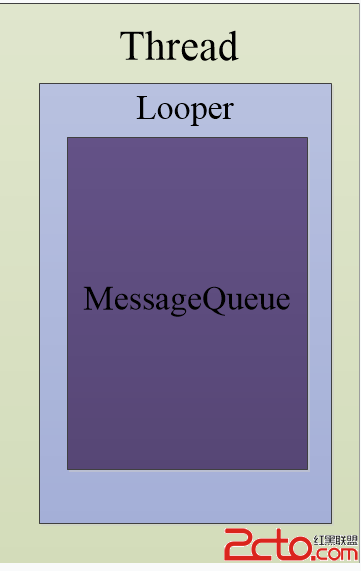 Android消息機制
Android消息機制 每一個Android應用在啟動的時候都會創建一個線程,這個線程被稱為主線程或者UI線程,Android應用的所有操作默認都會運行在這個線程中。
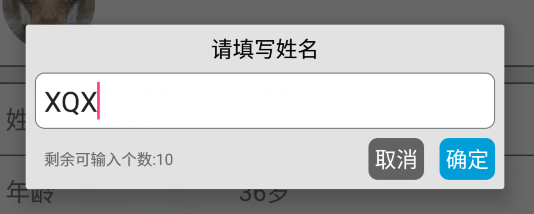 Android項目實戰(二十七):數據交互(信息編輯)填寫總結,android信息編輯
Android項目實戰(二十七):數據交互(信息編輯)填寫總結,android信息編輯前言: 項目中必定用到的數據填寫需求。比如修改用戶名的文字編輯對話框,修改生日的
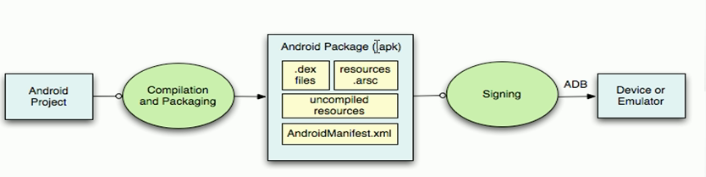 Android開發學習——應用安裝過程,android開發
Android開發學習——應用安裝過程,android開發 首先一個android項目,然後編譯和打包,將.java文件編譯為.class,.class編譯為.dex,將