編輯:關於android開發
前言:
項目中必定用到的數據填寫需求。比如修改用戶名的文字編輯對話框,修改生日的日期選擇對話框等等。現總結一下,方便以後使用。
注:
先寫實現過程,想要學習的同學可以看看,不需要的同學可以直接拉到最下面復制代碼使用。
一、文字編輯對話框
看下效果圖(仿今日頭條):
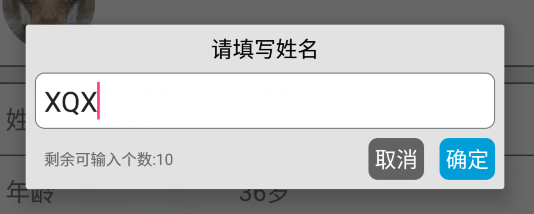
包括:
一個標題TextView
一個圓角白色背景EditText
一個可輸入個數提示的TextView
兩個按鈕,‘確定’、‘取消’
代碼實現:
(1)編寫布局文件

<?xml version="1.0" encoding="utf-8"?>
<LinearLayout xmlns:android="http://schemas.android.com/apk/res/android"
    android:orientation="vertical"
    android:layout_width="match_parent"
    android:layout_height="wrap_content"
    android:background="@color/grey_5"
    android:id="@+id/popup_edit_info_ly"
    >
    <!--標題-->
    <TextView
        android:id="@+id/popup_edit_info_txt_title"
        android:layout_width="match_parent"
        android:layout_height="wrap_content"
        android:text="title"
        android:gravity="center_horizontal"
        android:padding="@dimen/dp_6"
        android:textColor="@color/black"
        />

    <!--編輯框-->
    <EditText
        android:id="@+id/popup_edit_info_edit_content"
        android:layout_width="match_parent"
        android:layout_height="wrap_content"
        android:layout_marginLeft="@dimen/dp_6"
        android:layout_marginRight="@dimen/dp_6"
        android:background="@drawable/bg_popup_edit"
        android:maxLength="10"
        android:padding="@dimen/dp_6"
        >
    </EditText>

    <RelativeLayout
        android:layout_width="match_parent"
        android:layout_height="wrap_content"
        android:padding="@dimen/dp_6"
        >
        <!--提示文字-->
        <TextView
            android:id="@+id/popup_edit_info_txt_tip"
            android:layout_width="wrap_content"
            android:layout_height="wrap_content"
            android:textSize="@dimen/txt_10"
            android:text="剩余可輸入個數:"
            android:layout_centerVertical="true"
            android:layout_marginLeft="@dimen/dp_6"
            />

        <!--確定按鈕,這裡用TextView ,當然也可以用Button ImageButton-->
        <TextView
            android:id="@+id/popup_edit_info_btn_confirm"
            android:layout_width="wrap_content"
            android:layout_height="wrap_content"
            android:text="@string/confirm"
            android:background="@drawable/bg_btn_blue"
            android:padding="@dimen/dp_4"
            android:textColor="@color/white"
            android:layout_alignParentRight="true"
            />

        <!--取消按鈕-->
        <TextView
            android:id="@+id/popup_edit_info_btn_cancel"
            android:layout_width="wrap_content"
            android:layout_height="wrap_content"
            android:text="@string/cancel"
            android:background="@drawable/bg_btn_grey"
            android:padding="@dimen/dp_4"
            android:textColor="@color/white"
            android:layout_toLeftOf="@id/popup_edit_info_btn_confirm"
            android:layout_marginRight="@dimen/dp_10"
            />
    </RelativeLayout>

</LinearLayout>
dialog_edit_txt
裡面編輯框EditView涉及到了圓角白色背景 需要寫一個drawable文件
<?xml version="1.0" encoding="utf-8"?>
<shape xmlns:android="http://schemas.android.com/apk/res/android">
    <!--popupwindow 編輯框的背景顏色 用於popup_edit_info.xml布局文件-->
    <solid android:color="@color/white" ></solid>
    <corners android:radius="@dimen/dp_6"></corners>
    <stroke android:width="0.5dp" android:color="@color/grey_1"></stroke>
</shape>
bg_popup_edit
(2)、在activity或者fragment中使用
①、這裡我把對話框寫在一個方法裡,方便使用
title 文本對話框的標題
isSingleLine EditText是否限制一行顯示
maxSize EditText中文字的最大長度
textview 修改的TextView控件,首先要講該控件的文本顯示在EditText中,點擊確定後需要將編輯文本顯示在改控件中

private void showEditDialog(String title , boolean isSingleLine , final int maxSize, final TextView textview)
②、根據布局文件生成view 並 初始化控件
     View view = LayoutInflater.from(this).inflate(R.layout.dialog_edit_txt, null);
        TextView popup_edit_info_txt_title;//標題
        final TextView popup_edit_info_txt_tip;       //編輯框剩余個數提示
        TextView popup_edit_info_btn_cancel;    //取消按鈕
        TextView popup_edit_info_btn_confirm;    //確定按鈕
        final EditText popup_edit_info_edit_content;   //編輯框
        popup_edit_info_txt_title = (TextView) view.findViewById(R.id.popup_edit_info_txt_title);
        popup_edit_info_txt_tip = (TextView) view.findViewById(R.id.popup_edit_info_txt_tip);
        popup_edit_info_btn_cancel = (TextView) view.findViewById(R.id.popup_edit_info_btn_cancel);
        popup_edit_info_btn_confirm = (TextView) view.findViewById(R.id.popup_edit_info_btn_confirm);
        popup_edit_info_edit_content = (EditText) view.findViewById(R.id.popup_edit_info_edit_content);
③、進行控件的屬性設置
     popup_edit_info_edit_content.setText(textview.getText().toString());            // 將參數textview的文本數據顯示在EditText中
        popup_edit_info_edit_content.setSingleLine(isSingleLine);                       // 設置EditView是否單行,像用戶名這種信息需要單行,像評價簡介這種的不需要單行
        popup_edit_info_edit_content.setFilters(new InputFilter[]{new InputFilter.LengthFilter(maxSize)}); // 設置EditText的最大長度,當輸入超過這個值的時候不在允許輸入
        popup_edit_info_txt_tip.setText("剩余可輸入個數:"+(maxSize-textview.getText().toString().length()));        // 設置 剩余文字個數提示
        final AlertDialog dialog = new AlertDialog.Builder(this)                        //創建對話框
                .setView(view)
                .create();
        popup_edit_info_txt_title.setText(title);                                       // 設置標題
dialog.setCanceledOnTouchOutside(false); // 設置點擊屏幕Dialog不消失
④、進行EditText的設置 ,監聽文字數據字數變化,改變提示文本的內容
      popup_edit_info_edit_content.addTextChangedListener(new TextWatcher() {
            @Override
            public void beforeTextChanged(CharSequence s, int start, int count, int after) {
            }
            @Override
            public void onTextChanged(CharSequence s, int start, int before, int count) {
            }
            @Override
            public void afterTextChanged(Editable s) {
                int length = s.length();
                popup_edit_info_txt_tip.setText("剩余可輸入個數:"+(maxSize-length));
            }
        });
⑤、設置‘確定’、‘取消’點擊事件
popup_edit_info_btn_cancel.setOnClickListener(new View.OnClickListener() {
            @Override
            public void onClick(View v) {
                dialog.dismiss();
            }
        });
        popup_edit_info_btn_confirm.setOnClickListener(new View.OnClickListener() {
            @Override
            public void onClick(View v) {
                textview.setText(popup_edit_info_edit_content.getText().toString());
                dialog.dismiss();
            }
        });
⑥、顯示對話框
dialog.show();
二、日期選擇對話框(未完待續)
......
......
......
---------------------------------------------------------------------------------------------------------------------
完整代碼:
一、文字編輯對話框
布局文件:
<?xml version="1.0" encoding="utf-8"?>
<LinearLayout xmlns:android="http://schemas.android.com/apk/res/android"
    android:orientation="vertical"
    android:layout_width="match_parent"
    android:layout_height="wrap_content"
    android:background="@color/grey_5"
    android:id="@+id/popup_edit_info_ly"
    >
    <!--標題-->
    <TextView
        android:id="@+id/popup_edit_info_txt_title"
        android:layout_width="match_parent"
        android:layout_height="wrap_content"
        android:text="title"
        android:gravity="center_horizontal"
        android:padding="@dimen/dp_6"
        android:textColor="@color/black"
        />

    <!--編輯框-->
    <EditText
        android:id="@+id/popup_edit_info_edit_content"
        android:layout_width="match_parent"
        android:layout_height="wrap_content"
        android:layout_marginLeft="@dimen/dp_6"
        android:layout_marginRight="@dimen/dp_6"
        android:background="@drawable/bg_popup_edit"
        android:maxLength="10"
        android:padding="@dimen/dp_6"
        >
    </EditText>

    <RelativeLayout
        android:layout_width="match_parent"
        android:layout_height="wrap_content"
        android:padding="@dimen/dp_6"
        >
        <!--提示文字-->
        <TextView
            android:id="@+id/popup_edit_info_txt_tip"
            android:layout_width="wrap_content"
            android:layout_height="wrap_content"
            android:textSize="@dimen/txt_10"
            android:text="剩余可輸入個數:"
            android:layout_centerVertical="true"
            android:layout_marginLeft="@dimen/dp_6"
            />

        <!--確定按鈕,這裡用TextView ,當然也可以用Button ImageButton-->
        <TextView
            android:id="@+id/popup_edit_info_btn_confirm"
            android:layout_width="wrap_content"
            android:layout_height="wrap_content"
            android:text="@string/confirm"
            android:background="@drawable/bg_btn_blue"
            android:padding="@dimen/dp_4"
            android:textColor="@color/white"
            android:layout_alignParentRight="true"
            />

        <!--取消按鈕-->
        <TextView
            android:id="@+id/popup_edit_info_btn_cancel"
            android:layout_width="wrap_content"
            android:layout_height="wrap_content"
            android:text="@string/cancel"
            android:background="@drawable/bg_btn_grey"
            android:padding="@dimen/dp_4"
            android:textColor="@color/white"
            android:layout_toLeftOf="@id/popup_edit_info_btn_confirm"
            android:layout_marginRight="@dimen/dp_10"
            />
    </RelativeLayout>

</LinearLayout>
dialog_edit_txt
drawable文件: 用於設置EditText圓角白色背景
<?xml version="1.0" encoding="utf-8"?>
<shape xmlns:android="http://schemas.android.com/apk/res/android">
    <!--popupwindow 編輯框的背景顏色 用於popup_edit_info.xml布局文件-->
    <solid android:color="@color/white" ></solid>
    <corners android:radius="@dimen/dp_6"></corners>
    <stroke android:width="0.5dp" android:color="@color/grey_1"></stroke>
</shape>
bg_popup_edit
java文件:
showEditDialog("請填寫姓名",true,10,edit_info_txt_name);

    private void showEditDialog(String title , boolean isSingleLine , final int maxSize, final TextView textview) {

        View view = LayoutInflater.from(this).inflate(R.layout.dialog_edit_txt, null);
        TextView popup_edit_info_txt_title;//標題
        final TextView popup_edit_info_txt_tip;       //編輯框剩余個數提示
        TextView popup_edit_info_btn_cancel;    //取消按鈕
        TextView popup_edit_info_btn_confirm;    //確定按鈕
        final EditText popup_edit_info_edit_content;   //編輯框
        popup_edit_info_txt_title = (TextView) view.findViewById(R.id.popup_edit_info_txt_title);
        popup_edit_info_txt_tip = (TextView) view.findViewById(R.id.popup_edit_info_txt_tip);
        popup_edit_info_btn_cancel = (TextView) view.findViewById(R.id.popup_edit_info_btn_cancel);
        popup_edit_info_btn_confirm = (TextView) view.findViewById(R.id.popup_edit_info_btn_confirm);
        popup_edit_info_edit_content = (EditText) view.findViewById(R.id.popup_edit_info_edit_content);
        popup_edit_info_edit_content.setText(textview.getText().toString());
        popup_edit_info_edit_content.setSingleLine(isSingleLine);
        popup_edit_info_edit_content.setFilters(new InputFilter[]{new InputFilter.LengthFilter(maxSize)});
        popup_edit_info_txt_tip.setText("剩余可輸入個數:"+(maxSize-textview.getText().toString().length()));
        final AlertDialog dialog = new AlertDialog.Builder(this)
                .setView(view)
                .create();
        popup_edit_info_txt_title.setText(title);

        popup_edit_info_edit_content.addTextChangedListener(new TextWatcher() {
            @Override
            public void beforeTextChanged(CharSequence s, int start, int count, int after) {
            }
            @Override
            public void onTextChanged(CharSequence s, int start, int before, int count) {
            }
            @Override
            public void afterTextChanged(Editable s) {
                int length = s.length();
                popup_edit_info_txt_tip.setText("剩余可輸入個數:"+(maxSize-length));
            }
        });
        popup_edit_info_btn_cancel.setOnClickListener(new View.OnClickListener() {
            @Override
            public void onClick(View v) {
                dialog.dismiss();
            }
        });
        popup_edit_info_btn_confirm.setOnClickListener(new View.OnClickListener() {
            @Override
            public void onClick(View v) {
                textview.setText(popup_edit_info_edit_content.getText().toString());
                dialog.dismiss();
            }
        });
        dialog.setCanceledOnTouchOutside(false);// 設置點擊屏幕Dialog不消失
        dialog.show();

    }
java
效果圖:

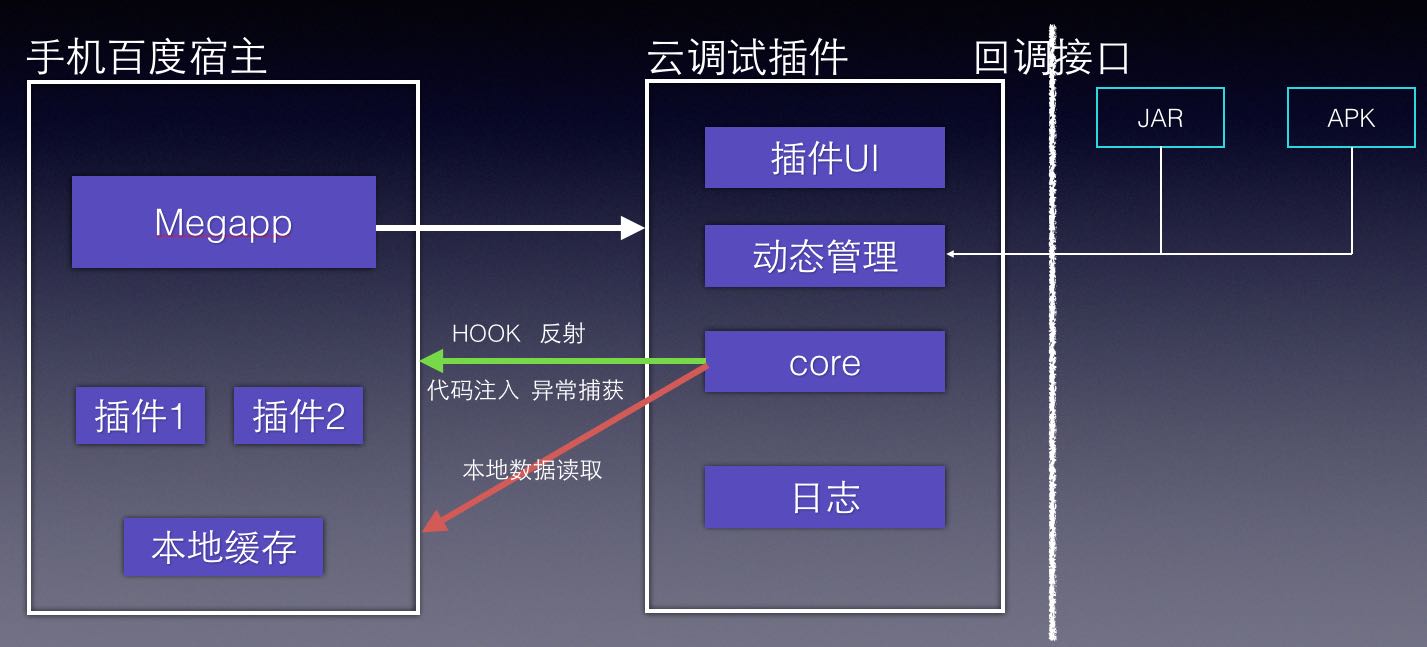 一種基於動態插件系統的移動測試黑科技
一種基於動態插件系統的移動測試黑科技百度MTC是業界領先的移動應用測試服務平台,為廣大開發者在移動應用測試中面臨的成本、技術和效率問題提供解決方案。同時分享行業領先的百度
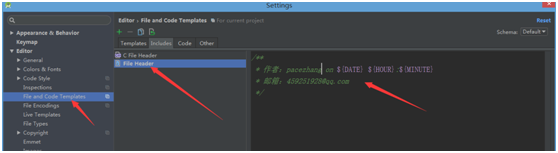 注釋設置,eclipse設置注釋模板
注釋設置,eclipse設置注釋模板自動添加上一些關於文件開頭的注釋信息: 增加函數注釋模板: 注意:先創建 Template Group 再創建 Li
 全新的手勢,側滑返回、全局右滑返回都OUT啦!,全局out
全新的手勢,側滑返回、全局右滑返回都OUT啦!,全局out前言 Android快速開發框架-ZBLibrary 最近將以前的 全局右滑返回 手勢功能改成了 底部左右滑動手
 活動的生命周期系列(一)返回棧,生命周期系列
活動的生命周期系列(一)返回棧,生命周期系列 生命周期對程序員很重要,特別當我們了解,就可以寫出更流暢的程序,更好的來