編輯:關於android開發
分類:C#、Android、VS2015;
創建日期:2016-03-13
Android提供的Camera有兩個典型的版本,一個是在Android 5.0以前提供的,稱為Camera;另一個是從Android 5.0開始提供的,稱為Camera2。
這裡僅演示使用系統Camera程序實現拍照的基本用法。
用Camera實現拍照和攝像功能時,有以下兩種實現辦法:
一是直接利用Intent啟動系統自帶的Camera App打開相機實現拍照和攝像功能,然後通過Android.Provider命名空間下的.MediaStore類獲取拍照或攝像結果保存的文件路徑。這是最簡單的實現辦法,對於一般的需求基本上就能滿足要求了。
二是使用Camera API自定義相機,實現專用的拍照和攝像功能。
1、確定是否需要在AndroidMainfest.xml中聲明使用照相機.
(1)Camera權限和Camera特性
如果你是調用系統Camera程序,不必聲明該權限和特性。
如果你是構造自定義的Camera程序,則必須在AndroidMainfest.xml中聲明使用照相機的權限,例如:
<uses-permission android:name="android.permission.CAMERA" />
你還必須在AndroidMainfest.xml中聲明照相機特性,例如:
<uses-feature android:name="android.hardware.camera" />
如果你的程序可能需要使用照相機,但並不是一定要使用,那麼可以設置android:required屬性,比如:
<uses-feature android:name="android.hardware.camera" android:required="false" />
(2)存儲權限
如果需要在擴展存儲設備上(如sd卡)存儲你的照片或者拍攝的視頻,那麼必須聲明如下權限:
<uses-permission android:name="android.permission.WRITE_EXTERNAL_STORAGE" />
(3)音頻錄制權限
如果需要錄制音頻或者視頻,必須在AndroidMainfest.xml文件中設置如下權限:
<uses-permission android:name="android.permission.RECORD_AUDIO" />
2、使用系統Camera程序
這是一種可以讓你的程序以最少的編碼,然後可以快速使用照相機的方法,此方式通過一個Intent來調用系統的Camera程序,讓系統的Camera應用程序去拍攝照片或者錄制視頻,而且可以返回拍攝或者錄制的結果給你自己的應用程序。
(1)基本用法
(a)構造一個Camera Intent -- 創建一個拍攝照片或者視頻的Intent,可以使用如下兩種方法:
向系統Camera程序請求拍攝圖片。例如:
Intent intent = new Intent(MediaStore.ActionImageCapture);
向系統Camera程序請求錄制視頻。例如:
Intent intent = new Intent(MediaStore.ActionVideoCapture);
(b)開啟Camera intent -- 通過調用startActivityForResult()來執行Camera intent, 在你調用這個方法之後,系統Camera程序就是出現在用戶界面,然後用戶就可以拍攝照片或者視頻了。
(c)接收Intent 結果 -- 在你的應用程序裡面建立一個OnActivityResult()方法來接收來自系統Camera程序的執行結果。當用戶拍攝了照片或者視頻(也許取消了拍攝操作),系統就會調用這個方法。
(2)圖片拍攝Intent
使用系統Camera來拍攝圖片,是一種以最快的速度,最少的代碼,讓你的程序能夠拍照的方法。一個圖片拍攝的intent可以包含如下擴展信息:
(a)MediaStore.ExtraOutput -- 指定一個Uri對象,系統Camera程序會把拍攝的圖片存儲到指定位置。這個設置一般是強烈推薦的。如果你不指定這個Uri路徑,那麼系統Camera程序會把圖片以一個默認的名字存儲在一個默認的位置。我們可以通過返回的intent,然後用Intent.GetData()方法來獲取這個值。
例如:
private File file;
string dirPath;
string filePath;
……
Intent imageIntent = new Intent(MediaStore.ActionImageCapture);
filePath = dirPath + $"/PP{System.DateTime.Now:yyyyMMdd_hhmmss}.jpg";
file = new File(filePath);
imageIntent.PutExtra(MediaStore.ExtraOutput, Uri.FromFile(file));
StartActivityForResult(imageIntent, 100, savedInstanceState);
當StartActivityForResult()方法執行之後,用戶就會看到系統的Camera界面。當用戶完成拍攝照片(或者取消拍攝)之後,用戶界面就會返回你自己的應用程序。那麼你必須攔截OnActivityResult方法,以便接收執行結果和繼續你自己代碼的邏輯。
(3)視頻錄制intent
使用系統Camera來錄制視頻,是一種以最快的速度,最少的代碼,讓你的程序能夠錄制視頻的方法。一個視頻錄制的intent可以包含如下擴展信息:
MediaStore.ExtraOutput -- 指定一個Uri對象,系統Camera程序會把錄制的視頻存儲到指定位置。這個設置一般是強烈推薦的。如果你不指定這個Uri路徑,那麼系統Camera程序會把視頻以一個默認的名字存儲在默認的位置。可以通過返回的intent,然後用Intent.GetData()方法來獲取這個值。
MediaStore.ExtraVideoQuality -- 視頻質量,0(低質量,比較小的文件來存儲視頻), 1(高質量,比較大的文件來存儲視頻)
MediaStore.ExtraDurationLimit -- 設置一個值來限制視頻的錄制時間,單位為秒。
MediaStore.ExtraSizeLimit -- 設置一個值來限制視頻大小,byte為單位。
當StartActivityForResult()方法執行之後,用戶就會看到系統的Camera界面。當用戶完成錄制視頻(或者取消拍攝)之後,用戶界面就會返回你自己的應用程序,接下來你就通過重寫的OnActivityResult()方法接收執行結果。
(4)接收Camera返回的結果
一旦你執行了拍攝圖片或者視頻的intent之後,就可以重寫OnActivityResult()方法接收執行結果了。得到結果後,存儲在指定位置的圖片或者視頻就能被我們的程序使用了。
3、構造自定義的Camera程序
調用系統Camera App實現拍照和攝像功能雖然能夠滿足我們的簡單需求,但是畢竟自由度降低了,而且拍照的界面就是系統提供的樣子。
如果你希望自定義比較漂亮的界面,可以自己定制Camera應用程序制自定義的Camera程序可能比調用系統的Camera需要更多的代碼,但是這能給你的用戶帶來不一樣的用戶體驗。比如Camera 360軟件等,就需要根據SDK提供的Camera API來編寫自己的程序。
注意:Android已經棄用了5.0之前的版本中提供的Android.Hardware.Camera類,而是改為用Camera2實現,具體用法請參看相關資料。
由於手機自帶攝像頭,因此可直接使用相機功能。但是,如果你希望在模擬器中測試你的程序,在模擬器中可利用前置相機(Front Camera)來模擬。
下圖是Android 4.4.2(Api 19)的模擬器參數設置界面:
將此界面中的【Front Camera】設置為“Emulated”以後,模擬器就會用一個隨機移動的矩形來模擬相機的拍照和攝像效果。
下圖是Android 6.0(Api 23)的模擬器參數設置界面:
在模擬器中運行時,打開相機後,單擊下方的圓形按鈕即可拍照,拍照的結果保存到SD卡中指定的文件夾下,所拍的圖片也會立即在ImageView控件中顯示出來,而且還能單獨通過Android系統自帶的【圖庫】程序查看拍照的結果。
1、運行截圖
下圖左側為初始界面,右側為單擊【拍照】後的拍照界面。
下圖左側為單擊圓形拍照按鈕後的結果,右側為對號後顯示的文件保存位置。
下面左圖為單擊【視頻錄制】後的結果,右圖為錄制完成後的結果。
2、設計步驟
(1)權限要求
本例子需要在AndroidManifest.xml中添加下面的權限:
<uses-permission android:name="android.permission.WRITE_EXTERNAL_STORAGE" />
如果已經有對應的權限就不用再添加了,如果沒有就雙擊Properties文件夾勾選這個權限,讓系統自動將其添加到AndroidManifest.xml文件中,或者自己直接將其添加到AndroidManifest.xml文件中。
(2)添加ch2003Main.axml
<?xml version="1.0" encoding="utf-8"?>
<LinearLayout xmlns:android="http://schemas.android.com/apk/res/android"
    android:orientation="vertical"
    android:layout_width="fill_parent"
    android:layout_height="fill_parent">
    <Button
        android:id="@+id/ch2003_btn1"
        android:layout_width="fill_parent"
        android:layout_height="wrap_content"
        android:text="拍照" />
  <Button
      android:id="@+id/ch2003_btn2"
      android:layout_width="fill_parent"
      android:layout_height="wrap_content"
      android:text="視頻錄制" />
  <TextView
        android:text=""
        android:textAppearance="?android:attr/textAppearanceSmall"
        android:layout_width="match_parent"
        android:layout_height="wrap_content"
        android:id="@+id/ch2003_textView1" />
  <ImageView
        android:src="@android:drawable/ic_menu_gallery"
        android:layout_width="fill_parent"
        android:layout_height="300dp"
        android:id="@+id/ch2003_imageView1"
        android:adjustViewBounds="true" />
  <VideoView
    android:layout_width="match_parent"
    android:layout_height="wrap_content"
    android:id="@+id/ch2003_videoView1" />
</LinearLayout>
(3)添加ch2003BitmapHelpers.cs
該文件會自動縮放圖片以適應屏幕大小,這是為了解決內存不夠時直接加載大圖片可能會導致應用程序崩潰的情況。
using Android.Widget;
using Android.Graphics.Drawables;
using Android.Graphics;

namespace MyDemos.SrcDemos
{
    public static class ch2003BitmapHelpers
    {
        public static void RecycleBitmap(ImageView imageView)
        {
            if (imageView == null)
            {
                return;
            }

            Drawable toRecycle = imageView.Drawable;
            if (toRecycle != null)
            {
                ((BitmapDrawable)toRecycle).Bitmap.Recycle();
            }
        }

        public static Bitmap LoadAndResizeBitmap(string fileName, int width, int height)
        {
            BitmapFactory.Options options = new BitmapFactory.Options
            {
                InPurgeable = true,
                InJustDecodeBounds = true
            };
            BitmapFactory.DecodeFile(fileName, options);
            int outHeight = options.OutHeight;
            int outWidth = options.OutWidth;
            int inSampleSize = 1;
            if (outHeight > height || outWidth > width)
            {
                if(outWidth > outHeight)
                {
                    inSampleSize = outHeight / height;
                }
                else
                {
                    inSampleSize = outWidth / width;
                }
            }
            options.InSampleSize = inSampleSize;
            options.InJustDecodeBounds = false;
            Bitmap resizedBitmap = BitmapFactory.DecodeFile(fileName, options);
            return resizedBitmap;
        }
    }
}
(4)添加ch2003MainActivity.cs
using System.Collections.Generic;
using Android.App;
using Android.Content;
using Android.OS;
using Android.Runtime;
using Android.Widget;
using Android.Provider;
using Android.Content.PM;
using Android.Graphics;

using Android.Net;
using Java.IO;

namespace MyDemos.SrcDemos
{
    [Activity(Label = "ch2003MainActivity")]
    [IntentFilter(new[] { Intent.ActionMain },
        Categories = new[] { Intent.CategoryDefault, ch.MyDemosCategory })]
    public class ch2003MainActivity : Activity
    {
        private File file;
        string dirPath;
        string filePath;
        private ImageView imageView1;
        private VideoView videoView1;
        private TextView textView1;
        private MediaType mediaType;

        protected override void OnCreate(Bundle savedInstanceState)
        {
            base.OnCreate(savedInstanceState);

            SetContentView(Resource.Layout.ch2003Main);
            textView1 = FindViewById<TextView>(Resource.Id.ch2003_textView1);
            imageView1 = FindViewById<ImageView>(Resource.Id.ch2003_imageView1);
            videoView1 = FindViewById<VideoView>(Resource.Id.ch2003_videoView1);
            Button btn1 = FindViewById<Button>(Resource.Id.ch2003_btn1);
            Button btn2 = FindViewById<Button>(Resource.Id.ch2003_btn2);

            //判斷相機是否可用(是否有一個App正在准備拍照)
            if (IsThereAnAppToTakePictures())
            {
                dirPath = $"{Environment.ExternalStorageDirectory.Path}/{Environment.DirectoryPictures}/MyDemosPictures";
                if (!System.IO.Directory.Exists(dirPath))
                {
                    System.IO.Directory.CreateDirectory(dirPath);
                }
                btn1.Click += delegate
                {
                    //拍照
                    mediaType = MediaType.Image;
                    Intent imageIntent = new Intent(MediaStore.ActionImageCapture);
                    filePath = dirPath + $"/PP{System.DateTime.Now:yyyyMMdd_hhmmss}.jpg";
                    file = new File(filePath);
                    imageIntent.PutExtra(MediaStore.ExtraOutput, Uri.FromFile(file));
                    StartActivityForResult(imageIntent, 100);
                };
                btn2.Click += delegate
                {
                    //視頻錄制
                    mediaType = MediaType.Video;
                    Intent videoIntent = new Intent(MediaStore.ActionVideoCapture);
                    filePath = dirPath + $"/PP{System.DateTime.Now:yyyyMMdd_hhmmss}.mp4";
                    file = new File(filePath);
                    videoIntent.PutExtra(MediaStore.ExtraOutput, Uri.FromFile(file));
                    videoIntent.PutExtra(MediaStore.ExtraVideoQuality, 1);
                    StartActivityForResult(videoIntent, 200);
                };
            }
            else
            {
                //如果相機不可用,禁用按鈕
                btn1.Text = "相機不可用,無法拍照";
                btn2.Text = "相機不可用,無法錄制視頻";
                btn1.Enabled = btn2.Enabled = false;
            }
        }

        /// <summary>
        /// 判斷相機是否可用(是否有一個App正在准備拍照)
        /// </summary>
        /// <returns></returns>
        private bool IsThereAnAppToTakePictures()
        {
            Intent intent = new Intent(MediaStore.ActionImageCapture);
            IList<ResolveInfo> availableActivities = PackageManager.QueryIntentActivities(intent, PackageInfoFlags.MatchDefaultOnly);
            return availableActivities != null && availableActivities.Count > 0;
        }

        protected override void OnActivityResult(int requestCode, [GeneratedEnum] Result resultCode, Intent data)
        {
            base.OnActivityResult(requestCode, resultCode, data);

            // 使其可以在圖庫中可用,即浏覽圖庫時能看到相機拍攝的照片
            Intent mediaScanIntent = new Intent(Intent.ActionMediaScannerScanFile);
            Uri contentUri = Uri.FromFile(file);
            mediaScanIntent.SetData(contentUri);
            SendBroadcast(mediaScanIntent);

            if(mediaType== MediaType.Image)
            {
                imageView1.Visibility = Android.Views.ViewStates.Visible;
                videoView1.Visibility = Android.Views.ViewStates.Gone;
                //輔助程序(ch2003BitmapHelpers.cs)會自動縮放該圖片以適應屏幕大小。
                int width = Resources.DisplayMetrics.WidthPixels;
                int height = imageView1.Height;
                using (Bitmap bitmap = ch2003BitmapHelpers.LoadAndResizeBitmap(filePath, width, height))
                {
                    ch2003BitmapHelpers.RecycleBitmap(imageView1);
                    imageView1.SetImageBitmap(bitmap);
                    imageView1.RefreshDrawableState();
                }
                textView1.Text = "拍照結果:\n" + filePath;
            }
            else
            {
                imageView1.Visibility = Android.Views.ViewStates.Gone;
                videoView1.Visibility = Android.Views.ViewStates.Visible;
                videoView1.SetVideoURI(Uri.Parse(filePath));
                videoView1.SetMediaController(new MediaController(this));
                videoView1.Start();
                textView1.Text = "視頻錄制結果:\n" + filePath;
            }
        }
    }
}
 Android Studio NDK開發
Android Studio NDK開發 以前接觸過NDK的開發,是在Eclipse環境下開發的。今天嘗試了下用Android Studio來配置,結果真是處處都是坑,現
 git 上的pull request 是什麼意思?,gitpull
git 上的pull request 是什麼意思?,gitpull 1、git 上有常見的pull request 功能
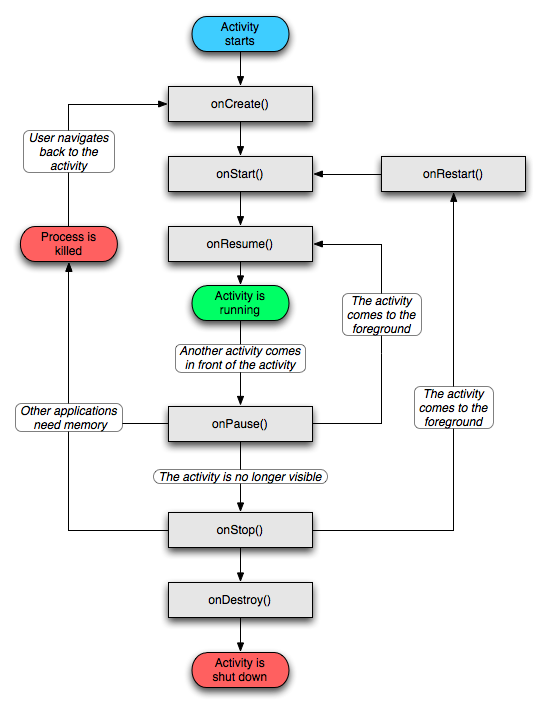 Android活動的生存期,Android活動生存期
Android活動的生存期,Android活動生存期Activity 類中定義了七個回調方法,覆蓋了活動生命周期的每一個環節,下面我來一一介紹下這七個方法。1. onCr
 使用Eclipse開發,Java Compiler中Annotation Processin不出現的解決方案,eclipseannotation
使用Eclipse開發,Java Compiler中Annotation Processin不出現的解決方案,eclipseannotation第一步:在Eclipse菜