編輯:關於android開發
 1 import java.util.ArrayList;
 2
 3 import android.app.Activity;
 4 import android.content.Context;
 5 import android.os.Bundle;
 6 import android.view.LayoutInflater;
 7 import android.view.View;
 8 import android.view.View.OnClickListener;
 9 import android.view.ViewGroup;
10 import android.widget.ArrayAdapter;
11 import android.widget.Button;
12 import android.widget.EditText;
13 import android.widget.ListView;
14 import android.widget.TextView;
15
16 public class MainActivity extends Activity {
17     EditText et;
18     Button btn;
19     ListView lv;
20     MyAdapter mMyAdapter;
21     ArrayList<String> date;
22
23     @Override
24     protected void onCreate(Bundle savedInstanceState) {
25         super.onCreate(savedInstanceState);
26         setContentView(R.layout.activity_main);
27
28         date = new ArrayList<String>();
29         et = (EditText) findViewById(R.id.et1);
30         btn = (Button) findViewById(R.id.btn1);
31         lv = (ListView) findViewById(R.id.lv);
32
33         mMyAdapter = new MyAdapter(this, R.layout.list);
34         // 設置ListView的適配器 (ArrayAdapter適配器的用法)
35         lv.setAdapter(mMyAdapter);
36
37         btn.setOnClickListener(new OnClickListener() {
38
39             @Override
40             public void onClick(View v) {
41                 sendmessage();
42             }
43         });
44     }
45
46     public void sendmessage() {
47         date.add(et.getText().toString());
48         mMyAdapter.notifyDataSetChanged();
49         // 發送完設置輸入框為空
50         et.setText(null);
51         // 發送消息後將ListView滾動到最下方
52         lv.setSelection(ListView.FOCUS_DOWN);
53     }
54
55     public class MyAdapter extends ArrayAdapter {
56         private Context context;
57         private int resource;
58
59         public MyAdapter(Context context, int resource) {
60             super(context, resource);
61             this.resource = resource;
62             this.context = context;
63         }
64
65         @Override
66         public int getCount() {
67
68             return date.size();
69         }
70
71         @Override
72         public View getView(int position, View convertView, ViewGroup parent) {
73
74             LayoutInflater flater = LayoutInflater.from(context);
75             // 設置可以復用view
76             if (convertView == null) {
77                 convertView = flater.inflate(resource, null);
78             }
79             TextView tv = (TextView) convertView.findViewById(R.id.qqtxt);
80             tv.setText(date.get(position));
81
82             return convertView;
83         }
84
85     }
86 }
xml文件:
 1 <?xml version="1.0" encoding="utf-8"?>
 2 <RelativeLayout xmlns:android="http://schemas.android.com/apk/res/android"
 3     android:id="@+id/RelativeLayout1"
 4     android:layout_width="match_parent"
 5     android:layout_height="match_parent" >
 6
 7     <ImageView
 8         android:id="@+id/ImageView1"
 9         android:layout_width="50dp"
10         android:layout_height="50dp"
11         android:layout_alignParentRight="true"
12         android:layout_centerVertical="true"
13         android:background="@drawable/meimei" />
14
15     <TextView
16         android:id="@+id/qqtxt"
17         android:layout_width="wrap_content"
18         android:layout_height="wrap_content"
19         android:layout_centerVertical="true"
20         android:layout_toLeftOf="@+id/ImageView1"
21         android:background="#ff5252"
22         android:text="1233"
23         android:textSize="20sp" />
24
25 </RelativeLayout>
 1 <RelativeLayout xmlns:android="http://schemas.android.com/apk/res/android"
 2     xmlns:tools="http://schemas.android.com/tools"
 3     android:layout_width="match_parent"
 4     android:layout_height="match_parent"
 5     tools:context="com.lixu.qqduihua.MainActivity" >
 6
 7     <ListView
 8         android:id="@+id/lv"
 9         android:layout_width="match_parent"
10         android:layout_height="wrap_content"
11         android:layout_above="@+id/commentLinearLayout"
12         android:layout_alignParentTop="true"
13         android:divider="@android:color/transparent"
14         android:dividerHeight="15dip"
15         android:scrollbars="none" />
16
17     <LinearLayout
18         android:id="@+id/commentLinearLayout"
19         android:layout_width="match_parent"
20         android:layout_height="wrap_content"
21         android:layout_alignParentBottom="true"
22         android:background="#e0e0e0"
23         android:orientation="horizontal" >
24
25         <EditText
26             android:id="@+id/et1"
27             android:layout_width="wrap_content"
28             android:layout_height="wrap_content"
29             android:layout_weight="2"
30             android:ems="10"
31             android:hint="請輸入內容" >
32
33             <requestFocus />
34         </EditText>
35
36         <Button
37             android:id="@+id/btn1"
38             android:layout_width="wrap_content"
39             android:layout_height="wrap_content"
40             android:background="@drawable/round"
41             android:text="發送" />
42     </LinearLayout>
43
44 </RelativeLayout>
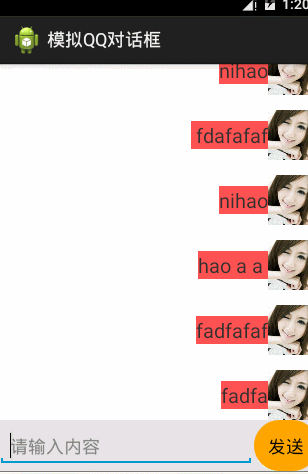
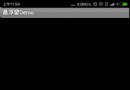
運行效果:
 Android--Activity生命周期
Android--Activity生命周期 熟悉javaEE的朋友們都了解servlet技術,我們想要實現一個自己的servlet,需要繼承相應的基類,重寫它的方法,這些
 Android WindowManager實現懸浮窗效果 (一)——與當前Activity綁定,windowmanager懸浮窗
Android WindowManager實現懸浮窗效果 (一)——與當前Activity綁定,windowmanager懸浮窗 最近有學生做畢業設計,想使用懸浮窗這種
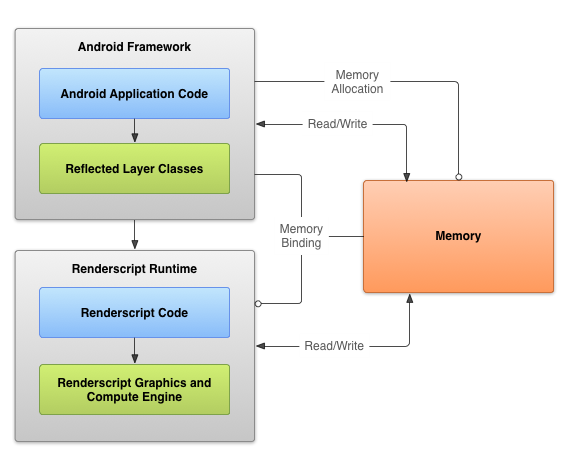 Android高效計算——RenderScript(一),androidrenderscript
Android高效計算——RenderScript(一),androidrenderscript高效計算——RenderScript Render
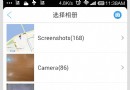 Android:支持多選的本地相冊
Android:支持多選的本地相冊 前段時間在做一個動態發布功能,需要用到圖片上傳。一開始直接調用的系統相冊和相機,由於系統相機不支持多選,就花點時間做了個本地相冊,