編輯:關於android開發
最近仿照QQ聊天做了一個類似界面,先看下界面組成(畫面不太美湊合湊合呗,,,,):
其中聊天背景可以是一個LinearLayout或者RelativeLayout裡面存放的是ListView(將ListView的分割線設置成透明:android:divider="#0000"否則聊天界面會顯示出分割線,,,想想都屌,,,)
於是,我要上主界面的xml布局文件了:
<?xml version="1.0" encoding="utf-8"?>
<LinearLayout xmlns:android="http://schemas.android.com/apk/res/android"
android:layout_width="match_parent"
android:layout_height="match_parent"
android:background="#c2c2c2"
android:orientation="vertical"
android:padding="16dp" >
<LinearLayout
android:layout_width="match_parent"
android:layout_height="wrap_content"
android:layout_marginTop="@dimen/activity_horizontal_margin"
android:layout_weight="1"
android:background="@drawable/app_lvjian_rbtn_normal_background"
android:orientation="vertical"
android:padding="8dp" >
<ListView
android:id="@+id/lv_chat_dialog"
android:layout_width="match_parent"
android:layout_height="wrap_content"
android:divider="#0000"
android:dividerHeight="8dp"
android:scrollbars="none" >
</ListView>
</LinearLayout>
<LinearLayout
android:layout_width="match_parent"
android:layout_height="32dp"
android:layout_marginTop="8dp"
android:orientation="horizontal" >
<EditText
android:id="@+id/et_chat_message"
android:layout_width="0dp"
android:layout_height="match_parent"
android:layout_weight="1"
android:textSize="14sp"
android:background="@drawable/app_lvjian_rbtn_normal_background"
android:gravity="center|left"
android:padding="8dp" />
<Button
android:id="@+id/btn_chat_message_send"
> 完了就會出現下圖:
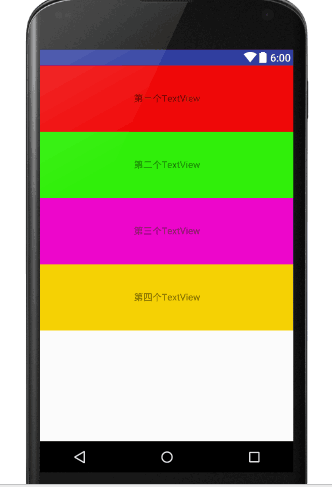
於是該為ListView設置條目了,就是咱們聊天的消息了!
由圖可以看出要為ListView設置兩個item文件,(頭像和氣泡的位置,方向,都不一樣)其中氣泡一定是.9png的否則會失真的。
左邊的item:
<?xml version="1.0" encoding="utf-8"?>
<LinearLayout xmlns:android="http://schemas.android.com/apk/res/android"
android:layout_width="match_parent"
android:layout_height="match_parent"
android:orientation="horizontal" >
<ImageView
android:id="@+id/ivicon"
android:layout_width="24dp"
android:layout_height="24dp"
android:layout_gravity="top"
android:src="@drawable/app_lvjian_message_background" />
<TextView
android:id="@+id/tvname"
android:layout_width="wrap_content"
android:layout_height="wrap_content"
android:layout_marginLeft="8dp"
android:layout_marginTop="8dp"
android:padding="8dp"
android:background="@drawable/app_lvjian_other_chat_background"
android:text="權志龍好帥!!!" />
</LinearLayout>
右邊的item
<?xml version="1.0" encoding="utf-8"?>
<RelativeLayout xmlns:android="http://schemas.android.com/apk/res/android"
android:layout_width="match_parent"
android:layout_height="match_parent"
android:orientation="horizontal" >
<TextView
android:id="@+id/tv_chat_me_message"
android:layout_width="wrap_content"
android:layout_height="wrap_content"
android:layout_marginRight="8dp"
android:layout_marginTop="8dp"
android:layout_toLeftOf="@+id/iv_chat_imagr_right"
android:background="@drawable/app_lvjian_chat_right"
android:padding="8dp"
android:text="把那些販毒的關到小黑屋,槍斃五十次,快去" />
<ImageView
android:id="@+id/iv_chat_imagr_right"
android:layout_width="24dp"
android:layout_height="24dp"
android:layout_alignParentRight="true"
android:layout_gravity="top"
android:src="@drawable/app_lvjian_message_background" />
</RelativeLayout>
接下來還要為LiseView設置Adapter,發送消息時候有姓名,聊天內容等,我把這些元素封裝了一個實體類先貼出來(Adapter會用到的):
package com.example.mychattext;
public class PersonChat {
/**
* id
*/
private int id;
/**
* 姓名
*/
private String name;
/**
* 聊天內容
*/
private String chatMessage;
/**
*
* @return 是否為本人發送
*/
private boolean isMeSend;
public int getId() {
return id;
}
public void setId(int id) {
this.id = id;
}
public String getName() {
return name;
}
public void setName(String name) {
this.name = name;
}
public String getChatMessage() {
return chatMessage;
}
public void setChatMessage(String chatMessage) {
this.chatMessage = chatMessage;
}
public boolean isMeSend() {
return isMeSend;
}
public void setMeSend(boolean isMeSend) {
this.isMeSend = isMeSend;
}
public PersonChat(int id, String name, String chatMessage, boolean isMeSend) {
super();
this.id = id;
this.name = name;
this.chatMessage = chatMessage;
this.isMeSend = isMeSend;
}
public PersonChat() {
super();
}
}
自定義的Adapter加載布局文件的時候需要判斷是哪方發送的消息來決定用哪個item布局文件,看Adapter:
package com.example.mychattext;
import java.util.List;
import android.content.Context;
import android.view.View;
import android.view.ViewGroup;
import android.widget.BaseAdapter;
import android.widget.TextView;
public class ChatAdapter extends BaseAdapter {
private Context context;
private List<PersonChat> lists;
public ChatAdapter(Context context, List<PersonChat> lists) {
super();
this.context = context;
this.lists = lists;
}
/**
* 是否是自己發送的消息
*
* @author cyf
*
*/
public static interface IMsgViewType {
int IMVT_COM_MSG = 0;// 收到對方的消息
int IMVT_TO_MSG = 1;// 自己發送出去的消息
}
@Override
public int getCount() {
// TODO Auto-generated method stub
return lists.size();
}
@Override
public Object getItem(int arg0) {
// TODO Auto-generated method stub
return lists.get(arg0);
}
@Override
public long getItemId(int arg0) {
// TODO Auto-generated method stub
return arg0;
}
/**
* 得到Item的類型,是對方發過來的消息,還是自己發送出去的
*/
public int getItemViewType(int position) {
PersonChat entity = lists.get(position);
if (entity.isMeSend()) {// 收到的消息
return IMsgViewType.IMVT_COM_MSG;
} else {// 自己發送的消息
return IMsgViewType.IMVT_TO_MSG;
}
}
@Override
public View getView(int arg0, View arg1, ViewGroup arg2) {
// TODO Auto-generated method stub
HolderView holderView = null;
PersonChat entity = lists.get(arg0);
boolean isMeSend = entity.isMeSend();
if (holderView == null) {
holderView = new HolderView();
if (isMeSend) {
arg1 = View.inflate(context, R.layout.chat_dialog_right_item,
null);
holderView.tv_chat_me_message = (TextView) arg1
.findViewById(R.id.tv_chat_me_message);
holderView.tv_chat_me_message.setText(entity.getChatMessage());
} else {
arg1 = View.inflate(context, R.layout.chat_dialog_left_item,
null);
}
arg1.setTag(holderView);
} else {
holderView = (HolderView) arg1.getTag();
}
return arg1;
}
class HolderView {
TextView tv_chat_me_message;
}
@Override
public boolean isEnabled(int position) {
return false;
}
}
區分消息發送方重點在IMsgViewType、getItemViewType、getView方法中,注釋很詳細,相信大家可以理解
最後是注釋詳細的MAinActivity:
package com.example.mychattext;
import java.util.ArrayList;
import java.util.List;
import android.app.Activity;
import android.os.Bundle;
import android.os.Handler;
import android.text.TextUtils;
import android.view.View;
import android.view.View.OnClickListener;
import android.view.Window;
import android.widget.Button;
import android.widget.EditText;
import android.widget.ListView;
import android.widget.Toast;
public class MainActivity extends Activity {
private ChatAdapter chatAdapter;
/**
* 聲明ListView
*/
private ListView lv_chat_dialog;
/**
* 集合
*/
private List<PersonChat> personChats = new ArrayList<PersonChat>();
private Handler handler = new Handler() {
public void handleMessage(android.os.Message msg) {
int what = msg.what;
switch (what) {
case 1:
/**
* ListView條目控制在最後一行
*/
lv_chat_dialog.setSelection(personChats.size());
break;
default:
break;
}
};
};
@Override
protected void onCreate(Bundle savedInstanceState) {
super.onCreate(savedInstanceState);
requestWindowFeature(Window.FEATURE_NO_TITLE);
setContentView(R.layout.activity_main);
/**
* 虛擬4條發送方的消息
*/
for (int i = 0; i <= 3; i++) {
PersonChat personChat = new PersonChat();
personChat.setMeSend(false);
personChats.add(personChat);
}
lv_chat_dialog = (ListView) findViewById(R.id.lv_chat_dialog);
Button btn_chat_message_send = (Button) findViewById(R.id.btn_chat_message_send);
final EditText et_chat_message = (EditText) findViewById(R.id.et_chat_message);
/**
*setAdapter
*/
chatAdapter = new ChatAdapter(this, personChats);
lv_chat_dialog.setAdapter(chatAdapter);
/**
* 發送按鈕的點擊事件
*/
btn_chat_message_send.setOnClickListener(new OnClickListener() {
@Override
public void onClick(View arg0) {
// TODO Auto-generated method stub
if (TextUtils.isEmpty(et_chat_message.getText().toString())) {
Toast.makeText(MainActivity.this, "發送內容不能為空", 0).show();
return;
}
PersonChat personChat = new PersonChat();
//代表自己發送
personChat.setMeSend(true);
//得到發送內容
personChat.setChatMessage(et_chat_message.getText().toString());
//加入集合
personChats.add(personChat);
//清空輸入框
et_chat_message.setText("");
//刷新ListView
chatAdapter.notifyDataSetChanged();
handler.sendEmptyMessage(1);
}
});
}
}
源碼連接:https://yunpan.cn/cS4CAwunXBfYt 訪問密碼 82eb
 手勢滑動和自定意控件,滑動自定意
手勢滑動和自定意控件,滑動自定意如圖當我點擊下一個時會跳轉到別個界面,當我用手勢向右滑動的時候也調轉到下一頁 其中點擊最上面的RelativeLayout則CheckBo
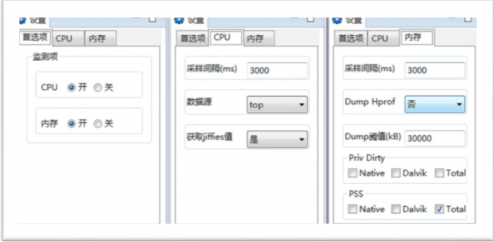 【Android性能工具】騰訊開源工具APT,androidapt
【Android性能工具】騰訊開源工具APT,androidapt做App測試時監測使用期間的cpu,內存,流量,電量等指標時,發現的企鵝很好用的工具。 備份至此,方便後
 Android菜單項內容大全,android菜單項大全
Android菜單項內容大全,android菜單項大全一、介紹: 菜單是許多應用中常見的用戶界面組件。 Android3.0版本以前,Android設備會提供一個專用“菜
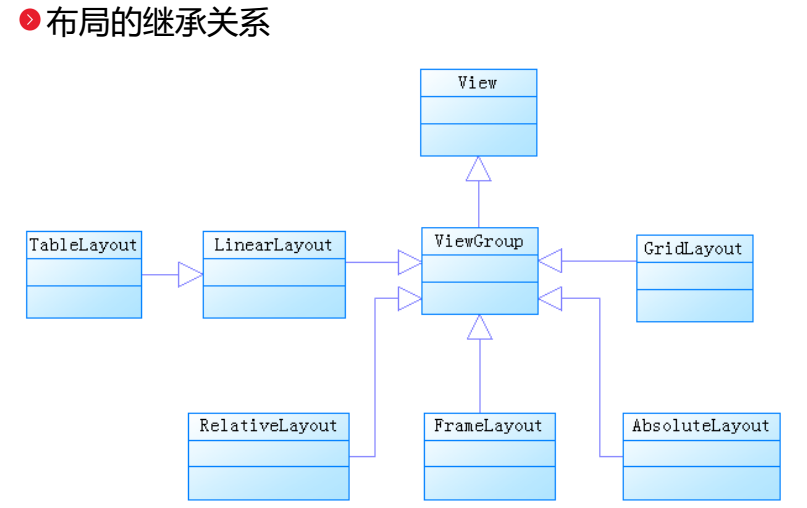 安卓的主要幾大布局,安卓布局
安卓的主要幾大布局,安卓布局今天我們的主要內容就是安卓的主要幾個基礎的布局方式。(主要布局如下:) 1.線性布局(LinerLayout) 2.相對布局(Relative