編輯:關於android開發
本文主要介紹Android立體旋轉動畫,或者3D旋轉,下圖是我自己實現的一個界面
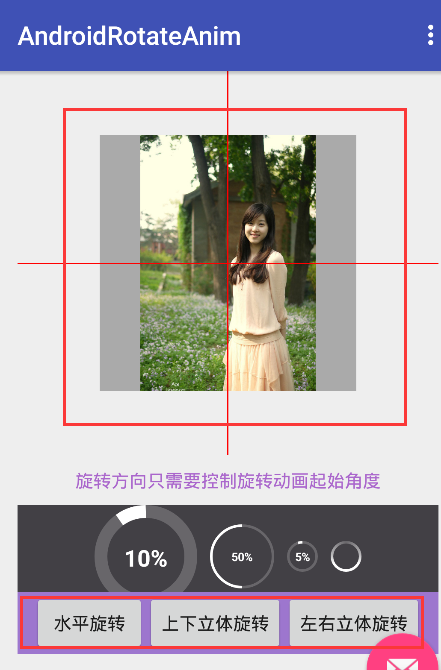
立體旋轉分為以下三種:
1. 以X軸為軸心旋轉
2. 以Y軸為軸心旋轉
3. 以Z軸為軸心旋轉--這種等價於android默認自帶的旋轉動畫RotateAnimation
實現立體旋轉核心步驟:
1. 繼承系統Animation重寫applyTransformation方法
通過applyTransformation方法的回調參數 float interpolatedTime, Transformation t 來控制旋轉動畫
interpolatedTime 用來計算旋轉角度而 t 用來控制變換矩陣從而實現圖像的旋轉
2. android.graphics.Camera控制旋轉算法
Camera可以對圖像執行一些比較復雜的操作--旋轉,綻放,與Matrix一起實現圖像的傾斜
核心代碼封裝:Rotate3dAnimation
package rotateanim.example.com.androidrotateanim;

import android.view.animation.Animation;
import android.view.animation.Transformation;
import android.graphics.Camera;
import android.graphics.Matrix;

/**
 * An animation that rotates the view on the X,Y,Z axis between two specified angles.
 * This animation also adds a translation on the Z axis (depth) to improve the effect.
 */
public class Rotate3dAnimation extends Animation {
    public static final Byte ROTATE_X_AXIS = 0x00;
    public static final Byte ROTATE_Y_AXIS = 0x01;
    public static final Byte ROTATE_Z_AXIS = 0x02;
    private final float mFromDegrees;
    private final float mToDegrees;
    private final float mCenterX;
    private final float mCenterY;
    private final float mDepthZ;
    private final boolean mReverse;
    private Camera mCamera;
    private Byte mRotateAxis;  // 0:X軸  1:Y軸  2:Z軸

    /**創建3D旋轉動畫
     * @param fromDegrees the start angle of the 3D rotation
     * @param toDegrees the end angle of the 3D rotation
     * @param centerX the X center of the 3D rotation
     * @param centerY the Y center of the 3D rotation
     * @param depthZ the Z depth of the 3D rotation
     * @param rotateAxis the rotate axis of the 3D rotation
     * @param reverse true if the translation should be reversed, false otherwise
     */
    public Rotate3dAnimation(float fromDegrees, float toDegrees,
            float centerX, float centerY, float depthZ, Byte rotateAxis, boolean reverse) {
        mFromDegrees = fromDegrees;
        mToDegrees = toDegrees;
        mCenterX = centerX;
        mCenterY = centerY;
        mDepthZ = depthZ;
        mRotateAxis = rotateAxis;
        mReverse = reverse;
    }

    @Override
    public void initialize(int width, int height, int parentWidth, int parentHeight) {
        super.initialize(width, height, parentWidth, parentHeight);
        mCamera = new Camera();
    }

    @Override
    protected void applyTransformation(float interpolatedTime, Transformation t) {
        final float fromDegrees = mFromDegrees;
        float degrees = fromDegrees + ((mToDegrees - fromDegrees) * interpolatedTime);

        final float centerX = mCenterX;
        final float centerY = mCenterY;
        final Camera camera = mCamera;

        final Matrix matrix = t.getMatrix();
        // 將當前的攝像頭位置保存下來,以便變換進行完成後恢復成原位
        camera.save();
        if (mReverse) {
            // z的偏移會越來越大。這就會形成這樣一個效果,view從近到遠
            camera.translate(0.0f, 0.0f, mDepthZ * interpolatedTime);
        } else {
            // z的偏移會越來越小。這就會形成這樣一個效果,我們的View從一個很遠的地方向我們移過來,越來越近,最終移到了我們的窗口上面
            camera.translate(0.0f, 0.0f, mDepthZ * (1.0f - interpolatedTime));
        }
        // 是給我們的View加上旋轉效果,在移動的過程中,視圖還會以XYZ軸為中心進行旋轉。
        if (ROTATE_X_AXIS.equals(mRotateAxis)) {
            camera.rotateX(degrees);
        } else if (ROTATE_Y_AXIS.equals(mRotateAxis)) {
            camera.rotateY(degrees);
        } else {
            camera.rotateZ(degrees);
        }

        // 這個是將我們剛才定義的一系列變換應用到變換矩陣上面,調用完這句之後,我們就可以將camera的位置恢復了,以便下一次再使用。
        camera.getMatrix(matrix);
        // camera位置恢復
        camera.restore();

        // 下面兩句是為了動畫是以View中心為旋轉點
        matrix.preTranslate(-centerX, -centerY);
        matrix.postTranslate(centerX, centerY);
    }
}
Rotate3dAnimation使用:跟普通動畫使用沒區別,設置給一個View對象,啟動動畫就搞定
mRotateImgv就是需要旋轉的View對象

// 以X軸為軸心旋轉
private void rotateOnXCoordinate() {
    float centerX = mRotateImgv.getWidth() / 2.0f;
    float centerY = mRotateImgv.getHeight() / 2.0f;
    float depthZ = 0f;
    Rotate3dAnimation rotate3dAnimationX = new Rotate3dAnimation(0, 180, centerX, centerY, depthZ, Rotate3dAnimation.ROTATE_X_AXIS, true);
    rotate3dAnimationX.setDuration(1000);
    mRotateImgv.startAnimation(rotate3dAnimationX);
}

// 以X軸為軸心旋轉
private void rotateOnYCoordinate() {
    float centerX = mRotateImgv.getWidth() / 2.0f;
    float centerY = mRotateImgv.getHeight() / 2.0f;
    float centerZ = 0f;

    Rotate3dAnimation rotate3dAnimationX = new Rotate3dAnimation(0, 180, centerX, centerY, centerZ, Rotate3dAnimation.ROTATE_Y_AXIS, true);
    rotate3dAnimationX.setDuration(1000);
    mRotateImgv.startAnimation(rotate3dAnimationX);
}

// 以Z軸為軸心旋轉---等價於普通平面旋轉動畫
private void rotateAnimHorizon() {
    float centerX = mRotateImgv.getWidth() / 2.0f;
    float centerY = mRotateImgv.getHeight() / 2.0f;
    float centerZ = 0f;

    Rotate3dAnimation rotate3dAnimationX = new Rotate3dAnimation(180, 0, centerX, centerY, centerZ, Rotate3dAnimation.ROTATE_Z_AXIS, true);
    rotate3dAnimationX.setDuration(1000);
    mRotateImgv.startAnimation(rotate3dAnimationX);

    // 下面是使用android自帶的旋轉動畫
    // RotateAnimation rotateAnimation = new RotateAnimation(0, 180, Animation.RELATIVE_TO_SELF, 0.5f, Animation.RELATIVE_TO_SELF, 0.5f);
    // rotateAnimation.setDuration(1000);
    // mRotateImgv.startAnimation(rotateAnimation);
}
 安卓應用的界面編程(4),安卓界面編程
安卓應用的界面編程(4),安卓界面編程第三組UI組件:ImageView及其子類 主要功能是顯示圖片,任何Drawable對象都可使用ImageView來顯
 Android開發Tips(2)
Android開發Tips(2) 1. Dagger2的開發順序 Module -> Component -> Application 首先模塊(Modul
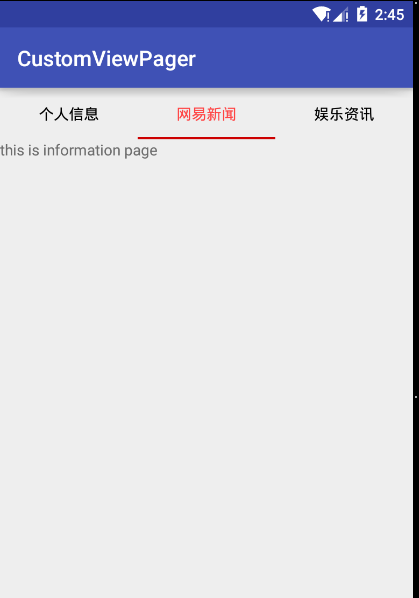 TabLayout和ViewPager簡單實現頁卡的滑動,tablayoutviewpager
TabLayout和ViewPager簡單實現頁卡的滑動,tablayoutviewpager首先需要在當前的module中的build Gradle的 dependen
 (轉)可收縮、擴展的TextView,擴展textview
(轉)可收縮、擴展的TextView,擴展textview在一些應用中,比如騰訊的應用市場APP應用寶,關於某款應用的介紹文字,如果介紹文字過長,那麼不是全部展現出來,而