編輯:關於android開發
作者:Antonio Leiva
時間:Dec 12, 2016
原文鏈接:http://antonioleiva.com/kotlin-android-extensions/
你也許已厭倦日復一日使用findViewById編寫Android視圖。或是你可能放棄它轉而使用著名的Butterknife庫。那麼你將會喜愛Kotlin的Android擴展。
Kotlin的Android擴展是Kotlin插件的正規插件之一,它無縫覆蓋Activities的視圖,Fragments y視圖。
讓我們看看它是怎樣簡單。
雖然你要使用一插件時可以將其集成到代碼中,但是你還是需要在Android模塊中填加額外的apply:
1 apply plugin: 'com.android.application'
2 apply plugin: 'kotlin-android'
3 apply plugin: 'kotlin-android-extensions'
這些都是你需要添加的。這樣你就准備好使用它。
此時,在你的Activity或Fragment中覆蓋視圖與直接在XML中用視圖id定義一樣方便。
想象你有這樣的XML:
 1 <?xml version="1.0" encoding="utf-8"?>
 2 <FrameLayout
 3     xmlns:android="http://schemas.android.com/apk/res/android"
 4     android:layout_width="match_parent"
 5     android:layout_height="match_parent">
 6
 7     <TextView
 8         android:id="@+id/welcomeMessage"
 9         android:layout_width="wrap_content"
10         android:layout_height="wrap_content"
11         android:layout_gravity="center"
12         android:text="Hello World!"/>
13
14 </FrameLayout>
如你所見,TestView有welcomeMessage id。
只需在你的MainActivity這樣編寫:
1 override fun onCreate(savedInstanceState: Bundle?) {
2     super.onCreate(savedInstanceState)
3     setContentView(R.layout.activity_main)
4
5     welcomeMessage.text = "Hello Kotlin!"
6 }
為了能夠使用它,你需要專門import(這句我寫在下面),而且IDE能夠自動添加引入(import)它。這不是很容易嗎!
import kotlinx.android.synthetic.main.activity_main.*
插件生成代碼能夠存儲視圖緩存(cache),這樣你再次訪問視圖時,就不需要另一個findViewById。
我們有這樣的視圖:
 1 <LinearLayout xmlns:android="http://schemas.android.com/apk/res/android"
 2               android:orientation="vertical"
 3               android:layout_width="match_parent"
 4               android:layout_height="match_parent">
 5
 6     <ImageView
 7         android:id="@+id/itemImage"
 8         android:layout_width="match_parent"
 9         android:layout_height="200dp"/>
10
11     <TextView
12         android:id="@+id/itemTitle"
13         android:layout_width="match_parent"
14         android:layout_height="wrap_content"/>
15
16 </LinearLayout>
如你在其內添加adapter。
你只需用這個插件,就可直接訪問子視圖:
1 val itemView = ...
2 itemView.itemImage.setImageResource(R.mipmap.ic_launcher)
3 itemView.itemTitle.text = "My Text"
盡管插件也幫助你填寫了import,不過這類有一點點不同:
import kotlinx.android.synthetic.main.view_item.view.*
對此有一些事情你需要知道:
但是,你只要仔細利用它,它還是非常有用的工具。
你已經知道怎樣在Kotlin中方便的處理Android視圖。用一個簡單的插件,我們就可以在擴展後忽略所有那些涉及視圖恢復的糟糕代碼。這插件將按照我們的要求特性產生沒有任何問題的正確的類型。
 Android應用開發教程之五:EditText詳解
EditText在API中的結構 java.lang.Object android.view.View android.widget.Text
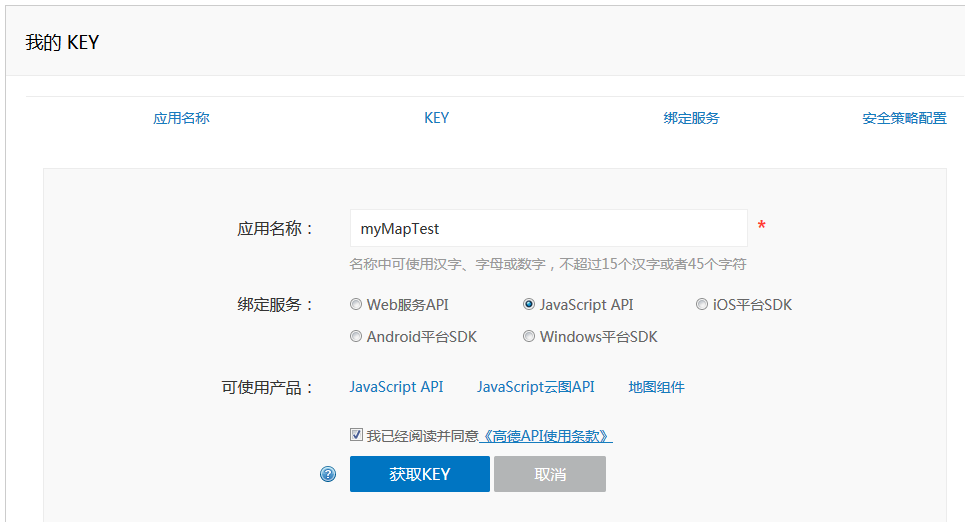 高德地圖JS-API (超簡單Get新技能√),高德js-api
高德地圖JS-API (超簡單Get新技能√),高德js-api 上幾章我們研究了百度地圖SDK的用法,雖然不難但是配置起來也是相當的繁瑣,現在高德LBS開放平台推出了
 Android AutoLayout全新的適配方式 堪稱適配終結者
Android AutoLayout全新的適配方式 堪稱適配終結者 一、概述 相信Android的開發者對於設配問題都比較苦惱,Google官方雖
 Android AsyncTask 深度理解、簡單封裝、任務隊列分析、自定義線程池,androidasynctask
Android AsyncTask 深度理解、簡單封裝、任務隊列分析、自定義線程池,androidasynctask前言:由於最近在做SDK的功能,需要設計線程池。看了很