編輯:關於Android編程
基本思想:
(1)如果想要加載圖片,首先先去內存緩存中查看是否有圖片(內存緩存)
(2)如果內存緩存中沒有,就會去本地SD卡上查找是否存在(SD卡緩存)
(3)如果本地SD卡上也沒有的話,則會去網絡下載了,下載完成之後將該圖片存入本地緩存和內存緩存;
這篇主要從本地緩存角度介紹優化ListView顯示圖片的方法,接下來的幾篇再從內存緩存以及本地緩存和內存緩存相結合的角度來優化ListView顯示圖片;
這裡的本地緩存指的就是DiskLruCache,當緩存區已經滿的時候他采用最近最少使用算法來替換其中的內容,當然對於本地緩存來說,這點並不是主要考慮的對象,因為畢竟SD卡的容量還是挺大的吧;
要想使用DiskLruCache,我們需要在工程中引入DiskLruCache.java文件,雖然DiskLruCache是谷歌推薦的,但是並不是谷歌開發的:
在正式使用之前,我們先來說說使用DiskLruCache的步驟:
(1)首先當然是創建DiskLruCache對象了,因為DiskLruCache的構造函數是私有的,所以我們不能直接new出來他的實例,但是他提供了一個public static 類型的open方法,在這個方法裡面是有通過new來創建DiskLruCache實例的,所以我們可以通過open方法的返回值來獲得一個DiskLruCache對象;
(2)接著我們來看看要想調用open方法需要哪些參數吧
/**
     * Opens the cache in {@code directory}, creating a cache if none exists
     * there.
     *
     * @param directory a writable directory
     * @param appVersion
     * @param valueCount the number of values per cache entry. Must be positive.
     * @param maxSize the maximum number of bytes this cache should use to store
     * @throws java.io.IOException if reading or writing the cache directory fails
     */
    public static DiskLruCache open(File directory, int appVersion, int valueCount, long maxSize)
官方注釋已經寫的很清楚了:
第一個參數directory指的是一個可寫的目錄,如果有SD卡或者SD卡不可移除的話,通常通過context.getExternalCacheDir().getPath()獲取,對應的SD卡路徑是/sdcard/Android/data/包名/cache,如果沒有SD卡的話,通常通過context.getCacheDir().getPath()獲取,對應獲取到的路徑是/data/data/包名/cache;
第二個參數是app的版本號,因為我們對於圖片數據的緩存很大程度上是與app的版本號有關系的,當app的版本發生更新的時候DiskLruCache會默認先刪除先前所緩存的內容,其實這點是很好理解的,因為新版本會有新功能加入,而新的功能會有不同的布局內容,之前緩存的圖片及視頻語音之類的可能已經不再能適應新版本的界面要求啦!
第三個參數指的是同一個key值所對應的所對應的緩存文件的個數,這個值只能是正數;
第四個參數指的是緩存區的最大字節數,當然你不能指定成大於SD卡的容量了;
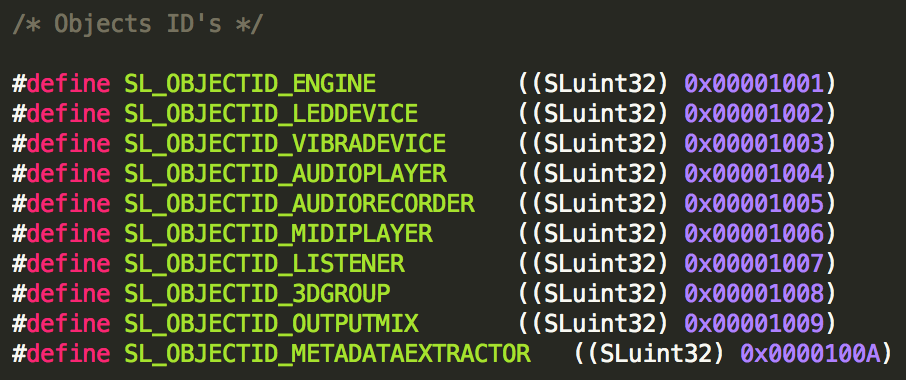
(3)很多人會發現你的app安裝目錄下會多好多名字奇怪的文件,然而你還打不開這些文件,別擔心,那些就是緩存文件了,這些文件中有一個名字為journal,這類似於我們通常程序中的日志文件,這個文件是在open方法調用DiskLruCache構造函數的時候創建的,他記錄了我們對緩存的種種操作,不信我打開一個你看看:

第一行表示我們使用的是DiskLruCache
第二行是DiskLruCache的版本,目前來說是恆為1的
第三行是app的版本,這個值就是上面open方法傳入的第二個參數了
第四行是空行,用來分開頭部和主體部分
第五行DIRTY表示後面這個名字的文件是個髒數據文件,每當我們調用DiskLruCache的edit方法的時候都會寫入一條DIRTY信息
第六行CLEAN表示後面這個名字的文件已經成為了緩存文件,每當我們調用DiskLruCache的commit方法之後都會在journal文件中加入這麼一條記錄
有時候你還會看到開頭是REMOVE名字的一行,這是在調用DiskLruCache abort方法的時候寫入日志的一條記錄
(4)好了,現在有了DiskLruCache對象了,通過他我們可以獲取到Editor對象,他是DiskLruCache的內部類,注意這個才是真正寫緩存的對象,我們可以通過他的commit、abort、close、flush等方法來進行寫緩存操作
(5)有了寫緩存的介紹,那麼讀緩存呢?讀緩存是通過Snapshot來完成的,同樣,他也是DiskLruCache的內部類
好了,DiskLruCache的大致操作過程介紹完畢了,接下來通過實例來完成帶有本地緩存的ListView加載圖片:
首先定義Activity布局文件listView.xml,用來顯示ListView
接著定義ListView中每個item的布局文件item.xml
上面兩個布局文件都很好理解,在此不做過多解釋;
因為創建DiskLruCache需要用到一個可寫的目錄以及app的版本號,因此我們實現了一個工具類Utils,其中兩個方法如下:
	/**
	 * 獲取磁盤緩存的存儲路徑
	 * @param context
	 * @param uniqueName
	 * @return
	 */
	public static File getDiskCacheDir(Context context,String uniqueName)
	{
		String filePath = "";
		if(Environment.MEDIA_MOUNTED.equals(Environment.getExternalStorageState()) || !Environment.isExternalStorageRemovable())
		{
			//表示SD卡存在或者不可移除
			try {
				filePath = context.getExternalCacheDir().getPath();//獲得緩存路徑
			} catch (Exception e) {
				System.out.println(e.toString());
			}
		}else
		{
			filePath = context.getCacheDir().getPath();
		}
		System.out.println(filePath+File.separator+uniqueName);
		return new File(filePath+File.separator+uniqueName);
	}

	/**
	 * 獲取app的版本號
	 * @param context
	 */
	public static int getAppVersion(Context context)
	{
		PackageInfo info;
		try {
			info = context.getPackageManager().getPackageInfo(context.getPackageName(), 0);
			return info.versionCode;
		} catch (NameNotFoundException e) {
			e.printStackTrace();
		}
		return 1;
	}
getDiskCacheDir用於生成需要將緩存文件存儲的地方,getAppVersion用於獲得app的版本號;
接下來就是最關鍵的ListViewAdapter了,代碼有點長,先貼出來再解釋:
public class ListViewAdapter extends BaseAdapter{

	public List list;
	public DiskLruCache diskCache;
	public LayoutInflater inflater;
	public ListView listView;
	public Set tasks;
	public int reqWidth;
	public int reqHeight;

	public ListViewAdapter() {
	}

	public ListViewAdapter(Context context,List list,DiskLruCache diskCache,ListView listView,ImageView imageView) {
		this.list = list;
		this.diskCache = diskCache;
		this.inflater = LayoutInflater.from(context);
		this.listView = listView;
		tasks = new HashSet();
		//獲得ImageView的寬和高
		LayoutParams params = imageView.getLayoutParams();
		this.reqWidth = params.width;
		this.reqHeight = params.height;
	}

	@Override
	public int getCount() {
		return list.size();
	}

	@Override
	public String getItem(int position) {
		return list.get(position);
	}

	@Override
	public long getItemId(int position) {
		return 0;
	}

	@Override
	public View getView(int position, View convertView, ViewGroup parent) {
		View view = null;
		ViewHolder holder = null;
		if(convertView == null)
		{
			view = inflater.inflate(R.layout.item, null);
			holder = new ViewHolder();
			holder.imageView = (ImageView)view.findViewById(R.id.imageView);
			holder.textView = (TextView)view.findViewById(R.id.textView);
			view.setTag(holder);//為了復用holder
		}else
		{
			view = convertView;
			holder = (ViewHolder) view.getTag();
		}
		//為ImageView設置標志,防止亂序
		holder.imageView.setTag(position);
		holder.textView.setTag(position+"#");
		return view;
	}

	/**
	 * 加載圖片
	 * @param url
	 * @param key
	 * @param holder
	 */
	public void loadImage(String url,String key,final int index)
	{
		//查看DiskLruCache緩存中是否存在對應key值得緩存文件,如果存在的話,則直接從緩存中取出圖片即可,如果不存在的話,則需要從網絡中加載,加載完成同時寫到緩存中
		//讀緩存是通過DiskLruCache的Snaphot來實現的
		final ImageView imageView;
		final TextView textView;
		DiskLruCache.Snapshot snapshot = null;
		FileInputStream  in = null;
		Bitmap bitmap = null;
		try {
			snapshot = diskCache.get(key);
			if(snapshot != null)
			{
				imageView = (ImageView)listView.findViewWithTag(index);
				textView = (TextView)listView.findViewWithTag(index+"#");
				//非空表示緩存中存在該緩存文件
				//通過Snapshot直接從緩存中取出寫入到內存的輸入流,隨後調用BitmapFactory工廠方法來將其轉變成為Bitmap對象顯示在ImageView上面,同時將TextView設置為是從緩存中讀取的數據
				in = (FileInputStream) snapshot.getInputStream(0);//這裡的0指的是key對應的第1個緩存文件,因為在創建DiskLruCache的時候,第三個參數我們會用來輸入一個key對應幾個緩存文件,之前我們創建的DiskLruCache的第三個參數輸入的是1
				//對流中的圖片進行壓縮處理操作
				bitmap = decodeSampleBitmapFromStream(in, reqWidth, reqHeight);
				if(imageView != null)
					imageView.setImageBitmap(bitmap);
                if(textView != null)
                	textView.setText("從緩存中獲取的");
			}else
			{
				//否則的話需要開啟線程,從網絡中獲取圖片,獲取成功後返回該圖片,並且將其設置為ImageView顯示的圖片,同時將TextView的值設置成是從網絡中獲取的
				//這裡我們使用的是AsyncTask,因為可以很方便的獲取到我們要的圖片,當然也可以通過Handler的方式來獲取圖片
				ImageAsyncTask task = new ImageAsyncTask(listView,diskCache,index);
				task.setOnImageLoadListener(new OnImageLoadListener() {

					@Override
					public void onSuccessLoad(Bitmap bitmap) {
						System.out.println("已經使用的緩存大小:  "+((float)diskCache.size())/(1024*1024)+" M");
						System.out.println("加載圖片成功.......");
					}

					@Override
					public void onFailureLoad() {
						System.out.println("加載圖片失敗.......");
					}
				});
				tasks.add(task);//將任務加入到線程池中
				task.execute(url);//執行加載圖片的線程
			}
		} catch (Exception e) {
			e.printStackTrace();
		}
	}

	/**
	 * 暫停所有任務(為了防止在滑動的時候仍然有線程處於請求狀態)
	 */
	public void cancelTask()
	{
		if(tasks != null)
		{
			for(ImageAsyncTask task: tasks)
				task.cancel(false);//暫停任務
		}
	}

	/**
	 * 對圖片進行壓縮處理
	 * @param in
	 * @param reqWidth
	 * @param reqHeight
	 * @return
	 */
	public static Bitmap decodeSampleBitmapFromStream(FileInputStream in,int reqWidth,int reqHeight)
	{
		//設置BitmapFactory.Options的inJustDecodeBounds屬性為true表示禁止為bitmap分配內存
		BitmapFactory.Options options = new BitmapFactory.Options();
		options.inJustDecodeBounds = true;
		byte[] data = inputStreamToByteArray(in);
		//這次調用的目的是獲取到原始圖片的寬、高,但是這次操作是沒有寫內存操作的
		Bitmap beforeBitmap = BitmapFactory.decodeByteArray(data, 0, data.length, options);
		options.inSampleSize = calculateInSampleSize(options, reqWidth, reqHeight);
		//設置這次加載圖片需要加載到內存中
		options.inJustDecodeBounds = false;
		Bitmap afterBitmap = BitmapFactory.decodeByteArray(data, 0, data.length, options);
		return afterBitmap;
	}

	/**
	 * 計算出壓縮比
	 * @param options
	 * @param reqWith
	 * @param reqHeight
	 * @return
	 */
	public static int calculateInSampleSize(BitmapFactory.Options options,int reqWidth,int reqHeight)
	{
		//通過參數options來獲取真實圖片的寬、高
		int width = options.outWidth;
		int height = options.outHeight;
		int inSampleSize = 1;//初始值是沒有壓縮的
		if(width > reqWidth || height > reqHeight)
		{
			//計算出原始寬與現有寬,原始高與現有高的比率
			int widthRatio = Math.round((float)width/(float)reqWidth);
			int heightRatio = Math.round((float)height/(float)reqHeight);
			//選出兩個比率中的較小值,這樣的話能夠保證圖片顯示完全
			inSampleSize = widthRatio < heightRatio ? widthRatio:heightRatio;
		}
		return inSampleSize;
	}

	/**
	 * 將InputStream轉換為Byte數組
	 * @param in
	 * @return
	 */
	public static byte[] inputStreamToByteArray(InputStream in)
	{
		ByteArrayOutputStream outputStream = new ByteArrayOutputStream();
		byte[] buffer = new byte[1024];
		int len;
		try {
			while((len = in.read(buffer)) != -1)
			{
				outputStream.write(buffer, 0, len);
			}
		} catch (IOException e) {
			e.printStackTrace();
		}finally{
			try {
				in.close();
				outputStream.close();
			} catch (IOException e) {
				e.printStackTrace();
			}
		}
		return outputStream.toByteArray();
	}
	static class ViewHolder
	{
		ImageView imageView;
		TextView textView;
	}
	//這裡為了能夠獲知ImageAsyncTask網絡加載圖片成功與否,我們定義了一個接口OnImageLoadListener,裡面有兩個方法onSuccessLoad
	//與onFailureLoad,並且通過setOnImageLoadListener來將其綁定到指定的ImageAsyncTask中
	class ImageAsyncTask extends AsyncTask
	{
		public OnImageLoadListener listener;
		public DiskLruCache diskCache;
		public int index;
		public ListView listView;

		public void setOnImageLoadListener(OnImageLoadListener listener)
		{
			this.listener = listener;
		}

		public ImageAsyncTask(ListView listView,DiskLruCache diskCache,int index)
		{
			this.listView = listView;
			this.diskCache = diskCache;
			this.index = index;
		}
		@Override
		protected Bitmap doInBackground(String... params) {
			String url = params[0];
			String key = Utils.md5(url);
			DiskLruCache.Editor editor;
			DiskLruCache.Snapshot snapshot;
			OutputStream out;
			FileInputStream in;
			Bitmap bitmap = null;
			try {
				editor = diskCache.edit(key);
				out = editor.newOutputStream(0);
				if(Utils.downloadToStream(url, out))
				{
					//寫入緩存
					editor.commit();
				}else
				{
					editor.abort();
				}
				diskCache.flush();//刷新到緩存中
				//從緩存中將圖片轉換成Bitmap
				snapshot = diskCache.get(key);
				if(snapshot != null)
				{
					in = (FileInputStream) snapshot.getInputStream(0);
				    bitmap = ListViewAdapter.decodeSampleBitmapFromStream(in, reqWidth, reqHeight);
				}
			} catch (IOException e) {
				e.printStackTrace();
			}
			return bitmap;
		}

		@Override
		protected void onPostExecute(Bitmap result) {
			if(result != null)
			{
				listener.onSuccessLoad(result);
				ImageView imageView = (ImageView) listView.findViewWithTag(index);
				TextView textView = (TextView)listView.findViewWithTag(index+"#");
				if(imageView != null)
					imageView.setImageBitmap(result);
				if(textView != null)
					textView.setText("從網絡獲取的");
			}
			else
				listener.onFailureLoad();
			tasks.remove(this);//加載結束移除任務(這點要特別注意,加載結束一定要記得移出任務)
		}
	}
}
第14行我們在創建ListViewAdapter的時候同時傳入了DiskLruCache、ListView和ImageView對象,ImageView對象主要用來獲得當前顯示圖片的ImageView寬和高分別是多少的,這樣方便我們壓縮圖片;
再看getView,第58,59行這裡我們防止圖片以及文本亂序,分別對其添加了Tag標志;其他部分就是復用convertView以及viewHolder了,這沒什麼可以講的;
第69行的loadImage用於加載第index位置上的圖片,首先第79行,他會利用Snapshot對象去SD卡緩存裡面查找是否存在指定key值的圖片緩存是否存在,如果存在的話,則通過findViewWithTag獲取到對應於index位置的ImageView和TextView對象,並且調用decodeSampleBitmapFromStream對圖片進行適當的壓縮處理,89--92行則判斷獲得的ImageView和TextView是否為空並且對其進行相應賦值;如果緩存中不存在的話,則開啟線程去網絡加載圖片,同時第111行將該線程加入到Set
public interface OnImageLoadListener {
	public void onSuccessLoad(Bitmap bitmap);
	public void onFailureLoad();
}
就只是定義了onSuccessLoad和onFailureLoad兩個方法,並且我們通過ImageAsyncTask的setOnImageLoadListener方法將其設置到了當前線程中;
第122行是用於暫停當前所有線程的,很簡單,因為我們把當前所有開啟的子線程都加到了Set
那麼接下來關鍵就是實現圖片加載了,第230行開始就是比較關鍵的代碼,首先通過params[0]獲得當前傳入需要加載的圖片的url,隨後調用md5算法計算出緩存文件的名字,md5實現代碼:
/**
	 * 對指定URL進行MD5編碼,生成緩存文件的名字
	 * @param str
	 * @return
	 */
	public static String md5(String str)
	{
		MessageDigest md5 = null;
		try {
			md5 = MessageDigest.getInstance("MD5");
		} catch (Exception e) {
			e.printStackTrace();
			return "";
		}

		char[] charArray = str.toCharArray();
		byte[] byteArray = new byte[charArray.length];

		for(int i = 0;i < charArray.length;i++)
		{
			byteArray[i] = (byte) charArray[i];
		}

		byte[] md5Bytes = md5.digest(byteArray);

		 StringBuffer hexValue = new StringBuffer();
		 for(int i = 0;i < md5Bytes.length;i++)
		 {
			 int val = ((int) md5Bytes[i]) & 0xff;
			 if(val < 16)
			 {
				 hexValue.append("0");
			 }
			 hexValue.append(Integer.toHexString(val));
		 }
		 return hexValue.toString();
	}
第239行在SD卡上生成一個名字為key的文件對象,240行獲得該文件對象的流對象,241行調用Utils的downloadToStream方法將對應url中的內容寫入到out流對象中,downloadToStream的代碼:
/**
	 * 根據url路徑將對應圖片緩存到本地磁盤
	 * @param urlString
	 * @param outputStream
	 * @return
	 */
	public static boolean downloadToStream(String urlString,OutputStream outputStream)
	{
		HttpURLConnection connection = null;
		BufferedInputStream in = null;
		BufferedOutputStream out = null;
		Bitmap bitmap = null;
		try {
			URL url = new URL(urlString);
			connection = (HttpURLConnection) url.openConnection();
			InputStream instream = connection.getInputStream();
			in = new BufferedInputStream(instream);
			out = new BufferedOutputStream(outputStream);
			byte[] buf = new byte[1024];
			int len = 0;
			while((len = in.read(buf)) != -1)
			{
				out.write(buf, 0, len);
			}
			return true;
		} catch (Exception e) {
			e.printStackTrace();
		}finally
		{
			if(connection != null)
				connection.disconnect();
			try {
				if(out != null)
				{
					out.close();
					out = null;
				}
				if(in != null)
				{
					in.close();
					in = null;
				}
			} catch (Exception e2) {
				e2.printStackTrace();
			}
		}
		return false;
	}
這段代碼就是通過HttpURLConnection來獲得對應url的流,隨後將其寫入到OutputStream對象中去,並且返回是否寫入完成;
如果寫入流成功的話,第244行用於將流中的內容寫入到緩存文件中,這時候你會發現SD卡上緩存文件的大小並沒有發生變化,所以最後還得調用249行的flush方法刷新緩存內容到文件,如果寫入流失敗的話,第247行則調用abort方法關閉了緩存;之後和上面的方法一樣,我們會使用Snapshot對象去緩存中對指定key的緩存文件,如果存在的話,則會對其進行壓縮,並且將其返回,注意在doInBackground裡面是不可以進行更新UI操作的,因為他屬於子線程,更新UI操作的方法應該在第264行的onPostExecute中實現,這裡的代碼就應該很好理解了吧,之前有講過啦,同時這裡還進行了OnImageLoadListener回調處理,result不為空的話調用onSuccessLoad方法,為空的話調用onFailureLoad方法;
最後就是我們的MainActivity了:
public class MainActivity extends Activity implements OnScrollListener {

	public ListView listView = null;
	public ListViewAdapter adapter = null;
	public int start_index;
	public int end_index;
	public List list;
	public boolean isInit = true;
	public ImageView imageView;

	@Override
	protected void onCreate(Bundle savedInstanceState) {
		super.onCreate(savedInstanceState);
		setContentView(R.layout.listview);
		//首先創建存儲緩存文件的地方
		File directory = Utils.getDiskCacheDir(this, "bitmap");
		if(!directory.exists())
		{
			//目錄不存在的話
			directory.mkdirs();
		}
		//獲取app的版本信息
		int appVersion = Utils.getAppVersion(this);
		//此處的參數1表示每個key對應於一個緩存文件,1024*1024*100表示緩存大小為100M
		DiskLruCache diskCache = null;
		try {
			diskCache = DiskLruCache.open(directory, appVersion, 1, 1024*1024*100);
		} catch (IOException e) {
			e.printStackTrace();
		}
		//創建用於傳遞給ListViewAdapter的數據
		list = new ArrayList();
		int index = 0;
		for(int i = 0;i < 50;i++)
		{
			index = i % Utils.images.length;
			list.add(Utils.images[index]);
		}
		listView = (ListView) findViewById(R.id.listView);
		LayoutInflater inflater = LayoutInflater.from(this);
		View view = inflater.inflate(R.layout.item, null,false);
		imageView = (ImageView) view.findViewById(R.id.imageView);
		//創建Adapter對象
	    adapter = new ListViewAdapter(this, list, diskCache,listView,imageView);
		listView.setOnScrollListener(this);
		listView.setAdapter(adapter);
	}
	@Override
	public void onScroll(AbsListView view, int firstVisibleItem, int visibleItemCount, int totalItemCount) {
		start_index = firstVisibleItem;
		end_index = start_index + visibleItemCount;
		if(isInit == true && visibleItemCount > 0)
		{
			String url = "";
			String key = "";
			for(int i = start_index;i < end_index;i++)
			{
				url = list.get(i);
				key = Utils.md5(url);
				adapter.loadImage(url,key,i);
		    }
			isInit = false;
		}
	}
	@Override
	public void onScrollStateChanged(AbsListView view, int scrollState) {
		if(scrollState == AbsListView.OnScrollListener.SCROLL_STATE_IDLE)
		{
			//表示停止滑動,這時候就可以加載圖片
			String url = "";
			String key = "";
			for(int i = start_index;i < end_index;i++)
			{
				url = list.get(i);
				key = Utils.md5(url);
				adapter.loadImage(url,key,i);
		    }
		}else
		{
			adapter.cancelTask();
		}
	}
}
首先第27行調用open方法創建了DiskLruCache,第44行創建了ListViewAdapter對象,同時將該對象設置到了ListView上面;
為了防止在滑動的時候仍然有線程加載圖片導致OOM異常,我們為ListView設置了滑動事件,第66行的onScrollStateChanged會在滑動停止的時候調用loadImage方法去加載圖片的,否則的話會調用cancelTask停止所有正在執行加載圖片的子線程,至於start_index以及end_index是通過第49行的onScroll獲取的,還有一點需要注意的是,我們在首次加載的時候也是需要調用loadImage來加載圖片的,這就是我們設置isInit標志的原因,因為首次加載你是沒有滑動屏幕的,那麼他就不會在onScrollStateChanged裡面調用loadImage去加載圖片,這時候你會發現首次加載ListView上面是沒有圖片的,當你滑動後再停止才會有圖片出現,這顯然是不合理的,所以首次加載的時候也應該讓他能夠調用loadImage方法;
好了,采用DiskLruCache來實現ListView圖片加載講解結束啦,之後我們將會從內存緩存的角度對ListView進行進一步優化,謝謝大家!
 Activit跳轉動畫之界面上某個位置 裂開上下拉伸動畫跳轉
需求:Activity(fragment)跳轉的時候當前界面裂開,上下各自拉出手機屏幕,之後跳轉到相對應的Activity.整體效果圖如下 思路: 1,在當前Acti
 Android Multimedia框架總結(十三)CodeC部分之OpenMAX框架初識及接口與適配層實現
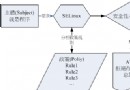
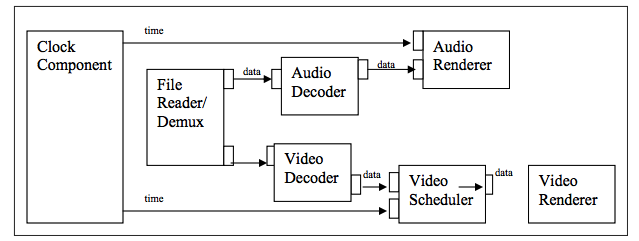
前言:上篇中介紹OMX事件回調,從今天開始,走入Codec部分之OpenMAX框架裡。看下今天的Agenda如下:一張圖回顧音視頻同步 一張圖看清OpenMAX在Andr
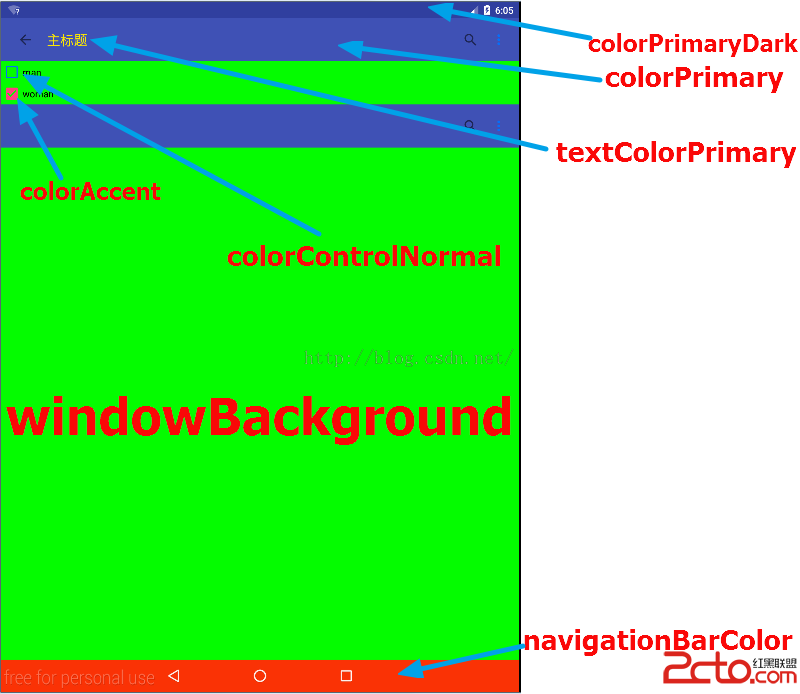 Android5.0常用顏色屬性說明
在使用Eclipse的時代,我們很少去在style文件給整個應用或者Activity去設定顏色,那是因為即使設置也不會提升用戶的視覺效果。但是材料設計號稱讓沒有設計功底的
 AndroidUI組件---SlidingTabLayout實現ViewPager頁卡滑動效果
使用SlidingTabLayout需要准備2個類,分別是 SlidingTabLayout,與SlidingTabStrip,,放進項目中時只用修改下包名即可。效果制作